Managing and sharing 365 files
- By Joe Habraken
- 3/3/2022
Creating and managing files
The Microsoft 365 applications provide you with different ways to create new files. When you open one of the applications, such as Word, Excel, or PowerPoint, you are taken to the Start screen. The Start screen enables you to create a new blank file (such as a new blank document in Word), open files from the Recent list, or take advantage of a huge library of themes and templates.
INSIDE OUT: CHOOSE OR CREATE THE RIGHT TEMPLATE FOR YOUR FILE
Everything that you create in the 365 applications is based on a template. Each application has a default template. For example, in Word, the default template is the Normal template and is used when you create a new blank document. By design, templates are ready-made blueprints for documents, workbooks, or other application files. For example, you might want to create a monthly budget for your household. If you want some help in creating the overall layout that goes into making this budget in Excel, you can take advantage of the Simple Monthly Budget template that is provided by Office.com and easily opened via the Excel Backstage. Remember, you are not limited to the templates that are provided by the various applications such as Word and Excel. You can also create your own templates so you have greater control over a particular Word document or Excel workbook.
When you want to create a more specialized document, workbook, or presentation, the easiest route is to take advantage of one of the templates provided by the application in which you are working. Templates often provide layout attributes, text formatting, and even placeholder text. The sophistication of the file created using a particular template depends on the actual template. For example, you might use a Word Memo template that creates a simple memo containing some placeholder text (that you replace) in the To, From, and Re: areas of the memo. Or you might take advantage of the Simple Monthly Budget template mentioned a moment ago. It provides individual tables in a worksheet for items such as projected costs and projected monthly income, and it supplies ready-made charts for your monthly expenses and expenses by category. Figure 3-5 shows a new Excel worksheet started using the Simple Personal Budget template.
)
Figure 3-5 Excel’s Simple Personal Budget template
You can also start a new file using a theme. A theme is a collection of colors, fonts, and text effects. Most of the possibilities provided on the Start screen and the Backstage New page are actually themes (unless you do an online search for templates on the Start screen or New page). Themes provide you with an overall document look, as a template does, but using a theme negates having to work within the confines of a template’s placeholder text and other document settings. However, using themes or templates is a quick way to begin the process of creating an eye-catching document, presentation, or worksheet.
You can take advantage of themes and templates in Excel, Word, PowerPoint, and Publisher. To start a new file based on a template or theme, follow these steps:
Select File to open the Backstage.
Select New in the Backstage. The New page opens (which is similar to the Start screen). Figure 3-6 shows the Excel New page.
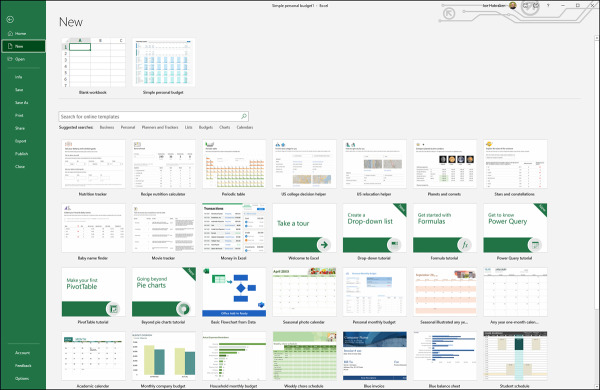
Figure 3-6 Create a new file based on a template or theme.
Select a template or theme in the New window to preview the template or theme. The Preview window also describes the theme or template.
If you want to search for an online template or theme, select one of the suggested searches at the top of the New page or enter keywords in the Search box and run the search.
The search results show all the templates available online that match your search criteria. On the right side of the Search results, you find a Category list. The categories listed are keyword subsets of all the templates that were found using your search terms. Each category has a number to the right showing how many of the listed templates fall into the category. You can view a subset of the search results by selecting a category.
If you selected a template stored locally on your computer, click Create. If the template is an Office.com template, click Download. In either case, a new file opens in the application window based on the template.
)
You determine whether to create your files from new blank documents, workbooks, or presentations or to take advantage of the various themes and templates available. Working with themes and templates can help you determine how a special document, such as a newsletter, or a special worksheet, such as an invoice, should be laid out. So instead of reinventing the wheel, it makes sense to take advantage of the benefits a template can provide. You can also use themes to great advantage when you are creating a “family” of documents that are related. For example, you might use the same theme for a Word document, an Excel worksheet, and a PowerPoint presentation that are related to a specific project you are developing.
Managing files
Managing files effectively is a bit of an art form. You need to create some sort of structured environment that keeps your saved files organized but also makes it easy for you to find the files you work with often. Your particular situation might also require that you store your files in particular network shares (folders) so that others can easily access them. The Microsoft applications have adopted a cloud storage strategy that also makes it possible for you to easily store files on your OneDrive (both the free version and the version available with a Microsoft 365 subscription—OneDrive for Business), or a corporate SharePoint site.
Whether you store your files on your computer’s hard drive, on a shared drive on a network server, or in the cloud on your OneDrive, you still must adopt a strategy for organizing your files. And whether you are talking about a hard drive or OneDrive, these storage containers can still be seen as the electronic equivalent of a filing cabinet. Each drawer in the filing cabinet is equivalent to a folder on the drive. The hanging file folders inside filing cabinet drawers are equivalent to the subfolders inside the main folders.
The naming conventions you use for the folders and subfolders you create are really up to you but should reflect some sort of system. For example, you could have a folder named Projects that contains subfolders named for each of the specific projects you are working on. Take some time to figure out your folder taxonomy. If you end up with a folder named Miscellaneous, I recommend that you rethink your naming system.
In Windows 10, a library is a container that gathers files from different locations on your computer and your network and displays them as a collection that you can access. By default, Windows 10 provides the Documents, Music, Pictures, and Videos libraries. You can toggle the libraries on (if you don’t see them) in the File Explorer by right-clicking the Navigation pane and selecting Show Libraries.
So you can go “old school” and create folders and subfolders on your computer’s hard drive, or you can take advantage of libraries to give you easy access to the files you use. Whether you are creating new folders on your computer or on a network share assigned to you, you can use the File Explorer as your primary tool. The same goes if you want to create new libraries: Use the File Explorer.
The next two sections look more closely at creating folders and libraries on your computer’s hard drive. Working in the cloud and organizing cloud storage is similar in most respects to organizing a “physical” drive. You can create folders on both your OneDrive or other network drives that you access. OneDrive for Business also gives you the capability to create and manage libraries. Both OneDrive for Business and Windows 10 allow you to create libraries that serve as virtual containers for the files that you create and share.
Creating a new folder
In Windows 10, switch to the desktop and then click the File Explorer icon on the taskbar. File Explorer (shown in Figure 3-7) provides links on the left side of the window, such as various links to the desktop or your current libraries (Documents, Music, and so on). In its main pane, you can see a listing of the hard drives, DVD drives, CD drives, and so forth on your computer and any network shares (in the Network Location area) configured for your use (including SharePoint sites).
)
Figure 3-7 Create new libraries or folders using File Explorer.
To view the folders on a particular drive, such as the C: drive (which is typically the default drive on most PCs), double-click the drive. You can create new folders on any drive or in existing folders, such as the Documents folder. Navigate to the drive or folder you want to serve as the parent container, and then click the New Folder button on File Explorer’s ribbon. Type a new name for the folder, and you are good to go. You can drag existing files and folders into the new folder (using File Explorer) and specify the new folder when you save a file in the Save As dialog box.
Creating a new library
As already mentioned, a Windows library enables you to view and access files from different locations on your computer and your network. A library isn’t really a container because a library doesn’t store the actual files. A library is a kind of virtual container that can point to different folder locations and enable you to access related files (such as all the files related to a particular project).
To create a new library in File Explorer, follow these steps:
Right-click the Navigation pane and select Show Libraries. This places the Libraries icon in the Navigation pane.
Right-click the Libraries icon and point at New on the shortcut menu.
Select Library and a New Library appears in the Details pane.
Click on the default library name (New Library) and then type a name for the library.
Once you have created a library, you can add folders to the library as needed. Use File Explorer to navigate to any folder on your computer or your network. Right-click the folder and then point at Include In Library. A list of available libraries appears. Select the desired library.
When you are working in one of the 365 applications and want to open a particular file from one of your libraries using the Open dialog box, select the desired library in the Location list and then locate the file you want to open. You can also save your files to folders in a library when you are in the Save As dialog box.
Viewing file versions in an application
When you are working in an application such as Word or Excel, the application uses the AutoRecover feature to create different versions of the file on which you are working. By default, the 365 applications save AutoRecover information for your current file every 10 minutes. If you accidentally close a document or workbook in Word or Excel without saving, the last AutoRecovered version of your file is saved so that you can access it. This is also a default setting in the application’s Save options.
When you save a file and close it, all the AutoRecovered versions of the file are deleted. But you can peruse the different versions of your file saved by the AutoRecover feature as you work on the document. This includes any unsaved versions of the document that exist because you did not save changes that you made to the file before you closed it.
To view any unsaved versions of the current file, such as a Word document, select File to open the Backstage and then click Info. Figure 3-8 shows the Info window for a Word document. The area of interest in this window is the Manage Document area. Note that in Figure 3-8, a version of the file exists (from earlier in the day) because the Word document was autosaved (which happens by default every 10 minutes).
)
Figure 3-8 The Word Info page
You can also browse for unsaved versions of a file by clicking the Manage Document button and then selecting Recover Unsaved Documents. This enables you to browse for any unsaved versions stored on your computer. Any unsaved versions of the current document that have been automatically saved are listed in the Versions area of the window.
You can open a version of the file from the list by selecting it. When you open the automatically saved version of the file (which is labeled “Unsaved”), a message bar appears at the top of the document window below the ribbon. It states that the current document is a “Recovered Unsaved File” and the file is temporarily stored on the computer. You are provided two options: Compare and Restore. You can select Compare to compare this version of the file with the current version of the file. Any differences between the two files are detailed using the Track Changes feature and are displayed in the document and the Reviewing pane. You can go through each of the changes marked in the document and accept or reject them as needed.
You also have the option of selecting Restore. This option saves the AutoRecovered version of the file over the current copy of the file. A message box opens, letting you know that the current version will be overwritten by the restored version. Click OK to overwrite the current version.