Develop Azure Infrastructure as a Service Compute Solution
- By Santiago Fernández Muñoz
- 11/12/2019
- Skill 1.1: Implement solutions that use virtual machines (VM)
- Skill 1.2: Implement batch jobs by using Azure Batch Services
Skill 1.2: Implement batch jobs by using Azure Batch Services
When you start a new project, you need to evaluate how you are going to implement the requirements of the application or solution that you need to implement. Sometimes, one of those requirements is that the application needs to make a lot of calculations to prepare some amount of data that needs to be presented to the user; calculations also might be processed before other components of the solution so it can work with the data. These types of tasks are usually time consuming and heavy in terms of resource needs that can negatively affect the performance of an application.
Examples include running risk simulations for a financial service application, image processing for a geographic information system (GIS), or VFX or 3D image–rendering for a movie. In all these cases, a good option for your application is to have a specialized and separate system from your main application that can run all these heavy tasks.
You can implement this specialized and separate system by deploying your own VMs or scale sets in Azure. However, in this case, you need to take care of the overhead of managing those VMs or scale sets. Another downside is that you will be charged for all the time those VMs are running, regardless of whether you are running your specialized workload (risk simulation, image analysis, 3D image–rendering, and the like).
Fortunately, Azure provides you with a service that is aimed to solve this need. Azure Batch allows you to run parallel workloads that can execute the application that makes the specialized calculations and provides you with the results. The advantages of this service are that you don’t need to take care of configuring virtual machines, clusters, and the like, and you only will be charged for the resources that your application needs while it is running.
Manage batch jobs by using Batch Service API
When you plan to work with Azure Batch, there are some resources that are common to any workload that you may integrate into your application. These common resources are:
Batch account Every single processing resource dedicated to run your workloads needs to be managed by a batch account. You can run more than one workload inside a single batch account. You can also associate a storage account to a batch account for storing all the files, programs, and resources that your workloads may need during their execution.
Compute node A compute node is each of the computing resources that will actually run the application that performs the task you need to accomplish, such as image processing or data manipulation. Compute nodes are organized into pools.
Pool A pool is a collection of compute nodes. A pool is the resource that manages the type, size, scaling policy communication, task scheduling, network configuration, and other settings that your workload needs for running correctly. A single pool can run multiple jobs and tasks. You should bear in mind that you configure the target or desired size of your pool, but the actual size could be limited by the quota of the number of cores in the batch account.
Job Manages how the execution of the tasks is performed on each compute node in a pool. When you create a job, you can specify whether you want to create a new pool for this job or use an existing pool. It also manages other attributes, such as job priority, constraints, or the behavior of the job when all tasks are completed.
Task This type of resource performs the actual execution of your command, script, or application in a single compute node. A task is always associated to a job, and it is scheduled, queued, and prioritized by its job.
All these elements are related to each other in the high-level workflow that you see in Figure 1-3.
)
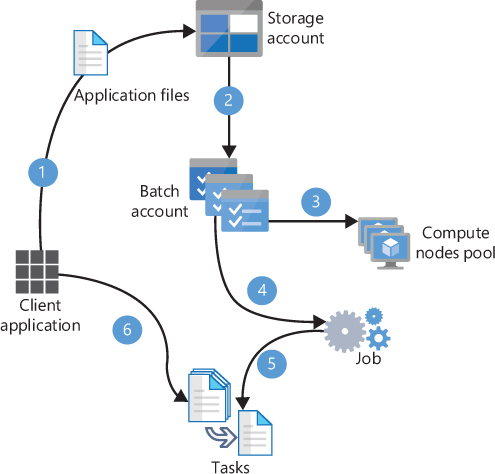
FIGURE 1-3 Creating a Batch service job
Following is a description of the workflow shown in Figure 1-3:
Upload data files to a Storage Account. Every Batch account can have an associated storage account where you will store the data files that you will need for your jobs. You will also use this storage account for storing the results of your tasks.
Upload application files needed for your tasks. You will use the storage account associated to the batch account to store the scripts or applications and their dependencies that need to be deployed on the compute nodes for the task to be able to run. Also, you can package all your application files and their dependencies into a zip file, called an application package, that will automatically be deployed to the compute nodes. Even if you decide to use an application package, you still need to have a storage account linked to the Batch account.
Create a compute nodes pool. At this point, you set the number, the size, and the operating system of the compute nodes that will be part of this pool.
Create a job. This job will be in charge of managing the tasks that will actually run the application on each compute node. You need to ensure that all needed files for the tasks are present on the compute node to be able to run the task. This is done by the job preparation task, which is executed on each compute node that is scheduled to run a task and is the first task to run in the compute node. The Batch service waits for the job preparation task to finish before starting the actual task. On the other hand, when the job is marked as completed, you can also perform some cleanup operations by using a job-release task.
Add tasks to the job. A task is the actual script or application that you program for performing the desired action in the compute node. A task can upload the result of its operation to the storage account. Bear in mind that if you save the results of the task in the compute node itself, this data will be lost when the compute node is recycled or destroyed. As soon as you add the tasks to the job, the compute node starts scheduling their execution.
Monitor tasks. Once you have started the execution of the tasks, you should monitor the status of the tasks. This optional step allows you to perform additional actions based on the status of the execution.
When you need to implement this workflow in your application, you need to work with two main APIs—Azure Batch Services and Azure Storage. You will use Azure Storage API for uploading and downloading files from blob containers. You will use Azure Batch for creating and deleting the pool of compute nodes; you’ll also use Azure Batch for creating, monitoring, deleting, starting, and stopping the job as well as managing, monitoring, and adding the tasks to the job.
During the configuration of a Batch job, you may have some additional requirements that are not covered with the default configuration. You can control the amount of time that a job is executing by configuring the MaxWallClockTimeExpiry setting. If the job didn’t finish all the tasks in the max wall clock time, then the Batch Account terminates the job and any pending tasks with MaxWallClockTimeExpiry. You can also control the number of times that a failing task can be relaunched by setting the MaxTaskRetryCount parameter. A task is considered to have failed if it returns an exit code different from zero. If an error occurs while downloading the assets needed for the task to perform its actions, the task can fail. In this situation, a failureInfo object is created and attached to the task. The Azure Batch account uses this object for determining whether it should finish the job after the failure of one task in the job. This action is controlled by the OnTaskFailure property (you can see this property as the When a task fails setting in the Azure Portal), and its default value is to take no action.
As we already saw, a job is in charge of managing the execution of tasks on the compute node. Azure Batch provides you with a default task manager that performs this task management. However, you can also create a job manager task for implementing your own logic when deploying and running your tasks in the compute nodes. The job manager task is executed in one of the compute nodes, and it has all the information required for creating the tasks in the job. The job manager task is managed by the batch account and is created as one of the first steps when the job is created. Because of the importance of this task, it is monitored and automatically created if the task fails. This job manager task is also a requirement if you decide to use job schedules, which allow you to create recurring tasks when you need to control the duration, frequency, and schedule of jobs created during the scheduled period.
Microsoft offers a client Batch API for .NET, Python, Node.js, and Java. If your application doesn’t use any of the previous languages, you can still work with Azure Batch from your application by using the provided REST API.
Whatever API you decide to use, you need to get the following information from your batch and storage account before you can make any API call:
Batch account name This is the name you gave to your batch account when you created it.
Batch account URL This URL has the form of https://<batch_account_name>.<region>.batch.azure.com.
Batch account key This key is used for authenticating the request to the batch account. Any batch account has two separate keys. You can use either of them for authenticating, although you should only use the same key on your application.
Storage account name This is the name of the storage account associated with the batch account.
Storage account key You need to provide one of the two available keys for accessing the storage account.
In the section “Write code to run an Azure Batch Services batch job,” we will review an example of code that you can use for running jobs in Azure using C#.
Run a batch job by using Azure CLI, Azure Portal, and other tools
In the previous section, we looked at a high-level review of the Batch Service API for managing jobs. You can also use Batch Management API for managing batch accounts. However, you can also perform these actions by using other tools like PowerShell, Azure CLI, Azure Portal, Azure Batch Explorer, Azure Batch Shipyard, or Azure Storage Explorer. With the exception of Azure Storage Explorer, the main advantage of using any of these tools is that they unify the Batch Service and Batch Management APIs’ capabilities into the same tool. Although Azure Storage Explorer cannot directly manage batch jobs or tasks, this tool makes developing and debugging your Batch solutions easier.
Azure Batch Explorer is a rich desktop client that you can download for Windows, Linux, or OSX. You can manage different batch accounts to view high level statistics and manage pools, jobs, job schedules, packages, or digital certificates. You can also troubleshoot the task execution by accessing to the content of each compute node in the pool.
Another interesting feature is that Azure Batch supports the execution of tasks using Docker or Singularity containers. For easing the provision, monitoring, and execution of batch workloads based on containers, you can use Batch Shipyard. The best part is that you don’t need to download or install any tool in your local environment; simply open a Cloud Shell and type shipyard in your favorite shell to run this tool.
In the next few examples, we will review the procedure for running a batch job by using these tools. The job consists of discovering the type of data that your files contain. To do so, we will use the Linux file command. For this example, we will assume that all needed resources are already created:
An Azure Batch account.
A compute nodes pool.
A storage account linked with the Azure Batch account.
A container in the storage account. This container will store the files that will be analyzed in the tasks.
A resource group that will contain all the resources needed for the Azure Batch account.
In this first example, we will review how to create a job and tasks using the Azure Portal. To start, we need to create the compute nodes pool that will execute the job:
Sign in to the management portal (http://portal.azure.com).
In the search box at the top of the Azure Portal, type the name of your Batch account.
Click the search result that matches your Batch account.
On the Batch Account blade, in the left column, under Features, click the Pools entry. This will open the Batch’s blade.
On the Batch Pools blade, click the Add button to add a new pool. This will open the Add Pool blade.
On the Add Pool blade, on the Pool Detail section, enter the Pool ID and optionally, the Display Name.
On the Operating System section, select Canonical in the publisher drop-down menu, ensure that UbuntuServer is selected in the Offer drop-down menu, and select 18.04-LTS in the Sku drop-down menu. We won’t need data disks for these compute nodes.
On the Node Size section, ensure that Standard A1 VM size is selected.
On the Scale section, set the number of Target Dedicated Nodes to 4. Remember that the actual number of nodes depends on the quota limit of your subscription.
Click the OK button to create the pool.
Once we have created the pool, we can create the job and tasks. Creating a task for a job is a separate procedure that you need to perform once you have created a job:
Sign in to the management Portal (http://portal.azure.com).
In the search box at the top of the Azure Portal, type the name of your Batch account.
Click the search result that matches your Batch account.
On the Batch Account blade and on left side column under the Features section, click on the Jobs entry. This will open the Jobs blade.
On the Jobs blade, click on the Add button to add a new job. This will open the Add Job blade shown in Figure 1-4.
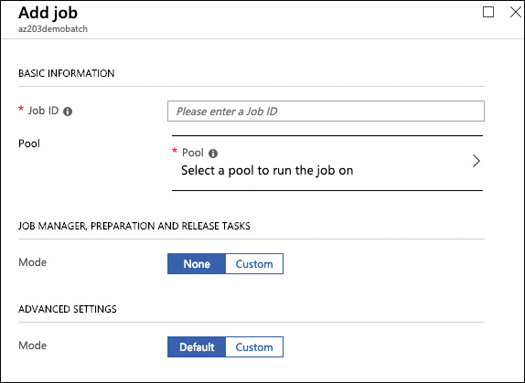
FIGURE 1-4 Creating a new Batch Service job dialog
In the Job ID field, enter the value. You will need this value later if you want to manage this job from PowerShell, Azure CLI, or programmatically.
On the Select A Pool To Run The Job On control, select the pool that you created in the previous procedure.
Leave the remaining options as is and click OK.
)
Once you have created the job, you need to create the tasks that will be run by this job:
On the Azure Batch Job blade, click on the job that you configured in the previous procedure. This will open a blade with the specific details of your job.
In the General section, click the Tasks option, which will open the Tasks blade. You will use this blade for adding tasks to the job.
On the Tasks blade, click the Add button located in the upper-right corner of the blade, which will open the Add Task blade.
On the Add Task blade, in the General section, provide a Task ID and the Command Line that will be executed by this task.
Complete the Advanced Settings according to your requirements. At the least, you will need to add resource files to your task. These Advanced Settings are explained below in more detail.
Click Submit to create the task and add it to the job.
While you have been adding the task, you can also adjust some Advanced Settings:
Max Wall Clock Time This controls the maximum time that the task is allowed to run. If the task is not completed before this time is exhausted, the Batch account terminates the job and all its tasks.
Max Task Retry Count If a task completes with a non-zero return code, the task is considered to have failed. This setting controls the maximum times that a failed task can be retried.
Retention Time This is the time that the Batch account will maintain the data in the working directory of the task. By default, this time is 7 days, but you can customize it with this setting.
User Identity Controls the user privileges that will be used for running this task. You can select between auto-user accounts with or without admin privileges. Auto-user accounts are built-in user accounts used for running the task. You can also define your own named user accounts, but you can only programmatically attach a named user account to a task.
Multi-Instance Settings By default, tasks cannot communicate with other tasks. This setting allows your tasks to be able to communicate between them, using MPI (Message Passing Interface).
Resource Files This is a list of files that will be downloaded to the task before it runs. These files are needed for the task to do the job.
Environment Settings Defines any environment variable that your task may require to run.
Task Dependencies You can define a hierarchy of tasks by defining dependencies between them. The child task won’t run until the parent task has successfully executed. You can define the following Task Dependency types:
One-To-One A child task won’t run until its parent task has finished successfully.
One-To-Main A child task has two or more parents. Child tasks won’t run until all parent tasks have finished successfully. The parent task ID can be any string that best fits your needs.
Task ID Range This is similar to the One-To-Many dependency type, but parent task IDs need to be resolved to an integer. For example, this means that 5, 7, 008, and 256 are valid task IDs, but 3monkeys is not a valid task ID.
Application Packages An application package contains all the needed dependencies and binaries for the task to run. This setting controls the application package that will be uploaded to the task before starting its execution.
Just as we have configured a pool, a job, and its tasks using the Azure Portal, we can use PowerShell or Azure CLI to do the same. In the following procedure, we will configure a pool, a job, and its tasks using PowerShell:
Open a PowerShell in an elevated session.
Install the Azure PowerShell module by using the Install-Module -Name Az -AllowClover cmdlet in the PowerShell window. Alternately, you can use Azure Cloud Shell. If you decide to use Azure Cloud Shell, skip ahead to step 5.
Connect to your subscription:
Connect-AzAccount
Register the Azure Batch provider namespace. You need to perform this step only once per subscription:
Register-AzResourceProvider -ProviderName Microsoft.Batch
Get the access keys for your Batch Account. In this procedure, we will use the primary account key. This is also known as the Batch context for the cmdlets. You will need to use this context on the next steps:
$context = Get-AzBatchAccountKeys -AccountName <Batch_account_name>
Create a Batch pool. This will create a pool with four dedicated nodes. Each node is a Ubuntu 18.04.0-LTS virtual machine.
$vmImage = New-Object -TypeName "Microsoft.Azure.Commands.Batch.Models.
PSImageReference" -ArgumentList @("UbuntuServer","Canonical","18.04.0-LTS")
$vmConfig = New-Object -TypeName "Microsoft.Azure.Commands.Batch.Models.
PSVirtualMachineConfiguration" -ArgumentList @($vmImage, "batch.node.ubuntu
18.04")
New-AzBatchPool -Id <your_pool_id> -VirtualMachineSize "Standard_a1"
-VirtualMachineConfiguration $vmConfig -AutoScaleFormula '$TargetDedicated=4;'
-BatchContext $context
Create a Job. When you create a job, you cannot use directly the pool object that you created in the previous step. You need to construct an PSPoolInformation object that contains the information about the pool where you will create the job:
$poolInformation = New-Object -TypeName "Microsoft.Azure.Commands.Batch.Models.
PSPoolInformation"
$poolInformation.PoolID = <your_pool_id>
New-AzBatchJob -Id <your_job_id> -PoolInformation $poolInformation -BatchContext
$context
Create as many Batch tasks as you need:
$tasks = @()
1..4 | foreach {
    $task = New-Object Microsoft.Azure.Commands.Batch.Models.
PSCloudTask("SampleTask$_", "uname -a")
    $tasks += $task
    }
New-AzBatchTask -JobId "jobPStesting" -Tasks $tasks -BatchContext $Context
Write code to run an Azure Batch Services batch job
Although Azure Portal, PowerShell, Azure CLI, and Azure Batch Explorer are powerful tools for managing or even defining Batch pools, jobs, and tasks, the most flexible approach for integrating your solution with Azure Batch is using one of the available client SDKs in your code.
In this section, we will review how to perform the same tasks that you already performed in the previous section using Azure Portal or PowerShell, but we’ll use the .Net client library. Also, we will add a little bit of complexity by including some interaction with the Azure Storage account linked to the Batch account. The tasks in the job will get information about the file type of the files that we will provide to the tasks. You will upload to the storage account all the files that the tasks will need to run. Microsoft provides separate SDKs for working with pools, jobs, and tasks, and for managing a Batch account. Azure Batch Client library is the SDK used for creating your pools, jobs, and tasks. If you need to manage a Batch account, you need to use the Azure Batch Management library.
When you are writing code for Batch jobs, you are not limited to write your code for Windows Operating System if you want to use the .NET client library. The example that we will review in this section is written in .NET Core, and you can execute it on Windows, Linux, or MacOS X.
Before you can proceed to compile this example, you need to meet some requirements:
Create an Azure Batch account.
Create an Azure Storage account and link it to the Azure Batch account.
You need .NET Core 2.1 or newer.
You need the Microsoft.Azure.Batch nuget package.
You need the WindowsAzure.Storage nuget package.
Before you can start programming the batch pools, jobs, and tasks, you need to upload the files to the storage account. You need to do this as one of the first steps because you need the references to the files in the storage account to pass them as the resource files for the tasks. You need to create a CloudBlobClient object. This object will be used for managing the access to your storage account.
//.Net Core 2.2
//Create a blob client. We will use this client for accessing the images that we need to
//process
string storageConnectionString = $"DefaultEndpointsProtocol=https;AccountName={ STORAGE_
ACCOUNT_NAME };AccountKey={ STORAGE_ACCOUNT_KEY }";
CloudStorageAccount storageAccount = CloudStorageAccount.Parse(storageConnectionString);
CloudBlobClient blobClient = storageAccount.CreateCloudBlobClient();
Once you have the CloudBlobClient object, you need to ensure that the container that you will use for storing the images already exists. You need to get a CloudBlobContainer object for working with blob containers. Then you call the method CreateIfNotExistsAsync(), which ensures that the container is created even if it didn’t exist on your storage account. Then you need to upload the files to the blob storage by using the UploadFromFileAsync() method. This method requires the CloudBlobClient that you created for uploading the images (see Listing 1-3).
Listing 1-3 Uploading files to a Storage account
//Get a reference to the blob container. We will create if it not exist.
const string STORAGE_ACCOUNT_IMAGES_CONTAINER_NAME = "images";
CloudBlobContainer imagesContainer = blobClient.
GetContainerReference(STORAGE_ACCOUNT_IMAGES_CONTAINER_NAME);
imagesContainer.CreateIfNotExistsAsync().Wait();

//List of images your local computer that will be uploaded
List<string> inputFilePaths = new List<string>(Directory.GetFiles("images/"));

//Create a list of references of files once they have been uploaded to the blob
container
List<ResourceFile> inputImages = new List<ResourceFile>();
foreach (string imagePath in inputFilePaths)
{
    Console.WriteLine("Uploading file {0} to container [{1}]...", filePath,
    STORAGE_ACCOUNT_IMAGES_CONTAINER_NAME);
    string blobName = Path.GetFileName(imagePath);
    imagePath = Path.Combine(Environment.CurrentDirectory, imagePath);
    CloudBlobContainer container = blobClient.
    GetContainerReference(STORAGE_ACCOUNT_IMAGES_CONTAINER_NAME);
    CloudBlockBlob blobData = container.GetBlockBlobReference(blobName);
    blobData.UploadFromFileAsync(imagePath).Wait();
    //We access the storage account by using a Shared Access Signature (SAS) token.
    //You need to start the upload operation as soon as possible, so we set no start
    //time for making the token immediately available.
     SharedAccessBlobPolicy sasConstraints = new SharedAccessBlobPolicy
    {
        SharedAccessExpiryTime = DateTime.UtcNow.AddHours(2),
        Permissions = SharedAccessBlobPermissions.Read
    };
    // Construct the SAS URL for blob
    string sasBlobToken = blobData.GetSharedAccessSignature(sasConstraints);
    string blobSasUri = String.Format("{0}{1}", blobData.Uri, sasBlobToken);
    ResourceFile resourceFile = new ResourceFile(blobSasUri, blobName);
    inputImages.Add(resourceFile);
}
Once you have all the files needed for the tasks to run, you need to create the Batch pool, job, and tasks. When you work with Batch Client Library for .NET, the first thing you need to do is create a batch client that will be in charge of authenticating and performing all the communication tasks with the Azure Batch account. To create a BatchClient, you need to provide the credentials that your application will use for connecting to your Batch account. These credentials are managed by a BatchSharedKeyCredentials. You need to provide the Batch account name, URL, and key for creating the BatchSharedKeyCredentials object. You can get the value for the name and URL from the Overview page in your Batch Account blade. The value for the key parameter can be obtained from the Keys sections in your Batch Account blade. You will find two different keys. You can use either of them. As a best practice, you should always use the same key for all your applications that need to access to your Batch account.
//We start by getting a Batch Account client.
BatchSharedKeyCredentials batchCredentials = new BatchSharedKeyCredentials(BATCH_
ACCOUNT_URL, BATCH_ACCOUNT_NAME, BATCH_ACCOUNT_KEY);
using (BatchClient batchClient = BatchClient.Open(batchCredentials))
{
…
Now you can create the pool, job, and tasks that will run in your Batch account. First, you need to create the compute nodes pool. To do this, you need to create an image reference for the VMs that will be included in the pool. Then, using the image reference, you can create the VM configuration. The last step will be to create the pool itself. When creating the Batch pool, you need to create a BatchPool object, fill all the required properties—such as pool ID, number of target nodes, size of the nodes, and VM configuration—and then commit the changes to the Batch account for creating the pool. See Listing 1-4.
Listing 1-4 Create a compute node pool
//Create the compute nodes pool
Console.WriteLine($"Creating pool {POOL_ID} ...");
//We will use Linux VMs for this pool.
//We need to create a Linux Server image reference, VM configuration and Batch pool
ImageReference imageReference = new ImageReference(
                                    publisher: "Canonical",
                                    offer: "UbuntuServer",
                                    sku: "18.04-LTS",
                                    version: "latest");
VirtualMachineConfiguration vmConfiguration = new VirtualMachineConfiguration(
                                              imageReference: imageReference,
                                              nodeAgentSkuId: "batch.node.ubuntu 18.04");
//Create the Batch pool
try
{
    CloudPool pool = batchClient.PoolOperations.CreatePool(
                    poolId: POOL_ID,
                    targetDedicatedComputeNodes: POOL_NODE_COUNT,
                    virtualMachineSize: POOL_VM_SIZE,
                    virtualMachineConfiguration: vmConfiguration);
    pool.Commit();
}
catch (BatchException be)
{
    // Accept the specific error code PoolExists as that is expected if the pool already
    // exists
    if (be.RequestInformation?.BatchError?.Code == BatchErrorCodeStrings.PoolExists)
    {
        Console.WriteLine("The pool {0} already existed when we tried to create it",
        POOL_ID);
    }
    else
    {
        throw; // Any other exception is unexpected
    }
}
Now that you have the Batch pool, you can create the job and the tasks for getting the information from the uploaded files. You need to create a CloudJob object for working with any job in the Batch pool. The way you create a job is similar to creating a pool. You need to create the CloudJob object, fill the required properties ID and PoolInformation, and then commit the changes to the Batch account for actually creating the job (see Listing 1-5).
Listing 1-5 Creating a CloudJob object
//Create the actual Batch Job
Console.WriteLine($"Creating job [{JOB_ID}]...");

try
{
    CloudJob job = batchClient.JobOperations.CreateJob();
    job.Id = JOB_ID;
    job.PoolInformation = new PoolInformation { PoolId = POOL_ID };

    job.Commit();
}
catch (BatchException be)
{
    //If the job already exists, we just accept it and register in the log.
    if (be.RequestInformation?.BatchError?.Code == BatchErrorCodeStrings.JobExists)
    {
        Console.WriteLine($"The Job {JOB_ID} already exists...");
    }
    else
    {
        throw;
    }
}
Now that you have your pool ready, you can create the tasks that will get the information from the files that you uploaded previously. In this case, you are going to create a task for every file that you uploaded to the storage account. You need to create a CloudTask object and use the ResourceFiles property for indicating which file will be analyzed by the task. When creating the task, you need to set the command line that will be run by the task. In this example, your task will run the file command to get the information about the file uploaded in the ResourceFiles property. Place all the tasks that you need to create in a List object that you use for storing CloudTask objects. Then you will use this list to pass the tasks to the job for so they can be executed (see Listing 1-6).
Listing 1-6 Creating the tasks to add to a job
//Now, we need to create the tasks that we will add to the job.
System.Console.WriteLine($"Adding {inputImages.Count} tasks to the job [{JOB_ID}]...");
List<CloudTask> tasks = new List<CloudTask>();
//We put each file to be processed in a separate task. We created the inputImages List
//when you uploaded the files to the storage account
for (int i = 0; i < inputImages.Count; i++)
{
    string taskId = $"Task{i}";
    string imageFilename = inputImages[i].FilePath;
    string taskCommandLine = $"file {imageFilename}";

    CloudTask task = new CloudTask(taskId, taskCommandLine);
    task.ResourceFiles = new List<ResourceFile> { inputImages[i]};
    tasks.Add(task);
}
Now you can attach the list of your tasks to your job. As soon as you add the tasks to the job, the job manager will try to deploy to an available node and execute the task.
//Add all tasks to the job.
batchClient.JobOperations.AddTask(JOB_ID, tasks);
Once you have your tasks running inside your job in your compute nodes tool, you need to monitor them to ensure all the tasks have completed successfully. You can monitor the status of the added task by creating a TaskStateMonitor. Before you can create this monitor, you need to get the list of added tasks to the job by using the method ListTasks() in the JobOperations property of your Batch client.
//At this point, we need to monitor if tasks are failing or not. We need to set the
//maximum amount of time to wait for the tasks to complete.
TimeSpan timeout = TimeSpan.FromMinutes(30);
System.Console.WriteLine($"Monitoring all tasks to be completed, timeout in
{timeout}...");
IEnumerable<CloudTask> addedTasks = batchClient.JobOperations.ListTasks(JOB_ID);
batchClient.Utilities.CreateTaskStateMonitor().WaitAll(addedTasks, TaskState.Completed,
timeout);
To get the result of the execution of each task, you need to read the content of the stdout.txt file from the node where the task was executed.
//Print tasks results
System.Console.WriteLine();
System.Console.WriteLine("Printing tasks results...");
System.Console.WriteLine("Printing tasks results...");

IEnumerable<CloudTask> completedTasks = batchClient.JobOperations.ListTasks(JOB_ID);

foreach (CloudTask task in completedTasks)
{
    System.Console.WriteLine($"Task: {task.Id}");
    System.Console.WriteLine($"Node: {task.ComputeNodeInformation.ComputeNodeId}");
    System.Console.WriteLine("Standard output:");
    System.Console.WriteLine(task.GetNodeFile(Constants.StandardOutFileName).
    ReadAsString());
}
Finally, you can perform some clean up by deleting the job and the pool, directly from your code.
//Clean up Batch resources
batchClient.JobOperations.DeleteJob(JOB_ID);
batchClient.PoolOperations.DeletePool(POOL_ID);