Develop Azure Infrastructure as a Service Compute Solution
- By Santiago Fernández Muñoz
- 11/12/2019
- Skill 1.1: Implement solutions that use virtual machines (VM)
- Skill 1.2: Implement batch jobs by using Azure Batch Services
In this sample chapter from Exam Ref AZ-203 Developing Solutions for Microsoft Azure, author Santiago Fernández Muñoz reviews how to work with the options that Azure makes available to you for developing your solutions based on the Infrastructure as a Service model.
Today, cloud computing is a consolidated reality that any company or professional should consider when developing or maintaining new or existing products. When you are planning for developing or deploying an application, you can choose between two main models of cloud services, Infrastructure as a Service (IaaS) or Platform as a Service (PaaS), and each model has its own pros and cons.
In this chapter, we will review how to work with the options that Azure makes available to you for developing your solutions based on the Infrastructure as a Service model.
Skills covered in this chapter:
Skill 1.1: Implement solutions that use virtual machines (VM)
Skill 1.2: Implement batch jobs by using Azure Batch Services
Skill 1.3: Create containerized solutions
Skill 1.1: Implement solutions that use virtual machines (VM)
One of the main characteristics of the IaaS model is the greater level of control that it offers when deploying the infrastructure needed for your application. Typically, you need to work with this model because you need more control over the different elements of your application. Using IaaS, you deploy your own virtual machines where you will deploy all the needed components for solution.
Azure will provide you with all the underlying hardware and configuration needed for your virtual machine to run correctly, but you still need to manage all administrative tasks related to the VM’s operating system, such as installing operating system upgrades or security patches. Even Microsoft manages the configuration needed for providing the fault tolerance for the physical hardware that supports your virtual machine. If you require that your application or software solution be highly available, you need to manage the configuration of the VMs that host your application.
Provision VMs
Deploying a VM in Azure is a straightforward process, but you still need to think about some key points if you want to achieve the best balance between the costs and your requirements. Perhaps the most obvious decision is which operating system you should use. The good news is that Azure fully supports Windows, Windows Server, and the main distributions of Linux.
All these Windows and Linux OSes are preinstalled and available to you in the Azure Marketplace as VM Images. Apart from these default VM images, you will also find other images in the marketplace from other vendors containing preconfigured solutions that may better match with your needs.
Once you have chosen your operating system, you need to decide other important aspects of the virtual machine:
Name This will be the name of the virtual machine. Names may be up to 15 characters long.
Location You need to select the geographical region where your virtual machine will be deployed. Azure has several datacenters deployed across the globe that are grouped in geographical regions. Choosing the wrong region or location may have negative effects.
Size This is the amount of resources that you will assign to your virtual machines. These resources include amount of memory, processing power, number of virtual NICs that you can attach to your virtual machine, and total storage capacity that will be available for your virtual machine.
Limits Every subscription has default quota limits. These limits can affect you when deploying new virtual machines. By default, each subscription is limited to 20 VMs per region. However, this limit can be raised by contacting Azure’s support service.
Extensions Extensions give you additional capabilities after the deployment of the virtual machine has finished correctly. Extensions allow you to automate some tasks or configuration once your VM has been deployed. Some of the most common extensions are
Run custom scripts
Deploy and manage configurations
Collect diagnostic data
Related resources When you deploy a virtual machine, you need to think about the amount and type of storage, such as whether this VM will be connected to the Internet and need a public IP or which type of traffic is allowed to go to or from the virtual machine. Some of these related resources, as shown below, are mandatory for deploying a VM.
Resource group Every virtual machine needs to be contained in a resource group. You can create a new resource group or re-use an existing one.
Storage account The virtual disks needed by the VM are .vhd files stored as page blobs in a storage account. Depending on the performance requirements of your VM, you can use standard or premium storage accounts. If you configure managed disks when deploying a VM, the storage account is automatically managed by Azure and won’t appear in the VM configuration.
Virtual network To be able to communicate with the rest of the world, your new VM needs to be connected to a virtual network.
Network interface As in the physical world, your VM needs a network interface to connect to the virtual network for sending and receiving information.
Once you have gathered all the information that you need to deploy your VM, you are ready for deployment. You have several ways for doing this task:
Using the Azure Portal
Using PowerShell
Using Azure CLI
Programmatically using REST API or C#
In general, when you want to deploy a new virtual machine, you need to follow these steps:
Create a resource group for the virtual machine. You can also use an existing resource group for this VM.
Create a virtual network. If you are using the Azure Portal, you can do this while you are creating the VM. For PowerShell and Azure CLI, you need to specify the virtual network. However, if a virtual network doesn’t already exist, one is created automatically.
Create a virtual NIC. If you are using Azure Portal, PowerShell, or Azure CLI, you don’t need to do this because it is automatically done for you during the deployment.
Create the virtual machine.
The following piece of code shows how to create a virtual machine with managed disks in your Azure subscription.
Listing 1-1 Creating a virtual machine
//dotnet core 2.2
/* You need to create an authentication file with the following structure:
    subscription=<subscription-id>
    client=<client-id>
    key=<client-secret>
    tenant=<tenant-id>
    managementURI=https://management.core.windows.net/
    baseURL=https://management.azure.com/
    authURL=https://login.windows.net/
    graphURL=https://graph.windows.net/
*/
//Create the management client. This will be used for all the operations that we will
//perform in Azure.
var credentials = SdkContext.AzureCredentialsFactory.FromFile("./azureauth.properties");

var azure = Azure.Configure().WithLogLevel(HttpLoggingDelegatingHandler.Level.Basic)
                               .Authenticate(credentials)
                               .WithDefaultSubscription();

//First of all, we need to create a resource group where we will add all the resources
//needed for the virtual machine.
var groupName = "az203-ResoureGroup";
var vmName = "az203VMTesting";
var location = Region.USWest2;
var vNetName = "az203VNET";
var vNetAddress = "172.16.0.0/16";
var subnetName = "az203Subnet";
var subnetAddress = "172.16.0.0/24";
var nicName = "az203NIC";
var adminUser = "azureadminuser";
var adminPassword = "Pa$$w0rd!2019";

//Create the management client. This will be used for all the operations that we will
perform in Azure.
var credentials = SdkContext.AzureCredentialsFactory.FromFile("./azureauth.properties");
var azure = Azure.Configure()
    .WithLogLevel(HttpLoggingDelegatingHandler.Level.Basic)
    .Authenticate(credentials)
    .WithDefaultSubscription();

//We need to create the resource group where we will add the virtual machine.
var resourceGroup = azure.ResourceGroups.Define(groupName)
    .WithRegion(location)
    .Create();
//Every virtual machine needs to be connected to a virtual network.
var network = azure.Networks.Define(vNetName)
    .WithRegion(location)
    .WithExistingResourceGroup(groupName)
    .WithAddressSpace(vNetAddress)
    .WithSubnet(subnetName, subnetAddress)
    .Create();
//Any virtual machine needs a network interface for connecting to the virtual network.
var nic = azure.NetworkInterfaces.Define(nicName)
    .WithRegion(location)
    .WithExistingResourceGroup(groupName)
    .WithExistingPrimaryNetwork(network)
    .WithSubnet(subnetName)
    .WithPrimaryPrivateIPAddressDynamic()
    .Create();
//Create the virtual machine.
azure.VirtualMachines.Define(vmName)
    .WithRegion(location)
    .WithExistingResourceGroup(groupName)
    .WithExistingPrimaryNetworkInterface(nic)
    .WithLatestWindowsImage("MicrosoftWindowsServer", "WindowsServer",
    "2012-R2-Datacenter")
    .WithAdminUsername(adminUser)
    .WithAdminPassword(adminPassword)
    .WithComputerName(vmName)
    .WithSize(VirtualMachineSizeTypes.StandardDS2V2)
    .Create();
As you can see in Listing 1-1, we need to create each of the related and required resources separately and then provide all the needed dependencies to the Azure management client that will create the virtual machine.
Before you proceed to deploy a new VM, you also need to take into account other considerations that would affect the deployment. For example, if your application or software solution must be highly available, you would typically use a load balancer. If your virtual machines use a load balancer, you need to put your VMs that host the application into an availability set. This will ensure that any virtual machine in the same availability set will never be on the same hardware and won’t be restarted at the same time because of software upgrades on the servers running the VM. A virtual machine may only be added to an availability set during creation of the VM. If you forget to add the VM to an availability set, you need to delete the VM and start from the beginning.
Create ARM templates
One of the biggest advantages of using Azure IaaS is the level of automation that you can achieve when deploying new services, resources, or infrastructure. One of the main reasons you can do this is because Microsoft provides you the Azure Resource Manager (ARM), which is the deployment and management service in Azure. The ARM service is in charge of creating, updating, and deleting the different kind of services you can deploy in your subscription. All actions offered by the ARM service are exposed through the same API. This means that no matter which mechanism you use—portal, PowerShell, Azure CLI, Rest API, or client SDKs—you will get a consistent behavior and result when interacting with ARM.
When we work with the Azure Resource Manager, there are some concepts and terms that we need to clearly understand:
Resource These are the items you can manage in Azure.
Resource group This is a container that we use for holding resources. You can use any grouping criteria for your resources, but you need to remember that any single resource needs to be contained in a resource group. You can also use resource groups for managing different levels of management access to different groups of users.
Resource provider A resource provider is a service that offers the different kinds of Azure resources, and they manage the resource’s lifecycle. For example, the service in charge of offering virtual machine resources is the Microsoft.Compute provider. You can also use the Microsoft.Storage provider for storage accounts or Microsoft.Network for all networking resources.
Resource Manager template This is the file that you need to provide to the ARM API when you want to deploy one or more resources to a resource group or subscription. This file is written in JavaScript Object Notation (JSON).
The main advantage of using ARM templates is that you have the definition of all the resources that you want to deploy in a consistent structure. This allows you to reuse the same template for deploying the same group of resources in different subscriptions, resource groups, or regions. Some common scenarios in which you can take advantage of the ARM templates are disaster recovery plan implementations, high availability configurations, or automatic provisioning scenarios (such as continuous deployment scenarios). In the following code snippet, you can see the most basic structure for an ARM template.
{
    "$schema": "https://schema.management.azure.com/schemas/2015-01-01/
    deploymentTemplate.json#",
    "contentVersion": "",
    "parameters": {  },
    "variables": {  },
    "functions": [  ],
    "resources": [  ],
    "outputs": {  }
}
Insofar as the ARM template structure is concerned, only the $schema, contentVersion, and resources sections are required to be present in a valid template. Following is a brief description of each section in a template:
$schema This required section sets the JSON schema that describes the version of the template you will use in the file. You can choose between two different schemas depending on the deployment type:
Resource group deployments You should use https://schema.management.azure.com/schemas/2015-01-01/deploymentTemplate.json#.
Subscription deployments You should use https://schema.management.azure.com/schemas/2018-05-01/subscriptionDeploymentTemplate.json#.
contentVersion In this required section, you set a value you can use for providing your internal version number to the template, such as 1.0.0. This version number is only meaningful for you; Azure does not use it. Typically, you change the version of the template when you make significant changes to the template.
parameters This is an optional section that you can use to set the values provided to the Resource Manager when you are performing a deployment. You can use customizable template parameters for different deployments without changing the content of the template.
variables This optional section contains the values that you will reuse across the entire template. You use variables for improving the usability and readability of the template.
functions You can use this optional section for defining your own functions to be used in the template.
resources This is a required section that contains all the resources that will be deployed or updated by the template.
outputs This optional section defines the values that the Resource Manager should return once the deployment has finished.
The ARM template that you need to use for deploying new VMs with the same configuration is shown in Listing 1-2. You may modify the values of the parameters according to your needs.
Listing 1-2 ARM template for deploying a VM
{
    "$schema": "https://schema.management.azure.com/schemas/2015-01-01/
    deploymentTemplate.json#",
    "contentVersion": "1.0.0.0",
    "parameters": {
        "virtualNetworks_az203VNET_name": {
            "defaultValue": "az203demoVNET",
            "type": "string"
        },
        "networkInterfaces_az203NIC_name": {
            "defaultValue": "az203demoNIC",
            "type": "string"
        },
        "virtualMachines_az203VMTesting_name": {
            "defaultValue": "az203demoVM",
            "type": "string"
        },
        "subnets_az203Subnet_name": {
            "defaultValue": "az203demoSubnet",
            "type": "string"
        },
        "virtualMachines_az203VMTesting_id": {
            "defaultValue": "[concat(parameters('virtualMachines_
            az203VMTesting_name'),'_OSDisk1_1')]",
            "type": "string"
        },
        "virtualMachines_adminUser": {
            "defaultValue": "azureadminuser",
            "type": "string"
        },
        "virtualMachines_adminpassword": {
            "defaultValue": "Pa$$w0rd",
            "type": "securestring"
        }
    },
    "variables": {
        "osDiskName": "_OSDisk1_1_39c654d89d88405e968db84b722002d1"
    },
    "resources": [
        {
            "type": "Microsoft.Compute/virtualMachines",
            "name": "[parameters('virtualMachines_az203VMTesting_name')]",
            "apiVersion": "2018-06-01",
            "location": "westus2",
            "tags": {},
            "scale": null,
            "properties": {
                "hardwareProfile": {
                    "vmSize": "Standard_DS2_v2"
                },
                "storageProfile": {
                    "imageReference": {
                        "publisher": "MicrosoftWindowsServer",
                        "offer": "WindowsServer",
                        "sku": "2012-R2-Datacenter",
                        "version": "latest"
                    },
                    "osDisk": {
                        "osType": "Windows",
                        "name": "[concat(parameters('virtualMachines_az203VMTesting_name'),
                        variables('osDiskName'))]",
                        "createOption": "FromImage",
                        "caching": "ReadWrite"
                    },
                    "dataDisks": []
                },
                "osProfile": {
                    "computerName": "[parameters('virtualMachines_az203VMTesting_name')]",
                    "adminUsername": "azureadminuser",
                    "adminPassword": "Pa$$w0rd",
                    "windowsConfiguration": {
                        "provisionVMAgent": true,
                        "enableAutomaticUpdates": true
                    },
                    "secrets": [],
                    "allowExtensionOperations": true
                },
                "networkProfile": {
                    "networkInterfaces": [
                        {
                            "id": "[resourceId('Microsoft.Network/networkInterfaces',
                            parameters('networkInterfaces_az203NIC_name'))]",
                            "properties": {
                                "primary": true
                            }
                        }
                    ]
                }
            },
            "dependsOn": [
                "[resourceId('Microsoft.Network/networkInterfaces',
                parameters('networkInterfaces_az203NIC_name'))]"
            ]
        },
        {
            "type": "Microsoft.Network/networkInterfaces",
            "name": "[parameters('networkInterfaces_az203NIC_name')]",
            "apiVersion": "2018-10-01",
            "location": "westus2",
            "tags": {},
            "scale": null,
            "properties": {
                "ipConfigurations": [
                    {
                        "name": "primary",
                        "properties": {
                            "privateIPAllocationMethod": "Dynamic",
                            "subnet": {
                                "id": "[resourceId('Microsoft.Network/virtualNetworks/
                                subnets', parameters('virtualNetworks_az203VNET_name'),
                                parameters('subnets_az203Subnet_name'))]"
                            },
                            "primary": true,
                            "privateIPAddressVersion": "IPv4"
                        }
                    }
                ],
                "dnsSettings": {
                    "dnsServers": [],
                    "appliedDnsServers": []
                },
                "enableAcceleratedNetworking": false,
                "enableIPForwarding": false,
                "primary": true,
                "tapConfigurations": []
            },
            "dependsOn": [
                "[resourceId('Microsoft.Network/virtualNetworks/
                subnets', parameters('virtualNetworks_az203VNET_name'),
                parameters('subnets_az203Subnet_name'))]"
            ]
        },
        {
            "type": "Microsoft.Network/virtualNetworks",
            "name": "[parameters('virtualNetworks_az203VNET_name')]",
            "apiVersion": "2018-10-01",
            "location": "westus2",
            "tags": {},
            "scale": null,
            "properties": {
                "resourceGuid": "145e7bfc-8b00-48cf-8fa1-082448a30bae",
                "addressSpace": {
                    "addressPrefixes": [
                        "172.16.0.0/16"
                    ]
                },
                "dhcpOptions": {
                    "dnsServers": []
                },
                "subnets": [
                    {
                        "name": "[parameters('subnets_az203Subnet_name')]",
                        "properties": {
                            "addressPrefix": "172.16.0.0/24"
                        }
                    }
                ],
                "virtualNetworkPeerings": [],
                "enableDdosProtection": false,
                "enableVmProtection": false
            },
            "dependsOn": []
        },
        {
            "type": "Microsoft.Network/virtualNetworks/subnets",
            "name": "[concat(parameters('virtualNetworks_az203VNET_name'), '/',
            parameters('subnets_az203Subnet_name'))]",
            "apiVersion": "2018-10-01",
            "scale": null,
            "properties": {
                "addressPrefix": "172.16.0.0/24"
            },
            "dependsOn": [
                "[resourceId('Microsoft.Network/virtualNetworks',
                parameters('virtualNetworks_az203VNET_name'))]"
            ]
        }
    ]
}
This example has some interesting features to which we should pay attention. We have defined parameters and variables that we will use throughout the template. If you look at any parameter definition, you can see that it has three elements—paramenterName, default Value, and type. The type element is almost self-explanatory; it sets the kind of the value that this parameter will contain. The allowed types are string, securestring, int, bool, object, secureObject, and array. The parameterName is also quite straightforward and is any valid JavaScript that represents the name of the parameter. However, why use a defaultValue element instead of a value element? You use defaultValue because when you define a parameter in the template file, the only required elements are parameterName and type. The parameter’s value is actually provided during the deployment process. If you don’t provide a value for a parameter that you defined in the template, then the defaultValue will be used instead. You should bear in mind that this element is optional.
You can provide values to the parameters that you define for your template by using the command line or creating a file with the values that you want to provide to each parameter. The following example shows the content of a parameter file for the template shown previously in Listing 1-2:
{
    "$schema": "https://schema.management.azure.com/schemas/2015-01-01/
    deploymentParameters.json#",
    "contentVersion": "1.0.0.0",
    "parameters": {
        "virtualNetworks_az203VNET_name": {
            "value": "az203demoVNET"
        },
        "networkInterfaces_az203NIC_name": {
            "value": "az203demoNIC"
        },
        "virtualMachines_az203VMTesting_name": {
            "value": "az203demoVM"
        },
        "subnets_az203Subnet_name": {
            "value": "az203demoSubnet"
        },
        "virtualMachines_az203VMTesting_id": {
            "value": "[concat(parameters('virtualMachines_az203VMTesting_name'),
            '_OSDisk1_1_39c654d89d88405e968db84b722002d1')]"
        },
        "virtualMachines_adminUser": {
            "value": "azureadminuser"
        },
        "virtualMachines_adminpassword": {
            "value": "Pa$$w0rd"
        }
    }
}
When you are defining the value for a parameter, you can also use functions to construct dynamic values. If you take a look at the virtualMachines_az203VMTesting_id parameter, you can see that its value is set to a function. In this case, the function returns a string that is the result of adding the string _OSDisk1_1_39c654d89d88405e968db84b722002d1 to the value of the parameter virtualMachines_az203VMTesting_name.
There are many predefined functions that you can use in your template. You can even define your own custom functions for those complicated pieces of code that repeats in your template. When working with custom functions, beware of some limitations:
Custom functions cannot access template variables, although you can pass them as a parameter of your function.
Your custom function cannot access the template’s parameters; instead, they have access only to the parameters that you define in your function.
Parameters on your custom function cannot have default values.
Your custom function cannot call other custom functions; only predefined functions may be called.
You cannot use the reference() predefined function.
When we initially talked about the resources that we need for deploying a VM, we saw that there are some resources that we need for the VM to run correctly. For example, we need at least one virtual disk for storing the operating system. We also need a virtual network for connecting the VM with the world, and we need a virtual network interface card for connecting the VM to the virtual network. All those dependencies are defined in an ARM template by using the element dependsOn on each resource type. This element accepts a list of resource names, separated by commas, that define the resources that need to be deployed before the resource can be deployed. As a best practice to avoid ambiguity, you should reference any resource that you put on the dependsOn element by using its provider namespace and type. You can do this by using the resourceId() predefined function.
If we review our example, the virtual network virtualNetworks_az203VNET_name needs to be deployed before subnets_az203Subnet_name can be deployed (see Figure 1-1). The dependsOn element is needed because the resources defined in the template are not deployed in the same order that appears in the template.
)
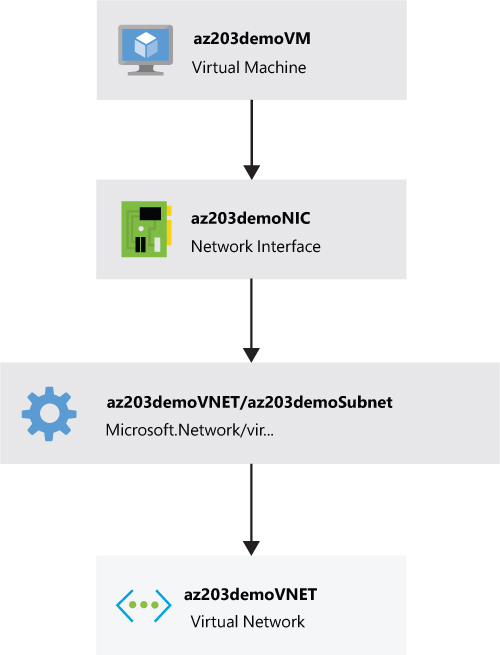
FIGURE 1-1 Resource dependencies
Once we are happy with our template, we can deploy it to our Azure subscription by using PowerShell, Azure CLI, Azure Cloud Shell, or REST API. Another interesting feature that we didn’t mention before is that you can store your template JSON files in a remote location. This remote location needs to be publicly available. If your template contains information that shouldn’t be public, you can provide that information as an inline parameter during the deployment. If you prefer your template not to be public, you can also store your template in a storage account and protect it by using an SAS token.
The following command shows how to deploy our example template using the template file az203-template.json and the properties file az203-parameters.json.
#!/bin/bash
#Azure CLI template deployment
az group create --name AZ203-ResourceGroup --location "West US"
az group deployment create   --name AZ203DemoDeployment   --resource-group AZ203-ResourceGroup   --template-file az203-template.json   --parameters @az203-parameters.json
The previous command creates the resource group called AZ203-ResoureGroup in the West US region. Then it creates a new deployment called AZ203DemoDeployment that will create the resources defined in the az203-template.json template using the values provided in the parameters file named az203-parameters.json. Note the use of the @ symbol in front of the parameters file. This is required by the az group deployment create command.
Configure Azure Disk Encryption for VMs
One of the main concerns of any organization is how to protect their data. Azure has the security of all data that is stored in one way or another in the cloud. Azure VM uses virtual disks for storing the operating system or any additional data that the VM needs. Virtual disks—managed or unmanaged disks—are automatically and transparently encrypted and decrypted by the Azure Storage Service Encryption (SSE) service. However, the SSE service only ensures the data protection at rest. This means the virtual disk file is encrypted, but the information inside the virtual disk is not encrypted.
The good news is that you can also encrypt the content of the virtual disk by using the Azure Disk Encryption service. This service is supported by the Azure Key Vault service for storing the encryption keys that you need for encrypting your disks. The Azure Disk Encryption service also depends on the BitLocker feature for Windows VMs and the DM-Crypt feature existing in Linux VMs.
Before you enable disk encryption on one of your IaaS VMs, you should review the supported scenarios:
Enabling encryption on new Windows IaaS VMs. You can enable the encryption for VMs created from a supported Azure Gallery image or from a pre-encrypted VHD with your own encryption keys.
Enabling encryption of existing IaaS VMs in Azure. You can enable disk encryption for Windows or Linux VMs for the OS or data disks. Bear in mind that if you want to enable encryption on a Linux VM, you need to ensure the VM has a minimum of 7GB of memory.
Enabling encryption on virtual machine scale sets. For Windows VMs in a scale set, you can enable the encryption for OS and data disks. For Linux VMs in a scale set, you can only enable the disk encryption for data disks.
Enabling encryption on managed disks. You can also enable the encryption on IaaS VMs configured with managed disks.
Disabling encryption on IaaS VMs. Depending on your operating system, you have different scenarios:
Windows You can disable disk encryption on the OS or data disk regardless of whether the VM is a member of a scale set or is a standalone VM.
Linux For standalone or members of scale-set VMs, you can disable disk encryption only on data disks.
Backup and restore encrypted VMs. You can also protect your encrypted IaaS VMs by configuring their backups using the Azure Backup service.
You should also carefully review these non-supported scenarios:
You cannot enable disk encryption on basic-tier IaaS VMs.
You should disable encryption on OS drives for Linux IaaS VMs.
You should disable encryption on data drives for Linux IaaS VMs when the OS drive is already encrypted.
Classic IaaS VMs are not supported.
You should enable encryption on Linux custom images.
You cannot use the disk encryption feature for encrypting
Azure Files (shared folders)
Network File Systems (NFS)
Dynamic volumes
Windows IaaS VMs configured with a software-based RAID
Once you have evaluated the supported scenarios, you should follow the next high-level workflow (see Figure 1-2) for encrypting a Windows or Linux VM:
)
FIGURE 1-2 New VM encryption workflow
If you plan to deploy a VM from an existing encrypted VHD from your on-premises infrastructure, you need to upload the VHD to an Azure storage account and the encryption key to your key vault.
If you want to create a new IaaS from your custom VHD or from a Marketplace image, you need to provide the encryption configuration.
Grant access to Azure platform to your key vault. Azure needs to be able to read needed encryption keys to be able to encrypt your IaaS VM.
Azure configures your encrypted VM with the needed encryption key and key vault settings.
You can use following procedure for deploying the prerequisites and encrypt an existing Windows IaaS VM. In this procedure we will use Azure Cloud Shell and PowerShell:
If needed, create a new resource group:
New-AzureRmResourceGroup -Name 'az203-EncryptionDemo' -Location 'West US'
Create a new key vault. Remember that your vault name needs to be universally unique.
$keyVault = New-AzureRmKeyVault -VaultName 'az203DemoEncryptionVault'
-ResourceGroupName 'az203-EncryptionDemo' -Location 'West US'
Grant Azure access to your key vault. Azure needs to access your key vault to make the encryption keys available to the VM during the boot and decryption processes:
Set-AzureRmKeyVaultAccessPolicy -VaultName 'az203DemoEncryptionVault'
-ResourceGroupName 'az203-EncryptionDemo' -EnabledForDiskEncryption
Grant Azure yourself access to your key vault. When you create a new key vault, all access is denied by default. You need to create an access policy for your Azure Active Directory user to be able to create a new key for encrypting disks:
Set-AzureRmKeyVaultAccessPolicy -VaultName 'az203DemoEncryptionVault'
-UserPrincipalName '<your_AAD_username>' -PermissionsToKeys Get,List,Update,Create,
Import,Delete -PermissionsToSecrets Get,List,Set,Delete,Recover,Backup,Restore
Create a new key for encrypting the disk:
$keyEncryptionKeyName = 'az203VMEncryptionKey';
Add-AzureKeyVaultKey -VaultName 'az203DemoEncryptionVault'
-Name $keyEncryptionKeyName -Destination 'Software';
$keyEncryptionKeyUrl = (Get-AzureKeyVaultKey -VaultName 'az203DemoEncryptionVault'
-Name $keyEncryptionKeyName).Key.kid;
Encrypt the disks of the Windows IaaS VM. You need to ensure that you set the ResourceGroupName parameter to the resource group where the VM exists. The VM also needs to be running to enable the disk encryption extension.
Set-AzureRmVMDiskEncryptionExtension -ResourceGroupName
'az203-EncryptionDemo' -VMName 'az203demoVM' -DiskEncryptionKeyVaultUrl
$keyVault.VaultUri -DiskEncryptionKeyVaultId $keyVault.ResourceId
-KeyEncryptionKeyUrl $keyEncryptionKeyUrl -KeyEncryptionKeyVaultId
$keyVault.ResourceId;