Using Windows 10
- By Ed Bott and Craig Stinson
- 4/9/2019
- An overview of the Windows 10 user experience
- Navigating Windows 10
- Using and customizing the taskbar
- Using and customizing Action Center
- Switching tasks
- Reviewing, revisiting, resuming with Timeline
- Switching between virtual desktops
- Managing and arranging windows
- Using a keyboard and mouse in Windows 10
- Using Windows 10 on a touchscreen device
- Using the Windows Ink workspace
- Working with fonts
Using and customizing Action Center
Action Center is the formal name of the pane that appears at the right side of your screen when you swipe in from the right (on a touchscreen), press Windows key+A, or click the small button just to the right of the clock on your taskbar. It serves two important functions. First, it supplies a notification area that can display messages from various apps and system components. These notifications occupy the upper part of Action Center. Second, it provides a panel of Quick Action buttons for such things as switching in and out of Airplane Mode or Tablet Mode, creating a note in OneNote, connecting to a Wi-Fi access point, and so on. The action buttons appear as one or more rows of tiles along the lower edge of Action Center. Figure 3-9 shows an example of Action Center with three notifications and three rows of Quick Action buttons. Notifications are grouped under headings corresponding to the notifying applications. Collapse icons beside each notification to reduce the verbosity of the notification; these are handy if your Action Center is teeming with messages.
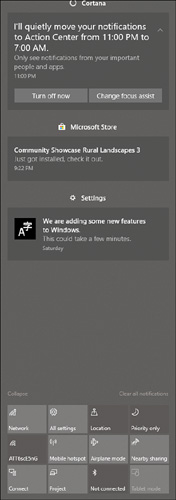
Figure 3-9 Action Center consists of two parts: a set of notifications at the top and one or more rows of Quick Action buttons at the bottom.
You can respond to notifications in various ways. If you hover the mouse pointer over a notification, a Close button appears in its upper-right corner, and you can dismiss the notification by clicking there. If you click on the body of the notification, the relevant action occurs. For example, clicking on a news bulletin opens the story in the News app; clicking on a message from Windows Update telling you that a system restart is pending might open a secondary message with more details and a button for effecting an immediate restart.
Some Quick Action buttons are simple commands. Clicking All Settings, for example, opens Settings. Others, such as Tablet Mode and Wi-Fi, are toggle switches. Action Center uses the current accent color to indicate which switches are currently on.
Customizing the Quick Actions panel
To rearrange the contents of the Quick Actions panel, go to Settings > System > Notifications & Actions. The current Quick Actions layout is shown near the top of the page:
)
)
You can change the order in which your Quick Actions are displayed by dragging with the mouse or other pointer. On a touchscreen, press and hold a button to select it, and then drag. Note that you do not have to have an empty space in the panel to do the rearranging; Windows adjusts button positions as you drag.
The arrangement of the Quick Actions panel matters in one way. With the Collapse button that appears directly above the panel in Action Center (shown in Figure 3-9), you can reduce the panel to a single row of four. The row that appears then is the top row shown in Settings > System > Notifications & Actions. You can think of this row as the quickest of your Quick Actions. If you want to get in and out of Airplane Mode effortlessly, for example, you can put that button in the top row, collapse the panel in Action Center, and then swipe in from the right when you board the plane. Your Airplane Mode Quick Action button will be right there, more or less under your thumb.
To change the content of the Quick Actions panel, click Add Or Remove Quick Actions. (See the previous illustration.) The list of choices that appears is appropriate for your hardware. Figure 3-10, for example, shows the Quick Actions available on a Surface Pro 3. Some of these, such as Battery Saver and Rotation Lock, would not appear on a desktop computer.
)
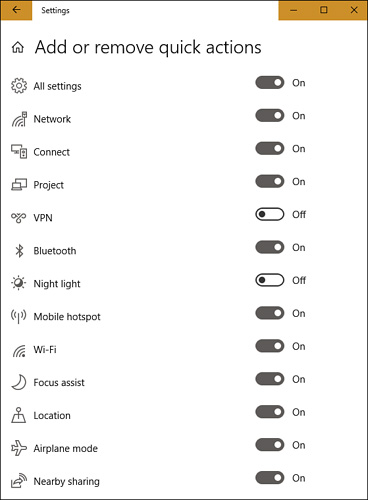
Figure 3-10 The list of available Quick Actions is appropriate for your hardware.
Customizing notifications
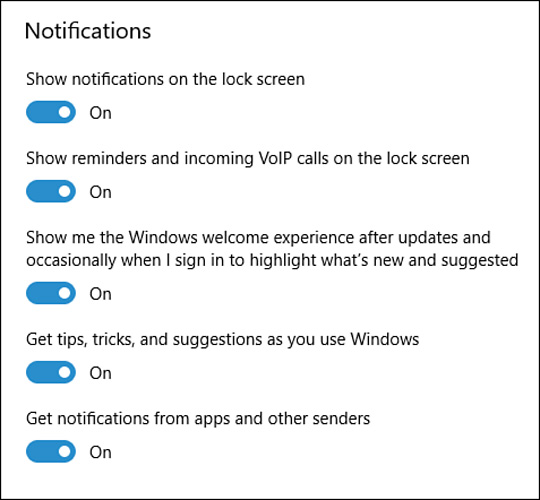
The options for controlling which “senders” can deliver messages to the notification area of Action Center are also located at Settings > System > Notifications & Actions, just below those for Quick Actions. Switches here also control whether messages are displayed on your lock screen. The following illustration shows the options governing general notification behavior.
Scroll down from these general switches, and you’ll come to switches for individual senders. You can use the switches to squelch or permit notifications from particular senders. Clicking on the sender takes you to a more granular set of controls, such as the ones for the Calendar app, shown next:
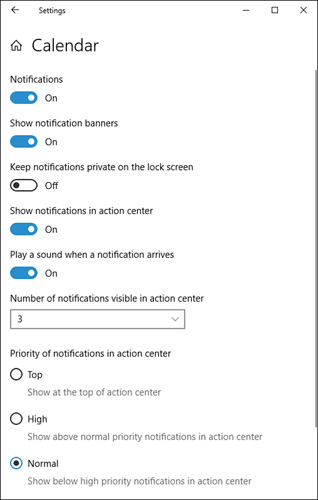
You can use this set of controls for such things as determining whether a sender provides a notification banner (a pop-up that appears briefly when a notification arrives), whether a sound is played, the maximum number of notifications that will be displayed at one time in Action Center (you can use an Expand button to see the remainder), and the priority given to the sender’s notifications. For example, if you want your Calendar notifications always to show up at the top of Action Center, you can select Top.