Design data implementation
- By Haishi Bai, Santiago Fernandez Munoz, Dan Stolts
- 8/27/2018
- Skill 2.1: Design for Azure Storage solutions
- Skill 2.2: Design for Azure Data Services
- Skill 2.3: Design for relational database storage
- Skill 2.4: Design for NoSQL storage
- Skill 2.5: Design for Cosmos DB storage
- Thought experiment
- Thought experiment answers
- Chapter summary
Skill 2.3: Design for relational database storage
Traditionally, relational databases have been the way applications store information in an ordered and effective way. If you are moving to the cloud or developing a new application in the cloud from the beginning, there is a possibility that you want to use a relational database for storing your application’s data.
As with many other services, Microsoft offers you the option of moving your databases to the cloud using a managed service. This allows you to focus on the development of your product and abstracting from tasks that need to provide enterprise-level services, like High Availability, backup and restore, or Disaster Recovery. You can also take advantage of the scale-up and scale-out capabilities that Azure offers through Azure SQL Databases.
Azure SQL Database
Based on the well-known SQL Server database engine, Azure SQL Database allows you to deploy and consume databases in Azure without worrying about the details of deploying a SQL Server and its associated infrastructure needs.
You can create three different types of databases in Azure SQL Database:
Single databases You create a single database inside a resource group. You assign to that resource group a set of compute and storage resources for running the needed workloads.
Elastic pools You typically use this type of database when you are not sure or cannot predict the demand for the database. You create a database inside a pool of databases on a resource group. All databases in the elastic pool share the resources assigned to the pool.
Managed instance This type of database is most similar to the on-premises SQL servers that you typically use. This is the ideal option when you want to migrate existing applications to Azure, minimizing the impact of the migration process.
When you decide to create a single instance database or an elastic pool you need to use a logical server prior to creating your first database. A logical server is the entry point for the databases and controls logins, firewall rules, auditing rules, thread detection policies and failover groups. You should not confuse an Azure SQL Database logical server with an on-premises SQL Server. The logical server is a logical structure that doesn’t provide any way for connecting to instance or feature level. The following procedure shows how to create an Azure SQL Database:
Sign into the management portal (http://portal.azure.com).
In the upper-left corner of the portal, click on Create A Resource icon.
On the New blade, select Databases and then SQL Database.
On the SQL Database blade, provide the name for the database.
Select the subscription where the database will be created.
Create a new resource group or use an existing one.
You can choose to create a new blank database, use the sample database (AdventureworksLT) or restore a database from a backup. We will cover how to create and manage backups later in this skill.
You need to provide a logical server that you will use for connecting to the database. If you do not already have one, you need to create one. Figure 2-15 shows needed information for creating a new logical server.
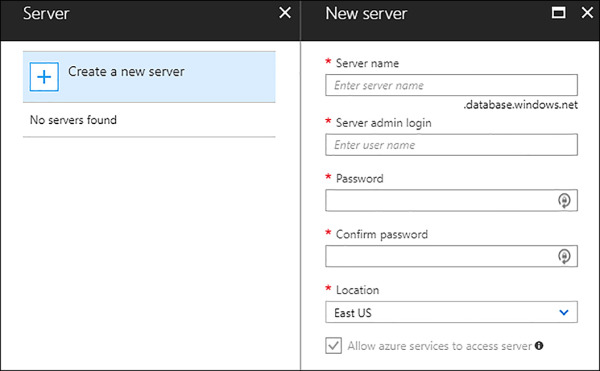
FIGURE 2-15 Creating new logical server
Next, select if you what to include the database in an elastic pool. For this procedure, keep the default selection Not Now.
Select the pricing tier.
Configure the collation for the database. Keep the default collation for this procedure.
)
Because of how Azure provides high availability to the databases, there is no need for the logical server to be on the same region as the databases it manages. Azure SQL Database does not guarantee that the logical server and its related databases will be on the same region. When you create the logical server, the first user you create is granted with administrator privileges on the master database and any following database that you create. This first account is a SQL login account. You can only use SQL login and Azure Active Directory login accounts. Windows authentication is not supported with SQL logical server. Once you have created the logical server, you can also add an Azure Active Directory administrator. You can use either a single user or a security group. If you plan to manage control access to SQL Database using Azure Active Directory you need to configure an Azure Active Directory administrator.
When you provision resources for the database, depending on the usage pattern of your database you may find that those resource are not used most of the time. If you need to deploy several databases you may find that you are not optimizing resource usage. Elastic pools are designed for solving this issue. An elastic pool allows you to share assigned resources to the pool between all databases in the pool. This way, when one database is not using those assigned resources to the pool, another database in the pool can take advantage of it. This way you minimize the waste of resources. The elastic pool is the best option when you need to deal with unpredictable databases workloads. The elastic pool ensures that all databases in the pool will always have a minimum amount of resources.
Resources assigned to a database are measured in DTU or Database Transaction Units. This unit is a combination of CPU, memory, and data and transaction log I/Os. The ratio of assigned resources in a DTU is set by Microsoft based on the OLTP benchmark workload. If the database exceeds the assigned amount of any of those resources, then the throughput is throttled and you may experience performance issues and timeouts. When you need to assign resources to an elastic pool, you will use eDTU or elastic Database Transaction Units.
When you create your database, you need to also protect the access to it. The SQL Database firewall helps you protect the database by preventing the access to the database. After you create your logical server, you need to specifically allow the access to the server from outside your subscription. The SQL Database firewall offers two levels of protection:
Logical server You configure firewall rules for allowing access to logical server. Each IP that you allow to access to the logical server will have access to all databases and elastic pools managed by the server.
Database You can configure more granular firewall rules, by granting access only to specific databases or elastic pools inside managed by the logical server.
If you want your Azure applications to connect to a database or elastic pool, you need to ensure that the Azure Connections option in the firewall is enabled. This way, you will be able to connect your virtual machines inside a virtual network to a database, elastic pool, datawarehouse, or storage account using the virtual network service endpoints.
Microsoft offers three different service tiers (Basic, Standard and Premium) for single databases and elastic pools and offers a single General-Purpose service tier for Managed Instances. A service or pricing tier is a group of differentiated range of performances, storage, and pricing levels. This means that each service tier is a compound set of resources. When you want to set a limit for the resources that are available to your database or elastic pool, you choose between those limits existing on a service tier. You assign two different types of resources: DTUs or eDTUs, and storage. The following procedure shows how to switch between service tiers and how to assign more resources to a database:
Sign into the management portal (http://portal.azure.com).
On the navigation pane on the left side of the portal, select SQL Databases. This open the SQL Databases Management blade.
Look for your database on the databases list and select your database.
On the database blade, select Pricing Tier (scale DTUs). You can also access this panel from the Overview blade, clicking on the current pricing tier.
On the Configure Performance blade, select the new pricing tier. You can also change the assignment of resources by changing the DTU and Storage slicers (Figure 2-16).
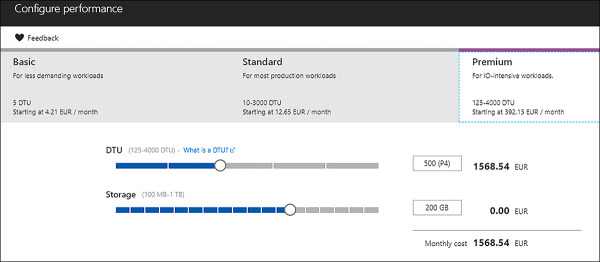
FIGURE 2-16 Changing resources for a database
Once you are happy with your selection. Click on the Apply button at the left corner of the blade.
)
Since a Logical server is not equivalent to an on-premises traditional SQL Server, there are situations where migrating an application from your infrastructure to Azure can be a challenging task. For those scenarios, Microsoft has released Managed Instances. This is a new capability added to Azure SQL Database that makes this service almost 100% compatible with a traditional SQL Server. Managed Instances depend on virtual networks for addressing security concerns and achieving instance security isolation. As with Azure SQL Database logical servers, with Managed Instances you can use SQL or Azure Active Directory authentication. Although this feature is near 100% compatible with on-premises SQL Server, it’s still a PaaS (Platform as a Services) service. This means that it’s a fully managed service, and you don’t need to worry about services patches, provisioning, configurations and other IaaS (Infrastructure as a Service) related tasks. At the time of this writing, Azure SQL Database Managed Instance is in public preview.
SQL Server Stretch Database
The older your data gets, the less it is usually accessed. This is also true for databases, because records in a table that get older are less accessed. But you still need to store them just in case you need to access them. This means that there are occasions where you may be using expensive storage for storing cool data. You can apply archiving techniques for moving that cool data to cheaper storage, but in those cases where you need to access to that data, you need to put the data online again or tune your queries for accessing that data.
Microsoft provides you with a cool data management that integrates transparently with your on-premises SQL Server 2016 or newer databases. SQL Server Stretch Database migrates your cool data securely and transparently to Azure. The main advantage of this solution is that your data is always online, and you not need to change any query or any configuration or code line in your application to work with SQL Server Stretch Database. Since you are moving your cool data to the cloud, you reduce your need for high performance storage for the on-premises database servers.
You can migrate full tables or just parts of online tables by using a filtering function. Although not all tables are appropriate for migrating to Stretch Database, Microsoft provides a separate tool for analysis to identify the suitable tables to be migrated.
You need to bear in mind that not all tables are suitable for being migrated to Azure using SQL Stretch. You will find a full list of table limitations that avoid you from using SQL Stretch at the Limitations for Stretch Database page (https://docs.microsoft.com/en-us/sql/sql-server/stretch-database/limitations-for-stretch-database). The following procedure shows you how to enable SQL Stretch for a database:
Open SQL Server Management Studio and connect to your database server. Remember that your SQL Server needs to be at version 2016 or later.
Expand the list of databases and right click on the database where you want to enable SQL Stretch. From the contextual menu, select Tasks > Stretch > Enable. This will launch the Enable Database for Stretch wizard.
Click Next on the Introduction page.
Select the table or tables you want to migrate to Azure and select Next. Selecting the Tables page will review all tables on the database and show you which tables are candidates for migrating. When you select a table, you can migrate all rows or migrate just a group of rows. On the migrate column Entire Table appears by default. This means that you will migrate all rows in the table. If you want to migrate only a group of rows, you need to create a filter that includes the rows you want to migrate. Once you define the filter for the table, the name of the filter appears in the migrate column. Figure 2-17 shows an example of a filter.
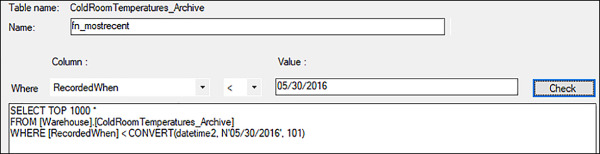
FIGURE 2-17 Creating a filter
You need to sign in your Azure Subscription. Select the Sign In button and provide an account with administrative privileges.
You need to select which subscription you will use for storing the Azure SQL Database. You also need to provide the region for the database. As with any other database, you need to provide a SQL logical server. If you don’t already have a logical server for Azure SQL Database, you can create one using this wizard.
Provide a database master key (DMK) for protecting the credentials that you provided in the previous step. If you already have a DMK for this database, then you need to provide it here.
You need to provide the IPs that will be able to connect to the logical server. By default, logical servers do not allow access from outside Azure.
On the summary page, review the information about the configuration and then click on Finish.
Once the operation finish, the Results page will show you the status and result for all actions performed during the setup.
)
Design for scalability and features
When you need more computing resources, you have two options: assigning more resources, also known as scale up, or creating more identical elements and distributing the load across all elements, also known as scale out. You can use both strategies with Azure SQL Databases for achieving the best results for your needs. When you add more DTUs to a database, you are growing vertically or scaling-up your resources assigned to the database. If you want to grow horizontally or scale-out, you need to add additional databases to your application. There are different techniques for distributing the load and data when you scale-out, but Azure SQL Database uses a Sharding technique. Using this technique, the data is divided and distributed among databases structured identically. You use the Elastic Database client library for managing scale-out.
Sharding is especially useful when you need to store data for different customers. These final customers are also known as tenants. When you need to distribute the data for each tenant you can do it using two different patterns:
Single-tenant sharding pattern You assign a single database to each tenant. All data associated to each tenant will be always stored in the same database. Your application is responsible for routing each request to correct database. This pattern offers isolation, backup/restore ability and resource scaling at the tenant level. When you use this pattern, you don’t need to provide an ID or customer key value to each tenant.
Multi-tenant sharding pattern You use each database for storing one or more tenants inside the database. This pattern is useful when your application needs to manage large numbers of small tenants. Each tenant needs to be identified by an ID or customer key value and is the application layer that is responsible for routing the request to the appropriate database. The elastic database client library helps with this kind of scenarios. You can also apply row-level security to filter which rows can be accessed for each tenant.
These patterns are not mutually exclusive. You can use the multi-tenant sharding pattern for small tenants, and when the tenant requires more resources or additional level of isolation/protection or whatever other criteria you decide. And you can use the split-merge tool for migrating tenant’s data from one database in one pattern to another database using a different pattern. Microsoft provides the Elastic database client library for helping administrators and developers manage and implement the multi-tenant sharding pattern. When you use the Elastic client library, you deal with shards, which is conceptually equivalent to a database. This client library helps you with:
Shard map management When you store tenant data in databases you need to keep a tracing system for knowing in which database each tenant’s data is stored. This feature creates a shard map database for storing metadata about the mapping of each tenant with its database, allowing you to register each database as a shard. This feature makes the management and evolution of the tenant’s data inside the system easier for you, since you don’t need to worry about implementing your own mapping system.
Data dependent routing This feature allows you to select the correct database based on the information that you provide on the query for accessing the tenant’s data. You can also use the context in your application for providing the needed information that will route your request to the correct shard.
Multi-shard queries (MSQ) This feature is used when you make a request that involves more than one shard. This type of query executes the same T-SQL on all shards that participate with the query and returns the resultant data as the result of a UNION ALL.
Azure Database for MySQL/PostgreSQL
Like Azure SQL Databases, Azure also offers support for other SQL engines like MySQL or PostgreSQL. Based on the community edition of these popular SQL database management systems, Microsoft offers a full managed service for those users who want to store their data using MySQL or PostgreSQL database engines, without worrying about management tasks. At the time of this writing, Azure Database for MySQL and Azure Database for PostgreSQL is in public preview, but it stills offers a good level of capabilities and features like:
High availability Already included in the price.
Predictable performance You can choose between different performance layers using pay-as-you-go model.
Scale on the fly You can always assign more resources to your database server.
Secured All data at-rest or in-motion is encrypted.
Automatic backups You can have automatic backups from a 7 to 35-day retention period. Azure Database for MySQL also offers point-in-time-restore.
Enterprise-grade security and compliance Azure Database for MySQL or PostgreSQL offers three different performance tiers: Basic, General Purpose and Memory Optimized. Each performance tiers offers different limits of resources that you can assign to the database server. You can modify the resources assigned to the database server, but you cannot modify the pricing tier, the Compute Generation, or the type of Backup.
When you want to use Azure Database for MySQL or PostgreSQL, you need to create a server first. This MySQL or PostgreSQL server is pretty the same as an on-premises MySQL or PostgreSQL server and is the entry point for the databases that you will create. The server is also the parent resource for those databases. This means that the resources that you assign to the server are shared among all databases managed by the server. You can decide to create a server per database on a server with more resources assigned that hosts more databases. The following procedure shows how to create a new Azure Database for MySQL server using Azure Cloud Shell. You can use the same procedure for creating a PostgreSQL server:
Sign into the management portal (http://portal.azure.com).
Click on the Cloud Shell icon in the upper-right corner, as shown in the Figure 2-18.

FIGURE 2-18 Launching Cloud Shell
Create a resource group for the MySQL server.
az group create --name <resource group name> --location <location>
Add the latest Azure Database for MySQL management extension.
az extension add --name rdbms
Create a database server. In this example, this command creates a server in General Purpose Gen 4 performance tier with 2 vCores assigned. The MySQL engine version is 5.7. You can choose between versions 5.6 and 5.7.
az mysql server create --resource-group <resource group name> --name <mysql server name> --location <location> --admin-user <username for admin> --admin-password <password for admin> --sku-name GP_Gen4_2 --version 5.7
You need to create a firewall rule on this server if you want that external applications to be able to connect to the database.
az mysql server firewall-rule create --resource-group <resource group name> --server <mysql server name> --name <rule name> --start-ip-address <start ip address> --end-ip-address <end ip address>
Once you are done creating the server, you can review connection the connection information. You will use this information for connecting with your MySQL IDE or for connecting your application to the database. You need to create a database before start using it in your application.
az mysql server show --resource-group <resource group name> --name <mysql server name>
)
When you want to assign resources to your server, MySQL or PostgreSQL, there are a couple of concepts that you need to know:
Compute generation This represents the physical CPUs that are used for the logical CPUs. Gen4 logical CPUs are based on Intel E5-2673 v3 2.4GHz processors while Gen5 logical CPUs are based on Intel E5-2673 v4 2.3GHz processors.
vCore This is the number of logical CPUs that you assign to your server. The amount of memory assigned to a vCore depends on the pricing tier that you choose. The amount of memory assigned to each vCore is also doubled as you increase the pricing tier. That is, the memory assigned to a vCore in the Memory Optimized tier is double than the memory assigned in the General Purpose tier, and this double than the memory assigned in the Basic tier.
Storage This is the amount of storage you provide for storing database files, temporary files, transaction logs and server logs. The performance tier and IOPS of the storage also depends on the pricing tier. This way, Basic tier IOPS is not guaranteed and the Standard performance tier is used for storage. For General Purpose and Memory Optimized tiers, Premium performance tier is used for storage. The IOPS reservation scales in a ratio of 3:1 with the storage size. The range of storage size that you can select on all pricing tiers is from 5GB to 1TB.
Although you don’t need to restart the server for scaling up or down your server, you should bear in mind that the connection to the database is interrupted. This means that any current connection will be disconnected and any uncommitted transactions will be canceled. This happens because when you scale up or down, Azure creates another server with the new requested resources. Once the server is ready, it disconnects the current server from the storage and attaches it to the new server.
Design for HA/DR and geo-replication
High availability (HA) and disaster recovery (DR) design depends on the service you are using and your needs. We will review these features separately for SQL databases and MySQL or PostgreSQL.
Azure SQL Databases
Fails happen. This is a fact, and High availability techniques are here for minimizing the impact that a fail may have on your infrastructure. Although there is a myriad of situations that may lead to a failure, to clearly scope and address the solution for these situations, Microsoft defines three main types of failures that HA should deal with:
Hardware and software failures
Human error failures made by operational staff
Planned servicing outages
Azure SQL Database uses direct attached disks for providing fault tolerance to the databases. Depending on the service tier that you configure for your database, this direct storage is a Local Storage (LS) for Premium database service tier or Remote Storage (RS) on Azure Premium page blobs, for both Basic and Standard service tiers.
Premium service tier will use LS replication, while Basic and Standard service tiers will use RS replication. Regardless of the service tier that you decide to use, the internal mechanism that uses Azure SQL Database is based on Always ON SQL server feature.
When you use a Local Store (LS) configuration, Azure configures three copies of the database, all located inside the same datacenter, but in distinct physical systems. These three copies make up the control ring managed by the management service (MS). The copies are always distributed with one primary replica and two secondary replicas or quorum-set. When you request any read or write operation, the gateway (GW) sends the request to the primary replica. Write operations are then asynchronously replicated between primary and secondary replicas. The transaction is not considered as committed until the data is written to the primary replica and at least one of the secondary replicas. In case of a failure, the Service Fabric failover system automatically rebuilds the failing node and replaces it. Figure 2-19 shows a diagram of how LS configuration works.
)
FIGURE 2-19 Local store replication
Failure detection depends on Azure Service Fabric. If a failure arises in the primary replica, the error is quite evident since you made the gateway forward all reads and writes to the primary replica. In this case, a secondary replica is immediately promoted to the primary replica. The recovery time objective (RTO) for this operation is 30 seconds, while the recovery point objective (RPO) is 0. As a best practice for mitigating the RTO, you should encourage your application to reconnect several times with a smaller wait time.
If the failure happens on a secondary replica, the service fabric initiates a reconfiguration process. There is a waiting time for determining if the failure is permanent. After this time, the service fabric creates another replica, but only if the failure is not due to operating system failure or upgrades. This happened due to allowing the failed node to restart instead of immediately creating a new replica.
Although high availability is a great feature, it does not protect against a catastrophic failure of the entire Azure region. For those cases, you need to put in place a disaster recovery plan. Azure SQL Database provides you with two features that makes it easier to implement these type of plans: active geo-replication and auto-failover groups. At the time of this writing, auto-failover groups were in public preview.
With active geo-replication you can configure up to four readable secondary databases in the same or different regions. In case of a region outage, your application needs to manually failover the database. If you require that the failover happens automatically performance, then you need to use auto-failover groups. When a secondary replica of a geo-replication is activated on the secondary region or promoted to primary, all of the other secondary replicas are automatically pointed to the new primary. Once the failover to the new primary is complete, all DNS endpoints will be redirected to the new region.
If you need active geo-replication to failover automatically in the event of a failure, you need to use auto-failover groups. In that case, all databases in the group can be replicated only to one secondary server in a different region.
When you use active geo-replication, data is replicated to the secondary region automatically and asynchronously. This means that the transactions in the primary database are committed before they are copied to the secondary databases. You can increase the level of protection by creating up to four secondary replicas. You can also use those secondary databases for read-only operations, and to enable geo-replication on any database in any elastic pool. The secondary database can also be a regular database or a database in an elastic pool. Primary and secondary databases need to be on the same service tier, although it’s not required to be on the same performance level. This means you can have a primary database in a P6 and the secondary at a lower level, like a P2. Although this flexibility is possible, it is not recommended, since it can impose lag on the replication process. In case of a failover, the performance of the application will be greatly impacted by the lower resources assigned to the secondary database.
To minimize the complexity of configuration and potential downtimes due to configuration issues, Microsoft recommends using database firewall rules for replicated databases. This way, firewall rules are replicated with the database and there is no need to maintain server rules on the replicas. The same recommendation applies to user access. You should use Azure Active Directory or a user-contained database for granting access to the database.
Built on top of active geo-replication, the auto-failover group manages the replication of a group of databases configured in a primary server that will automatically failover to the secondary server in case of failure. The secondary server cannot be deployed on the same region as the primary server. You should bear in mind that replication between regions happens asynchronously due to high latency on the communication between datacenters. Because of this, there is a potential of some data loss in case of a failure.
You can configure active geo-replication and auto-failover groups using the Azure Portal, PowerShell, T-SQL, or the REST API. The following procedure shows how to configure active geo-replication on an existing database:
Sign into the management portal (http://portal.azure.com).
Select the SQL database in the navigation bar.
In the SQL databases blade, look for the database you want to configure and select your database.
On the navigation bar, in the selected database blade, select Geo-Replication on the Settings section.
On the Geo-Replication blade, you should see a map of the world that displays the different regions location. Select the secondary region that you want to add to the replication. Figure 2-20 shows a partial view of the regions.
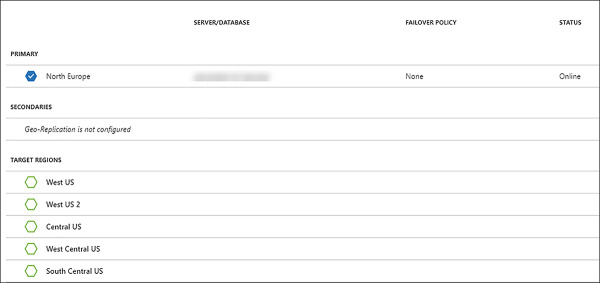
FIGURE 2-20 Configuring geo-replication
Choose the configurable region for the secondary replica, and the Create Secondary blade will appear. Select the target server. If you don’t have a server available you can create a new one here. You can’t select the current primary server as your secondary server without raising an error. Select the Pricing tier. Remember that the primary and secondary replicas need to be on the same service tier.
Click on OK.
)
Azure SQL Databases for MySQL or PostgreSQL
Azure Database for MySQL or PostgreSQL provides high availability by default. This high availability is provided by the already built-in fail-over mechanism at the node-level. When a node-level interruption happens, the database server automatically creates a new node and attaches the storage to a new level. Like with the scale-up and down, any active connection with the database will be dropped, and any in-flight transaction won’t be committed. The application using the MySQL or PostgreSQL server database is responsible for providing the mechanism of reconnection and transaction retries.
Design a backup and recovery strategy
When you deploy an Azure SQL Database, Microsoft provides you with an automatic backup for your databases at no additional charge. This backup is also geo-redundant because it transparently uses read-access geo-redundant storage (RA-GRS). Depending on the service tier, the retention period of this backup is 7 days, for Basic tier or 35 days for Standard and Premium tiers.
Automatic backup in SQL Databases is based on the SQL Server technology. This means that it creates full, differential and transactions back up automatically. The schedule of each backup depends also on the type of backup. A full backup is scheduled to happen weekly, differential backups happen every few hours, while transactional log backups happen every 5 to 10 minutes. The exact time when each backup happens is automatically managed by the Azure SQL Database services to automatically accommodate the current system load. Geo-replicated backup depends on the Azure Storage replication schedule. The first full backup occurs when you create your database, which takes about 30 minutes. It can take longer, however, if you are copying or restoring a database.
With this feature you can perform different types of restores:
Point-in-time restore You create a new database in the same server as the original. The restore can take place within the retention period.
Deleted database You can restore a full deleted database to the point in time that it was deleted. You can only restore the deleted database to the same logical server where the original database existed.
Restore to another geographical region This allows you to implement basic disaster recovery. You restore your database in any existing logical server in any region.
Restore from Azure Recovery Services vault If you enable long-term retention, you can restore a specific version of your database from your Azure Recovery Services vault.
As mentioned earlier, retention policy depends on the service tier configured for the database. If you decide to switch to another service tier, then the access to the backup changes depending on the movement. For example, if your database is configured with a Standard or Premium service tier, and you switch to Basic, only backups with seven days or less are available. If you change the service tier from Basic to Standard or Premium, then the existing backups are extended until they are 35 days old.
If you want to extend the default retention period beyond the 35 days, you need to configure long-term retention. This feature depends on Azure Recovery Services, and you can extend the retention time up to 10 years. To enable SQL Database long-term retention, you need to create an Azure Recovery Services vault in the same subscription, geographical region and the resource group as the SQL logical server. Once you configure the retention policy, the weekly full database backups are copied to the vault automatically. When you enable long-term retention, you can recover any of these backups to a new database in any server in the subscription. The following procedure shows how to enable long-term retention using the Azure Portal:
Sign into the management portal (http://portal.azure.com).
Select Create A Resource in the upper-left corner of the portal. On the Azure Marketplace, select Storage and select Backup And Site Recovery (OMS).
Create a Backup Service vault. You need to create this vault in the same resource group as the SQL logical server where you want to enable the long-term retention.
Select the resource groups on the navigation bar. Look for the resource group that hosts your database server and select the name of the resource group.
On the Overview blade, select the name of the server.
Select Long-term Backup Retention under the Settings section.
Select the database you want to configure and select Configure on the top menu.
Select the Recovery service vault. Select the vault that you just configured in step 3. If you see that your vault is listed, but it’s disabled, ensure that you created the vault in the same subscription, region, and resource group as the SQL logical server.
Create a new retention policy. Provide a name for the retention policy and a retention period. Click on OK to accept the configuration.
Click on Save in the upper-left corner of the long-term backup retention blade. Confirm that you want to apply the configuration.
Once the long-term retention has been correctly configured, your database should show the assigned retention policy and the retention period (Figure 2-21).
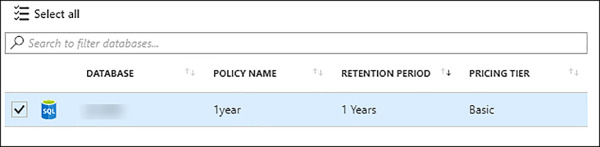
FIGURE 2-21 Database with long-term retention enabled
)
When you need to recover a database from an automatic backup you can restore it to:
A new database in the same logical server from a point-in-time within the retention period.
A database in the same logical server from a deleted database.
A new database from the most recent daily backup to any logical server in any region.
When you restore a database, you can incur additional costs if the size of the database that you want to restore is greater than the amount of storage included on the performance level. This usually happens when you want to restore from a larger performance level, like P11 to P15, to a smaller performance level, like P1 to P6, or S4 to S12.
You also need to remember the recovery time when you want to perform a database restore. That time depends on several factors, like the size of the database, the performance level, the number of transaction logs involved, the amount of activity that need to be replayed when performing a recover to a point-in-time, and the network bandwidth when you perform a restore to a different region.
When you want to make a restore, you can use two different approaches:
Replacement Here you want to restore the full database and replace the old one. You cannot make a database restore into an existing database. If you need to make a database replacement, you need to restore your backup to a new database. Then rename the old database using the ALTER DATABASE command in T-SQL. After you have successfully renamed the old database, change the name of the new restored database to the name of the database that you want to replace.
Data recovery This is for those situations where there was some data loss due to application or user error. With data recovery you don’t need or want to perform a full database replacement, but just restore the missing or corrupted data. You need to write your own data recovery scripts for performing the data recovery.
Design optimization strategies for Azure SQL Data Warehouse columnar storage
When you use Azure SQL Data Warehouse it’s important to apply some techniques and best practices for maintaining a good level of performance in your operations:
Maintain statistics SQL Data Warehouse requires that you create and update columns statistics manually. These statistics directly impact the quality of the execution plan created by the optimizer. A good strategy for this manual maintenance is to update the statistics every time your data is significantly updated, on a daily basis or after each load. If you notice that the statistics update is impacting the performance, then review which columns have statistics and which columns need to be update frequently.
Avoid using singleton INSERTS Using one-time inserts performs well on small tables. But if you need to insert a big amount of data, like thousands or millions of rows, this approach may greatly impact the performance. In those cases, writing data to a file and periodically loading this file into the table has a better performance.
Use Polybase Polybase is designed to work better with the MPP architecture of SQL Data Warehouse, so this is the ideal tool for loading and exporting data. While Polybase is the right tool for loading and exporting, you should avoid using Polybase for querying SQL Data Warehouse since it needs to load the data to tempdb before being able to process the query.
Avoid Round Robin distribution In MPP, a distribution is the basic unit for storage and processing parallel queries. Every time you run a query, this is divided into 60 different queries that run on one data distribution. When you use a round-robin algorithm for distribution, rows are evenly distributed across all distributions. This assignment is random, which cannot guarantee that rows with equal value are assigned to the same distribution. The hash algorithm computes a hash for assigning data to each distribution. This ensures that rows with the same values calculate the same hash and are assigned to the same distribution.
Watch partitions Having too many partitions can affect performance loss since it reduces the effectiveness of clustered indexes for partitions with fewer than one million rows. By default, SQL Data Warehouse distributes your data across 60 different distributions or databases. If you create a table with 100 partitions, you will end with 6000 partitions.
Minimize transaction size When you use INSERT, UPDATE and DELETE statements, you run it in a transaction. If any of those statements fail during the execution of the transaction, they must be rolled back. The bigger the transaction is, the longer it takes to roll back. You should consider splitting big transactions into smaller chunks for minimizing the risk of a rollback.
Use adequate column size You should use the minimum column size that supports your data. This will improve performance, especially with CHAR and VARCHAR columns. If you need to store strings that will contain only ASCII chars use VARCHAR instead of NVARCHAR. NVARCHAR is more flexible since it can store Unicode strings, but requires more space for storing the data.
Use temporary tables When you are importing data to SQL Data Warehouse, using temporary heap tables before applying more transformation will speed up the process.
Optimize clustered columnstore tables When you work with columnstore tables, the quality of the segment directly impacts on the performance of the table. You can measure the quality of segments in the columnstore by the number of rows in a compressed Row Group. The quality of the columnstore segment can suffer under conditions of memory pressure when data is written to the table.
Use appropriate resource classes Depending on you want to improve performance or concurrency, you need to adjust the size of the resource class that SQL Data Warehouse assigns to each database for running queries in memory. By default, SQL DW grants 100 MB of memory per distribution. This means that the total system-wide memory allocation is 6000MB, since SQL DW uses 60 distributions out of the box. If you have queries with large joins or loads to clustered columnstore tables, you will benefit from larger memory allocations, thus improving the performance. On the other side, if you notice that queries start to have a long delay, you should consider reducing the size of the resource classes, since those queries maybe consume a lot of concurrency slots, causing other queries to be delayed.
In this section we covered the different solutions that Azure offers for working with relational databases, as well as high availability, disaster recovery, and business continuity options related with the Azure SQL Database service. Next, we detail what Azure can offer when working with NoSQL systems.