Design data implementation
- By Haishi Bai, Santiago Fernandez Munoz, Dan Stolts
- 8/27/2018
In this sample chapter from Exam Ref 70-535 Architecting Microsoft Azure Solutions, explore skills related to the design of Azure Storage solutions, Azure Data Services, NoSQL storage, Cosmos DB storage, and more.
From simple web apps to complex machine learning apps, almost every app needs to store data in some fashion, and apps hosted in Azure are no exception. But not all apps have the same needs for storing and managing information. For instance, backups, virtual machines, regular files, and databases are types of services or solutions that have different storage requirements.
Azure provides you with solutions for your storage needs that can go from unstructured data, such as files or documents, to databases or Big Data storage. This chapter provides coverage on Azure storage solutions, and the different ways to access them.
Skills covered in this chapter:
Skill 2.1: Design for Azure Storage solutions
Skill 2.2: Design for Azure Data Services
Skill 2.3: Design for relational database storage
Skill 2.4: Design for NoSQL storage
Skill 2.5: Design for Cosmos DB storage
Skill 2.1: Design for Azure Storage solutions
Every workflow uses and processes some kind of data. Most of that data needs to be stored in a place where you can access it later. Azure Storage solutions are part of the storage options that Microsoft offers. These cloud-based Microsoft-managed storage solutions are highly available, secure, durable, scalable, and redundant. You can access this storage from anywhere using HTTP or HTTPS. Azure Storage also provides you with different levels of access and security for making your data public or private, depending on the configuration that you need.
Azure Storage solutions provide Azure Blob storage or Azure File storage for different data requirements. In this section we will examine those solutions and when to use them.
In order to use Azure Storage you must create an Azure Storage account. Azure offers you three different types of storage accounts:
General-purpose v1 storage accounts (GPv1)
General-purpose v2 storage accounts (GPv2)
Blob storage accounts
General-purpose storage accounts are designed to give you access to blobs, files, queues, tables, and Azure virtual machine disks. GPv1 are the original storage accounts used on the classic deployment model. While the pricing for this type of storage account is lower, it doesn’t offer the most recent features like access tiers.
GPv2 shares all of the features offered by GPv1, but it also includes the latest features, like access tiers, that can be used with this type of account. We will review access tiers in detail in the next section.
General-purposes storage accounts, v1 and v2, also offer two different performance tiers: standard and premium storage performance. The premium storage performance tier is available only for Azure virtual machine disks.
Blob storage accounts are a specialized type of storage account. You will use blob storage accounts to store block or append blobs, but not page blobs. We will cover blob storage accounts in depth in the next section.
Azure Blob Storage
A blob is a collection of binary data stored as a file that can be of any type and size. You can use blobs for storing files, documents, media files, logs, Azure virtual machine drives, and others. Azure Storage provides three different types of blobs:
Block blobs Designed for storing and managing large files over networks. The information is stored in blocks inside the blob. Each block can be up to 100MB, and each blob can have up to 50,000 blocks. This means that a single block blob can store a little more than 4.75 TB (100 MB x 50,000 blocks). Text and binary files are the ideal type of data that you should store in this type of blob.
Append blobs They are like block blobs, but optimized for appending operations. You can only perform append operations to this type of blob. Update or delete operations are not supported here. This way, you will use append blobs for storing log files or similar workloads where you usually add information, but rarely need to delete or update information. Each block in an append blob can be up to 4MB in size, and you can have up to 50,000 blocks in a single append blob. This means that the total size of this type of blob can be more than 196GB (4MB X 50,000 blocks).
Page blobs They use pages as the unit for storing information. Each page has a size of 512 bytes and is grouped into collections. Pages are optimized for read and write operations and are especially suited for disks used in Azure Virtual Machines. A single page blob can be up to 8TB in size.
Blob storage accounts can store only blocks and append blobs. If you need to store disks for Azure Virtual Machines, you should select general-purpose storage accounts.
The information inside a storage account is organized in three different levels. Those levels are organized in a parent-child relationship and are used for organizing and providing different levels of granularity of settings and security. In the first level we have the storage account itself. Inside a storage account you can create an unlimited number of containers that are the structures where you can create the different types of blobs. A blob must be always created inside a container (see Figure 2-1).
)
FIGURE 2-1 Blob storage account structure
Microsoft provides high availability and durability to all storage accounts by replicating the information stored in a storage account across different locations. This replication is transparent to the user and is always performed. This replication copies the information to different places in Azure’s infrastructure, ensuring that your data is protected against hardware or even datacenter failures.
Depending on where this replica is stored, you can choose between four different replica strategies:
Locally redundant storage (LRS) Designed to provide 99.999999999% (11 nines) of durability over a given year of your data. Using this strategy, data will be copied inside the same datacenter in different fault domains.
Zone-redundant storage (ZRS) Designed to provide 99.9999999999% (12 nines) over a given year. The information is copied between different availability zones inside the region where you created the storage account.
Geo-redundant storage (GRS) The data is copied to a secondary region, and is designed to provide 99.99999999999999% (16 nines). Secondary regions are pre-assigned and cannot be configured or changed. You cannot read data from the secondary region using this replication strategy, unless Microsoft automatically performs a failover to the secondary region.
Read-access geo-redundant storage (RA-GRS) This works similar to GRS, but it allows read-access to data stored in the secondary region.
You can select the replica strategy during the creation process of a storage account. Once the storage account has been created and you set the replica strategy, you can switch to a different strategy, depending on the type of strategy you initially configured. Storage accounts configured with a ZRS strategy cannot be converted to or from any other replica strategy. You can switch from LRS to GRS, or RA-GRS, and vice versa.
You can create a storage account from Azure portal, Azure Cloud Shell, or Azure CLI. The following procedure shows how to create a blob storage account with RA-GRS replication.
Sign into the management portal (http://portal.azure.com).
Click on the Create A Resource Link at the upper-left corner, and then select Storage > Storage Account – Blob, File, Table, Queue, as shown in Figure 2-2.

FIGURE 2-2 Creating a new storage account
On the Create storage account blade, type the name for the storage account. Notice that the name must be between 3 and 24 characters long and can contain only lowercase letters and numbers. The name must be also unique across all storage accounts in Azure.
In the Account Kind dropdown, select Blob Storage. Notice that when you make this selection, the Premium Performance option is disabled.
Ensure that Read-Access Geo-Redundant Storage (RA-GRS) is selected in the Replication dropdown. This is the default option.
Ensure that Access Tier (default) has selected the Hot option.
Keep Secure Transfer Required Disabled
Select your subscription, resource group name, and location. You can also select the virtual network that will have exclusive access to the storage account
Click on the Create button to create the storage account.
)
Blob tiers (hot, cool, archive)
One of the features introduced with blob storage and general-purpose v2 accounts are storage tiers. One interesting quality about data is that any kind of information that you may think about has age. And its age has a direct relationship with the requirement of speed of access to the information. This way, the younger the information is (the more recently it has been created, updated, or accessed), the greater the probability you need it. So, why store data that is rarely accessed on high-speed/high-performance and more expensive storage?
Blob tiers have been designed to provide you with different levels of access times to store your data most effectively, depending on your access requirements. This distribution of tiers can also have a positive impact on your storage costs depending on how you use them.
Blob storage provides you with three storage tiers:
Hot access tier Optimized for storing data that you or your applications usually access. This tier has the highest costs for storing data but the lowest cost for access and transactions. Data read and written frequently by your application is a good example of usage of this tier.
Cool access tier Optimized for storing data that will be store for at least 30 days. You usually put data here that is infrequently accessed. Access and transaction costs are higher, while storing costs are lower than those from the hot storage tier. You can find short-term backups or large-term storage for telemetry data using this type of storage tier.
Archive access tier This tier is available only at the blob level. You will typically store data here for at least 180 days. You cannot read, update, or copy a blob that is in the archive tier, since the blob is offline. You can access its metadata and perform some operations like delete, list, get blob’s metadata and properties, or change the blob tier. This tier is suitable for storing data required for law compliance or archiving. The archive tier has the highest costs for access and transactions, while the lowest costs for storage.
Once you store information in an archived blob you cannot read it until you un-archive that blob, meaning you convert back to a cool or hot access tier. This process is called blob rehydration. You should plan this operation since it can take up to 15 hours to complete.
Storage tiers can be applied at storage account level or at blob level. If you do not specify any tier configuration for a blob, it will inherit the configuration from the storage account. Remember that you can only configure archive store tier at blobs level, not for storage accounts.
You can switch the storage tier for a storage account or blob from Azure portal, Azure Cloud Shell, or Azure CLI. The following procedure shows you how to change the access tier for a blob using Azure Cloud Shell.
Sign into the management portal (http://portal.azure.com).
Click on the Cloud Shell icon in the upper-right corner, as shown in the Figure 2-3.

FIGURE 2-3 Launching Cloud Shell
On the Cloud Shell, ensure that you have selected PowerShell on the dropdown in the upper-left corner.
On the Cloud Shell, get a reference to the storage account and store it in a variable.
$storageAccount = Get-AzureRmStorageAccount -ResourceGroupName
<storage resource group> -StorageAccountName <storage account name>
Get a reference to the container that stores the blob.
$storageContainer = $storageAccount | Get-AzureStorageContainer
-name <container name>
Get a reference to the blob object that we want to change the access tier.
$blobObject = $ storageContainer | Get-AzureStorageBlob -Blob
<blob name>
Change the access tier to archive. Remember that if you want to move from the archive access tier, to any other tier you need to wait for the rehydration time.
$blobObject.ICloudBlob.SetStandardBlobTier(‘Archive’)
)
When you change between access tiers, you should consider the costs implications for each access tier. Figure 2-4 shows how prices evolve when you change between access tiers.
)
FIGURE 2-4 Price evolution between tiers
Azure Files
The objective of storing files is making the information available to users or applications for accessing when needed. If you think about how users access their daily information, one way is using shared folders hosted by on-premises file servers in their organizations.
Azure Files offers a way to access storage accounts using Server Message Block (SMB), the same protocol used for accessing shared folders on file servers. You can also access to Azure Files services by using the REST interface or the client libraries provided by the storage account. This means that Azure Files is a convenient way of sharing information between applications and users. While applications access information by using REST interfaces or client libraries, shared folders provide a more user-friendly way to get to the information.
In the same way that Azure Blob storage accounts are constructed based on a three-level structure, Azure Files uses a similar structure based on four levels:
Storage Account We need this level since it’s the one that provides access to the data.
Shares Like in a file server, a share provides SMB access to files and folders. The storage account can contain an unlimited number of shares with a maximum of capacity of 5 TiB per share. The number of files that you can create inside a share is also unlimited. A share is like a container where you create files and directories.
Directory It’s just an optional hierarchical level for your convenience. Each directory must be created on a share or inside a directory that is already inside a share.
Files The actual files. Each file can be up to 1 TB in size.
Figure 2-5 represents the structure of an Azure Files account.
)
FIGURE 2-5 Azure Files structure
Azure Files is also ideal for migrating applications that depend on file shares to the cloud. You can just create an Azure file share and move the data from the on-premises shared folder to the cloud. Depending on the amount of information that you want to upload to the Azure file share you have different options:
Azure File Sync This allows you to deploy an on-premises server on your infrastructure that is connected to your Azure Files account and makes a local copy of only the most recent accessed files. You can use this as a long-term solution for improving the performance of accessing your data, or just for the time needed for perform the migration. At the time of this writing, this feature is in preview.
Azure Import/Export You can copy all of the data that you want to migrate to Azure Files on disks that you send to Azure’s datacenter. Then, Microsoft’s staff copies the information to your Azure Files storage account.
Robocopy Just mount an Azure Files Share as a network drive and use the well-known tool robocopy to transfer your data to the cloud.
AzCopy This is a specialized tool for copying data to and from Azure Storage accounts, including blobs and files.
In the following procedure create an Azure File share.
Sign into the management portal (http://portal.azure.com), and create a General Purpose v2 storage account.
Once the storage account has been created, go to Storage accounts and select the new created storage account to open its blade.
On the File Service section, click on Files. This will open the Files blade.
On the Files blade, in the upper-left corner of the blade, click on the File share button to create a new file share. This will open the New file share dialog, as shown in Figure 2-6.
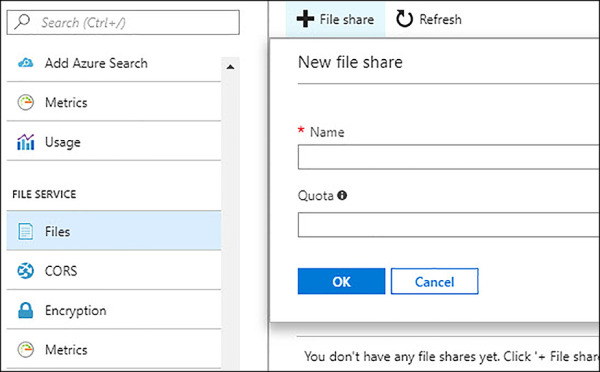
FIGURE 2-6 Creating a new file share
Once you have created the share, you need to get the storage account key for accessing to the new share. You will find the key in the settings section of the navigation pane in the storage account blade.
Now it’s time to mount the file share on your windows server. You can do it by using the net use command.
net use <desired-drive-letter>: \\<storage-account
-name>.file.core.windows.net\<share-name> <storage-account-key>
 /user:Azure\<storage-account-name>
)
Azure Disks
Like any regular computer, Azure Virtual Machines need disks for storing data and operating systems. Whenever you create a new virtual machine, Azure also creates its associated virtual disks. Those disks are stored in Azure Storage accounts as page blobs using the Virtual Hard Disk (VHD) format. By default, Azure always creates two virtual disks attached to the virtual machine: the operating system virtual disks and a temporary disk.
The operating system disk is presented to the virtual machine as a SAS disk and has a maximum capacity of 2048 GB. On the other hand, temporary disks are intended for storing temporary data like a swap area or page files. Although the information of this temporary disk is not deleted across virtual machine reboots, Azure cannot guarantee that the disk remains in case of redeployments of the virtual machine or maintenance events.
You can also create a data disk for storing your application’s data inside the virtual machine. Those data disks are presented to the virtual machine as SCSI disks. The number of data disks that you can attach to a virtual machine depends on the size of that virtual machine. Data stored inside a data disk is persistent across maintenance events or virtual machine redeployments.
Azure allows you to use four different types of disks:
Standard storage This type of disk is backed by HDD disks, which provides a good balance between cost-effective disk and performance. Standard storage disk can be configured for replicating locally (LRS), at zone level (ZRS), or geo-redundantly (GRS, RA-GRS).
Premium storage Backed by SSD disks, this type is suitable for intense I/O workloads. This type of disks delivers high-performance, low-latency access to data. You can use only LRS replication for premium storage.
Unmanaged disks This is the traditional way of using disks in VMs. In this model, you oversee the creation of the storage account that hosts the disks and make sure that you do not put too many disks that may go beyond the scalability limits of the storage account.
Managed disks When you use this type of disk, Azure automatically takes care of storage account creation and management along with other details related with scalability limits. You only need to worry about selecting Standard or Premium storage. You can only use LRS replica strategy with this type of disks.
As with any other type of blob, disks must be created inside a container in a storage account. Remember that disks are stored as page blobs and can be only created on General Purpose v1 (GPv1) or GPv2 storage accounts. When you create a disk inside a container and attach it to a virtual machine, that disk is leased on the VHD. This way, the disk cannot be deleted until you detach if from the virtual machine. Azure also puts a lease on the disk if you use it for creating your own images.
If you need to delete a single disk instead of deleting an entire virtual machine, you need to perform some additional steps. The following procedure shows you how to perform the deletion of a single data managed disk using Azure Portal:
Sign into the management portal (http://portal.azure.com), and locate the virtual machine that has attached the disk you want to delete.
In the navigation pane, in the Settings section, select Disks. This will show you all disks attached to the virtual machine. Temporary disks are not shown on this view.
At the upper-left corner of the disks blade, click on the Edit button. This will enable you the option for detaching the disk from the virtual machine. You can detach a disk from a virtual machine while is online, but bear in mind that any data stored in the data disk won’t be available for the virtual machine.
Look for the disk that you want to remove and click on the detach icon, as show in Figure 2-7.

FIGURE 2-7 Detach a data disk
On the upper-left corner of the disks blade for the virtual machine, click on the Save button to commit the changes. If you forget this step, you won’t be able to delete the disk.
Now you can delete the data disk. Since it is a managed data disk, you need to look for it on the Disks’ Service blade. Select the All Services button on the navigation bar and type disk on the filter text box. Now select the Disks service icon.
Look for the managed disk that you want to delete and select the name of the disk. The data disks blade should be open now.
On the menu bar at the top of the disk blade, click on the Delete button for removing the disk. If the button is disabled, please ensure that the DISK STATE is Unattached. You cannot remove a disk that is attached to a virtual machine or image.
)
Azure Data Box
Moving an important amount of data to the cloud is not a simple task. It highly depends on the available bandwidth, time, availability, and costs, and should be carefully planned for not impacting on other running workloads or business areas. In some cases, this means that performing the data copy over the network is just not an option. For those situations, Microsoft provides the Azure Import/Export service where you copy all of the information to physical disks that you send to Azure datacenters and then copy the information to your Azure Blob Storage or Azure Files accounts. But you still need to provide an HDD or SSD disk.
Azure Data Box is a storage appliance that you can connect to your on-premises infrastructure for copying all of the data that you want to migrate to Azure Blob Storage or Files accounts without impacting your other running workloads. This appliance is a 45-pound device. It is ruggedized, tamper-resistant, and human-manageable, and also integrates well with other storage solutions that you may have deployed on your infrastructure. Some of the partners that Microsoft has been working with to ease the integration with Azure Data Box are: Commvault, Veritas, Wandisco, Peer, Veeam, CloudLanes, NetApp, Avid, and Rubrik.
This appliance has a capacity up to 100TB of storage and can be accessed using SMB/CIFS protocols. Data in the Azure Data Box can be encrypted using 256-bit AES. You can also track the whole process from the Azure Portal. At the time of this writing, this service is in public preview.
Azure Storage Service Encryption
Data security is one of the main concerns of anyone who works with data in most types of environments, and especially with data on the cloud. You can protect your data during transmission using secured communications like SSL/TLS or tunneling. You can also protect your data by encrypting the information at the filesystem level, by using BitLocker for Windows virtual machines, or by using DM-Crypt features for Linux with Azure Disk Encryption service.
Azure Storage Service Encryption (SSE) provides an additional level of security by automatically encrypting any data that is written to a storage account. The data is also decrypted automatically when the data is read from the protected storage account. SSE service oversees the key management for encrypting the information. It uses 256-bit AES encryption for securing the data.
You enable Storage Service Encryption at the storage account level. You can use this service with blobs, files, and table and queue storage for both deployment models: classic and ARM. Once you enable encryption at the storage account level, all data written to the storage account will be encrypted. Any data that existed previously on the storage account won’t be encrypted unless you rewrite it. If you decide to disable the encryption, the data will be decrypted when the user reads it. Any encrypted data remains encrypted until you rewrite it. All encryption keys are managed automatically by Microsoft. If you prefer to manage your own encryption keys, you can integrate Storage Service Encryption with Azure Key Vault. This way, you will have more flexibility since you will be able to create, rotate, disable and define access controls on your own encryption keys.
Since Storage Service Encryption works transparently to the user, you can use any of the already known ways to upload information to an Azure Storage account. This includes REST, AzCopy, Storage Explorer, Storage Client libraries, or SMB.
Azure StorSimple
Storing every single type of data of your company on the cloud sometimes may not be the best option. There is data that your users use more frequently than others, and that data needs to be ready as soon as possible. Moving all of your data to the cloud means that you have a stronger dependency on available bandwidth connections to the Internet.
Here is where Azure StorSimple helps. This is a hybrid storage area network solution for storing more frequently accessed data in an on-premises device while moving less frequently accessed or archived data to Azure.
)
FIGURE 2-8 StorSimple data flow
You can deploy Azure StorSimple on your infrastructure in two different ways:
Azure StorSimple Virtual Array This is a virtual appliance that can be deployed on a single node virtualization infrastructure (Hyper-V or VMware). It can store up to 6.4 TB in local store and 64 TB in the cloud per virtual array. You can access this storage using iSCSI or SMB protocols.
StorSimple 8000 Series This is a physical device with SSD and HDD disks that you can install on your on-premises infrastructure. This appliance uses tiering techniques for storing more frequently accessed data in SSD drives while moving less frequently data to HDD drives. When data is valid to be archived, it is moved to Azure, reducing the need for local storage.
You will typically use the StorSimple Virtual Array on file sharing or archival file sharing scenarios, where data is infrequently accessed. You need to consider that each virtual array can write and read from an Azure Storage at a 100Mbps. If you share this between too many concurrent users, the virtual array will be a bottleneck, impacting negatively on the performance.
If you want to use StorSimple for frequently accessed file shares, you need to deploy StorSimple 8000 series devices. These devices come with compression, deduplication, automatic tiering, backup and snapshot capabilities that make it more appropriate for this type of workload. They also have redundant and hot-pluggable components, truly an enterprise-level highly available device. Apart from file sharing, StorSimple 8000 series devices are suitable for other workloads like distributed file sharing, SharePoint, simple file archiving, virtual machines, SQL, Video surveillance, primary, and secondary target backup.
Both StorSimple Virtual Array and 8000 series devices use a heat map to move data between different tiers. Azure Storage is treated as another tier inside the StorSimple virtual array or device. This way, the movement between tiers is transparent to the user, since the most accessed data will be always present on the fastest tier.
For those situations where you prefer not to move data to Azure Storage, you can configure StorSimple with locally pinned volumes. Any data stored on a locally pinned volume won’t be copied to Azure Storage.
This skill showed the different services that Azure offers you for storing your data. But storing data is just the beginning of the story. In the next section we will cover how Azure can help you on managing and exploiting the information stored in Azure.