Plan for Exchange Online and Skype for Business Online
- By Orin Thomas
- 4/6/2018
- Skill 4.1: Manage anti-malware and anti-spam policies
- Skill 4.2: Recommend a mailbox migration strategy
- Skill 4.3: Plan for Exchange Online
- Skill 4.4: Manage Skype for Business global external communications settings
- Thought experiment
- Thought experiment answers
- Chapter summary
Skill 4.4: Manage Skype for Business global external communications settings
This skill deals with managing tenancy level settings for Skype for Business. These settings allow you to manage, at the tenancy level, which external users Skype for Business clients are able to communicate with, including whether communication is allowed with the consumer version of Skype.
Manage external communication and domains
In the previous chapter, you read about how to manage external communication for Skype for Business Online users using the browser and the Skype for Business Admin Center, as shown in Figure 4-55.
)
FIGURE 4-55 Skype for Business admin center
You can also use a set of Skype for Business Online specific Windows PowerShell cmdlets to manage external communication settings. These cmdlets are as follows:
New-CsEdgeAllowAllKnownDomains This cmdlet allows Skype for Business Online users to communicate with any domain, except those on the block list.
New-CsEdgeAllowList Use this cmdlet to configure the domains with which Skype for Business Online users can communicate. This cmdlet must be used in conjunction with the New-CsEdgeDomainPattern and Set-CsTenantFederationConfiguration cmdlets.
New-CsEdgeDomainPattern You use this cmdlet to modify the list of allowed or blocked domains because string values cannot be passed directly to the cmdlets used to manage the list.
Get-CsTenantFederationConfiguration You can use this cmdlet to view information about the allowed domains and the blocked domains.
Managed allowed domain list
The following Windows PowerShell code allows users to only communicate with users in the tailspintoys.com and wingtiptoys.com domains.
$x = New-CsEdgeDomainPattern -Domain "tailspintoys.com"
$y = New-CsEdgeDomainPattern -Domain "wingtiptoys.com"
$newAllowList = New-CsEdgeAllowList -AllowedDomain $x,$y
Set-CsTenantFederationConfiguration -AllowedDomains $newAllowList
To remove a domain from the allowed list, you need to use a set of commands. First you need to place the current list of allowed domains in a variable:
$x = (Get-CsTenantFederationConfiguration).AllowedDomains
You then need to determine the number of the domain that you want to remove. You do this by issuing the variable as a command and then counting the number of lines until the domain that you want to remove, with the first line as zero. For example, if you had the following list output when you issued the variable as a command:
adatum.com
contoso.com
fabrikam.com
The domain contoso.com would be number 1, and adatum.com would be 0. Once you’ve determined which domain you want to remove, you issue the command $x.AllowedDomain.RemoveAt(Y), where Y is the number of the domain you want to remove. So if you wanted to remove fabrikam.com from the list, you would issue the command:
$x.AllowedDomain.RemoveAt(2)
You can repeat the process to remove other domains from the list. Once you’ve pruned all of the domains that you want to remove, you can then assign the list using the following command:
Set-CsTenantFederationConfiguration -AllowedDomains $x
The following command removes all domains from the current allow list:
$newAllowList = New-CsEdgeAllowList -AllowedDomain $Null
Set-CsTenantFederationConfiguration -Tenant -AllowedDomains $newAllowList
You can use the Get-CsTenantFederationConfiguration cmdlet to view the list of allowed domains by issuing the following command:
Get-CsTenantFederationConfiguration | Select-Object -ExpandProperty AllowedDomains
 | Select-Object AllowedDomain
Manage blocked domain list
To add a domain to the blocked list, use the BlockedDomains parameter. For example, to add margiestravel.com to the list of blocked domains, issue the following command:
$x = New-CsEdgeDomainPattern ''margiestravel.com''
Set-CsTenantFederationConfiguration –BlockedDomains @{Add=$x}
You can use the Get-CsTenantFederationConfiguration cmdlet to view the list of blocked domains by issuing the following command:
Get-CsTenantFederationConfiguration | Select-Object -ExpandProperty BlockedDomains
To remove the domain margiestravel.com from the domain blocked list, perform the following steps:
$x = New-CsEdgeDomainPattern ''margiestravel.com''
Set-CsTenantFederationConfiguration –BlockedDomains @{Remove=$x}
You can remove all domains from the blocked domain list by issuing the following command:
Set-CsTenantFederationConfiguration -BlockedDomains $Null
Manage Skype consumer connectivity
As you read about in the last chapter, you can use the Turn On Communication With Skype Users And Users Of Other Public IM Service Providers option, found in the External Communications area of the Skype for Business Admin Center, as shown in Figure 4-56, to allow or block Skype for Business users from communicating with Skype users.
)
FIGURE 4-56 Allow Skype communication
You can use the Set-CsTenantFederationConfiguration cmdlet to also disable and enable public IM connectivity. The following command enables public IM connectivity:
Set-CsTenantFederationConfiguration –AllowPublicUsers $True
Once you’ve enabled public IM connectivity, you can allow or block specific providers. You do this with the Set-CsTenantPublicProvider cmdlet. When using this cmdlet, you must specify the tenant identifier. You can determine the tenant ID using the following command:
Get-CsTenant | Select-Object TenantID
Once you have the tenant ID, you can enable connectivity to Skype using the following command:
Set-CsTenantPublicProvider -Tenant "TenantID" -Provider "Skype"
The following command disables public IM connectivity:
Set-CsTenantFederationConfiguration –AllowPublicUsers $False
Customize meeting invitations
You can customize meeting invitations, including a logo, help URL, legal URL, and meeting footer text. The logo can be up to 188 pixels by 30 pixels in size and can be in .jpg or .gif format. By default, meeting invitations are not customized.
To configure custom meeting invitations, perform the following steps:
Select the Meeting Invitation section in the Skype for Business Admin Center.
Provide information in the following areas, as shown in Figure 4-57:
Logo URL The URL of a JPG or GIF file no larger than 188 pixels by 30 pixels.
Help URL The URL of documentation providing assistance to meeting attendees.
Legal URL The URL of any legal information necessary for meeting attendees to be aware of.
Footer text Text that is included in the footer of any meeting invitation.
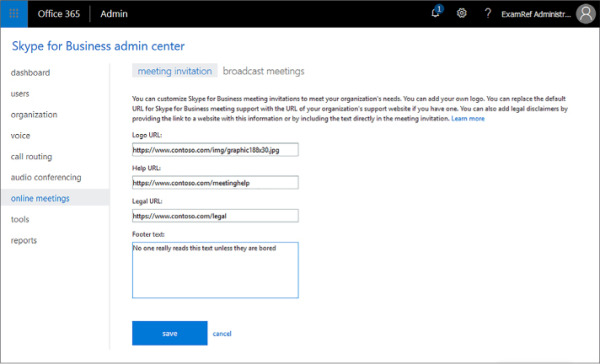
FIGURE 4-57 Custom meeting invitation
)
Disable push notifications
Push notification allows alerts about incoming and missed instant messages to be displayed whenever the user is not actively using Skype for Business on their phone or tablet. Push notifications are enabled by default in Skype for Business. Users are able to disable them through the options in the Skype for Business client on their own device. If you want to disable push notifications, users will receive alerts about incoming and missed instant messages the next time they use the Skype for Business client on their mobile device.
To disable push notifications, perform the following steps:
Select the Organization section in the Skype for Business Admin Center.
Ensure the General section is selected.
Under Mobile Phone Notifications, shown in Figure 4-58, and remove the check next to each of the notification types that you would like to remove.
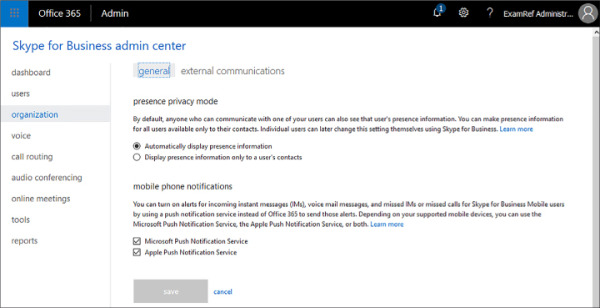
FIGURE 4-58 Push notifications
Click Save to apply the changes.
)
You use the Set-CsPushNotificationConfiguration cmdlet to enable or disable the Push Notification Service. To disable the Apple and Microsoft Push Notification Services, issue the following command:
Set-CsPushNotificationConfiguration -EnableApplePushNotificationService $False
-EnableMicrosoftPushNotificationService $False
You can disable the push notification for one service while keeping the push notification for the other service running. For example, to disable the Microsoft Push Notification Service, but enable the Apple Push Notification Service, issue the following command:
Set-CsPushNotificationConfiguration -EnableApplePushNotificationService $True
-EnableMicrosoftPushNotificationService $False
Cloud PBX
Cloud PBX, also known as Phone System in Office 365, allows organizations to replace their existing PBX deployment with Office 365. Phone System for Office 365 performs the following basic call tasks:
Placing calls to the PSTN network
Receiving calls from the PSTN network
Transferring calls
Muting and unmuting calls
Users are able to place and receive calls using their mobile devices, a headset with a laptop or desktop PC, or IP phones that support Skype for Business. You can connect Phone System in Office 365 to the PSTN network in one of the following ways:
Purchasing a calling plan add-on for Office 365. In this scenario Microsoft is the provider of both core calling and PSTN services. Microsoft is also able to provide or port your user’s existing phone numbers.
Using on-premises PSTN connectivity, where on-premises software connects to an existing telephony interface. Cloud Connector is a set of packaged virtual machines that provide on-premises PSTN connectivity with Phone System for Office 365. This solution is appropriate for organizations that want to allow Skype for Business Online users to use existing PSTN connections with call control managed by Office 365 in the cloud.
PSTN Conferencing
Office 365 PSTN Conferencing is an Office 365 E5 feature that provides the ability for meeting attendees to connect to the audio portion of a Skype for Business meeting using a dial-in phone number as an additional option to using the Skype for Business client.
To enable PSTN conferencing, perform the following steps:
In the Office 365 Admin Center, navigate to Skype for Business under Admin Centers.
In the Skype for Business Admin Center click Audio Conferencing.
On the Users tab, shown in Figure 4-59, select the user you wish to assign a dial-in conferencing number to, and click the edit (pencil) icon.
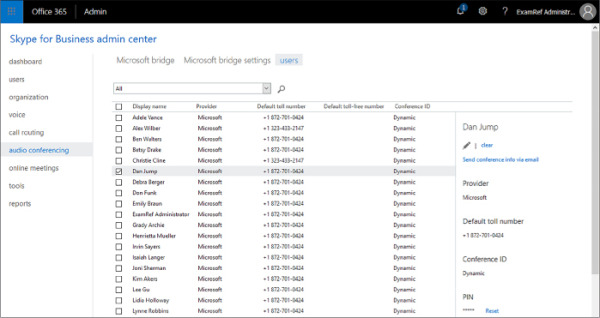
FIGURE 4-59 Audio conferencing users
On the Properties page, shown in Figure 4-60, select a default number. This will be the default number used for all meeting invites sent by this user.
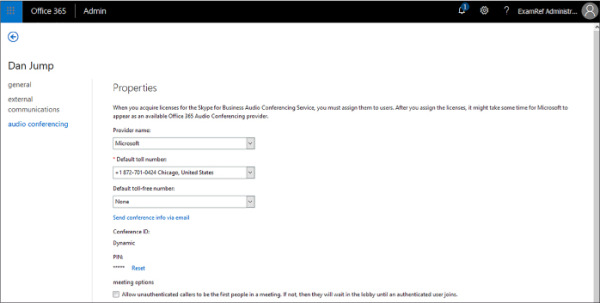
FIGURE 4-60 User toll number properties
Once you click Save, the user is sent an email message informing them that they have been configured for Skype for Business Dial-In conferencing, the telephone number to access conference, their personal conference ID, and their organizer PIN.
On the Microsoft bridge settings page, shown in Figure 4-61, you can configure the following options.
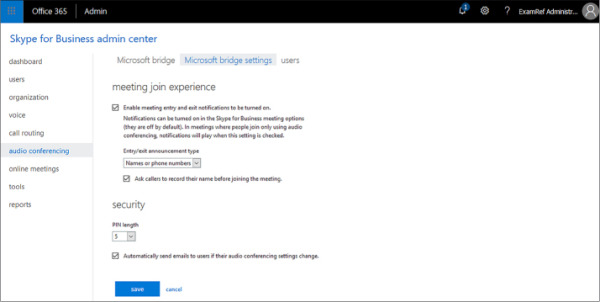
FIGURE 4-61 Microsoft bridge settings
Entry and exit notification settings. Allows you to determine whether or not entry and exit notifications are made and the nature of those notifications.
Whether callers are asked to record their name prior to entering the meeting.
Length of the PIN.
Sending an email when changes are made to a user’s dial-in conference settings.
)
)
)
Skype Meeting Broadcast
Skype Meeting Broadcast allows you to schedule, produce, and broadcast meetings online for audiences of up to 10,000 attendees. To enable Skype meeting broadcast, perform the following steps:
In the Office 365 Admin Center, navigate to Skype for Business under Admin Centers.
In the Skype for Business admin center, navigate to Broadcast meetings under Online meetings, and then select Enable Skype Meeting Broadcast, as shown in Figure 4-62.
)
FIGURE 4-62 Broadcast meetings
You can enable broadcast meetings using the following PowerShell command:
Set-CsBroadcastMeetingConfiguration –EnableBroadcastMeeting $True
 EXAM TIP
Remember the different Windows PowerShell cmdlets you would use to manage allowed and blocked domains.