Plan for Exchange Online and Skype for Business Online
- By Orin Thomas
- 4/6/2018
- Skill 4.1: Manage anti-malware and anti-spam policies
- Skill 4.2: Recommend a mailbox migration strategy
- Skill 4.3: Plan for Exchange Online
- Skill 4.4: Manage Skype for Business global external communications settings
- Thought experiment
- Thought experiment answers
- Chapter summary
In this sample chapter from Exam Ref 70-347 Enabling Office 365 Services, 2nd Edition, learn how to configure anti-spam and anti-malware policies, determine an appropriate mailbox migration strategy, perform compliance operations, and manage settings at a tenancy level for Skype for Business Online.
For many organizations, the default settings for Exchange Online and Skype for Business Online within an Office 365 tenancy don’t require much attention or modification. This is because the default configuration of these services does what the tenants needs them to do. For other users, it is necessary to tune the settings on these services to better meet organizational requirements. In this chapter, you’ll read about configuring anti-spam and anti-malware policies, determining an appropriate mailbox migration strategy, performing compliance operations, and managing settings at a tenancy level for Skype for Business Online.
Skills in this chapter:
Skill 4.1: Manage anti-malware and anti-spam policies
Skill 4.2: Recommend a mailbox migration strategy
Skill 4.3: Plan for Exchange Online
Skill 4.4: Manage Skype for Business global external communications settings
Skill 4.1: Manage anti-malware and anti-spam policies
This skill deals with the Exchange Online anti-malware and anti-spam functionality. You manage this functionality through the configuration of anti-malware and spam filter policies. These policies determine what action Exchange Online will take with spam and malware as it passes through the service.
Anti-malware policies
Anti-malware policies allow you to block incoming malware from reaching user inboxes. Anti-malware policies also allow you to stop your own users from inadvertently sending malware to other people in your organization or others on the Internet. Anti-malware policies are part of an in-depth defense strategy. Users in your organization are far less likely to be infected by malware transmitted through email messages if malware is being purged by Exchange Online, as well as by an anti-malware solution installed on the client computer.
Malware detection response
The malware detection response settings determine what happens when malware is detected in a message attachment on inbound and outbound messages. When malware is detected, the message is automatically quarantined. Only an administrator can release a message from quarantine. Because the malware engine occasionally generates false positives, you may wish to notify users if a message sent to them is flagged as containing malware. You can do this with the Malware Detection Response settings shown in Figure 4-1.
)
FIGURE 4-1 Malware Detection Response
You can configure the following options:
No No notification is sent to the recipient.
Yes And Use The Default Notification Text A notification using the default notification text is sent to the recipient.
Yes And Use Custom Notification Text A notification using custom notification text is sent to the recipient.
Anti-malware notifications
Notifications allow you to configure whether the sender of the message in which malware is detected is notified and whether administrators are notified. Notifications are only sent when the entire message is deleted. The notification language is dependent on the location of the message being processed. You can choose the following options, shown in Figure 4-2:
Notify Internal Senders Sends a message to a sender from within your organization who sends a message in which malware is detected.
Notify External Senders Sends a message to a sender external to your organization who sends a message to someone inside your organization in which malware is detected.
Notify Administrators About Undelivered Messages From Internal Senders Allows you to have an administrator sent a message about messages from internal senders in which malware is detected. You need to provide the administrator email address.
Notify Administrators About Undelivered Messages From External Senders Allows you to have an administrator sent a message about messages from external senders in which malware is detected. You need to provide the administrator email address.
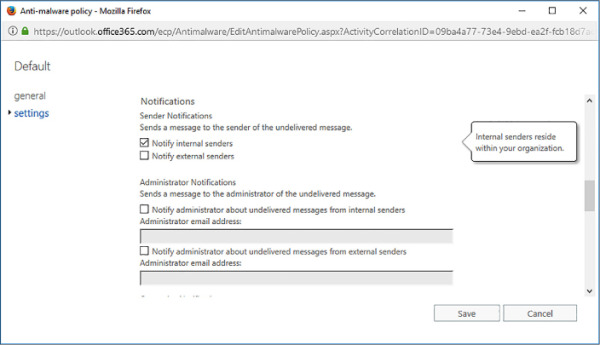
FIGURE 4-2 Notifications Settings
)
The default notification text is as follows “This message was created automatically by mail delivery software. Your email message was not delivered to the intended recipients because malware was detected.” If you don’t want to use the default notification text, you can create your own custom notification text by configuring the following settings, shown in Figure 4-3. These settings are only available if the relevant notifications are configured.
From Name The name that the email message appears to be from.
From Address The email address the message appears to originate from.
Messages From Internal Senders The subject and the message sent to internal senders who have messages deleted by the anti-malware policy.
Messages From External Senders The subject and the message sent to external senders who have messages deleted by the anti-malware policy.
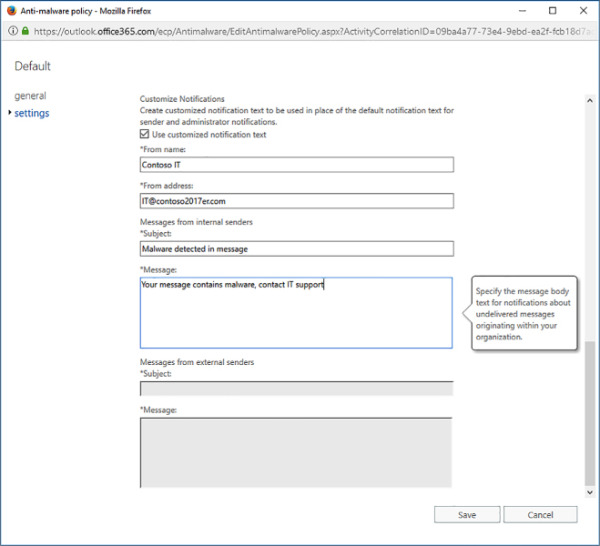
FIGURE 4-3 Customized notifications
)
Review default anti-malware policy
To review the default anti-malware policy, perform the following steps:
In the Office 365 Admin Center, click Exchange under Admin Centers.
In Exchange Admin Center, click Protection, and then click Malware Filter. Figure 4-4 shows the Default anti-malware policy selected.
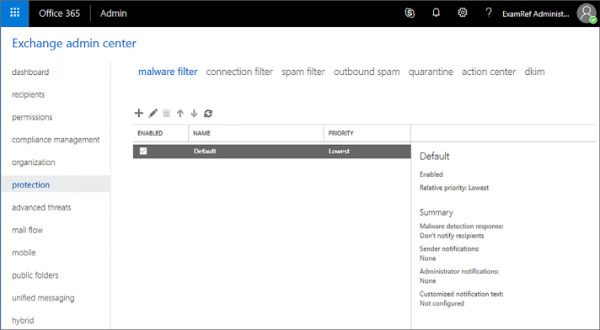
FIGURE 4-4 Default Malware Filter policies
With the Default policy selected, click the edit (Pencil) icon on the toolbar. This opens the Anti-Malware Policy properties page. The General section, shown in Figure 4-5, shows the policy Name and Description.
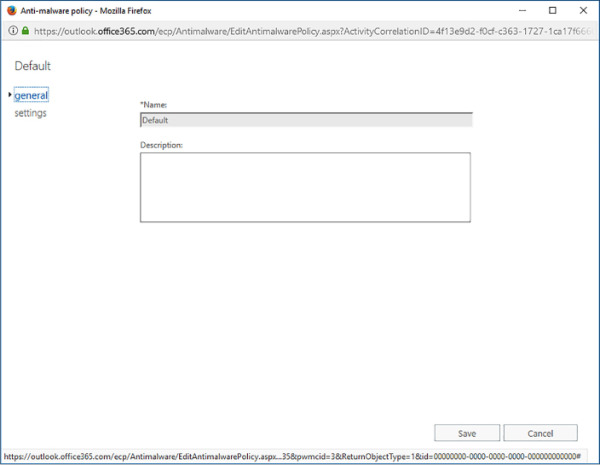
FIGURE 4-5 Default Policy
On the Settings page, you can configure the following settings:
Malware Detection Response
Notifications
Administrator Notifications
Customize Notifications
)
)
Create an anti-malware policy
You can create different anti-malware policies and then apply them to different groups of mail users. For example, you might wish to have an anti-malware policy for one group of users that provides notifications to the user if malware is detected and a message is purged, and another policy that sends notifications to an administrator if malware is detected and the message purged.
When creating a new custom anti-malware policy, you need to configure the Applied To setting. This setting takes the form of an If statement with a condition and exceptions. As Figure 4-6 shows, the If conditions can include:
The Recipient Is Use this to specify a specific recipient.
The Recipient Domain Is Use this to specify the recipient’s mail domain.
The Recipient IS A Member Of Use this to specify a recipient group.
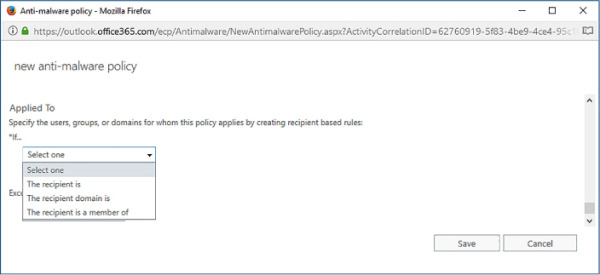
FIGURE 4-6 Select condition
)
The exceptions are the same and include:
The Recipient Is Use this to specify a specific recipient.
The Recipient Domain Is Use this to specify the recipient’s mail domain.
The Recipient Is A Member Of Use this to specify a recipient group.
You can create as many conditions as you want, as long as those conditions are unique. For example, Figure 4-7 shows a set of conditions that apply if the recipient is a member of the Accounting group, the recipient domain is contoso2017er.com, and if the recipient is Dan Jump or Don Funk.
)
FIGURE 4-7 Policy conditions
To create a new anti-malware policy, perform the following steps:
In the Office 365 Admin Center, click Exchange under Admin Centers.
In Exchange Admin Center, click Protection, and then click Malware Filter.
Click the Plus (+) icon. This opens the New Anti-Malware Policy page, shown in Figure 4-8. Provide the following information:
Policy Name
Policy Description
Malware Detection Response
Notification Settings
Applies To Settings
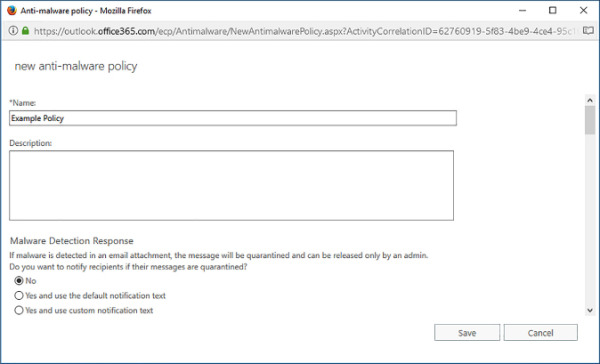
FIGURE 4-8 New anti-malware policy
)
When you have multiple policies, you can use the Malware Filter list to determine which apply and in which order they apply. The policy with the number closest to zero applies first. If the conditions of a message don’t match the first policy, it moves to the next policy until it encounters the Default policy. If any malware filter policies are configured, as shown in Figure 4-9, Example Policy is applied first, and then Another Example Policy, and then finally the Default policy. You can use the arrows to change the priority assigned to each policy.
)
FIGURE 4-9 Policy priorities
Windows PowerShell anti-malware policy cmdlets
There are a number of Windows PowerShell cmdlets that you can use to manage filter policies and malware filter rules. Filter rules determine the conditions under which a malware filter policy applies. For example, you might have one malware filter policy that applies to recipients in one recipient domain and another malware filter policy that applies to recipients in another recipient domain. The Windows PowerShell anti-malware policy cmdlets are as follows:
Get-MalwareFilterPolicy This cmdlet allows you to view malware filter policy settings.
Set-MalwareFilterPolicy This cmdlet allows you to modify malware filter policy settings.
New-MalwareFilterPolicy Allows you to create a new custom malware filter policy. This includes configuring an action, either blocking a message, replacing attachments with the default alert, or with a custom alert, and configuring notification settings.
Remove-MalwareFilterPolicy This cmdlet allows you to remove a custom filter policy.
New-MalwareFilterRule Use this cmdlet to create a new filter rule that can be applied to a custom policy. For example, you could use this cmdlet to apply a specific malware filter policy named ContosoExamplePolicy when the email recipient is in the contoso.com domain.
Set-MalwareFilterRule Use this cmdlet to edit an existing malware filter rule. For example, to change a rule so that it applies a specific policy to recipients in more than one email domain.
Enable-MalwareFilterRule Use this cmdlet to turn on a malware filter rule.
Disable-MalwareFilterRule Allows you to turn off a malware filter rule.
Connection filter policies
Connection filter policies let you always allow email from trusted senders and always block email from known spammers. Exchange Online only supports the default connection filter policy. You configure connection filters by configuring an IP Allow list and an IP block list, as shown in Figure 4-10.
)
FIGURE 4-10 Connection Filtering
When configuring connection filters, you can also enable the Safe List check box. When you enable this check box, your connection filter allows messages from a list of third-party sources of trusted senders to which Microsoft subscribes.
When adding an IP address list, you can either specify the IP address directly, or use CIDR notation in the form xxx.xxx.xxx.xxx/yy, where yy is a number between 24 and 32. You can specify a maximum of 1,273 separate entries, where an entry is either a single IP address or a CIDR range. IPv6 addresses are supported for TLS encrypted messages. You enter allowed IP addresses on the Allowed IP Address WebPage Dialog, shown in Figure 4-11.

FIGURE 4-11 Allowed IP address
You enter blocked IP address ranges on the Blocked IP Address webpage dialog box, as shown in Figure 4-12.
)
FIGURE 4-12 Add Blocked IP Address
If an IP address is added to both the allow list and the block list, email from that IP address will be allowed.
To edit the default connection filter policy, perform the following steps:
In the Office 365 Admin Center, click Exchange under Admin Centers.
In Exchange Admin Center, click Protection, and then click Connection Filter.
With the Default policy selected, click the Edit (Pencil) icon.
Click the Connection Filtering tab to access the IP Allow list, the IP Block list, and the Enable Safe List option, as shown in Figure 4-13.
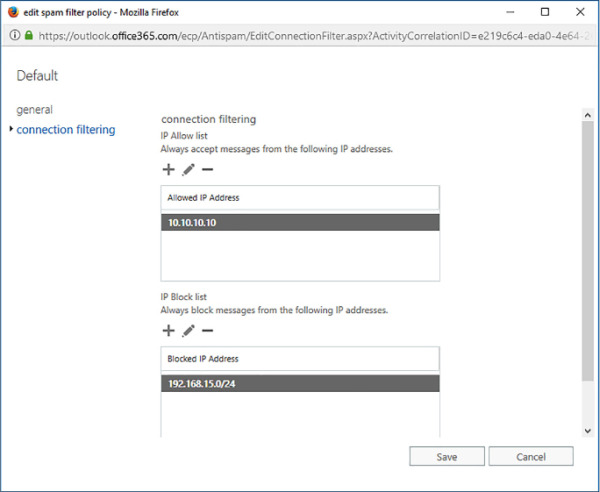
FIGURE 4-13 IP Allow and block lists
)
You can use the following Windows PowerShell cmdlets to managed the connection filter policy:
Get-HostedConnectionFilterPolicy Use this cmdlet when you want to review the default policy settings.
Set-HostedConnectionFilterPolicy Use this cmdlet to configure the connection filter policy settings. This cmdlet includes the IPAllowLIst and IPBlockList parameters.
Spam filter policies
Spam filter policies allow you to configure how incoming messages are categorized, including which characteristics a message might have that means you want flagged as spam. The default policy applies to all users in the company. You can also configure custom policies that apply to specific users, groups, and domains within the organization.
You configure spam filter policies on the Spam Filter tab of the Protection section in Exchange Admin Center, as shown in Figure 4-14. You can have multiple policies as long as each policy has a different set of conditions. The highest priority policy that has conditions that match a message will apply. When there are multiple custom policies, you can adjust their priority using the arrow buttons in the Exchange Admin Center.
)
FIGURE 4-14 Policy priority
Spam and bulk actions
When configuring the default policy or creating a custom policy, you need to configure which actions to take for messages that are likely to be spam and messages that are almost certainly spam.
You can choose from the following options for messages that are likely to be spam and for messages that are almost certainly spam:
Move Message To Junk Email Folder This is the default, with messages moved to each user’s junk email folder.
Quarantine Message When this setting is chosen, messages are moved to a quarantine folder for up to 15 days before being deleted. Being moved to quarantine allows someone to review the message so that they can determine whether or not it is actually spam. For example, you might choose to quarantine messages that are likely to be spam and delete messages that are almost certainly spam.
Delete Message When this setting is chosen, the message and any attachments are simply deleted.
You can also configure whether bulk email is marked as spam and the threshold that should be applied to bulk email. Setting the threshold as 1 will have almost all bulk email treated as spam and a setting of 9 will allow almost all bulk email to be delivered. A setting of 7 is the default. The Spam And Bulk Actions tab of a spam filter policy is shown in Figure 4-15.
)
FIGURE 4-15 Spam And Bulk Actions
Spam filter block lists
The block lists setting of a spam filter policy, shown in Figure 4-16, allows you to block email messages from specific email addresses or specific email domains. When a message comes from a blocked sender or a blocked domain, it is subject to the high confidence spam action configured in the spam and bulk actions section of the policy.
)
FIGURE 4-16 Block Lists
If you want to block all messages from a specific email address, you can add that email address to the blocked sender list. Figure 4-17 shows the email address don.funk@adatum.com being added to this list. The owner of the email address added to the list will not be notified that their email messages are being categorized as spam.
)
FIGURE 4-17 Block sender
You can add entire mail domains to a block list using the Add Blocked Domain dialog box shown in Figure 4-18. You should be as specific as possible when adding domains. If you add a top level domain, such as .com or .org to this list, all email messages that come from .com or .org addresses are marked as spam.
)
FIGURE 4-18 Blocked Domain
Spam filter allow lists
Spam filter allow lists provide you with a way of ensuring that email messages from specific users or from specific domains will always be delivered to users in your organization. When configuring Allow Lists in a spam filter policy, you configure the Sender Allow List for specific email addresses and the Domain Allow List for specific email domains. The Allow Lists section of the spam filter policy is shown in Figure 4-19.
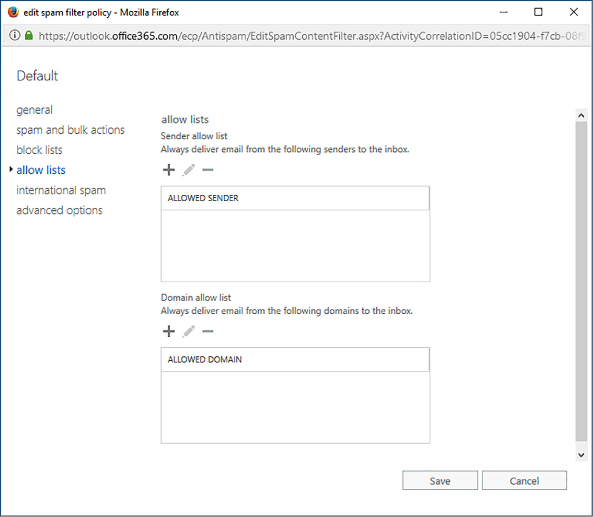
FIGURE 4-19 Allow Lists
You add users to the Allow List using the Add Allowed Sender dialog box, as shown in Figure 4-20. To separate email address entries, use a semicolon.
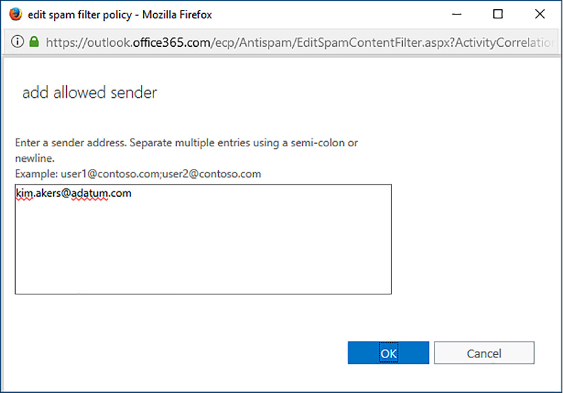
FIGURE 4-20 Allowed Sender
You Add Allowed Domains on the Add Allowed Domain dialog box, shown in Figure 4-21. You should be as specific as possible and not add generic top-level domains such as .com or .org because this allows email from all .com and .org domains.
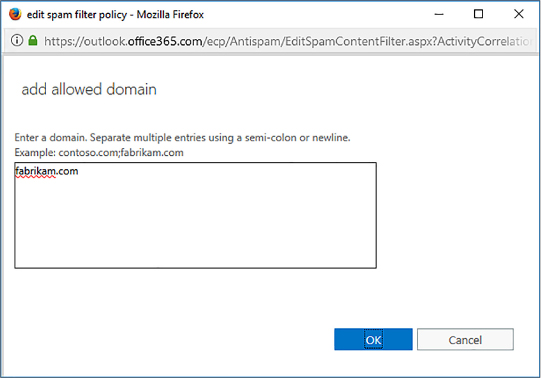
FIGURE 4-21 Allowed Domain
International spam
The International Spam settings, shown in Figure 4-22, allow you to filter messages based on the message language and the country or region from which the message is sent.
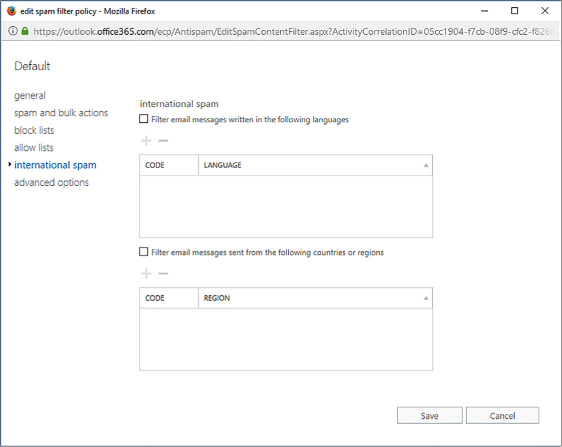
FIGURE 4-22 International Spam
When blocking message content on the basis of language, you enable the Filter Email Messages Written In The Following Languages option, and then specify the languages you want to filter on the Select Language dialog box, as shown in Figure 4-23.
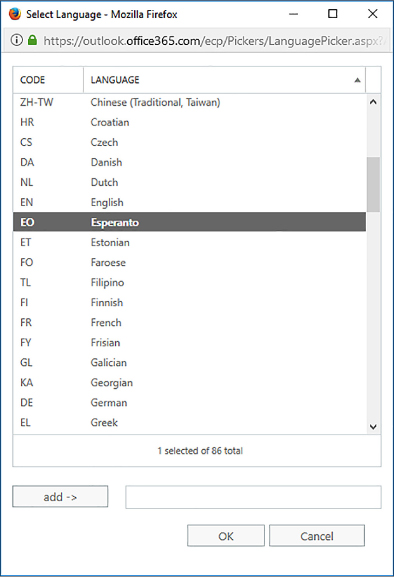
FIGURE 4-23 Select language
To block messages from specific regions, enable the Filter Email Messages Sent From The Following Countries Or Regions option, and then specify the countries or regions that you want to filter out on the Select Region dialog box, as shown in Figure 4-24.
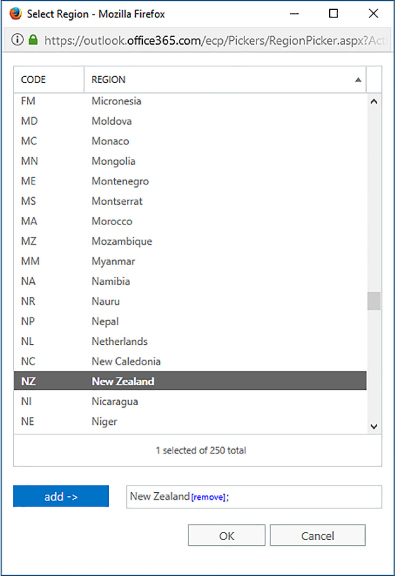
FIGURE 4-24 Select Region
Advanced policy options
Advanced policy options, shown in Figure 4-25, allow you to toggle specific options that either increase the spam score, making it more likely that Exchange Online will recognize the message as spam, or simply mark the message as spam directly.
)
FIGURE 4-25 Advanced Options
You can configure the policy to increase the spam score if the message includes the following types of links or URLs:
Image Links To Remote Sites Triggered if the message contains HTML content with an IMG tag linked to an image on a remote site.
Numeric IP Address In URL Triggered if the message has an URL with a numeric IP address.
URL Redirect To Other Port Triggered if the message contains a hyperlink that redirects to a port other than port 80, port 8080, or port 443.
URL To .Biz Or .Info Websites Triggered if the message contains a URL that includes the .biz or .info suffix.
You can configure the policy to mark a message as spam under the following conditions:
Empty Messages Triggered if the body and subject line are both empty and there is no attachment.
JavaScript Or VBScript In HTML Triggered if either JavaScript or VBScript is present in the HTML included in the message.
Frame Or IFrame Tags In HTML Triggered if the HTML code in the message includes the Frame or IFrame tags.
Object Tags In HTML Triggered if the HTML code in the message contains the <Object> tag.
Embed Tags In HTML Triggered if the HTML code in the message contains the <Embed> tag.
Form Tags In HTML Triggered if the HTML code in the message contains the <Form> tag.
Web Bugs In HTML Triggered if the message contains a web bug. Web bugs are small, usually one pixel by one pixel graphic images that are used to determine whether an email message has been read.
Apply Sensitive Word List Triggered if a word on the sensitive word list is present in the message. These words are associated with messages that are likely to be offensive. Administrators cannot edit the sensitive word list.
SPF Record: Hard Fail Triggered if the message fails a Sender Protection Framework (SPF) check. This means that the message was received from an IP address not listed in the SPF record. Used by organizations concerned about phishing messages.
Conditional Sender ID Filtering: Hard Fail Triggered if the message fails a conditional sender ID check, which combines an SPF check with a Sender ID check to protect against messages where the sender header is forged.
NDR Backscatter If you don’t enable this setting, Non Delivery Reports (NDRs) go through spam filtering.
Spam confidence levels
When a new message passes through the Exchange Online spam filtering algorithms, it is assigned a spam score. This spam score maps to a Spam Confidence Level (SCL) rating and is stamped in an X-Header for the message. Exchange Online performs actions on messages based on the SCL rating.
TABLE 4-1 SCL ratings
| SCL rating | Meaning | Action |
| -1 | Message coming from a sender, recipient, or IP address listed as trusted | Delivered to recipient |
| 0,1 | Message unlikely to be spam | Delivered to recipient |
| 5,6 | Message likely to be spam | Determined by filter policy setting for spam |
| 7,8,9 | Message very likely to be spam | Determined by filter policy setting for high confidence spam |
You can have Exchange manually set an SCL rating for a message using a transport rule, but transport rules are not addressed by the 70-347 exam.
Applying spam filter policies
When creating a new custom spam filter policy, you need to configure the Applied To setting. This setting determines which recipients the policy applies. This setting takes the form of an If statement with a condition and exceptions. As is the case with anti-malware policies, the If conditions can include:
The Recipient Is
The Recipient Domain Is
The Recipient Is A Member Of
The exceptions are the same and include:
The Recipient Is
The Recipient Domain Is
The Recipient Is A Member Of
You can create as many conditions as you want, as long as those conditions are unique. For example, Figure 4-26 shows a set of condition that will apply if the recipient domain is contoso2017er.com, the recipient is a member of the Accounting group, and the recipient is not Don Funk.
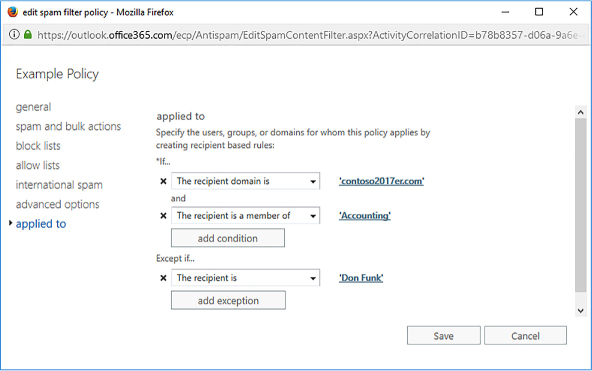
FIGURE 4-26 Applied To
Spam filter Windows PowerShell cmdlets
You can use the following PowerShell commands to configure spam filter policies:
Get-HostedContentFilterPolicy This allows you to view existing spam filter settings.
Set-HostedContentFilterPolicy Use this cmdlet to edit spam filter settings, including the recipients to which the spam filter policy applies.
New-HostedContentFilterPolicy Use this cmdlet to create a new custom spam filter policy.
Remove-HostedContentFilterPolicy This cmdlet allows you to remove a custom spam filter policy.
Outbound spam policy
The Outbound Spam policy blocks users inside of the organization from sending spam to recipients outside of the organization. If an outbound message is suspected to be spam, it is sent through the higher risk delivery pool. Using the higher risk delivery pool reduces the likelihood that the IP address of the normal outbound delivery pool will be added to a block list by real-time block list providers.
By configuring the default Outbound Spam policy, you can specify whether:
A copy of all suspicious messages is forwarded to one or more email addresses for review.
A notification is sent to one or more email addresses when a sender is blocked for sending outbound spam.
You can configure the default outbound spam policy by performing the following steps:
In the Office 365 Admin Center, click Exchange under Admin Centers.
In Exchange Admin Center, click Protection, and then click Outbound Spam.
Ensure that the Default policy is selected, as shown in Figure 4-27, and then click the Edit (Pencil) icon.
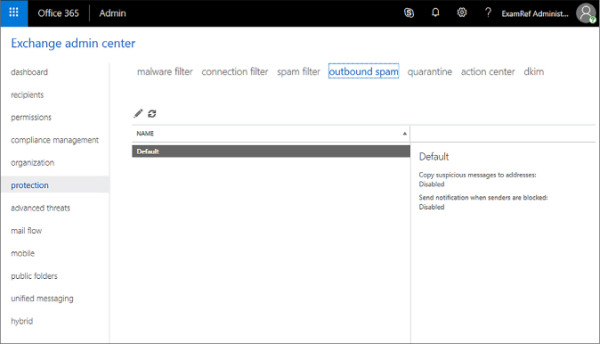
FIGURE 4-27 Default Outbound Spam policy
On the Outbound Spam Preferences page, shown in Figure 4-28, configure whether a copy of all suspicious messages is forwarded to one or more email addresses for review, and whether a notification is sent to one or more email addresses when a sender is blocked for sending outbound spam.

FIGURE 4-28 Outbound Spam Preferences
)
)
Quarantine
Content filtering can be configured to send messages to Quarantine rather than to a recipient’s junk email folder, or to simply delete them. Messages sent to Quarantine can be viewed in the Quarantine section of the Exchange Admin Center, as shown in Figure 4-29. Messages in Quarantine remain there until released by an administrator or until they are automatically deleted when the Quarantine period expires. The maximum Quarantine period for messages recognized as spam is 15 days.
)
FIGURE 4-29 Quarantine
Administrators can use the Quarantine section of the Exchange Admin Center to search for quarantined messages and to release messages to their intended recipients. When releasing a message, an administrator can choose between the following options:
Release The Message Without Reporting It As A False Positive When you select this option, you can choose to release the message to some or all of the message’s original recipients.
Release The Message And Report It As A False Positive If you choose this option, the message is released to all recipients. The message is also reported to the Microsoft Spam Analysis team, which might use the false positive result to adjust content filter rules across Exchange Online.
You can use the following Windows PowerShell cmdlets to manage quarantine:
Get-QuarantineMessage Allows you to search for messages in quarantine. For example use the following command to find all messages from the adatum.com email domain:
Get-QuarantineMessage | ? {$_.Senderaddress –like "*@adatum.com"}Release-QuarantineMessage Allows you to release a message from quarantine. Use the ReleaseToAll parameter to allow the message.
Advanced Threat Protection
Advanced Threat Protection (ATP) provides Office 365 with the ability to protect your organization from attacks through email. ATP analyzes email messages and their attachments for malicious content. There are three primary methods through which ATP provides protection, safe links, safe attachments, and spoof intelligence. ATP is available for Office 365 Enterprise E5 subscriptions.
Safe links policies
Safe links policies allow you to protect your organization from URLs in messages or attached Office documents that might be used for phishing and other attacks. When you configure a safe link policy, URLs that Microsoft knows to be malicious are blocked as well as any custom URLs that you add to a safe link policy. To configure a safe links policy, the user creating the policy must be a member of the Hygiene Management or Organization Management role groups.
To configure a safe link policy that applies to the entire organization, perform the following steps:
In the Office 365 Admin Center, click Security And Compliance under Admin Centers.
In the Security & Compliance Center, under Thread Management, choose Policy. Click Safe Links.
In the Safe Links policies area, select the Default policy, shown in Figure 4-30, and click the Edit (pencil) icon.
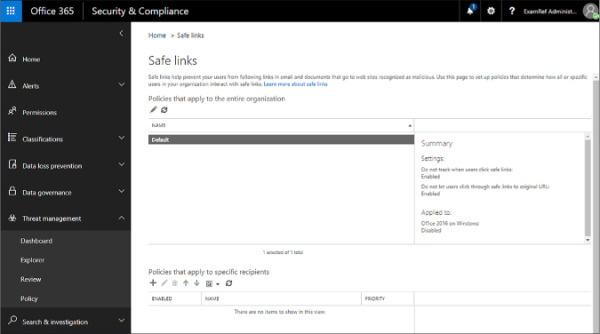
FIGURE 4-30 Safe links
In the Safe Links Policy For Your Organization dialog box, shown in Figure 4-31, choose from the following options:
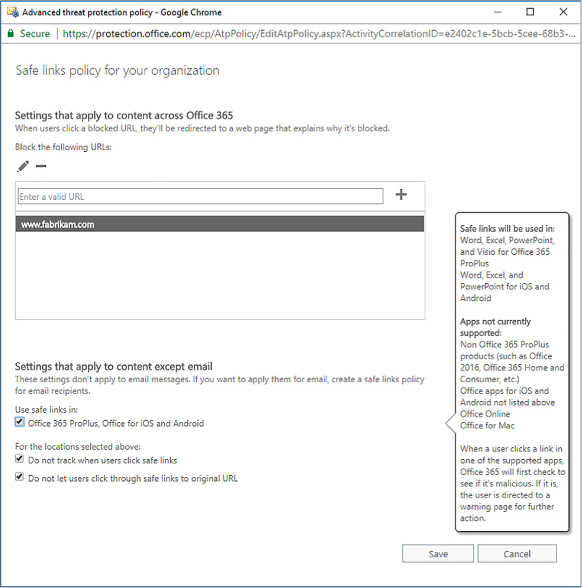
FIGURE 4-31 Safe links policy
Block The Following URLS Allows you to block a custom set of addresses in addition to URLs known to be malicious.
Office 365 ProPlus, Office For iOS And Android ATP safe link policies apply to hyperlinks in documents open in Office 365 applications.
Do Not Track When Users Click Safe Links Data about URLs that are encountered by ATP is not stored.
Don’t Let Users Click Through Safe Links To Original URLs Blocks users form clicking past the ATP warning to the URL that has been blocked.
Click Save.
)
)
)
)
)
)
)
)
)
)
You can also configure safe link policies that apply to specific users rather than to the entire organization. To configure a safe link policy that applies to a specific set of recipients, in the Policies that apply to specific recipients section, create a new policy and specify the recipients. Recipient policies override the default policy that applies to all recipients. You can choose from the following options shown in Figure 4-32:
)
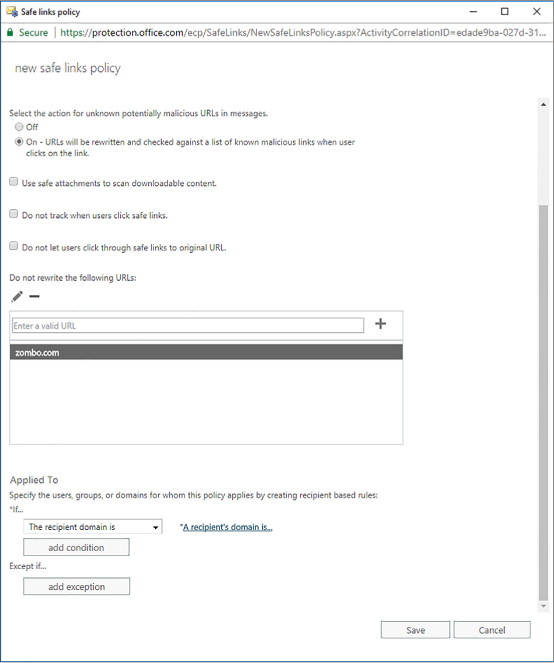
FIGURE 4-32 Safe links policy for specific recipients
Off Will not scan links in email messages. Use when you want to exempt a user from a safe links policy.
On Rewrites URLs so that users are routed through ATP safe link protection. This service compares the URL with Microsoft’s list of malicious URLs as well as the custom block list.
Use Safe Attachments To Scan Downloadable Content Hyperlinks in attachments are scanned and compared against ATP safe links.
Do Not Track When User Clicks Safe Links Click data for URLs is not stored.
Don’t Let Users Click Through Safe Links To Original URLs Blocks users form clicking past the ATP warning to the URL that has been blocked.
Do Not Rewrite The Following URLs Leaves specific URLs as they presented in original message.
Applied To Allows you to specify conditions under which the safe links policy applies.
Safe attachments policies
Safe attachment policies allow Office 365 administrators to manage how attachments that may contain malware might be treated. Safe attachment policies are configured for specific recipients and take precedence over the default malware policies. Like safe link policies, safe attachments policies are only available with an Office 365 Enterprise E5 subscription. A safe attachment policy is shown in Figure 4-33.
)
FIGURE 4-33 Safe attachments policy
The options in a safe attachment policy includes the following option:
Off Do not scan attachments from internal senders for malware.
Monitor Delivers messages that have attachments identified as containing malware. Monitors what happens next.
Block Blocks messages identified as containing malware. Malware is sent to quarantine for review. Future messages and attachments containing the same identified malware are automatically blocked.
Replace Removes attachments identified as containing malware. Message body is delivered.
Dynamic Delivery Message body is delivered immediately, attachments are delivered after being scanned and deemed safe.
Enable Redirect Forwards problematic attachments to a specific email address.
 EXAM TIP
Remember the Windows PowerShell cmdlets used to manage anti-malware policies and spam settings.