Create and manage documents
- By Joan Lambert
- 7/3/2023
Save and close documents
When you save a document in Word, it is saved in the default .docx file format, but you can also select a different format from many other choices. For example, if you plan to distribute the document electronically to people who use a different word-processing program, you can choose a compatible format, or if you want to protect the document content, you can save it as a PDF file.
Manually save documents
You save a document the first time by selecting the Save button on the title bar or by displaying the Backstage view and then selecting Save As. Both actions open the Save As page, where you can select a storage location.
You can save the document in a folder on your computer or, if you have an internet connection, in a folder on your OneDrive. If your company uses SharePoint, you can add a SharePoint site so that it is available from the location list on the Save As page, just like any other folder.
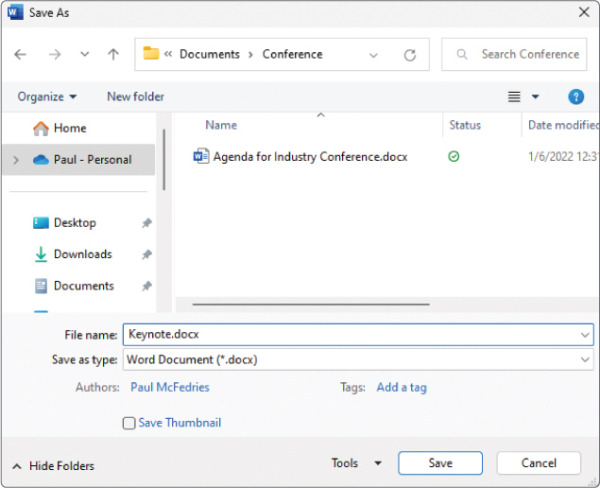
Selecting Browse at the bottom of the left pane displays the Save As dialog, in which you assign a name to the document and specify the folder in which you want to save it.
After you save a document for the first time, you save changes by selecting the Save button on the title bar. A new version of the document then overwrites the previous version.
To save a document for the first time
Select the File tab to display the Backstage view.
In the left pane of the Backstage view, select Save As.
On the Save As page of the Backstage view, select a storage location, and then select a recently accessed folder in the right pane, or select Browse.
In the Save As dialog, browse to the folder you want to save the document in.
In the File name box, enter a name for the document.
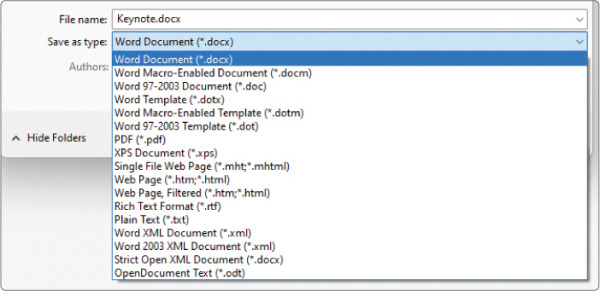
If you want to save the document in a format other than the one shown in the Save As Type box, select the Save as type arrow and then select the file format you want.
In the Save As dialog, select Save.
To add a cloud storage location
On the Save As page of the Backstage view, select Add a Place.
In the Add a Place list, select a place, such as OneDrive.
In the Add a service dialog, enter the email address you use to sign in to the cloud storage service, and then select Next.
In the Sign in dialog, enter the password associated with the account, and then select Sign In to add the cloud storage location associated with that account to the Places list.
To save a copy of a document
Display the Save As page of the Backstage view.
Save the document with a different name in the same location or with any name in a different location. (You can’t store two documents with the same name in the same folder.)
To save a document without changing its name or location
On the title bar, select the Save button.
In the Backstage view, select Save.
Press Ctrl+S.
Automatically save documents
Word automatically saves new versions of documents stored on SharePoint or OneDrive; these files have an AutoSave button on the title bar that you can use to toggle the function off and on.
When the AutoSave function is turned on:
If you’re working in a new, unnamed file, the app saves a temporary copy of the file to your default storage location.
If you’re working in a previously saved file, the app saves a copy of the file to the location in which you opened or last saved it.
You can turn off the automatic file-saving function if you prefer to save changes manually (although this is not advisable).
To toggle AutoSave on or off
In the title bar, select the AutoSave button.
Save documents in other formats
Word uses file formats based on a markup language called Extensible Markup Language or, more commonly, XML. These file formats, called the Microsoft Office Open XML Formats, were introduced with Microsoft Office 2007.
Word offers a selection of file formats intended to provide specific benefits. Each file format has a file name extension that identifies the file type to the system. The file formats and file name extensions for Word files include the following:
Word Document (.docx)
Word Macro-Enabled Document (.docm)
Word Template (.dotx)
Word Macro-Enabled Template (.dotm)
Word XML Document (.xml)
Older Word document types and other file types not specific to Word, such as text files, webpages, PDF files, and XPS files, are available from the Save As dialog.
The default file format for files created in Word is the .docx format, which provides the following benefits over the previous default .doc file format:
Decreased file size Files are compressed when saved, decreasing the amount of disk space and bandwidth needed to store and transmit files.
Simpler retrieval and editing of content XML files can be opened in text-editing apps such as Notepad.
Increased security Personal data can be located and removed from the document, and files can’t store macros. (The .docm file format is designed for documents that contain macros.)
If you want to save a Word document in a format that can be opened by the widest variety of programs (including text editors that are installed with most operating systems), use one of these two formats:
Rich Text Format (*.rtf) This format preserves the document’s formatting.
Plain Text (*.txt) This format preserves only the document’s text.
If you want people to be able to view a document exactly as it appears on your screen, use one of these two formats:
PDF (*.pdf) This format is preferred by commercial printing facilities. Recipients can display the file in the Microsoft Edge browser or the free Microsoft Reader or Adobe Reader apps and can display and edit the file in Word or Adobe Acrobat.
XPS (*.xps) This format precisely renders all fonts, images, and colors. Recipients can display the file in the free Windows XPS Viewer app.
The PDF (Portable Document Format) and XPS (XML Paper Specification) formats are designed to deliver documents as electronic representations of the way they appear when printed. Both types of files can easily be sent by email to many recipients and can be made available on a webpage for downloading by anyone who wants them. However, the files are no longer Word documents. A PDF file can be converted to the editable Word format; an XPS file, however, cannot be opened, viewed, or edited in Word.
When you save a Word document in PDF or XPS format, you can optimize the file size of the document for your intended distribution method—the larger Standard file size is better for printing, whereas the Minimum file size is suitable for online publishing.
To save all or part of a document in PDF format
Open the Save As dialog.
In the Save as type list, select PDF. The dialog content changes to provide additional options.
If you want to create a PDF file that has a smaller file size (but lower quality), select Minimum size (publishing online).
To modify any of the default settings, select the Options button, do any of the following, and then select OK:
Specify the pages to include in the file.
Include or exclude comments and tracked changes.
Include or exclude nonprinting elements such as bookmarks and properties.
Select compliance, font embedding, and encryption options.
If you don’t want to automatically open the new PDF file in your default PDF viewer, clear the Open file after publishing checkbox.
In the Save As dialog, select Save.
Close documents
Every time you open a document, a new instance of Word starts. When you close the file, you can exit that instance of Word. If you have only one document open, you can close the file and exit Word, or you can close the file but leave Word running.
To close a document
At the right end of the title bar, select the Close button to close the document and the Word window.
Display the Backstage view, and then select Close to close the document without exiting Word.
On the Windows taskbar, point to the Word button to display thumbnails of all open documents. Point to the thumbnail of the document you want to close, and then select the Close button that appears in its upper-right corner.


 SEE ALSO
 TIP
TIP
