Create and manage documents
- By Joan Lambert
- 7/3/2023
- Create documents
- Open and move around in documents
- Display different views of documents
- Display and edit file properties
- Save and close documents
- Key points
- Practice tasks
Display different views of documents
You can display a document in different views that provide different types of information and make it easier to interact with specific document elements. For a closer look at the document content, you can increase the magnification of the content pane. If you want a high-level view of the content—for example, to quickly review all the pages of a document for length—you can decrease the magnification and view multiple pages at the same time.
Word has five views in which you can create, organize, and preview documents. Each view is suited to a specific purpose. The views are:
Print Layout This view displays a document on the screen the way it will look when printed. You can review elements such as margins, page breaks, headers and footers, and watermarks. This is the default view and the view you’ll use most frequently (or perhaps the only view you’ll use) when developing content.
Read Mode This view displays as much document content as will fit on the screen at a comfortable size for reading. In this view, the ribbon is replaced by one toolbar at the top of the screen with buttons for searching and navigating in the document. You can display comments, but you can’t edit the document in this view.
Web Layout This view displays the document the way it will look when viewed in a web browser so that you can review the way that text wraps to fit the window and the positioning of graphics. Web Layout view also displays page backgrounds and effects.
Outline This view displays the structure of a document as nested levels of headings and body text and provides tools for viewing and changing the hierarchy.
 SEE ALSO
For information about displaying and modifying a document in Outline view, see “Reorganize document outlines” in Chapter 10, “Organize and arrange content.”
Draft This view displays the content of a document with a simplified layout so that you can quickly enter and edit text. Draft view doesn’t display images or layout elements such as headers and footers.
You manage the display of views and of window elements from the View tab of the ribbon. Three of the views are also available from the View Shortcuts toolbar near the right end of the status bar.
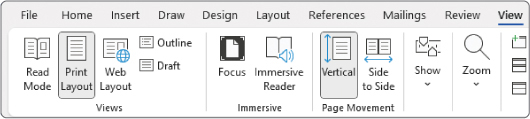
In the Views group on the View tab, the active view is shaded
While you’re developing a document in Print Layout view, the content pane displays the content of the document you’re working in. Each page is represented at the size specified in the document layout settings, with margins and other white space represented as they will appear when the document is printed. As you scroll through a multipage document, spaces appear between the pages. If you want to fit more content on the screen, you can hide the white space between pages and the margin content—including page headers and footers if the document has them—at the top and bottom of each page.
)
The bottom of one page and the top of the next page with and without white space
When working in Outline view or Draft view, you can display the paragraph style of each paragraph in the left margin, in an area called the style area pane. (It’s not a pane, though; it’s just a marginal area of the page.) By default, the style area pane width is set to zero inches wide, so it is effectively closed. If you want to display it, you can increase the width.
)
If your document uses styles to control the appearance and hierarchy of the content, you can display the headings in the Navigation pane and styles in the style area pane so that you can more quickly access and work with styles and styled content. You can also use the Navigation pane to display and move among page thumbnails or search results, as described in the previous topic.
Word has many other task-specific panes in which you can, for example, display Clipboard content, research terminology, review spelling, and format graphics. These panes usually appear to the right or left of the content pane and span its full height. Some of them can float within or outside the Word window or be docked to other sides of the window. Other chapters discuss these panes in the context of their functionality. Regardless of the purpose of the pane, however, you use the same methods to resize or move it.
You can change the space available for document content and app window elements by resizing the window, adjusting the relative sizes of the panes, or collapsing or hiding the ribbon. You can entirely hide not only the ribbon content but also the ribbon tabs and the app window title bar.
SEE ALSO
For information about hiding, collapsing, and displaying the ribbon, see “Work with the ribbon and status bar” in Chapter 1.
When you want to focus on the layout of a document, you can display rulers and gridlines to help you position and align elements. You can also adjust the magnification of the content area by using the tools available in the Zoom group on the View tab and at the right end of the status bar.
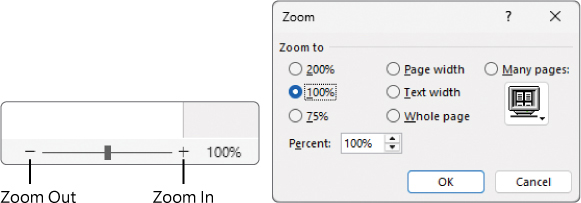
Change the content area magnification by using either the Zoom slider or the Zoom dialog
SEE ALSO
For information about controlling paragraph formatting from the ruler, see “Apply paragraph formatting” in Chapter 4, “Modify the structure and appearance of text.”
If you want to work with different parts of a document at the same time, you can open the same document in a second window and scroll through each window separately, or you can split the current window into two panes and scroll through each pane independently.
You’re not limited to working with one document at a time. You can quickly switch among multiple open documents. If you want to compare or work with the content of multiple documents, you can simplify the process by displaying the documents next to each other.
A feature that can be invaluable when you’re fine-tuning the layout of a document in Word is the display of nonprinting characters (such as tabs, paragraph marks, and section breaks) that control the layout of your document. You can control the display of these characters for each window.
To switch among views of a document
On the View tab, in the Views group, select the view you want.
On the View Shortcuts section of the status bar, select the view button you want.
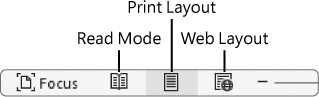
Switch views by using these buttons on Word’s status bar
To hide or display the top and bottom page margins in Print Layout view
Point to the page break indicator between the end of one page and the start of the next page.
When the margins are displayed, including the page headers and footers, a gap between the pages indicates the page break.
When the margins are hidden, a horizontal line indicates the page break.
When the pointer changes to a representation of the page break with two arrows pointing away from the break when the margins are hidden or toward the break when the margins are displayed), double-click.
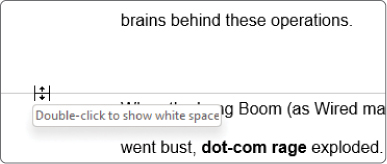
Point to the break between any two pages and then double-click
To show or hide the Navigation pane
On the View tab, in the Show group, select or clear the Navigation Pane checkbox.
To adjust the size of the Navigation pane
Point to the right border of the Navigation pane. When the pointer changes to a double-headed arrow, drag to the right or left.
 TIP
TIP
The Navigation pane is available in all views except Read Mode. When you adjust the width of the Navigation pane, the pane content changes accordingly. For example, the Navigation pane displays fewer page thumbnails in a narrow pane and more page thumbnails in a wide pane.
To display the style area pane in Draft view or Outline view
In the Backstage view, select the Options page tab to open the Word Options dialog.
In the Word Options dialog, select the Advanced page tab.
On the Advanced page, scroll to the Display area (about halfway down the page) and change the Style area pane width in Draft and Outline views setting to any number greater than 0. Then select OK.
To resize the style area pane in Draft view or Outline view
Point to the right border of the style area pane.
When the pointer changes to a double-headed arrow, drag the border to the left or right.
To change the magnification of document content
Do either of the following to open the Zoom dialog:
On the View tab, in the Zoom group, select Zoom.
At the right end of the status bar, select the Zoom Level button.
In the Zoom dialog, select a Zoom to option or enter a specific percentage in the Percent box, and then select OK.
Or
In the zoom controls at the right end of the status bar, do any of the following:
Drag the slider to the left to decrease the magnification or to the right to increase the magnification.
At the left end of the slider, select the Zoom Out button to decrease the magnification in 10-percent increments.
At the right end of the slider, select the Zoom In button to increase the magnification in 10-percent increments.
To display or hide rulers or gridlines in a document
On the View tab, in the Show group, do either of the following:
Select or clear the Ruler checkbox.
Select or clear the Gridlines checkbox.
SEE ALSOFor information about controlling document gridlines, see “Arrange objects on a page” in Chapter 10.
To display or hide nonprinting characters and formatting marks in a document
On the Home tab, in the Paragraph group, select the Show/Hide ¶ button.
Press Ctrl+* (asterisk).
TIPWhen entering an asterisk (*) on a standard keyboard rather than a numeric keypad, you must hold down the Shift key and then press the number 8 to enter an asterisk. So, in effect, you are pressing Ctrl+Shift+8.
To open a second window displaying the current document
On the View tab, in the Window group, select New Window.
To split a window into two panes
On the View tab, in the Window group, select Split.
To display a different open document
On the View tab, in the Window group, select Switch Windows, and then select the file you want to view.
Point to the Word icon on the Windows taskbar, and then select the thumbnail of the document you want to display.
To display multiple open documents at the same time
On the View tab, in the Window group, select Arrange All.