Mitigate threats using Azure Defender
- By Yuri Diogenes, Jake Mowrer, Sarah Young
- 9/24/2022
- Skill 2-1: Design and configure an Azure Defender implementation
- Skill 2-2: Plan and implement the use of data connectors for ingestion of data sources in Azure Defender
In this sample chapter from Exam Ref SC-200 Microsoft Security Operations Analyst, you will learn how to mitigate threats, manage rules, and understand how to investigate and automate response with Microsoft Azure Defender.
One critical component of any Security Operations Center (SOC) is the quality of the alert that is received from a given data source. The quality of the alert can be measured by the relevance of the information contained in the alert, how that alert reflects into the threat vectors of a cloud workload, and how these indications can help security operation analysts to investigate and respond to that alert. Azure Defender has different plans that offer threat detections for specific workloads, based on analytics that were created specifically for the threat vector of the workload’s type.
To mitigate threats using Azure Defender you must be able to design, configure, and manage the different types of Azure Defender plans, manage rules, and understand how to investigate and automate response.
Skills covered in this chapter:
Design and configure an Azure Defender implementation
Plan and implement the use of data connectors for ingestion of data in Azure Defender
Manage Azure Defender alert rules
Configure automation and remediation
Investigate Azure Defender alerts and incidents
Skill 2-1: Design and configure an Azure Defender implementation
Before implementing Azure Defender it is important to understand the different design considerations that will directly affect how you configure the solution based on the scenario’s requirements. This section of the chapter covers the skills necessary to design and configure Azure Defender implementation according to the SC-200 exam outline.
Plan and configure Azure Defender settings, including selecting target subscriptions and workspace
When planning to use Azure Defender, you must understand the requirements for the type of plan that you want to implement. If you are planning the implementation of Azure Defender for Servers, Azure Defender for Kubernetes, or Azure Defender for SQL Server on Machines, you also need to consider the requirement to deploy the Log Analytics (LA) Agent to the machines. By doing so, you will need to select the workspace to which the agent will send the information.
Other Azure Defender plans that are based on other Azure Platform as a Service (PaaS) offerings don’t require a workspace configuration in the beginning. This includes plans such as Azure Defender for Key Vault, Azure Defender for App Service, Azure Defender for Resource Manager, Azure Defender for Storage, Azure Defender for Containers Registries, Azure Defender for SQL database, and Azure Defender for DNS. You will only need to configure a workspace for these Azure Defender plans if you consider utilizing the continuous export capability in Azure Security Center. This feature is often used in the following scenarios:
When the organization wants to store all alerts that are triggered by all Azure Defender plans in the workspace because. By default, only VM-based alerts are stored in the workspace.
When the organization wants to store all security recommendations or regulatory compliance information in the workspace.
When the organization needs to send the alerts to a security information and event management (SIEM) via Azure Event Hub.
When you first activate Azure Security Center, the auto-provisioning feature is not enabled. However, if you want to ensure that all VMs are automatically configured to receive the LA agent and send the data to the correct workspace, you should enable this option. When auto-provisioning is enabled, and the Connect Azure VMs To The Default Workspace(s) Created By Security Center option is selected, Security Center will automatically create and manage a new workspace. Security Center creates a new resource group and a workspace (called default workspace) in the same geolocation of the VM and connects the agent to that workspace. The naming conventions for the default workspace and resource group are shown below:
Workspace DefaultWorkspace-[subscription-ID]-[geo]
Resource Group DefaultResourceGroup-[geo]
The fact that a default workspace is created according to the geolocation of the VM is an advantage if your design requirements dictates that you need to ensure that the data sent from the VM is stored in the same region as the VM’s location. Table 2-1 shows where the workspace will reside according to the VM’s location:
TABLE 2-1 VM and workspace locations
VM Location |
Workspace Location |
|---|---|
United States and Brazil |
United States |
Canada |
Canada |
Europe |
Europe |
United Kingdom |
United Kingdom |
East Asia and Southeast Asia |
Asia |
Korea |
Korea |
India |
India |
Japan |
Japan |
China |
China |
Australia |
Australia |
If your organization is already utilizing a Log Analytics workspace and it wants to leverage the same workspace for Security Center, you should select the Connect Azure VMs To A Different Workspace option and specify the workspace, which can be any workspace across all selected subscriptions within the same tenant.
The general best practice for workspace creation is to keep it as minimal as possible, which is not the case when you configure Security Center to manage the workspaces. When reading a scenario in the SC-200 exam, take into consideration the business requirements as well as the technical requirements. These requirements will lead you to select one of these two options:
You could use the default workspace, which can create a lot of workspaces according to the regions where the company’s VMs reside
You could take a more centralized approach where all VMs across all subscriptions will have to send data to a single workspace.
The actual steps to configure auto-provisioning and specify the workspace are provided later in this chapter.
Configure Azure Defender roles
Security Center uses Role-Cased Access Control (RBAC) based in Azure. By default, there are two roles in Security Center: Security Reader and Security Admin. The Security Reader role should be assigned to all users that need read access only to the dashboard. For example, Security Operations personnel that needs to monitor, and respond to security alerts, should be assigned the Security Reader role. It is important to mention that the assignment of this role is done in the Azure level, under the resource group that Security Center is monitoring, and using Access Control (IAM), as shown in Figure 2-1.
)
Figure 2-1 Access control in Azure
Workload owners usually need to manage a particular cloud workload and its related resources. Besides that, the workload owner is responsible for implementing and maintaining protections in accordance with company security policy. Security Admin role should be assigned for users that need to manage Security Center configuration.
Only subscription Owners/Contributors and Security Admins can edit a security policy. Only subscription and resource group Owners and Contributors can apply security recommendations for a resource. To enable Azure Defender, you need Security Admin or Subscription Owner privilege. To learn more about Role-Based Access Control (RBAC) in Azure, visit http://aka.ms/azurerbac.
Custom roles
There will be some scenarios where the organization may want to provide a more granular privilege for some users instead of granting access to the entire Security Admin access role. Consider an organization called Contoso that needs to provide privilege to security operation analysts to simply visualize and create alert-suppression rules. In this case, the Security Admin role provides more privileges than what is necessary. For scenarios like this, you can create a custom role in Azure and assign write privilege to this operation: Microsoft.Security/alertsSuppressionRules/write.
Another common scenario is when an organization needs to create a custom role to allow users to configure or edit the just-in-time (JIT) VM access. You need a set of privileges to work with JIT; these privileges will vary according to the type of operation that you need to perform or that you want to allow a user to perform. You can be very granular about this permission assignment by using these guidelines:
To configure or edit a JIT policy for a VM, you need to assign these actions to the role:
On the scope of a subscription or resource group that is associated with the VM: Microsoft.Security/locations/jitNetworkAccessPolicies/write.
On the scope of a subscription or resource group of VM: Microsoft.Compute/virtualMachines/write.
To request access to a VM, you need to assign these actions to the user:
On the scope of a subscription or resource group that is associated with the VM: Microsoft.Security/locations/jitNetworkAccessPolicies/initiate/action.
On the scope of a subscription or resource group that is associated with the VM: Microsoft.Security/locations/jitNetworkAccessPolicies/*/read.
On the scope of a subscription or resource group or VM: Microsoft.Compute/virtualMachines/read.
On the scope of a subscription or resource group or VM: Microsoft.Network/networkInterfaces/*/read.
On the scope of a subscription, resource group, or VM that you need to read JIT policies, assign these actions to the user:
Microsoft.Security/locations/jitNetworkAccessPolicies/read
Microsoft.Security/locations/jitNetworkAccessPolicies/initiate/action
Microsoft.Security/policies/read
Microsoft.Security/pricings/read
Microsoft.Compute/virtualMachines/read
Microsoft.Network/*/read
Also, if you need to see the JIT NSG policy from the VM—Networking blade, you need to add the following policies:
Microsoft.Network/networkSecurityGroups/read
Microsoft.Network/networkSecurityGroups/defaultSecurityRules/read
Microsoft.Network/networkSecurityGroups/securityRules/read
While the permissions above can be utilized to apply the principle of least privilege, keep in mind that you will need to merge some permissions if you are accessing via the Azure portal. For example, to configure or edit a JIT policy for a VM, you will need the privileges given and the privileges to read JIT policies.
Configure data retention policies
Azure Defender provides 500 MB per node, per day of free allowance for the data allocated in the Log Analytics workspace against the following subsets of security data types:
WindowsEvent
SecurityAlert
SecurityBaseline
SecurityBaselineSummary
SecurityDetection
SecurityEvent
WindowsFirewall
MaliciousIPCommunication
LinuxAuditLog
SysmonEvent
ProtectionStatus
Update and UpdateSummary data types can be used when the Update Management solution is not running on the workspace or when solution targeting is enabled.
If the workspace is in the legacy Per Node pricing tier, the Azure Defender and Log Analytics allocations are combined and applied jointly to all billable ingested data. When you configure Azure Defender to utilize a workspace, the data will be stored there is going to be available for 30 days by default. However, you can configure data retention at the workspace level up to 730 days (2 years) for all workspaces unless they are using the legacy free tier (for example, when using Azure Security Center without upgrading to Azure Defender).
Depending on the scenario that you are addressing, you might need to extend the data retention to more than 30 days. Make sure to always review the business and technical requirements of the scenario for hints about data retention. Once you determine the data retention goal, follow the steps below to configure data retention in Log Analytics workspace:
Navigate to the Azure portal by opening https://portal.azure.com.
In the search bar, type log ana, and under Services, click Log Analytics Workspaces.
In the Log Analytics Workspaces dashboard, click the workspace for which you want to configure data retention.
In the left navigation pane, in the General section, click Usage And Estimated Costs. The Usage And Estimated Costs page appears, as shown in Figure 2-2.
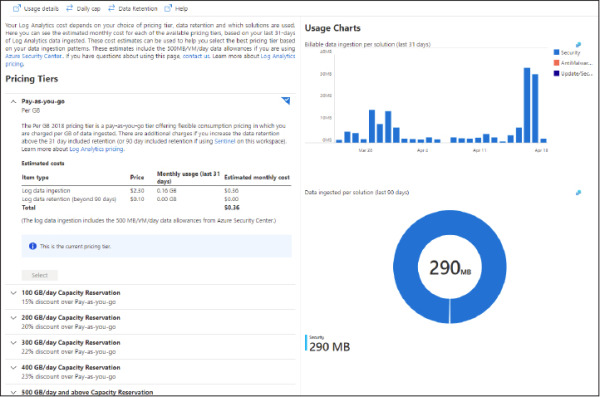
Figure 2-2 Log Analytics workspace usage and cost
Click the Data Retention button, and the Data Retention blade appears, as shown in Figure 2-3.
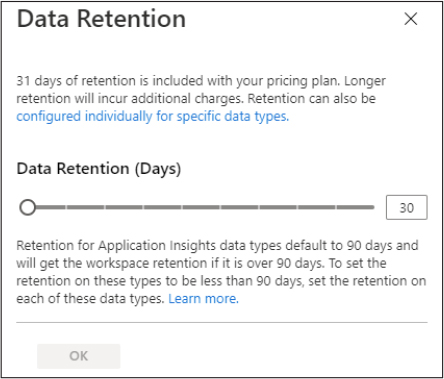
Figure 2-3 Configuring data retention for the Log Analytics workspace
You can use the Data Retention (Days) slider to increase the number of days that you want to retain the data. Once you finish, click the OK button to commit the changes.
)
)
You can also utilize an Azure Resource Manager (ARM) template to configure data retention by using the retentionInDays parameter. The advantage of using an ARM template for this operation is that you can apply in scale, and you can also customize other parameters. For example, if the scenario requires that you set the data retention to 30 days and trigger an immediate purge of older data, you can do that by using the immediatePurgeDataOn30Days parameter, which eliminates the grace period. This configuration could also be useful for compliance-related scenarios where immediate data removal is mandatory.
While the extension of the data retention policy for the entire workspace is usually the most common scenario, there are some situations that you might need to change the data retention based on a specific data type. Retention settings for individual data types are available from 4 to 730 days (except for workspaces in the legacy free tier). These settings will override the workspace-level default retention. You will also need to use ARM to change this setting. In the example below, the data retention for the SecurityEvent data type is being changed to 550 days:
PUT /subscriptions/00000000-0000-0000-0000-00000000000/resourceGroups/
MyResourceGroupName/providers/Microsoft.OperationalInsights/workspaces/MyWorkspaceName/
Tables/SecurityEvent?api-version=2017-04-26-preview
    {
        "properties":
        {
            "retentionInDays": 550
        }
    }
 EXAM TIP
When evaluating a scenario in the SC-200 exam, look for business requirements that lead to cost savings on data. Changing data retention only in certain data types can be used to reduce overall costs for data retention.
Assess and recommend cloud workload protection
As enterprises start their journeys to the cloud, they will face many challenges as they adapt their on-premises tools to a cloud-based model. In a cloud environment where there are different workloads to manage, it becomes imperative to have ongoing verification and corrective actions to ensure that the security posture of those workloads is always at the highest possible quality.
Security Center has a variety of capabilities that can be used in two categories of cloud solutions:
Cloud Security Posture Management (CSPM) This enables organizations to assess their cloud infrastructure to ensure compliance with industry regulations and identify security vulnerabilities in their cloud workloads.
Cloud Workload Protection Platform (CWPP) This enables organizations to assess their cloud workload risks and detect threats against their servers (IaaS), containers, databases (PaaS), and storage. It also allows organizations to identity faulty configurations and remediate those with security best-practice configurations. To use the CWPP capabilities, you need to upgrade to Azure Defender.
With an Azure subscription, you can activate the free tier of Security Center, which monitors compute, network, storage, and application resources in Azure. It also provides security policy, security assessment, security recommendations, and the ability to connect with other security partner solutions.
Even organizations that are getting started with Infrastructure as a Service (IaaS) in Azure can benefit from this free service because it will improve their security postures. When you upgrade your Security Center subscription from the free tier to Azure Defender, the Azure Defender for Servers will be automatically enabled. With this plan, the following features will be available:
Security event collection and advanced search
Network Map
Just-in-time VM Access
Adaptive application controls
Regulatory compliance reports
File integrity monitoring
Network Security Group (NSG) hardening
Security alerts
Threat protection for Azure VMs, non-Azure VMs, and PaaS services
Integration with Microsoft Defender for Endpoint (MDE)
Integration with Microsoft Cloud App Security (MCAS)
Multi-cloud support for Amazon Web Services (AWS) and Google Cloud Platform (GCP)
Vulnerability assessment integration with Qualys
Another advantage of upgrading to Azure Defender is that it allows you to monitor on-premises resources and VMs hosted by other cloud providers. You achieve this by onboarding your machine using Azure Arc and then installing the Log Analytics agent on the target machine.
Assessment and recommendations
Security Center will identify resources (compute, network, storage, identity, and application) that need security recommendations and will automatically suggest changes. You can see all recommendations in a single place, which is available under General > Recommendations. There, you can see security controls, as shown in Figure 2-4.
)
Figure 2-4 Security recommendations in Azure Security Center
During this initial assessment, Azure Security Center will also identify which workloads are available in the subscription. Also, it will suggest enabling the different Azure Defender plans for cloud workload protection. All plans will be part of the Azure Defender security control, as shown in Figure 2-5.
)
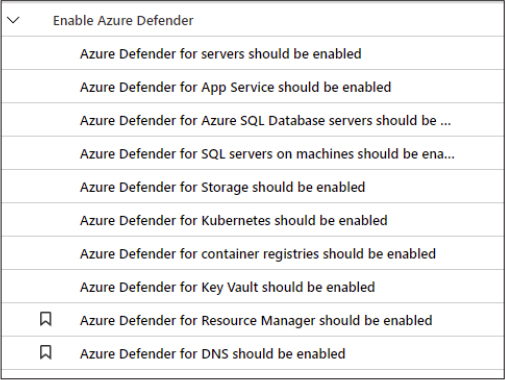
Figure 2-5 Enable Azure Defender security control
Enabling Azure Defender
To enable Azure Defender, you can click each recommendation and follow the remediation steps, go to the Price & Settings option in the left navigation pane, select the subscription, and select the plans you want to utilize. To review the pricing selection, click the Price & Settings option in the left navigation pane, and under Management, click the subscription on which you want to enable Azure Defender. The Azure Defender plans page will appear, as shown in Figure 2-6.
)
Figure 2-6 Pricing page showing the different Azure Defender plans
On this page, you can change the toggle to ON or OFF, where ON means that the Azure Defender plan is enabled on the selected subscription. While most of the Azure Defender plans can only be enabled on the subscription level, there are a couple that can be enabled individually:
Azure Defender for SQL (Azure SQL Database)
Azure Defender for Storage (Storage)
In both cases, you can toggle these to the OFF setting on this page, and you can go to each Azure SQL database or each Azure Storage account and enable Azure Defender from there. You might do this if the business requirement is to save cost by only enabling Azure Defender for SQL or Azure Defender for Storage on a company’s most critical assets, rather than enabling them for the entire subscription.
Make sure to analyze the business requirements that will guide you when deciding whether to disable it at the subscription level and enable it on each resource. If you need to enable Azure Defender in scale, you can also use ARM Templates or Azure Policy.