Customizing Excel
- By Bill Jelen
- 5/20/2022
Using the Excel Options dialog box
Open the File menu and select Options from the left navigation pane to open the Excel Options dialog box. The dialog box has categories for General, Formulas, Data, Proofing, Save, Language, Ease Of Access, Advanced, Customize Ribbon, Quick Access Toolbar, Add-Ins, and Trust Center. The Trust Center leads to another 13 categories.
To the Excel team’s credit, they tried to move the top options to the General category. Beyond those 19 settings, though, are hundreds of settings spread throughout 24 categories in the Excel Options and Trust Center. Table 3.1 gives you a top-level view of where to start looking for settings.
Table 3.1 Excel Options dialog box settings
Category |
Types of Settings |
|---|---|
General |
The most commonly used settings, such as user interface settings, the default font for new workbooks, number of sheets in a new workbook, customer name, and Start screen. |
Formulas |
All options for controlling calculation, error-checking rules, and formula settings. Note that options for multithreaded calculations are currently considered obscure enough to be on the Advanced tab rather than on the Formulas Tab. |
Data |
The data category is new in 2017. It offers the new Edit Default Layout for pivot tables, several other pivot table options, and then a series of checkboxes to bring back the legacy Get Data categories. When Power Query replaced Get Data on the Data tab of the ribbon, the old legacy icons were removed. |
Proofing |
Spell-check options and a link to the AutoCorrect dialog box. |
Save |
The default method for saving, AutoRecovery settings, legacy colors, and web server options. |
Language |
Choose the editing language, ToolTip language, and Help language. |
Ease of Access |
Options available are Provide Feedback With Sound, Provide Feedback With Animation, Screen Tip Style, and the default document font size. |
Advanced |
All options that Microsoft considers advanced, spread among 15 headings. |
Customize Ribbon |
Icons to customize the ribbon. |
Quick Access Toolbar |
Icons to customize the Quick Access Toolbar (QAT). |
Add-Ins |
A list of available and installed add-ins. New add-ins can be installed from the button at the bottom of this category. |
Trust Center |
Links to the Microsoft Trust Center, with 13 additional categories. |
Getting help with a setting
Many settings appear with a small i icon. If you hover the mouse near this icon, Excel displays a super ToolTip for the setting. The ToolTip explains what happens when you choose the setting. It also provides some tips about what you need to be aware of when you turn on the setting. For example, the ToolTip in Figure 3.6 shows information about the calculation settings. It also explains that you should use the F9 key to invoke a manual calculation.
)
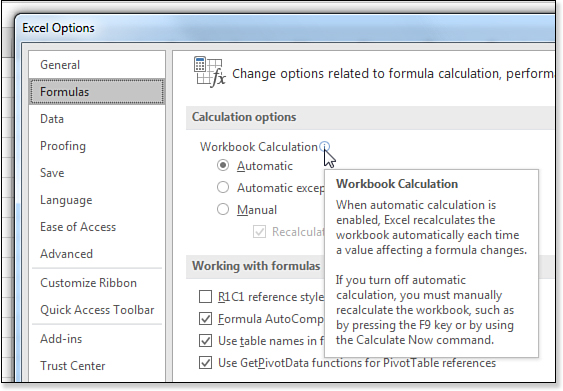
Figure 3.6 The i button explains many settings.
Recent new options in Excel
Excel today offers several new settings:
When Using Multiple Displays is found in the General category. Excel now supports newer High DPI displays, but many people might have two-monitor setups with one High DPI display and one older display. If you have problems when moving Excel between displays, choose Optimize For Compatibility from this setting.
Excel introduced data types for stocks, currency, geography, and more. In an effort to make the feature discoverable, if you enter city names into a few cells, Excel can offer to convert those cells to a Geography Data Type. This is great at first, but if it becomes bothersome, unselect Show Convert To Data Types When Typing from the General category.
Excel offers a Search box in the title bar. This is designed for finding commands when you can’t find them on the ribbon. If you think the Search box is taking up too much space, select Collapse The Microsoft Search Box By Default. It is found in the General category.
Microsoft added a dark mode to Excel. Use the Office Theme drop-down menu in the General category.
Near the bottom of the General category, you can assign which file extensions will open in Excel and ask Excel to notify you if it is not the default program for .XLSX and .XLSM files.
With the introduction of Dynamic Arrays, the Implicit Intersection behavior is different. If you attempt to write a formula with @ in the wrong places, Excel can warn you that the formula is not compatible with older versions of Excel. It offers to change the formula so it is backward compatible, as shown in Figure 3.7. To check any random formula, enter =@(the formula) and see if Excel shows a dialog box. To turn off this behavior, on the Formulas category, unselect Suggest Formula Variations That Are Supported By Older Versions of Excel.
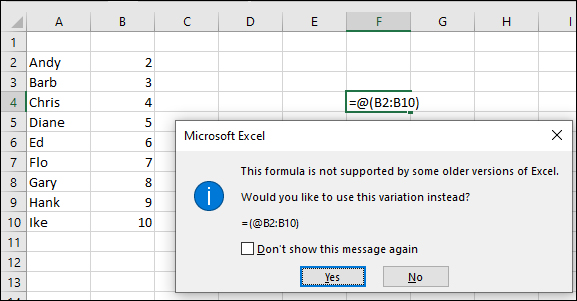
Figure 3.7 The @ will make sure that a formula designed to return a single value won’t return an array in earlier versions of Excel.
There are two new error-checking options in the Formulas category. A warning about a Misleading Number Format appears if your formula points to a numeric cell, but the formula is formatted as a date, as shown in Figure 3.8. By choosing Update Format, the number format from the source cell will be copied to the formula cell. Another new error-checking option is Cells Containing Data Types That Couldn’t Refresh. This alerts you if the linked data type cell could not be refreshed.
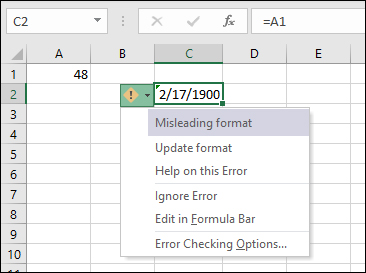
Figure 3.8 If a cell formatted as a date is pointing to cells formatted as a number, the Misleading Number Format warning displays.
Default PivotTable Layout is found in the new Data category. Change the default layout for all future pivot tables. Several items in the new Data category were moved to the Data category from the Advanced category.
Show Legacy Data Import Wizards is a series of seven choices in the new Data category. The Power Query tools debuted in Excel 2016 on the Data tab of the ribbon. These tools became so popular, Microsoft decided to remove the old Get External Data group from the ribbon, but some people had specific reasons why they liked the old icons. You can now add those old icons back by choosing From Access, From Web, From Text, From SQL Server, From OData Data Feed, From XML Data Import, or From Data Connection. If you choose something from this area, it will appear hidden on the ribbon. Look in Data, Get Data, Legacy Wizards.
Show Data Loss Warning when Editing Comma Delimited Files (*.csv) is found in the Save category. Excel used to nag you whenever you opened a file in CSV format. If you did not save the file as XLSX, it would warn you that you are about to lose formulas and formatting. A lot of people were tired of the nagging, and Microsoft turned off the nagging by default. If you need to be nagged, you can turn it back on here.
A new Cache Settings in the Save category controls how many days to keep files in the Office document cache and lets you empty the cache.
The Ease Of Access category is new in Excel 2019. You can choose to Provide Feedback With Sound and choose a Modern or Classic sound scheme. The new part is the Modern sound scheme. The annoying Classic Sound Scheme was previously the only choice in the Advanced category. You can turn off Animations. The choice to control whether Screen Tips are shown is repeated here from the General category. You can set the Default Font Size used in the document, and you can choose to turn off the calculation Function Screen Tips.
Use Pen To Select and Interact By Default is new in the Advanced category. If you prefer using a touchscreen, you can change the default behavior of touch.
Hyperlinks to Excel files stored in the cloud might open in Excel Online. If you prefer them to open in the desktop version of Excel, there is a new setting. The Link Handling subcategory is the third subcategory in the Advanced category. Choose Open Supported Hyperlinks To Office Files In Desktop Apps.
Excel lets you control how many recent files appear when you choose File > Open. The new Find Show This Number Of Recent Unpinned settings controls how many recent folders will be shown.
)
)
Using AutoRecover options
For many versions, Excel periodically saves a copy of your work every 10 minutes. If your computer crashes, the recovery pane offers to let you open the last AutoRecovered version of the file. This feature is sure to save you from retyping data that might have otherwise been lost.
Another painful situation occurs when you do not save changes and then close Excel. Yes, Excel asks if you want to save changes for each open document, but this question usually pops up at 5:00 p.m. when you are in a hurry to get out of the office. If you are thinking about what you need to do after work and not paying attention to which files are still open, you might click No to the first document and then click No again and again without noticing that the fifth open document was one that should have been saved.
Another scenario involves leaving an Excel file open overnight only to discover that Windows Update decided to restart the computer at 3 AM. After being burned a dozen times, you can change the behavior of Windows Update to stop doing this. However, if Windows Update closed Excel without saving your documents, you can lose those AutoRecovered documents.
A setting introduced in Excel 2010 has Excel save the last AutoRecovered version of each open file when you close without saving. This setting is on the Save category of Excel Options and is called Keep The Last AutoRecovered Version If I Close Without Saving.
Controlling image sizes
An Image Size & Quality section appears in the Advanced category. Most people add a photo to dress up the cover page of a document. However, you probably don’t need an 8-megapixel image being saved in the workbook. By default, Excel compresses the image before saving the file. You can control the target output size using the drop-down menu in Excel options. Choices include 96ppi, 150ppi, and 220ppi. The 96ppi setting will look fine on your display. Use 220ppi for images you will print. If you want to keep your images at the original size, you can select the Do Not Compress Images In File setting.
You should also understand the Discard Editing Data check box. Suppose that you insert an image in your workbook and then crop out part of the photograph. If you do not enable Discard Editing Data, someone else can come along and uncrop your photo. This can be an embarrassing situation—just ask the former TechTV co-host who discovered certain bits of photographs were still hanging around after she cropped them out.
Working with protected view for files originating from the Internet
Starting in Excel 2010, files from the Internet or Outlook initially open in protected mode. This mode gives you a chance to look at the workbook and formulas without having anything malicious happen. Unfortunately, you cannot view the macro code while the workbook is in protected view.
If you only want to view or print the workbook, protected mode works great. One statistic says that 40% of the time, people simply open a document and never make changes to it.
After you click Enable Editing, Excel will skip protected mode the next time you open the file.
Working with Trusted Document settings
By default, Excel warns you about all sorts of things. If you open a workbook with macros, links, external data connections, or even the new WEBSERVICE function, a message bar appears above the worksheet to let you know that Excel disabled those “threats.”
If you declare a folder on your hard drive to be a trusted folder, you can open those documents without Excel warning you about the items. Visit File, Options, Trust Center, Trust Center Settings, Trusted Locations to set up a trusted folder.
Starting in Excel 2010, if you open a file from your hard drive and enable the content, Excel automatically enables that content the next time. The inherent problem here is that if you open a file and discover the macros are bad, you will not want those macros to open the next time automatically. There is no way to untrust a single document other than deleting, renaming, or moving it. Instead, you have to go to the Trusted Documents category of the Trust Center where you can choose to clear the entire list of trusted documents.