Perform calculations on data
- By Curtis Frye and Joan Lambert
- 1/29/2022
Create formulas to calculate values
After you enter data on a worksheet and, optionally, define ranges to simplify data references, you can create formulas to performs calculations on your data. For example, you can calculate the total cost of a customer’s shipments, figure the average number of packages for all Wednesdays in the month of January, or find the highest and lowest daily package volumes for a week, month, or year.
You can enter a formula directly into a cell or into the formula bar located between the ribbon and the worksheet area.
Every formula begins with an equal sign (=), which tells Excel to interpret the expression after the equal sign as a calculation instead of as text. The formula that you enter after the equal sign can include simple references and mathematical operators, or it can begin with an Excel function. For example, you can find the sum of the numbers in cells C2 and C3 by using the formula =C2+C3. You can edit formulas by selecting the cell and then editing the formula in the cell or in the formula bar.
You can perform mathematical operations on numbers by using the mathematical operators for addition (+), subtraction (–), multiplication (*), division (/), negation (-), and exponentiation (^). You can perform other operations on a range of numbers by using the following Excel functions:
SUM Returns the sum of the numbers.
AVERAGE Returns the average of the numbers.
COUNT Returns the number of entries in the cell range.
MAX Returns the largest number.
MIN Returns the smallest number.
These functions are available from the AutoSum list, which is in the Editing group on the Home tab of the ribbon and in the Function Library group on the Formulas tab. The Function Library is also where you’ll find the rest of the Excel functions, organized into categories.
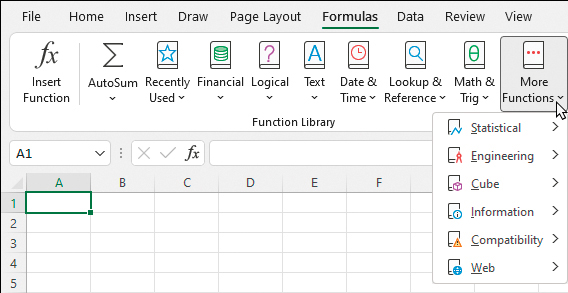
Excel includes a wide variety of functions
The Formula AutoComplete feature simplifies the process of referencing functions, named ranges, and tables in formulas. It provides a template for you to follow and suggests entries for each function argument. Here’s how it works:
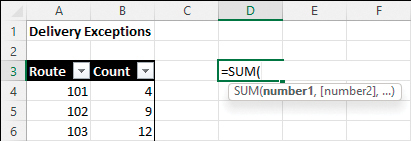
As you begin to enter a function name after the equal sign, Excel displays a list of functions matching the characters you’ve entered. You can select a function from the list and then press Tab to enter the function name and the opening parenthesis in the cell or formula bar.
After the opening parenthesis, Excel displays the arguments that the selected function accepts. Bold indicates required arguments and square brackets enclose optional arguments. You can simply follow the prompts to enter or select the necessary information, and then enter a closing parenthesis to finish the formula.
Excel prompts you for required and optional information
To reference a named range, table, or table element, start entering the name (or an opening square bracket to indicate a table element) and Excel displays a list of options to choose from.
 TIP
TIPYou can reference a series of contiguous cells in a formula by entering the cell range or by dragging through the cells. If the cells aren’t contiguous, hold down the Ctrl key and select each cell.
)
)
 SEE ALSO
For information about using keyboard shortcuts to select cell ranges, see the appendix, “Keyboard shortcuts.”
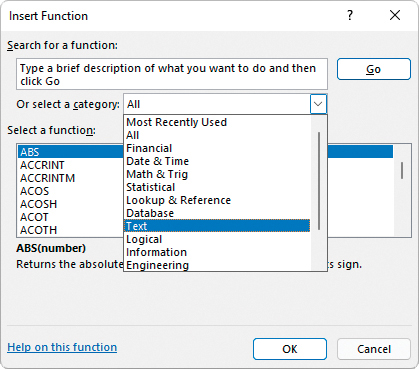
If you’re creating a more complex formula and want extra guidance, you can assemble the formula in the Insert Function dialog. All the Excel functions are available from within the dialog.
Create formulas in the Insert Function dialog
If you’re uncertain which function to use, you can search for one by entering a simple description of what you’d like to accomplish. Selecting any function displays the function’s arguments and description.
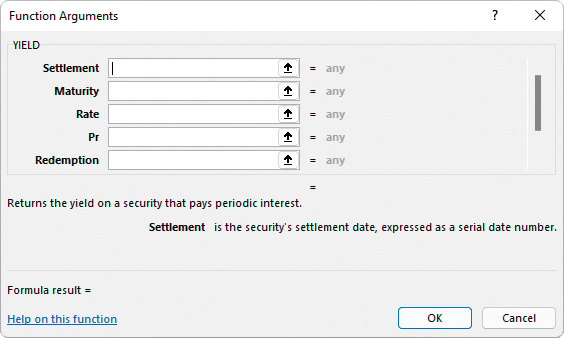
Activate any field to display a description of the argument
After you select a function, Excel displays an interface in which you can enter all the function arguments. The complexity of the interface depends on the function.
Whether you enter a formula directly or assemble it in the Insert Function dialog, you can reference data in cells (A3) or cell ranges (A3:J12), in named ranges (Northeast), or in table columns (TableName[ColumnName]). For example, if the Northeast range refers to cells C3:I3, you can calculate the average of cells C3:I3 by using the formula =AVERAGE(Northeast).
To create a formula manually
Select the cell in which you want to create the formula.
In the cell or in the formula bar, enter an equal sign (=).
If the formula will call a function, enter the function name and an opening parenthesis to begin the formula and display the required and optional arguments.
Enter the remainder of the formula:
Reference cells by entering the cell reference or selecting the cell.
Reference cell ranges by entering the cell range or dragging across the range.
Reference named ranges and tables by entering the range or table name.
Reference table elements by entering [ after the table name, selecting the element from the list, and then entering ].
If the formula includes a function, enter the closing parenthesis to end it.
Press Enter to enter the formula in the cell and return the results.
To open the Insert Function dialog
On the formula bar, to the left of the text entry box, select the Insert Function button (fx).
On the Formulas tab, in the Function Library group, select Insert Function.
Press Shift+F3.
To locate a function in the Insert Function dialog
In the Search for a function box, enter a brief description of the operation you want to perform, and then select Go.
Or
In the Or select a category list, select the function category.
Scroll down the Select a function list to the function.
To create a formula in the Insert Function dialog
Open the Insert Function dialog.
Select the function you want to use in the formula, and then select OK.
In the Function Arguments dialog, enter the function’s arguments, and then select OK.
To reference a named range in a formula
Enter the range name in place of the cell range.
To reference an Excel table column in a formula
Enter the table name followed by an opening bracket ([), the column name, and a closing bracket (]).