Perform calculations on data
- By Curtis Frye and Joan Lambert
- 1/29/2022
In this sample chapter from Microsoft Excel Step by Step (Office 2021 and Microsoft 365), you will review procedures related to naming data ranges, creating formulas to calculate values, summarizing data in one or more cells, copying and moving formulas, creating array formulas, troubleshooting issues with formula calculations, and configuring automatic and iterative calculation options.
In this chapter
Name data ranges
Create formulas to calculate values
Summarize data that meets specific conditions
Copy and move formulas
Create array formulas
Find and correct errors in calculations
Configure automatic and iterative calculation options
Excel workbooks provide an easy interface for storing and organizing data, but Excel can do so much more than that. Using the built-in functions, you can easily perform a variety of calculations—from simple tasks such as calculating totals to complex financial calculations. Excel can report information such as the current date and time, the maximum value or number of blank cells in a data set, and the cells that meet specific conditions, and it can use this information when performing calculations. To simplify the process of referencing cells or data ranges in your calculations, you can name them. Excel provides guidance for creating formulas to perform calculations and for identifying and fixing any errors in the calculations.
This chapter guides you through procedures related to naming data ranges, creating formulas to calculate values, summarizing data in one or more cells, copying and moving formulas, creating array formulas, troubleshooting issues with formula calculations, and configuring automatic and iterative calculation options.
Name data ranges
When you work with large amounts of data, it’s often useful to identify groups of cells that contain related data. For example, you might have a worksheet for a delivery service in which:
Each column of data summarizes the number of packages handled during one hour of the day.
Each row of data represents a region that handled packages.
)
Instead of specifying a cell or range of cells individually every time you want to reference the data they contain, you can name the cell or cells—in other words, create a named range. For example, you could group the packages handled in the Northeast region during all time periods into a range named Northeast. Whenever you want to use the contents of that range in a calculation, you can reference Northeast instead of $C$3:$I$3. That way, you don’t need to remember the cell range or even the worksheet it’s on.
)
 TIP
TIP
Range names can be simple or complex. In a workbook that contains different kinds of data, a more descriptive name such as NortheastVolume can help you remember the data the range includes.
If you have a range of data with consistent row or column headings, you can create a series of ranges at one time instead of having to create each individually.
By default, when you create a named range, its scope is the entire workbook. This means that you can reference the name in a formula on any worksheet in the workbook. If a workbook contains a series of worksheets with the same content—for example, sales data worksheets for each month of a year—you might want to set the scope of ranges on those worksheets to the worksheet instead of to the workbook.
After you create a named range, you can edit the name, the cells the range includes, or the scope in which the range exists, or delete a range you no longer need, in the Name Manager.
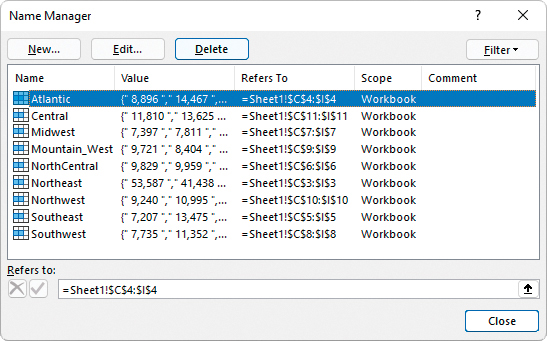
Manage named ranges in the Name Manager
TIP
If your workbook contains a lot of named ranges, tables, or other objects, you can filter the Name Manager list to locate objects more easily.
To create a named range
Select the cells you want to include in the named range.
In the Name Box, next to the formula bar, enter a name for your named range.
Or
Select the cells you want to include in the named range.
On the Formulas tab, in the Defined Names group, select Define Name.
In the New Name dialog, do the following:
In the Name box, enter a name for the range. The name must begin with a letter or underscore and may not contain spaces.
If you want to restrict the range to use on a specific worksheet, select that worksheet in the Scope list.
If you want to provide additional information to help workbook users identify the range, enter a description of up to 255 characters in the Comment box.
Verify that the Refers to box includes the cells you want to include in the range.
Select OK.
To create a series of named ranges from data with headings
Select the cells that contain the headings and data you want to include in the named ranges.
On the Formulas tab, in the Defined Names group, select Create from Selection.
In the Create Names from Selection dialog, select the checkbox next to the location of the heading text from which you want to create the range names.
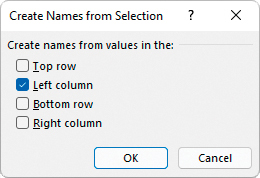
Name ranges by any outer row or column in the selection
Select OK.
To open the Name Manager
On the Formulas tab, in the Defined Names group, select Name Manager.
To change the name of a named range
Open the Name Manager.
Select the range you want to rename, and then select Edit.
In the Edit Name dialog, in the Name box, change the range name, and then select OK.
To change the cells in a named range
Open the Name Manager.
Select the range you want to edit, and then do either of the following:
In the Refers to box, change the cell range.
Select Edit. In the Edit Name dialog, in the Refers to box, change the cell range, and then select OK.
To change the scope of a named range
Select the range you want to change the scope of and note the range name shown in the Name Box.
On the Formulas tab, in the Defined Names group, select Define Name.
In the New Name dialog, do the following:
In the Name box, enter the existing range name that you noted in step 1.
In the Scope list, select the new scope.
If you want to provide additional information to help workbook users identify the range, enter a description of up to 255 characters in the Comment box.
Verify that the Refers to box includes the cells you want to include in the range.
Select OK.
To delete a named range
Open the Name Manager.
Select the range you want to delete, and then select Delete.
In the Microsoft Excel dialog prompting you to confirm the deletion, select OK.