Referring to ranges
- By Bill Jelen and Tracy Syrstad
- 3/11/2022
- The Range object
- Referencing ranges in other sheets
- Referencing a range relative to another range
- Using the Cells property to select a range
- Using the Offset property to refer to a range
- Using the Resize property to change the size of a range
- Using the Columns and Rows properties to specify a range
- Using the Union method to join multiple ranges
- Using the Intersect method to create a new range from overlapping ranges
- Using the IsEmpty function to check whether a cell is empty
- Using the CurrentRegion property to select a data range
- Using the Areas collection to return a noncontiguous range
- Referencing tables
- Next steps
Using the Resize property to change the size of a range
The Resize property enables you to change the size of a range based on the location of the active cell. You can create a new range as needed. This is the syntax for the Resize property:
Range.Resize(RowSize, ColumnSize)
To reference the range B3:D13, use the following:
Range("B3").Resize(RowSize:=11, ColumnSize:=3)
Here’s a simpler way to reference this range:
Range("B3").Resize(11, 3)
But what if you need to resize by only a row or a column—not both? You don’t have to enter both the row and the column parameters.
To expand by two columns, use either of the following:
Range("B3").Resize(ColumnSize:=2)
or
Range("B3").Resize(,2)
Both lines mean the same thing. The choice is yours. If you use the second line, make sure to include the comma so Excel knows the 2 refers to the ColumnSize argument. Resizing just the rows is similar. You can use either of the following:
Range("B3").Resize(RowSize:=2)
or
Range("B3").Resize(2)
Once again, the choice is yours. It is a matter of the readability of the code.
From the list of produce, say that you want to find the zero totals and color the cells of the total and corresponding produce (see Figure 3-3). Here’s what you do:
)
Set Rng = Range("B1:B16").Find(What:="0", LookAt:=xlWhole, _
    LookIn:=xlValues)
Rng.Offset(, -1).Resize(, 2).Interior.ColorIndex = 15
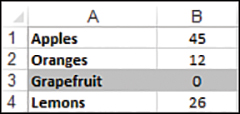
FIGURE 3-3 You can resize a range to extend the selection.
Notice that the Offset property first moves the active cell over to the produce column. When you’re resizing, the upper-left-corner cell must remain the same.
Resizing isn’t only for single cells; you can use it to resize an existing range. For example, if you have a named range but need it and the column next to it, use this:
Range("Produce").Resize(,2)
Remember, the number you resize by is the total number of rows/columns you want to include.