Describe fundamental principles of machine learning on Azure
- By Julian Sharp
- 2/1/2022
- Skill 2.1: Identify common machine learning types
- Skill 2.2: Describe core machine learning concepts
- Skill 2.3: Identify core tasks in creating a machine learning solution
Skill 2.3: Identify core tasks in creating a machine learning solution
Azure provides several different tools and services to build and manage machine learning models. While the tools vary, many of the tasks involved are very similar. This section describes how you use Azure Machine Learning to build and deploy machine learning models.
Understand machine learning on Azure
Azure provides many different ways to create and use Artificial Intelligence models. You can use the prebuilt models in Azure Cognitive Services, or you can build and deploy your own models with Azure Machine Learning services.
Machine learning on Azure
Microsoft provides a number of services created by Microsoft for machine learning and supports a wider set of open source and third-party services for data science and Artificial Intelligence that you can use within Azure for your own AI solutions.
The Azure Marketplace contains services and solutions for machine learning from both Microsoft and its partners, as shown in Figure 2-13.
)
FIGURE 2-13 Azure Marketplace
If you are used to tools such as PyCharm or Jupyter notebooks, you can use these within Azure and leverage other Azure services such as compute and storage.
If you are used to frameworks such as PyTorch, Scikit-Learn, TensorFlow, or ONNX, you can use these frameworks within Azure.
If you are used to using Apache Spark, you can use Azure Databricks, Microsoft’s implementation of Apache Spark that integrates tightly with other Azure services.
If you are used to Microsoft SQL Server machine learning, you can use an Azure Data Science virtual machine (DSVM), which comes with ML tools and R and Python installed.
You can also configure and use your own virtual machine configured using the tools and services that you may prefer.
As there are many different options available, we will focus on the native Azure services provided by Microsoft.
Azure Machine Learning workspace
To use Azure Machine Learning services, you first need access to an Azure subscription. An Azure subscription defines how you are billed for using Azure resources.
You then need to create an Azure Machine Learning workspace. An Azure ML workspace is a container for all of your resources used in building and deploying models, data, experiments, compute, and web services.
The purpose of a Machine Learning workspace is to make the building, training, and deployment of machine learning models easier, reducing the steps required and integrating storage and compute all within a secure environment.
Figure 2-14 shows the service description for Azure Machine Learning workspace.
)
FIGURE 2-14 Machine Learning workspace service description
After clicking on the Create button, the Create Machine Learning workspace pane opens, as shown in Figure 2-15.
)
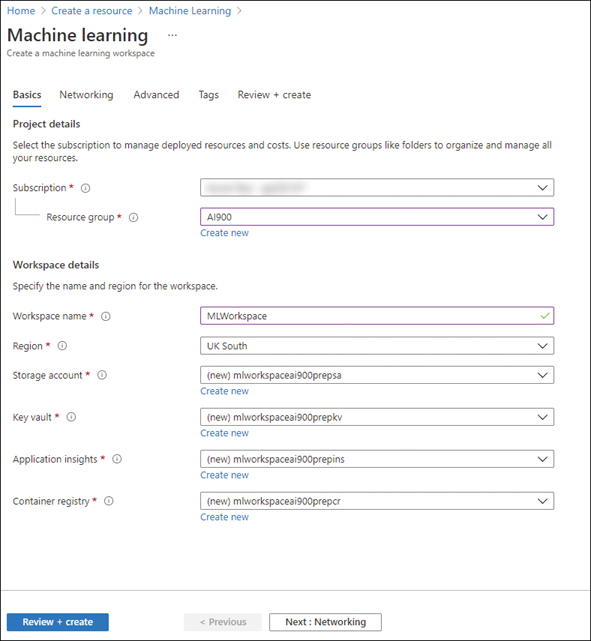
FIGURE 2-15 Creating a Machine Learning workspace resource
You will need to select the subscription, resource group, and region where the resource is to be deployed. You will then need to create a unique name for the workspace. There are four related Azure services:
Storage account The default datastore for the workspace for data used to train models as well as files used and generated by the workspace.
Key vault Securely stores secrets such as authentication keys and credentials that are used by the workspace.
Application insights Stores monitoring information for your deployed models.
Container registry Stores Docker images used in training and deployments.
You can either select existing resources or create new resources for these related services.
Clicking on Review + create will validate the options. You then click on Create to create the resource. The resource will be deployed after a few minutes.
Once your resource has been created, you can view the resources associated with the workspace, as shown in Figure 2-16.
)
FIGURE 2-16 Azure resources for a Machine Learning workspace
You can create a Machine Learning workspace using the CLI as follows:
        az ml workspace create –workspace_name <unique name> --resource-group <resource
group name> --location <region>
To access the workspace, you need to open the workspace in the portal. This will display the details of the workspace, as shown in Figure 2-17.
)
FIGURE 2-17 Machine Learning workspace resource
You can use Role-Based Access Control (RBAC) to give users permission to access the workspace and its resources, and to create and run experiments.
An Azure Machine Learning workspace is used to manage your machine learning assets:
Compute The virtual machines and Docker containers used for development, training, and deployment of models.
Datasets The data used for experimentation and training models.
Pipelines The connected steps for a machine learning model. A pipeline can contain the data ingestion, training, scoring, and evaluation steps.
Experiments The results for each run of a pipeline, including metrics and outputs.
Models The trained models.
Endpoints The web services for deployed models.
Before you can start working with your workspace, you need to assign compute resources to the workspace. These are referred to as compute targets:
Compute instance A development virtual machine used to process data and build your model.
Compute cluster A cluster of scalable virtual machines for training your model and running experiments.
Inference cluster Azure Kubernetes Service (AKS) cluster for running a deployed model to perform predictions.
Attached compute Existing Azure virtual machines or other ML services, such as Azure Databricks.
The high-level process for an Azure Machine Learning workspace is shown in Figure 2-18.
)
FIGURE 2-18 Machine Learning workspace process
You need to manage the data needed to build machine learning solutions. You can then build and train your model. All the outputs of each experiment are stored in the workspace to allow you to evaluate the model. When you are content that your model performs well, you publish your model as a web service that can be accessed via an HTTP endpoint.
Azure Machine Learning workspaces are tightly integrated with the Visual Studio Code IDE. Using Visual Studio Code you can build, train, and deploy machine learning models with Azure Machine Learning. Visual Studio Code supports creating machine learning models with .NET and R languages, as well as with Python and Jupyter notebooks. Figure 2-19 shows the Visual Studio Code connected to the Azure Machine Learning workspace and running Python code in a Jupyter notebook.
)
FIGURE 2-19 Visual Studio Code
 Exam Tip
For this exam, you do not need to know how to write code for machine learning, but you do need to know about the different languages and tools for building models.
Understand Azure Machine Learning studio
In the Machine Learning workspace resource, you will see a button called Launch studio. Clicking on this button will open the Machine Learning studio at https://ml.azure.com/, as shown in Figure 2-20.
)
FIGURE 2-20 Azure Machine Learning studio
Machine Learning studio allows you to create and manage the assets in your Machine Learning workspace using a graphical user interface.
Author
Azure Machine Learning studio supports both no-code and code-first experiences. You can build, train, and run machine learning models with Automated Machine Learning, Notebooks, and a Visual drag-and-drop designer.
Azure Machine Learning studio supports the use of Jupyter notebooks that use the Python SDK to create and run machine learning models.
Automated Machine Learning (AutoML) is a no-code tool that performs many of the steps required to build and train a model automatically, reducing the need for deep machine learning skills and domain knowledge. You just select the training data and the required model type, and AutoML determines the best algorithm to use and trains the model.
The Designer (drag-and-drop ML) is a no-code tool that allows you to build pipelines for data preparation and model creation.
The AutoML and Designer tools are explained in Skill 2.4 later in this chapter.
Compute
Before you can start ingesting data or building a model, you must first assign a compute instance. A compute instance is a configured development virtual machine environment for machine learning. A compute instance is used as a compute target for authoring and training models for development and testing purposes.
Clicking on Compute in the left-hand navigation pane of Azure Machine Learning studio displays the Compute options, as shown in Figure 2-21.
)
FIGURE 2-21 Machine Learning studio compute
After clicking on the + New button, the Create compute instance pane opens, as shown in Figure 2-22.
)
FIGURE 2-22 Create a compute instance
You will need to provide a unique name for the instance; select the machine type and size. You then click on Create to create the virtual machine. The virtual machine will be created and started after a few minutes. You will be able to see the state of the virtual machine, as shown in Figure 2-23.
)
FIGURE 2-23 Compute instances
You can stop the virtual machine used for the compute instance by clicking on the stop button, as shown in Figure 2-24.
)
FIGURE 2-24 Compute instance
Describe data ingestion and preparation
To train a model, you need to supply data for training and testing. You are going to need to either import your own data into the Machine Learning workspace or link to existing datastores used by other applications.
Ingestion
Each Machine Learning workspace has two built-in datastores: one for data used for training and evaluating models and another for files used by machine learning, such as logs and output files.
Figure 2-25 shows the built-in datastores in the Machine Learning workspace.
)
FIGURE 2-25 Datastores
When you click on the + New datastore button, you can add in the following existing datastores:
Azure Blob Storage
Azure file share
Azure Data Lake Gen 1
Azure Data Lake Gen 2
Azure SQL database
Azure PostgreSQL
Azure MySQL database
If you have existing data in Azure SQL database, you supply the details of the Azure SQL database, as shown in Figure 2-26.
)
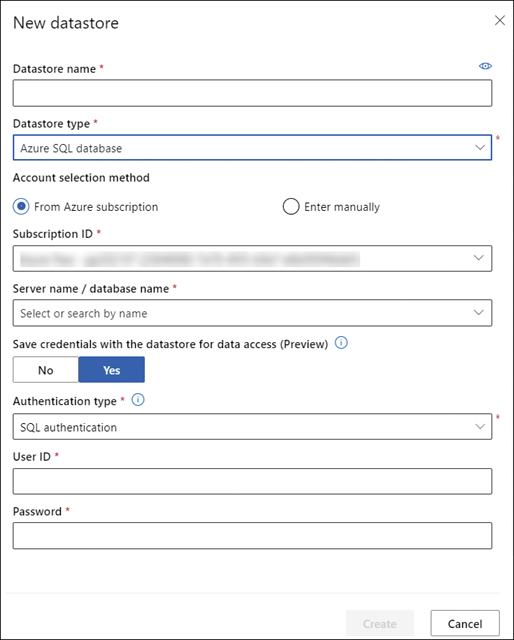
FIGURE 2-26 Add Azure SQL database
If you want to import your data into the Azure Machine Learning workspace, you register datasets using Machine Learning studio. You can create a dataset from:
Files uploaded from your local computer
A datastore associated with the workspace
Files accessed via an HTTP URL
Open datasets
When you import data, you must define the dataset type as either tabular or file:
Tabular Files containing data in a tabular format. You can create a tabular dataset from CSV, TSV, Parquet, JSON files, and from the output of an SQL query.
File A collection of file references in datastores or public URLs. A file dataset references single or multiple files.
The student data we referenced earlier in this chapter is held in a CSV file on a local computer. After clicking on + Create dataset, the Create dataset from the local files wizard is displayed, as shown in Figure 2-27.
)
FIGURE 2-27 Create a dataset from the local files wizard, step 1
You must enter the name of the dataset, select the dataset type as either Tabular or File. Clicking on Next displays the next step in the wizard, as shown in Figure 2-28.
)
FIGURE 2-28 Create a dataset from the local files wizard, step 2
You select the datastore where the data will be imported into. This will normally be the built-in blob datastore, but you can add your own datastore if required. You can then upload a single file or select an entire folder of files to upload. Clicking on Next will parse the selected file(s) and display the next step in the wizard, as shown in Figure 2-29.
)
FIGURE 2-29 Create a dataset from the local files wizard, step 3
You can review the tabular data to ensure it has been parsed correctly. Clicking on Next displays the next step in the wizard, as shown in Figure 2-30.
)
FIGURE 2-30 Create a dataset from the local files wizard, step 4
You can exclude columns from being imported and correct any data type for each column. Clicking on Next displays the final step in the wizard, as shown in Figure 2-31.
)
FIGURE 2-31 Create a dataset from the local files wizard, step 5
Clicking on Create will import the data and register the dataset, as shown in Figure 2-32.
)
FIGURE 2-32 Registered datasets
You can use publicly available data from URLs such as daily bike rental data that can be found at http://aka.ms/bike-rentals. You can import this dataset, as shown in Figure 2-33.
)
FIGURE 2-33 Create a dataset from the local files wizard, step 1
Azure Open datasets are curated datasets publicly available on Azure that you can import into your machine learning model, as shown in Figure 2-34.
)
FIGURE 2-34 Open datasets
You can simply add these datasets to your workspace. To find out more about these and other publicly available datasets, see https://docs.microsoft.com/azure/open-datasets/dataset-catalog.
Preparation
Once you have ingested your data, you will need to prepare your data for training and testing models. A good place to start is to explore the profile of the data. In Machine Learning studio, you can generate and review the profile of your data, as shown in Figure 2-35.
)
FIGURE 2-35 Dataset profile
The profile will inform you of issues with your data that require transformation and cleansing.
There are many actions you can perform to transform your dataset, including the following:
Normalization Adjusting the values in numeric columns so that all numeric values are on a common scale, normally between 0 and 1. A dataset that has features with different ranges can bias the model toward that feature.
Partitioning and sampling A method for reducing the size of data while retaining the same ratio of values.
How you perform these actions will depend on the tool you choose to build and train your model.
Data that is incomplete can cause issues when training your model. You can clean missing data by methods such as the following:
Replacing missing values with an average or another value.
Removing empty (or sparsely populated) rows.
Describe feature selection and engineering
Once the data has been prepared, the next step is to choose the features that you will use to train the model. You can select features from the dataset, but it may be necessary to engineer new features.
Feature selection
Feature selection is the process of selecting a subset of the columns in the dataset features to exclude features that are not relevant to the machine learning problem that we are trying to resolve. Feature selection restricts the data to the most valuable inputs, reducing noise and improving training performance.
Feature selection has two main purposes:
Increase the model’s ability to classify data accurately by eliminating features that are irrelevant, redundant, or highly correlated.
Increase the efficiency of the model training process.
If you can reduce the number of features without losing the variance and patterns in the data, the time taken to train the model is minimized. For instance, you can exclude features that are highly correlated with each other as this just adds redundancy to the processing.
Azure Machine Learning has a module for Filter-Based Feature Selection to assist in identifying features that are irrelevant. Azure Machine Learning applies statistical analysis to determine which columns are more predictive than the others and ranks the results. You can exclude the columns that have a poor predictive effect.
Feature engineering
Feature engineering is the process of creating new features from raw data to increase the predictive power of the machine learning model. Engineered features capture additional information that is not available in the original feature set. Examples of feature engineering are aggregating data, calculating a moving average, and calculating the difference over time.
It can be beneficial to aggregate data in the source data, reducing the amount of data imported and used to train the model.
In Azure Machine Learning, you can use modules such as feature hashing that use Cognitive Services to turn text into indices. For example, in our student data, we could apply feature hashing to convert the academic subject for each student into a numeric hash value.
Binning is an example of feature engineering where the data is segmented into groups of the same size. Binning is used when the distribution of values in the data is skewed. Binning transforms continuous numeric features into discrete categories.
A common example of feature engineering is around dates and times. You can convert dates and times to the relative number of days, hours, and minutes or take two datetime columns and creating the difference in minutes between. This might create a model that predicts more accurate outcomes.
Another similar example of feature engineering is to extract features from a single column, such as converting a date into the following data:
Day of the week
Day of the month
Month
Year
Weekend or weekday
Public holiday or working day
The daily bike rentals data shows how such features have been engineered.
Describe model training and evaluation
Azure Machine Learning provides several ways to train your models, from code-first solutions using the various SDKs to no-code tools.
There are different ways to train the model depending on which option you choose. You can either create a configuration script—for example, in Python—and then run a training job, or you can use pipelines, which are workflows containing reusable modules.
Compute cluster
Before you can train a model, you need to assign compute resources to your workspace. A compute cluster is used to train models with the Azure Machine Learning workspace. The cluster can also be used for generating predictions on large amounts of data in batch mode.
Clicking on Compute in the left-hand navigation pane displays the Compute options, as shown previously in Figure 2-21. Clicking the Compute clusters tab displays any existing cluster. After clicking on the + New button, the Create compute cluster pane opens, as shown in Figure 2-36.
)
FIGURE 2-36 Create compute cluster
You will need to select the machine type and size. Clicking on Next displays the cluster settings pane, as shown in Figure 2-37.
)
FIGURE 2-37 Create compute cluster settings
You will need to provide a unique name for the cluster and specify the minimum and maximum number of nodes in the cluster. You then click on Create to create the cluster. The cluster will be created after a few minutes. You will be able to see the state of the cluster, as shown in Figure 2-38.
)
FIGURE 2-38 Compute clusters
The number of active nodes will scale up and down automatically based on the training you are performing in the workspace.
You can change the number of nodes used in the compute cluster by changing the minimum and maximum number of nodes, as shown in Figure 2-39.
)
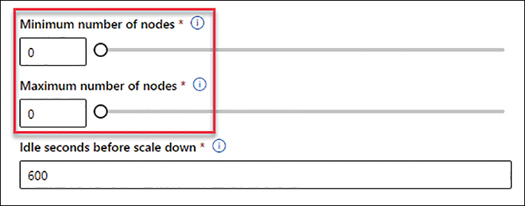
FIGURE 2-39 Compute cluster nodes
If you are not training models, you can set both numbers to zero.
Training
Training a model requires a combination of dataset, algorithm, and compute. Azure Machine Learning allows you to easily train a model, but in the real world, you need to run multiple experiments with different features and algorithms to build the best performing model.
Before training, you should have transformed and cleansed your dataset, selected features, performed any feature engineering required, and normalized the data. By properly preparing your dataset, you can improve the accuracy of the trained model.
Azure Machine Learning logs metrics for every experiment, and you can use these metrics to evaluate the model’s performance.
Once you have deployed your model, training does not stop. You may get additional data, and you will need to train and evaluate the model. As was discussed earlier, building models is an iterative process. But it is not just iterative—it is an ongoing process. With Azure Machine Learning, you can create new versions of your model and then deploy a version to replace the existing deployed model. You can also revert to an older version of the model if the version you have deployed does not perform well with new data.
Many algorithms have parameters, known as hyperparameters, that you can set. Hyperparameters control how model training is done, which can have a significant impact on model accuracy. Azure Machine Learning has a module that allows for tuning hyperparameters by iterating multiple times with combinations of parameters to find the best fit model
With the K-means clustering algorithm, you can adjust the K, which is the target number of clusters you want the model to find. Increasing K increases the compute time and cost.
Scoring
Azure Machine Learning contains a module that can split data into training and testing datasets. Once the model has been trained, you use the testing dataset to score the model.
The testing dataset contains data that was not used to train the model—data that is new to the model. You use the trained model to generate predictions for each row in the testing dataset. Azure Machine Learning enables visualization of the results from scoring, as shown in Figure 2-40 for a regression model using our student dataset and using the hours studied as a single feature and the score as the label.
)
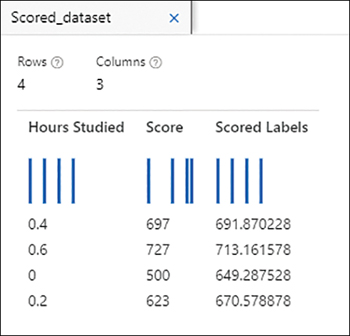
FIGURE 2-40 Score results for regression
In the results, you can see that the prediction (the scored label) for the first two rows is close to the actual score, but the other two rows are showing higher residual errors. The third row has a predicted score of 649, but the actual score was 500; the fourth row has a predicted score of 670, but the actual score was 623.
Figure 2-41 shows the scores for a classification model using our student dataset and using the hours studied and completed labs as features and pass as the label.
)
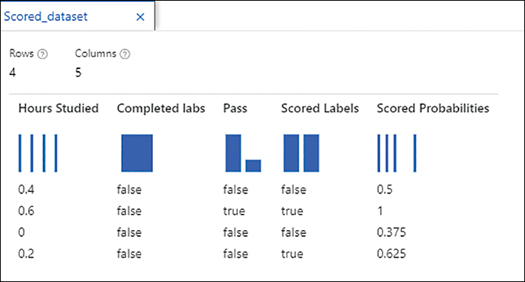
FIGURE 2-41 Score results for classification
In the results, you can see that the prediction (the scored label) for the first three rows is correct. The first row is a true negative, with the actual and prediction both false with a probability of 50%. The second row is a true positive, with the actual and prediction both true with a probability of 100%. The third row is a true negative, with the actual and prediction both false, but with a probability of only 37.5%. The fourth row is a false positive, with the actual being a fail but the model predicting a pass.
Once you have scored your model, you use the scores to generate metrics to evaluate the model’s performance and how good the predictions of the model are.
The sequence of the tasks when building a model is shown in Figure 2-42.
)

FIGURE 2-42 Sequence of model-building tasks
Evaluation
Evaluation is the process of measuring the accuracy of a trained model. A set of metrics is used to measure how accurate the predictions of the model are. Evaluation is a key part of the building of your model.
Azure Machine Learning generates metrics for each experiment. You can view these metrics to evaluate your model’s performance (as shown previously in Figure 2-42) for a regression model using our student dataset, with the hours studied as a single feature and the score as the label, as shown in Figure 2-43.
)
)
FIGURE 2-43 Metrics for a regression model
As you can see from these metrics, this model does not perform well with high error values and a low coefficient of determination. We will need to select additional features and train the model to see if we can create a better performing model.
Figure 2-44 shows the metrics for a classification model using our student dataset and using the hours studied and completed labs as features and pass as the label.
)
FIGURE 2-44 Metrics for a classification model
As you can see from these metrics, with a threshold set to 50%, the model is only 50% accurate with a precision of 33%. We will need to add additional data, use a different algorithm or perform feature engineering, and train the model to see if we can create a better performing model.
Earlier in the chapter, we discussed bias in the dataset, where the algorithm is unable to separate the true signal from the noise. This is often caused by the dataset used for training. If we have used a split of the same dataset for scoring and evaluating, then the model may appear to perform well but does not generalize—in other words, it does not predict well with new unseen data.
This is one of the most common problems with machine learning and is known as overfitting. Overfitting means that the model does not generalize well from training data to unseen data, especially data that is unlike the training data. Common causes are bias in the training data or too many features selected, meaning the model cannot distinguish between the signal and the noise.
One way to avoid overfitting is to perform cross validation. In cross validation, a dataset is repeatedly split into a training dataset and a validation dataset. Each split is used to train and test the model. Cross-validation evaluates both the dataset and the model, and it provides an idea of how representative the dataset is and how sensitive the model is to variations in input data.
Describe model deployment and management
Azure Machine Learning allows you to create and manage versions of your model and then choose which version of a model to deploy so that applications can use the model to make predictions.
In machine learning, inferencing refers to the use of a trained model to make predictions for new unseen data. A machine learning model can be used for:
Real-time For individual or small numbers of data observations.
Batch For large volumes of data.
For batch inference processing, you create a pipeline that includes steps to load the input data, load the model, predict labels, and write the results to a datastore, normally to a file or to a database.
For real-time processing, the model is deployed as a web service that enables applications to request via http.
If you have used a pipeline to build your model, you can create an inference pipeline that performs the same steps for new data input, not the sample data used in training. You can publish the inference pipeline as a web service. A real-time inference pipeline must have at least one Web Service Input module and one Web Service Output module. The Web Service Input module is normally the first step in the pipeline. The pipeline performs the same steps for new data input. The Web Service Output module is normally the final step in the pipeline.
In Azure Machine Learning, when you publish a real-time inferencing model, you deploy the model as a web service running in a Docker container. There are three ways you can deploy the container:
Azure Kubernetes Service (AKS) cluster AKS is Microsoft’s implementation of Kubernetes and is used to run highly scalable real-time interference as a web service for production.
Azure Container Instance (ACI) ACI is used to run a single Docker container. You can use this to expose your prediction model as a web service for testing and low-volume production scenarios.
IoT Edge Azure IoT Edge supports the running of containers containing machine learning models on small devices, reducing the need for network traffic and reducing latency.
You can also use ONNX (Open Neural Network Exchange) to export your model and deploy it on other platforms, such as on a mobile device.