Implement modern device services
- By Robert Clements and Brian Svidergol
- 6/14/2019
Skill 1.2: Manage device compliance
Device compliance is the practice of ensuring that the devices accessing your environment meet a distinct set of requirements, often defined by the IT and cybersecurity teams in your organization. For the purpose of this exam, device compliance is also referred to as a feature in Microsoft Intune. This feature is provided to aid administrators in defining their compliance requirements and using them to delegate access to data and services. As an administrator, it is your job to understand the use cases for device compliance and how to implement them.
The compliance policies that you define make up the connective tissue for several other actions in the platform. For example, the compliance status of a device can be leveraged as a determining factor for granting access to Exchange Online. This is accomplished using conditional access policies, another key feature covered in this chapter. Conditional access policies are a different type of policy, managed within Azure Active Directory (Azure AD), for allowing and denying access to data and services.
Plan for device compliance
This skill section covers planning considerations for device compliance. This includes topics such as prerequisites before implementation, compliance workflows, and possible use cases for your organization. Later in this chapter you will work with conditional access policies, and one of the dependencies for conditional access is the compliance status of the end user device. The MS-101 exam will present scenarios dealing with Intune enrollment, device compliance, and conditional access. As you prepare, take time to work with these technologies in the Azure portal and see what the dependencies are.
Understand the prerequisites for device compliance
Before you get started with creating device compliance policies, there are some technical prerequisites to plan for. Throughout this book you will see some trending prerequisites for each of the cloud technologies, particularly around the required subscriptions. Keep an eye on these for the exam and take some extra time to understand which features are included with the various subscription models.
These are the prerequisites for device compliance:
Subscriptions Device compliance is a technology with dependencies on Azure AD and Microsoft Intune. The device must be enrolled in Intune to receive a compliance policy, and the compliance flag is written to Azure AD for other features, such as conditional access. At a minimum you need a standalone Intune subscription and an Azure AD Premium P1 subscription. The higher tiered subscriptions, such as Azure AD premium P2, do not include additional capabilities focused on device compliance.
Platform support Device compliance policies support a wide range of platforms. For clarification, the term platform is referring to the operating system, not the physical hardware. Platform support is an important prerequisite if you are planning to manage devices that are not supported. At the time of this writing the following platforms are supported:
Android
Android Enterprise
iOS
macOS
Windows Phone 8.1
Windows 8.1
Windows 10
Enrollment Devices cannot report compliance until they are enrolled in Microsoft Intune.
Understand the process flow for device compliance
Device compliance and conditional access are both policy-based technologies. You configure the policy to address your needs, and then assign that policy to the desired resources in Microsoft Intune. Devices will evaluate the policy and report back whether they meet the requirements or not. The compliance state is then written to the device object in Azure AD as a custom attribute. The state of that attribute will determine if the device is approved to access data and services. This is where conditional access enters the picture, which is covered in more detail later in this chapter.
Refer to Figure 1-21 for a diagram that illustrates the device compliance flow. In this example we are using the default configuration for device compliance. As an administrator, you have a few options to change this flow to meet your needs.
)
Figure 1-21 Device Compliance Process Flow
These next few items address controls that an administrator has available to alter the device compliance flow.
Intune enrollment Devices that are not enrolled in Intune cannot receive device compliance policies. This rule also applies to devices that are Azure AD joined. This was covered earlier in the prerequisites section. In this context it can also be used to prevent compliance policies from applying to unmanaged devices.
Policy assignment In the compliance policy settings for Microsoft Intune, you have the option to mark devices as compliant if they do not have a policy assigned. By default, all devices without an assigned policy are marked as noncompliant. But you do have the option to change this behavior, making all devices compliant by default. This is represented by the dashed line between the policy assigned and the device marked compliant in the illustration, also marked as optional.
Device exemption Device exemption is another control you can configure. This is accomplished in the policy settings by defining which device platforms the compliance policy is scoped for. If your compliance policy includes all platforms except iOS, then iOS devices will be exempt from running that policy.
 EXAM TIP
As you prepare for this exam, spend time looking at each of the device compliance options in the Intune portal. In this last section we reviewed the default behavior for devices that have no policy assigned. You may see questions that test your knowledge about the default behavior for device compliance policy, or where to change that behavior under certain circumstances.
Determine use cases for device compliance
In this section we are going to look at some potential use cases for device compliance. First, understand that compliance policies contain a series of rules that you define. These rules determine whether a device is compliant or not. Compliance policies can help to remediate certain conditions, but in most cases the device will be quarantined, and remediation will be left up to the user. For example, you have a device compliance policy that has a security rule that requires a password before unlocking a device. If a device is noncompliant with this policy, the user will be prompted to set a password on their noncompliant device.
Users with devices that are marked as noncompliant will receive notifications about the conflicting rules. As an administrator, you can also create a conditional access policy to block these devices until they are remediated. Refer to Table 1-4 for a series of compliance policies and corresponding use cases.
Table 1-4 Device Compliance Use Cases
Platform |
Setting(S) |
Example Use Case |
|---|---|---|
Windows 10 |
Minimum OS version Valid operating system builds |
Windows 10 devices that are not running the latest cumulative update are marked as noncompliant. Windows 10 devices running the latest release of 1709 are still valid while upgrades are rolling out. |
macOS |
Require system integrity protection |
macOS devices that do not have system integrity protection enabled are marked as noncompliant. |
Android |
Rooted devices Encryption of data storage on device |
Android devices that are rooted are marked as noncompliant. Android devices that do not have data storage encryption enabled are marked as noncompliant |
iOS |
Jailbroken devices Minimum OS version Restricted apps |
iOS devices that are jailbroken are marked as noncompliant. iOS devices that are not running the latest major release of iOS are marked as noncompliant. iOS devices that have the Dropbox app installed are marked as noncompliant. |
Design conditional access policies
In this skill section you will review the design aspects of conditional access policies. It is worth pointing out that a majority of this chapter is dedicated to conditional access: designing, creating, and managing policies. As you prepare for these skills plan to spend time working in the Azure portal and following along to review the interface and controls for conditional access.
This chapter began by covering what device compliance means from a cloud management perspective. Now you will see how device compliance is used to establish access requirements for data and services in your organization.
Design for the protection of data and services using conditional access policies
There are a variety of policy settings available for conditional access, and a mixture of configurations that you can implement. Let’s first look at the Conditional Access Policies blade in the Azure portal. This will help set the stage for conditional access policies and introduce you to some key terms. Refer to Figure 1-22 for an example of the Policy Creation blade, as we drill down and take a closer look at each of the available options.
)
Figure 1-22 Conditional Access Policy Creation
Assignments Assignments define the scope, criteria and conditions of the policy you are deploying. On the Policy Creation blade you are presented with three categories under assignments. These three categories include:
Users And Groups They define who will receive the policy. You can either include or exclude users and groups. Although the creation screen will not prevent you from proceeding, all conditional access policies require a user and group assignment before it is applied. For includes you can select all users or specific users and groups. For example, if you have a group that only contains your marketing team you can select that as an option. For excludes you can select all guest users (defined by the userType attribute), specific directory roles such as “Application developer,” or specific users and groups.
Cloud Apps They define the services that users will access for productivity. You have the choice to include or exclude a pre-defined list of supported cloud apps. For includes you can select all cloud apps or specific apps, such as Microsoft Teams. For excludes you can select specific apps.
Conditions They define when a policy is applied. Refer to Table 1-5 for a breakdown of each condition, the available options, and some example use cases.
Table 1-5 Conditional Access Options
Condition |
Description |
Options |
Example Use Case |
|---|---|---|---|
Sign-in risk |
Azure AD determines a user’s sign-in risk based on a configurable policy under Azure AD Identity Protection. |
High, medium, low, or no risk |
Enforce a MFA policy for users that are flagged with a medium sign-in risk. |
Device platforms |
Azure AD retrieves the operating system of joined device, but the information is not verified. This should be combined with a Microsoft Intune enrollment and device compliance policy. |
Android, iOS, Windows Phone, Windows, macOS |
Enforce an app restriction policy on iOS and Android devices only. |
Locations |
Locations are used to define trusted network locations. Trusted network locations are configured in Azure AD under Named Locations. |
Trusted locations |
Block access to Exchange online from the San Francisco office with an IP subnet of 10.20.11.0/22 |
Client apps (preview) |
Set conditional restrictions based on specific client apps. |
Browsers, mobile apps and desktop clients |
Restrict access to mobile apps unless the device is marked as compliant. |
Device state (preview) |
Exclude corporate or trusted devices from conditional access restrictions |
Hybrid Azure AD joined devices, devices marked as compliant |
Enforce restrictions to Office 365 Exchange Online for noncompliant devices. |
Access controls They define additional requirements for granting or denying access, along with session controls for limiting the experience within cloud apps. The following options are available from the access controls section:
Grant It enables you to block access based on the conditions that you defined under the assignments section. Alternatively, you can choose to grant access and enforce additional requirements. For example, you can require MFA or only grant access to devices that are marked as compliant through device compliance policies.
Session This control enables you to limit the experience within certain cloud apps. At the time of this writing, Exchange Online and SharePoint Online are the only cloud apps that support app enforced restrictions. Enabling this feature adds real-time monitoring and control capabilities to these apps.
Now that you have spent some time exploring the interface, let’s look at how a conditional access policy is constructed. The policy is made up of two parts: the condition and the access control. You can also look at these in the following context: when this happens (condition), then do this (access control). For the exam you should be familiar with this formula and how it corresponds to conditional access restrictions. Refer to Table 1-6 for a few examples on how conditional access policies are assembled.
Table 1-6 Conditions and access controls
When This Happens (Condition) |
Then Do This (Access Control) |
|---|---|
Windows and macOS device owners are accessing SharePoint Online from an untrusted network. Additional security requirements are needed. |
Grant access to SharePoint Online for Windows and macOS devices. Require multi-factor authentication and a compliant device when accessed from an untrusted network. |
The sales team is accessing Exchange Online from their iOS and Android devices. These devices need to be compliant before access is granted. |
Grant access to Exchange Online for the sales group. Require all sales team device owners to be enrolled in Intune and marked as compliant. |
All users are accessing Microsoft Teams from trusted and untrusted networks. Users that are on an untrusted network need additional security requirements. |
Grant access to Microsoft Teams for all users. Require multi-factor authentication when accessed from an untrusted network. |
BYOD devices are accessing Exchange Online from their browser. Access needs to be restricted to approved apps. |
Grant access to Exchange Online for all users. Restrict access to trusted client apps only. |
The following list covers prerequisites that you need to be familiar with. Some of these are firm requirements and others are strategic questions to help prepare you for designing policies.
Subscriptions The basic capabilities of conditional access are available with an Azure AD premium subscription. There are additional capabilities, however, that will not be available until you upgrade your subscription. These include the following:
Azure AD Premium P1 The P1 subscription provides you with the basic capabilities of conditional access policies.
Azure AD Premium P2 The P2 subscription enables identity protection, which is a requirement if you want to leverage sign-in risk. Sign-in risk is a capability that determines if a user sign-in is malicious and measures the risk level. This can be leveraged as part of your policy conditions.
Microsoft Intune Intune can be purchased standalone or through an EMS E3 or E5 subscription. Policy definitions that require a compliant device are dependent on the device being enrolled in Intune.
Permissions Before you can start creating and managing conditional access policies, you will need the appropriate permissions assigned to your account. Conditional Access Administrator is a pre-defined role that that enables the necessary privileges.
Requirements to be delivered What requirements do you have for device compliance and conditional access? This is something you should start defining from the beginning. Determine if your goal is something straightforward, such as enforcing multi-factor authentication for users. Or something more advanced, such as restricting access to SharePoint Online from Windows devices when they are connected to an untrusted network.
Device management What kind of device management solution are you using today? The full capabilities of conditional access do have dependencies on Microsoft Intune, but if you are using ConfigMgr, you can enable co-management and start leveraging conditional access policies sooner.
Device platforms What types of devices and operating systems do you need to support? Conditional access policies support a variety of operating systems. At the time of this writing, the only current outliers are devices running Linux. Consider the devices in your environment and what type of restrictions you need to enforce.
Email requirements What are your access requirements around email? Email is often used as one of the first services for enforcing conditional access restrictions. If you have a goal to enable access restrictions for Exchange Online, then selecting the cloud app from the default list of assignments is straightforward, and something we will look at later in this chapter. If you have a goal to enable access restrictions for an on-premises Exchange server, you will need to plan for additional prerequisites, such as installing and configuring the on-premises Exchange connector.
Design device-based and app-based conditional access policies
First, understand that a conditional access policy can contain any mixture of options, including device-based and app-based restrictions. The distinction between device-based and app-based restrictions is relative to the controls that you select and how you structure your policies. That said, device-based and app-based policies can have different requirements and can operate independently of each other if you choose.
Let’s look at a few examples:
Device-based This first policy focuses on device-based controls. In this example the policy requires multi-factor authentication on untrusted networks for iOS devices. The policy is assigned to all users. In this example we have not defined any app-based restrictions, keeping the focus on the platform and network.
App-based This second policy focuses on app-based controls. In this example the policy requires approved client apps when accessing Exchange Online. This policy is assigned to all users. In this example we have not defined any device-based restrictions, keeping the focus on application controls.
Mixed This third policy includes a mixture of controls. In this example the policy requires all platforms to be enrolled in Intune and marked compliant before they can access Exchange Online from approved client apps. In this example we are specifying device-based restrictions and app-based restrictions to accomplish the desired result.
At this stage you should have a good understanding of the differences between device-based and app-based policies. Next, let’s examine the individual controls related to each policy type. The following items are focused on device-based policy requirements:
Azure AD joined This requirement is available as both a condition and an access control item. When you are defining a condition, you have the option to exclude devices that are Azure AD joined. This is available through the device state blade and can be used in a scenario where you are locking down access, but want to ignore Azure AD joined devices. Alternatively, when you are defining the controls for granting access, you have the option to require Azure AD joined devices. This is available through the grant blade for access control and can be used as one of many required controls before enabling access to cloud apps.
Device compliance This requirement is available as both a condition and an access control item, similar to the Azure AD join requirement mentioned above. Devices must be enrolled in Microsoft Intune and be marked as compliant for this requirement to work. When you are defining a condition, you have the option to exclude devices that are marked as compliant. This is available through the device state blade and can be used in a scenario where you are locking down access but want to ignore enrolled devices that are compliant. Alternatively, when you are defining the controls for granting access, you have the option to require enrolled and compliant devices. This is available through the grant blade for access control and can be used as one of many required controls before enabling access to cloud apps.
Device enrollment This requirement is not directly defined through a conditional access policy but is a prerequisite for identifying device compliance.
Device platforms This requirement is available as a condition item. When you are defining a condition, you have the option to include or exclude the following operating systems: Android, iOS, Windows Phone, Windows, and macOS. This is available through the device platforms blade and can be used in a scenario where you are restricting access to a cloud app and want to exclude certain platforms.
Next, let’s examine app-based requirements. We introduced session controls earlier in this skill section, which enable you to limit the experience within cloud apps. Two of the requirements we are going to cover are enabled using session controls. The following items are focused on app-based policy requirements.
Use app enforced restrictions This requirement is available as an access control item. When you are defining access controls, you have the option to enable app enforced restrictions. This is defined on the session blade and could be used in a scenario where you need to provide limited access to Office 365 Exchange Online or SharePoint Online for noncompliant devices.
Use Conditional Access App Control This requirement is available as an access control item. When you are defining access controls, you have the option to enable conditional access app control. This is defined on the session blade and could be used in a scenario where you need to monitor and control application access in real time. Access and session policies can then be configured through the Cloud App Security portal, enabling granular control over user access.
Available policies Include access, activity, app discovery, app permission, cloud discovery anomaly detection, files, and session policies. Some of these are designed for monitoring and alerting, others have automated actions that can be enabled.
Require approved client app This requirement is available as an access control item. When you are defining access controls, you have the option to enable the requirement for approved client apps. This is defined on the grant blade and can be used in a scenario where you need to ensure services are only accessed from approved client applications.
Create Azure AD Conditional Access policies
In this skill section we examine conditional access policies and how to create them. We leverage the design elements and controls that were reviewed in the previous skill section to assist with the creation process. At the time of this writing PowerShell support for conditional access policies is not available, so our walkthrough will be focused on the Azure portal. As with any policy, the controls you choose to enable will depend greatly on the needs of your organization and the goal you wish to achieve.
From an exam perspective, expect to see questions or scenarios that test your knowledge of the conditional access controls and what their capabilities are. We covered some of these fundamentals in the previous skill section, but now we will create the policies and assign them, so you can experience the end-to-end process. Over the next few sections we cover some of the more common conditional access use cases, which will provide you with the fundamentals you need. As always, try to follow along with the step-by-step instructions in your own lab.
Navigate and prepare for conditional access policies
Before creating conditional access policies, be aware that the restrictions you enforce can impact the productivity of your organization if assigned incorrectly. As a word of caution, always assign new policies to a dedicated test user or group and make it a priority to initially exclude admin accounts. Admin accounts can be re-introduced once you have tested the policy. This will prevent undesirable behavior, such as blocking Exchange Online for your senior management. Also, make sure you have the necessary subscription(s) active in your tenant.
To start off, let’s take a look at the Conditional Access – Policies blade in the Azure portal. There are a number of controls here that are leveraged prior to policy creation. Depending on your objective, you may need to configure some of these options.
Sign-in to the Microsoft Azure portal at https://portal.azure.com/.
Click All Services.
Search for Azure Active Directory and select it.
Under Security, select Conditional Access. In Figure 1-23 you can see an example of the Conditional Access blade in the Azure portal.
)
Figure 1-23 Conditional Access Policies blade
Let’s look at the available options on the Conditional Access blade:
Policies The policies blade is where you will create and manage conditional access policies. In Figure 1-23 the Policies blade is selected. You can see on the right that we have a few policies already defined and one of them is enabled.
Named Locations The Named Locations blade enables administrators to configure network and region-based locations. Network locations are defined by an IP range. Regional locations are defined through a dropdown list of known countries and regions. Named locations that you define can later be used in your conditional access policies.
Custom Controls (preview) The Custom Controls blade enables administrators to declare external services with additional authentication and validation steps. The administrator creates the control and provides the data input using the JSON format, interlinking conditional access and the third-party provider. At the time of this writing, the following providers offer integration with conditional access:
Duo Security, Entrust Datacard, Ping Identity, RSA, and Trusona.
Terms Of Use The Terms of Use blade enables administrators to upload a terms of use document, which can later be used by conditional access. Once uploaded, the terms of use are listed as another access control that you can require users to comply with before accessing data and services.
VPN Connectivity The VPN Connectivity blade enables administrators to create and manage VPN certificates for Always On VPN. Once created, a conditional access policy can be configured to grant access to the VPN server cloud app.
Classic Policies The class policies blade enables administrators to review and mange classic policies that were created using older versions of the Azure portal. This blade will list any existing classic policies and allow you to disable them as you migrate over to the new policy design.
Create conditional access policies
Now that you have some experience navigating the conditional access controls, let’s examine an example scenario and configure a policy. This scenario includes a basic example of what controls you have as an administrator and how they apply in a real world scenario.
Scenario: Require Multi-Factor Authentication
As an example, let’s say you have a requirement to enable multi-factor authentication and restrict access for cloud services to approved client apps only. The following conditions must be met:
Applies to all users.
Applies to iOS and Android platforms.
Applies to Office 365 Exchange Online.
Sign-in risk is medium or high.
Location is untrusted networks.
Devices are marked as compliant.
We are going to create a conditional access policy that meets these requirements. For each of these scenarios, consider any prerequisites that you may have to address before proceeding. For example, remember that sign-in risk does require an Azure AD premium P2 subscription and you will need to enable Azure AD Identity Protection for your tenant.
Sign-in to the Microsoft Azure portal at https://portal.azure.com/.
Click All Services.
Search for Azure Active Directory and select it.
Under Security, select Conditional Access.
On the Policies blade, click New Policy.
On the New blade, name the policy “ASH CA Policy.”
Under Assignments, click Users And Groups.
On the Users and groups blade, on the Include tab, select the radio button next to All Users and click Done. Refer to Figure 1-24 for an example of this configuration.
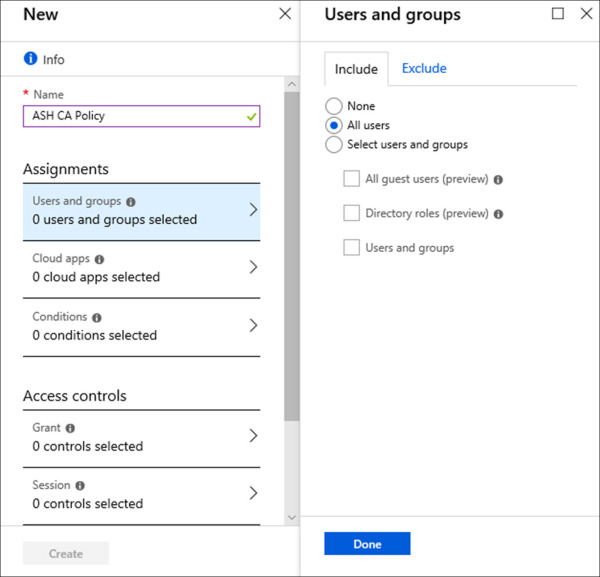
Figure 1-24 Conditional Access Users and Groups
Under Assignments, click Cloud Apps.
On the Cloud Apps blade, on the Include tab, select the radio button next to Select Apps and click Select.
On the Select blade, search for Office 365 Exchange Online and select it. Click Select. Refer to Figure 1-25 for an example of this configuration.
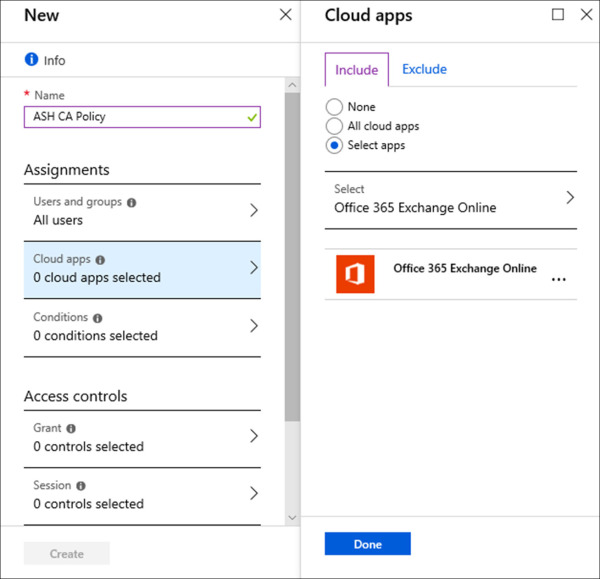
Figure 1-25 Conditional Access Cloud Apps
Click Done.
Under Assignments, click Conditions.
On the Conditions blade, click Sign-In Risk.
Under Configure, click Yes to configure this condition.
Check the boxes for High and Medium and click Select. Refer to Figure 1-26 for an example of this configuration.
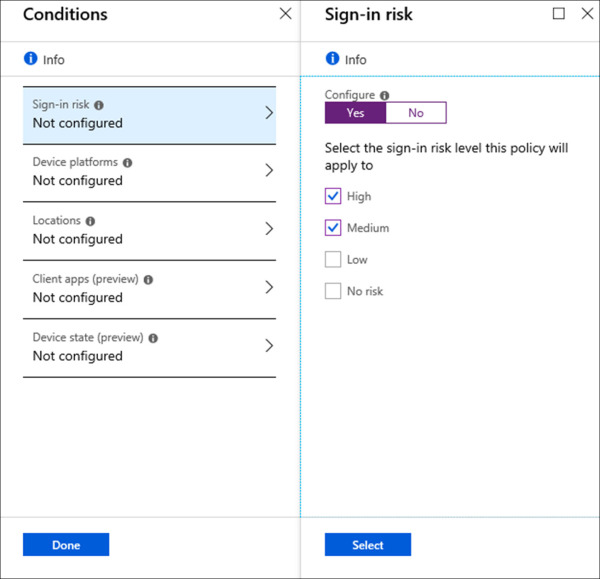
Figure 1-26 Conditional Access Sign-in Risk
On the Conditions blade, click Device Platforms.
Under Configure, click Yes to configure this condition.
On the Include tab, select the radio button next to Select Device Platforms.
Check the box next to Android and iOS and click Done. Refer to Figure 1-27 for an example of this configuration.
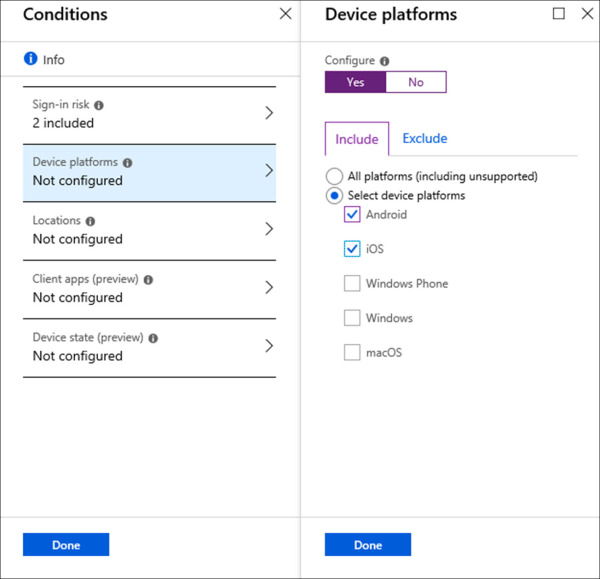
Figure 1-27 Conditional Access Device Platforms
On the Conditions blade, click Locations.
Under Configure, click Yes to configure this condition.
On the Exclude tab, select the radio button next to All Trusted Locations and click Done. Refer to Figure 1-28 for an example of this configuration. With this configuration we are including any location (default option on the include tab) and excluding all trusted networks. Once applied this policy will only affect users when connected from untrusted networks.
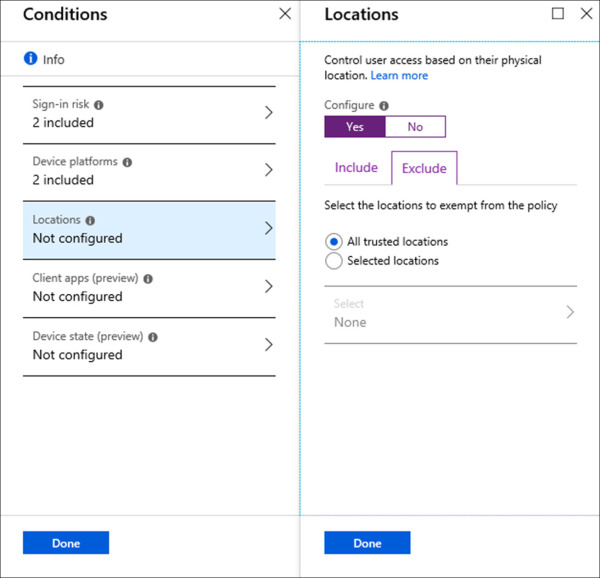
Figure 1-28 Conditional Access Locations
On the Conditions blade, click Done.
Under Access controls, click Grant.
On the Grant blade, select the radio button next to Grant access, check the box next to the following items and click Done. Refer to Figure 1-29 for an example of this configuration.
Require Multi-Factor Authentication
Require Device To Be Marked As Compliant
Require Approved Client App
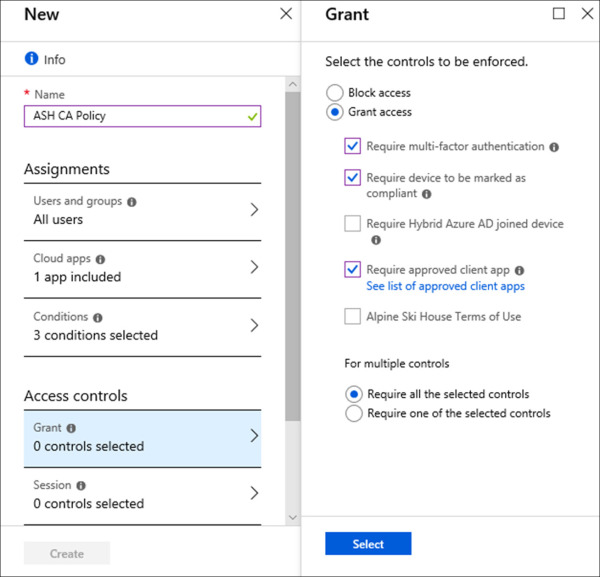
Figure 1-29 Conditional Access Grant
On the New blade, under Enable Policy, select On.
Click Create.
Review the Azure portal notifications to confirm that the conditional access policy was successfully created.
On the Policies blade, review the list of policies to confirm that the policy is present, and a check mark is present to indicate the policy is enabled.
)
)
)
)
)
)
After completing the above configuration, you should have a conditional access policy enabled that addresses both the device-based and app-based requirements outlined in this scenario. The goal for this scenario was to introduce you to the Conditional Access blades and build up your comfort level with navigating the various controls. Next, we will look at the What If tool to help assess which policies get applied to a user when certain criteria is defined.
Configure device compliance policy
This skill section covers the creation process for device compliance policies in Microsoft Intune. The examples cover common use cases for device compliance. Like conditional access policies, there are a variety of options and configurations for administrators to work with. This includes the ability to connect with third-party vendor solutions to further enhance the native capabilities. Also, as we navigate through the portal, remember that conditional access policies can leverage compliance status for restricting access to data and services.
Navigate and configure device compliance settings
When you access the Device Compliance blade for the first time, the first thing you might notice is the number of options available in comparison with the conditional access interface. The core functions are split into three groups: manage, monitor, and setup. Like we did with conditional access, let’s take a look through these groups and identify the purpose for each.
Sign-in to the Microsoft Azure portal at https://portal.azure.com/.
Click All Services.
Search for Intune and select it.
Under Manage, select Device Compliance. In Figure 1-30 you can see an example of the Device Compliance blade in the Azure portal.
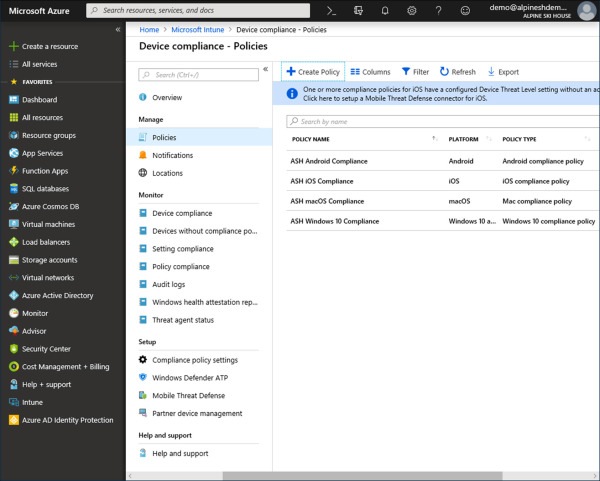
Figure 1-30 Device Compliance – Policies
)
Device compliance includes several built-in reports for administrators to review and export as needed. This includes an overview dashboard, providing a high-level look at overall compliance and areas of interest. Later in this section we will look at monitoring in more detail. For now, refer to Table 1-7 for a breakdown of each section.
Table 1-7 Device compliance blade
Option |
Category |
Description |
|---|---|---|
Overview |
Overview |
This blade offers a compliance dashboard with summarization data for:
|
Policies |
Manage |
This blade is used for creating and managing device compliance policies. |
Notifications |
Manage |
This blade is used for creating and managing notification templates that are used for compliance policies. |
Locations |
Manage |
This blade is use for creating and managing locations for location-based compliance policy settings. |
Device compliance |
Monitor |
This blade offers a report with all managed devices and their device compliance status. |
Devices without compliance policy |
Monitor |
This blade offers a report with all managed devices that do not have a compliance policy assigned. |
Setting compliance |
Monitor |
This blade offers a report with per-setting compliance information. |
Policy compliance |
Monitor |
This blade offers a report that summarizes policy compliance by device count, including compliant, noncompliant and errors. |
Audit logs |
Monitor |
This blade offers a report that shows recent administrative actions for compliances policies completed in the portal. |
Windows health attestation report |
Monitor |
This blade offers a report that shows detailed information for health attestation, including the status for BitLocker, code integrity, secure boot, and more. |
Threat agent status |
Monitor |
This blade offers multiple reports show detailed information for anti-virus enforcement, pending reboots, critical failures, and more. |
Compliance policy settings |
Setup |
This blade is used for managing how the compliance service treats devices, such as compliance state when no policies are assigned. |
Windows Defender ATP |
Setup |
This blade is used for integrating Windows Defender ATP with Microsoft Intune, enabling risk association for device compliance. |
Mobile Threat Defense |
Setup |
This blade is used for creating and managing connection points with third-party vendors, enabling additional risk association visibility for device compliance. |
Partner device management |
Setup |
This blade is used for creating and managing a connection with JAMF, a third-party MDM provider specializing in macOS and iOS devices. |
When you first begin working with device compliance, there are some configurations that you should review. From the Conditional access blade, click Compliance Policy Settings under Setup. There are three controls on this blade that should be considered before you begin creating policies.
Mark Devices with No Compliance Policy Assigned As Compliant | Not Compliant
The default configuration for this setting is not compliant. In many cases this will be the desired setting because you want to have some understanding of the device state before granting it access to services. Consider a scenario where you assign a conditional access policy that requires devices to be compliant in order to access Exchange Online.
Enhanced Jailbreak Detection Enabled | Disabled
The default configuration for this setting is Disabled. Enabling this feature requires iOS devices to evaluate and report their jailbreak status more frequently in conjunction with leveraging location services. This will impact the battery life of the device while enabled.
Compliance Status Validity Period (Days) 1 – 120
The default configuration for this setting is 30 days. This value determines the frequency in which devices must report back their device compliance status to Intune. If a device does not report compliance within the required timeframe they will be marked as noncompliant.
Create device compliance policies
Keep in mind that each compliance policy that you create is associated to a specific device platform, unlike conditional access policies, which enable you to select multiple platforms. Each platform has its own set of options. Some will be similar across platforms, but others will not. For example, macOS has a rule for requiring system integrity protection, which is exclusive to this platform. Based on this you should design your policies on a per-platform basis.
In the following example you are going to create a device compliance policy for Alpine Ski House. This goal is to cover common compliance rules and get you working with the technology.
SCENARIO: WINDOWS 10 DEVICE COMPLIANCE
For this example, you are the MDM administrator for Alpine Ski House. You have a requirement to create and assign a device compliance policy for the Windows 10 platform. This compliance policy will be focused on the security posture of the device and will be re-enforced using a conditional access policy for all cloud services. The following requirements must be met:
BitLocker is required.
Secure Boot is required.
Minimum OS version is 10.0.17134.
Encryption is required.
Firewall is required.
Antivirus is required.
AntiSpyware is required.
Windows Defender ATP machine risk is low.
Now that you have a list of requirements defined, follow these steps to create your device compliance policy:
Sign-in to the Microsoft Azure portal at https://portal.azure.com/.
Click All Services.
Search for Intune and select it.
Under Manage, select Device Compliance.
On the Device compliance blade, under Manage, click Policies.
On the Policies blade, click Create Policy.
On the Create Policy blade, name the policy “Windows 10 Security Compliance.”
Under Platform, select Windows 10 And Later.
On the Windows 10 compliance policy blade, click Device Health.
On the Device Health blade, set the following options and click OK. Refer to Figure 1-31 for an example of this configuration.
Set Require Bitlocker to Require.
Set Require Secure Boot To Be Enabled On The Device to Require.
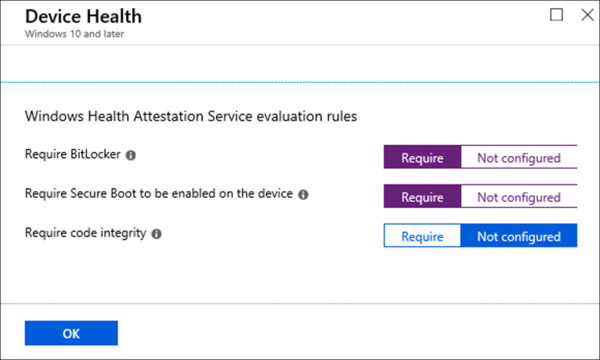
Figure 1-31 Device Compliance - Device Health
On the Windows 10 Compliance Policy blade, click Device Properties.
On the Device Properties blade, set the following option and click OK. Refer to Figure 1-32 for an example of this configuration.
Set Minimum OS version to 10.0.17134.
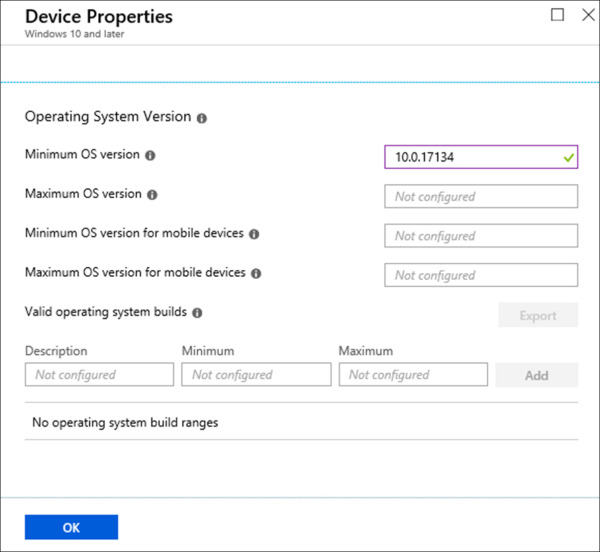
Figure 1-32 Device Compliance – Device Properties
On the Windows 10 compliance policy blade, click System Security.
On the System Security blade, set the following options and click OK. Refer to Figure 1-33 for an example of this configuration.
Set Encryption Of data Storage On Device to Require.
Set Firewall to Require.
Set Antivirus to Require.
Set AntiSpyware to Require.
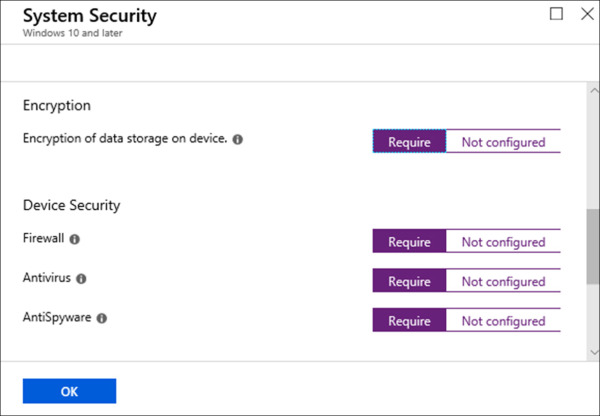
Figure 1-33 Device Compliance – System Security
On the Windows 10 compliance policy blade, click Windows Defender ATP.
On the Windows Defender ATP blade, set the following option and click OK. Refer to Figure 1-34 for an example of this configuration.
Set Require The Device To Be At Or Under The Machine Risk Score to Low.
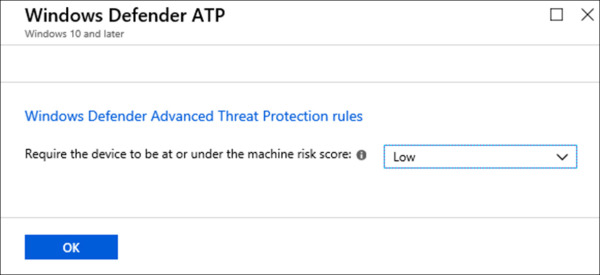
Figure 1-34 Device Compliance – Windows Defender ATP
On the Windows 10 Compliance Policy blade, click OK.
On the Create Policy blade, click Create.
Review the Azure portal notifications to confirm that the compliance policy was successfully created.
)
)
)
)
Once you complete these steps, you should have a compliance policy containing rules that pertain to Windows 10 device security. The next step is to assign this policy to your target audience and trigger an evaluation. For these steps it is assumed that you already have an existing AD group that contains Windows 10 devices.
On the Windows 10 Security Compliance blade, under Manage, click Assignments.
On the Assignments blade, click Select Groups To Include.
On the Select groups to include blade, select the group Windows 10 Devices and click Select.
On the Assignments blade, click Save.
Review the Azure portal notifications to confirm that the assignment was successfully saved.
On the Assignments blade, click Evaluate to force all group members to evaluate the compliance policy.
Manage conditional access policies
In this skill section we introduce two new tools in the Azure portal designed to help you manage their conditional access policies. The first tool is the What If tool. An administrator can define a user and specific criteria to determine which policies are getting assigned. The second tool is the Azure AD Sign-ins report. This report provides a record of user activity with the capability to drill down and view conditional access events. Over the next few sections these tools are examined in detail along with some examples of the interface.
Manage conditional access policies using the What If tool
As you begin designing the structure for your conditional access policies, you may find some policies start to overlap with others. For example, you might have a policy applied that enforces multi-factor authentication for all users. Then you introduce a new policy that does not enforce multi-factor authentication for a specific group of users with the condition that they are connected to a trusted network. The What If tool can help highlight exactly what policies are getting applied to each per-user. The What If tool is also a great solution for evaluating new policies before you enforce them across your organization, and should be considered as a first step in your rollout process.
The What If tool is available on the Conditional Access blade. Refer to the following steps to access the tool:
Sign-in to the Microsoft Azure portal at https://portal.azure.com/.
Click All Services.
Search for Azure Active Directory and select it.
Under Security, select Conditional Access.
On the Policies blade, click What If in the menu bar. In Figure 1-35 you can see an example of the What If tool in the Azure portal and what criteria is available.
)
Figure 1-35 What If Options
The following list covers the available criteria on the What If blade. Each of these options should look familiar, as they directly correspond to the controls that were defined when creating the conditional access policy.
User This option enables you to select a single user account for analysis. You cannot select multiple users or groups. This is the only required option to run the What If tool.
Cloud Apps This option enables you to select one or multiple cloud apps. Any Cloud Apps is the default option. If you are troubleshooting a policy issue with a specific cloud app, you should select that app here.
IP Address This option enables you to enter an IP address for location-based queries. Typically, this is the IP address of the user’s device. If you select this option, you must also specify a country.
Country This option enables you to select a specific country for location-based queries. Again, if you select a country you also must provide an IP address.
Device Platform This option enables you to select a specific device platform. This is helpful for troubleshooting policies that only apply to specific device platforms.
Client App This option enables you to select a specific client app. This is helpful for troubleshooting policies that apply to a combination of client app types.
Device State (preview) This option enables you to select Hybrid Azure AD join or device compliance. This is helpful for troubleshooting policies that have a device state requirement.
Sign-In Risk This option enables you to select a specific risk level. This is helpful for troubleshooting policies that have a sign-in risk level defined.
When you first start using the What If tool, you can begin by selecting any user in your tenant and clicking the What If button. This should provide you with some basic results regardless of whether the user has a conditional access policy assigned. In the following example the What If tool is used against a user account in our Alpine Ski House tenant. After running the tool you will be presented with the evaluation results at the bottom of the page. This includes two tabs. The first tab is for policies that will apply to the selected user account, and the second tab is for policies that will not apply.
In Figure 1-36 we have an example of the first tab. Take note of the Grant Controls column. This column will specify which access controls are being applied by the associated policy. You can use this information to determine where policies overlap, and drill down further by modifying the query criteria that we reviewed above. For example, set cloud apps to Exchange Online and rerun the tool to see if the same controls are being applied.
)
Figure 1-36 What If – Policies That Will Apply
Figure 1-37 shows an example of the second tab. Take note of the column: Reasons Why This Policy Will Not Apply, which is particularly helpful for identifying gaps in your policy design. For example, in this scenario we are reviewing the MFA policy for All Users, which should apply to iOS and Android devices. When running the tool, you selected iOS for the device platform, with the expectation that this policy would show applied. However, based on this evaluation, the tool has identified that this policy is not being applied due to the device platform, which is iOS in this case. With this information you now know that this policy needs to be reviewed to confirm that correct device platforms are selected.
)
Figure 1-37 What If – Policies That Will Not Apply
Manage conditional access policies using the Sign-ins report
Let’s now examine the Azure AD Sign-ins report. This report is helpful for tracking and troubleshooting various events related to user activity with Azure AD. For conditional access, it provides a drill down view of each user event. Unlike the What If tool, these are actual events that have occurred in your environment, compared to a view that shows what will happen.
Refer to the following steps for accessing the Azure AD Sign-ins report. In this example we have some activity recorded in the report to help demonstrate what kind of data to expect.
Sign-in to the Microsoft Azure portal at https://portal.azure.com/.
Click All Services.
Search for Azure Active Directory and select it.
Under Monitoring, select Sign-ins. In Figure 1-38 you can see an example of the Sign-ins report that we will be working with in this example.
On the Sign-ins report, select an event that you would like to see more detail for. In this example, we have defined the following search criteria to help narrow down the results:
User Adam
Application Microsoft Office 365 Portal
Status Failure
Date Last 24 hours
On the details pane there are five tabs. Each tab contains additional information about the selected event. Refer to the following list for a breakdown of each tab:
Basic Info This tab contains basic details about the selected sign-in event. Some of this is visible in the main report but there are key items like Location, Sign-In Error Code, Failure Reason, and Client App.
Device Info This tab contains details about the browser and device used during the sign-in event, including whether the device is enrolled in Intune and what the compliance status is.
MFA Info This tab contains details that pertain to multi-factor authentication. This includes whether an MFA request was required, if the request was completed, the authentication method, and details about that method. For example, if the method was text message, the details would include the last two digits of the phone number.
Conditional Access This tab contains details about the active conditional access policies, what the grant controls are, and the results of applying those policies during the sign-in event.
Troubleshooting And Support This tab contains details related to failed events and includes information for submitting a support request. In the details pane select the Conditional Access tab (see Figure 1-38).
In the details pane select the Conditional Access tab. In our example you can see the conditional access events for Adam Brooks when he signed in to the Microsoft Office 365 Portal.
)
Figure 1-38 Azure AD Sign-ins Report
As you review the results for this conditional access event, you can see that there was a failure on the Client Apps for All Users policy. Clicking on the policy name will bring up the settings for that policy as a new blade, enabling you to make changes without having to navigate away from the Sign-ins report. In this example the policy is setup to require approved client apps when accessing all cloud apps. The failure was due to the user attempting to sign-in from an unsupported client app.