Implement modern device services
- By Robert Clements and Brian Svidergol
- 6/14/2019
- Skill 1.1: Implement Mobile Device Management
- Skill 1.2: Manage device compliance
- Skill 1.3: Plan for devices and apps
- Skill 1.4: Plan Windows 10 deployment
- Thought experiment
- Thought experiment answers
- Chapter summary
In this sample chapter from Exam Ref MS-101 Microsoft 365 Mobility and Security, authors cover the skills to Implement Mobile Device Management, manage device compliance, plan for devices and apps, and plan Windows 10 deployment.
In this chapter we are working with cloud-based services within Microsoft 365 that are designed to deploy, secure, and manage devices in the enterprise. Throughout this book we will be working with various Microsoft technologies such as Azure, Microsoft Intune, Office 365, and System Center Configuration Manager (ConfigMgr). Along the way there will be several walkthroughs and examples that illustrate how to manage these tools. For these demonstrations we do recommend that you follow along in your own lab. Here are a few links to help get you started:
Enterprise Mobility + Security 90-day trial (includes Azure Active Directory Premium P2) https://www.microsoft.com/cloud-platform/enterprise-mobility-security-trial
Office 365 Business Premium 30-day trial: https://products.office.com/business/office-365-business-premium
System Center Configuration Manager Current Branch 90-day technical preview https://www.microsoft.com/evalcenter/evaluate-system-center-configuration-manager-and-endpoint-protection-technical-preview
Skills in this chapter:
Implement Mobile Device Management
Manage device compliance
Plan for devices and apps
Plan Windows 10 deployment
Skill 1.1: Implement Mobile Device Management
There are a variety of mobile device management (MDM) solutions available in the market for managing corporate devices and applications. Microsoft Intune is an MDM solution designed around modern device management and built within the Microsoft 365 umbrella. Without a functional MDM solution, the devices that are meant to provide value and productivity to your workforce, can also introduce security threats, IT support inefficiencies, and an overall inconsistent user experience.
When considering how to manage devices in the enterprise, you need to consider answers to questions such as: is on-premises data protected when accessed from an unmanaged device? Are users able to work in a consistent and effective manner when moving between devices? Can you support a bring-your-own-device (BYOD) program? MDM helps solve these problems by providing a centrally managed service that delivers a secure and productive experience to your organization. In this skill section we will review the process for implementing MDM, including planning considerations, configuration of the MDM, and device enrollment.
Plan for MDM
In this section we will cover planning considerations for MDM. For the exam you will need to be familiar with the different MDM services that are available from Microsoft, what those services support, and which service to choose if given a scenario with specific requirements. Other considerations that we will cover include prerequisites for your environment, such as network security and capacity planning, as well as pre-existing Group Policy Objects that may overlap with future MDM policies.
The planning stage for MDM is all about knowing what your options are, what the needs of the organization are, and how these two points intersect.
Choose an MDM solution
Microsoft offers a combination of MDM solutions to their customers. These offerings have changed over the years, with heavy investments into cloud services and integration with Azure. The introduction of Windows 10 has also influenced the way you manage devices with a set of native MDM protocols within the operating system, eliminating the need to install another agent on your endpoints. Knowing which solution to choose depends on your organization’s deployment goals and objectives. Here is a breakdown of these cloud-based services and some examples on why you might choose one over the other:
Microsoft Intune This solution works best for customers that require modern management capabilities for Windows 10 devices, but also need to limit their on-premises server infrastructure. Microsoft Intune is a cloud-based management solution that does not require additional server infrastructure. Platform support for Intune includes management capabilities for Windows 10 and macOS. You also have access to features like Autopilot, which can help reduce traditional operating system deployment requirements.
Co-management between Microsoft Intune and ConfigMgr This solution bridges Microsoft Intune and ConfigMgr, enabling customers to co-manage devices based on their requirements. ConfigMgr is an on-premises management solution that includes additional platform support, such as Windows Server. It also includes a unique set of technologies, such as task sequences and image deployment. Environments with co-management can take workloads for their Windows 10 devices and mobile devices and move them to the cloud, while still supporting traditional infrastructure.
MDM for Office 365 This MDM solution works best for customers that rely heavily on Office 365 and have a requirement to manage iOS and Android mobile devices. MDM for Office 365 is a cloud-based management solution that does not require additional server infrastructure, but has the smallest footprint when it comes to MDM capabilities.
There is a fourth solution that is not listed here, and that is Microsoft Intune Hybrid. This configuration was an earlier capability that enabled integration between ConfigMgr and Intune in order to maximize platform support and enable administrators to manage devices from a single pane of glass. With the rapid release of new capabilities in Intune, Microsoft reworked how these products were integrated. Intune Hybrid has now been deprecated and will be reaching the end of its support in September 2019.
Table 1-1 breaks down each MDM solution in additional detail, along with the list of supported operating systems. From an exam perspective, plan for questions that describe a company’s requirements for MDM. You should be familiar with the capabilities and supported operating systems for each solution.
Table 1-1 Available MDM solutions and capabilities
Management Platform |
Capabilities |
Supported Operating Systems |
|---|---|---|
Microsoft Intune |
All the capabilities of MDM for Office 365 Mobile device inventory and reporting Certificate management Application management Conditional Access Manage Windows 10 devices |
iOS, Android, Surface Hub, Windows 10 Mobile, Windows 10, Windows Holographic for Business |
MDM for Office 365 |
Secure access to Office 365 email and documents, security policies to enforce settings such as PIN lock, selective wipe of company data |
iOS, Android, Windows mobile |
 EXAM TIP
The MS-101 exam is focused on Microsoft 365 mobility and security. This covers modern cloud-based technologies and solutions that help customers move to the cloud. As you prepare for the exam keep an eye on new features and capabilities, such as co-management and how it fits in with modern MDM management. In Skill 1.3 we cover co-management in detail.
Plan your infrastructure
Cloud-based MDM services can help reduce or eliminate the need for on-premises server infrastructure, but there are other infrastructure components to consider, such as external network communication and bandwidth requirements.
Devices that are enrolled in MDM for Office 365 or Microsoft Intune will require regular communication with these cloud services. Communication is standardized across HTTP (80) and HTTPS (443). Microsoft maintains a published list of domains and IP addresses that should be reviewed and implemented into your existing firewall exceptions to ensure that devices can reach the corresponding cloud service. For the exam, you are not expected to memorize this list, but you should know what ports the service communicates over.
Moving from an on-premises management solution to the cloud will impact Internet bandwidth. Your organization’s Internet connection must be scaled accordingly to accommodate the increase in traffic. For example, depending on the policies you define, a device enrolled with Intune will check in daily for policy changes, updates, and malware definitions. Other activities like software updates or software distribution can have a substantial impact if they are not accounted for. At a minimum, Microsoft recommends that managed devices remain connected to the Internet for at least one hour each day. The following technologies can be implemented to help reduce network bandwidth impact:
Proxy server A caching proxy server can be used to cache certain types of content, reducing the impact of redundant downloads from multiple devices. For example, a Windows 10 feature update can be multiple gigabytes in size. Caching this content can dramatically reduce Internet bandwidth usage.
Delivery Optimization Delivery Optimization is a cloud-managed solution that helps reduce bandwidth consumption by leveraging peer-caching technology, sharing package contents between devices on a per-deployment basis. This technology is available for Windows 10 devices. Because it is a cloud-managed service, devices must have access to the Internet to leverage its capabilities.
Plan your device policies
This section covers the planning considerations for device policies when implementing MDM for Office 365 or Microsoft Intune. In a traditional Active Directory domain, Group Policy serves multiple roles. Administrative templates in Group Policy enable you to define various custom configuration changes for the operating system and your business applications. Enrolling devices in MDM will present two challenges to plan for:
Policy conflicts Once a device is enrolled in MDM, you create and assign a series of new policies to manage the device. Some of these policies may overlap with configurations that exist in Group Policy, or possibly other management tools, such as ConfigMgr. One example could be Windows Update settings, because these options can be configured in Group Policy, ConfigMgr, and MDM. Considering this challenge as part of the planning phase can save countless hours troubleshooting policy conflicts following enrollment.
Unified management The policies available in MDM for Office 365 and Microsoft Intune continue to evolve, providing additional controls for device management. There are, however, policy settings that are not yet available. In these situations, consider the impact of eliminating the policy setting altogether, or continuing to support traditional on-premises controls until they can be fully managed by MDM or are no longer needed.
Now that you know some of the challenges with policy management, let’s look at two possible solutions that can help you address these challenges as you plan for MDM. First, in Windows 10 1803 Microsoft introduced a new Intune policy called ControlPolicyConflict. When applied, this MDM policy ensures that when a conflict occurs between MDM and Group Policy, the MDM policy will always win. Figure 1-1 shows the Intune portal with the custom policy setting defined for ControlPolicyConflict. You can create this policy by following these steps:
Sign-in to the Microsoft Azure portal at https://portal.azure.com/.
Click All services.
Search for Intune and select it..
Under Manage, click Device configuration.
On the Device Configuration blade, under Manage, click Profiles.
Click Create profile.
On the Create Profile blade, fill in the following:
Name ControlPolicyConflict
Platform Windows 10 and later
Profile type Custom
On the Custom OMA-URI Settings blade, click Add.
On the Add Row blade, fill in the following and click OK.
Name ControlPolicyConflict
OMA-URI ./Device/Vendor/MSFT/Policy/Config/ControlPolicyConflict/MDMWinsOverGP
Data type Integer
Value 1
On the Custom OMA-URI Settings blade, click OK.
On the Create profile blade, click Create.
)
Figure 1-1 Custom Intune policy for ControlPolicyConflict
The second solution helps you identify Group Policy settings in your domain that are not supported by MDM. This solution is the MDM Migration Analysis Tool (MMAT). When executed, MMAT will scan the policies in your domain and compare them against a list of supported MDM policies. Once complete, the tool will generate an XML and HTML report that can assist administrators in determining potential conflicts.
In Figure 1-2 you can see an example of the HTML report generated by MMAT. In this example the tool has identified settings in the default domain policy that are not compatible with MDM and will need to be addressed. The following requirements need to be met before running MMAT in your environment:
The latest version of the Remote Server Administration Tools (RSAT) must be installed on the system you will be running MMAT from.
Execution is supported on Windows 7, Windows 8, Windows 8.1, and Windows 10.
The Invoke-MdmMigrationAnalysisTool.ps1 script needs to be executed from an elevated PowerShell window.
The PowerShell execution policy needs to be temporarily bypassed to run the script.
)
Figure 1-2 MDM Migration Analysis Tool (MMAT) results
Configure MDM integration with Azure AD
This section covers how to configure MDM integration with Azure Active Directory (Azure AD). This integration enables you to enroll Windows 10 devices, and is not associated with other platforms, such as iOS and Android. Microsoft has developed a series of protocols in the Windows 10 operating system that are designed to communicate with Azure AD and cloud-based MDM solutions. Furthermore, they have developed an open framework for third-party MDM providers to integrate their solutions with Azure AD. With these components interlinked, administrators can integrate MDM, whether it be Intune or a third-party solution, with Azure AD in an efficient manner. The outcome provides a consistent experience for administrators and end-users.
Plan for MDM integration
Organizations that are starting to take steps toward cloud-based modern management are going to have some new challenges to undertake. In many cases the first obstacle will be an existing on-premises Active Directory domain, with several business applications and processes that have interlinking dependencies. Over the next three sections we will look at steps to help address these early obstacles.
The integration between MDM and Azure AD has a few key prerequisites that you should be familiar with before implementation.
Active MDM subscription with a supported provider During the configuration of MDM, you can select which MDM provider you are going to configure. Intune is there by default and will require a supported subscription to enable. You also have the option to select a third-party MDM provider from the Azure AD app gallery.
Configure MDM settings Once you have obtained a subscription for Intune or an alternative MDM provider, you can start configuring you MDM enrollment settings. These settings include the URLs for MDM terms of use, MDM discovery, MDM compliance, and the scope of devices that will use automatic enrollment.
Automatic device enrollment At a minimum you will need an active Azure AD Premium P1 subscription in order to enable automatic device enrollment. This is an important prerequisite, as most organizations are going to want to leverage automatic enrollment for some portion of their organization. For information about Azure AD pricing, you can visit https://azure.microsoft.com/en-us/pricing/details/active-directory/.
Configure devices for automatic hybrid domain join with Azure AD and enrollment with Intune For modern management of devices in MDM, they need to be domain joined with Azure AD. If you have an on-premises Active Directory environment, you can accomplish this by configuring the hybrid Azure AD domain join.
Now that we have reviewed some of the planning considerations prior to configuring MDM integration, let’s explore the Azure portal and see where these configurations are located.
Sign-in to the Microsoft Azure portal at https://portal.azure.com/.
Click All Services.
Search for Azure Active Directory and select it.
Locate Mobility (MDM and MAM) and select it.
On the Mobility (MDM and MAM) blade, click Add Application. Figure 1-3 shows an example of the third-party MDM applications that are available in the Azure AD app gallery at the time of this writing. Notice there is an option available for an on-premises MDM. This option enables administrators to setup and MDM provider that is not hosted on an Azure tenant.
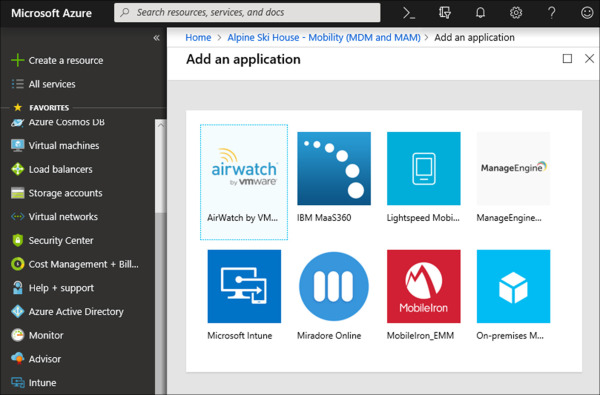
Figure 1-3 Azure AD App Gallery for MDM applications
Return to the Mobility (MDM and MAM) blade by clicking the navigation link above the Add An Application blade.
On the Mobility (MDM and MAM) blade, click the Microsoft Intune application. If your subscription includes an active Azure AD Premium license then you will reach the MDM and MAM configuration page, as shown in Figure 1-4. Otherwise, you will be presented with the option to sign up for a premium subscription.
)
)
Figure 1-4 Azure AD MDM and MAM configuration page
From the configuration page you can define the following MDM settings.
MDM user scope The user scope setting defines the list of users that will be enabled for automatic MDM enrollment. This setting is dependent on the device being joined to Azure AD. You have the option to enable this setting for all users or specify multiple groups.
MDM terms of use URL The terms of use URL is used during manual device enrollment and displays your organization’s terms of use to users before a device can be enrolled. The default URL is configured for Microsoft Intune.
MDM discovery URL The discovery URL is used for device enrollment to the MDM. The default URL is configured for Microsoft Intune.
MDM compliance URL The compliance URL is used when a device is found to be non-compliant. This URL displays the compliance issue to the user for further action. The default URL is configured for Microsoft Intune.
At this stage the settings we have reviewed deal primarily with setting up your MDM provider in Azure AD and modifying automatic enrollment for Azure AD joined devices. In the next section we will look at how to setup automatic enrollment using Group Policy or ConfigMgr, but before introducing those options you need to understand some basics about hybrid Azure AD join.
Administrators that manage an on-premises Active Directory domain can leverage configurations in Group Policy or ConfigMgr to enable hybrid Azure AD join and MDM enrollment. Hybrid Azure AD join is a foundational technology for migrating to the cloud. Organizations that have an on-premises domain will use this as a stepping stone to meet future goals and objectives. Before configuring hybrid Azure AD join or device enrollment, there are a few prerequisites to be aware of. For this exam you should be familiar with the following:
Azure AD Connect Azure AD Connect is an application that synchronizes users, groups and computer objects in your on-premises domain with Azure AD.
Registration URLs For hybrid Azure AD join to work, devices in your organization will require communication with Microsoft Azure. The following URLs must be accessible by the devices on your network that will be enrolling:
Setup MDM integration using Group Policy
Earlier in this chapter we discussed policy management between Group Policy and MDM. In that scenario we covered two methods for identifying and preventing Group Policy conflicts when MDM is introduced into an environment. Here we review two Group Policy settings that will assist you in configuring devices for MDM enrollment.
The first policy setting enables administrators to configure automatic hybrid Azure AD join for domain joined devices. This setting is supported on Windows 10 1607 and later. Use the following steps to locate and enable this setting.
Open the Group Policy Management Editor.
Create a new Group Policy Object (GPO) and name it “Azure AD Join.”
Right-click the new GPO and select Edit.
Under Computer Configuration, expand Policies.
Expand Administrative Templates.
Expand Windows Components.
Locate and select Device Registration.
Locate and edit the policy: Register Domain Joined Computers As Devices.
Select the radio button next to Enabled, as shown in Figure 1-5.
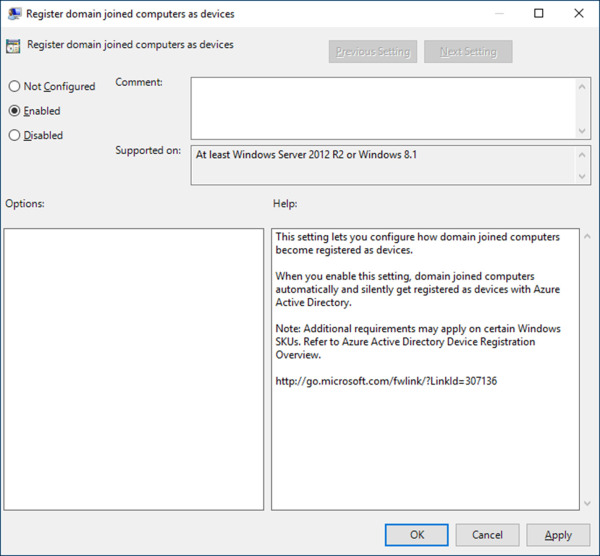
Figure 1-5 Group Policy preference editor
Click OK.
)
Once configured, you can link this GPO to a domain, site, or Organizational Unit (OU) to enforce hybrid Azure AD join. With the previous prerequisites complete, the targeted devices will join Azure AD. The following setting controls automatic enrollment into MDM. This setting is supported on Windows 10 1709 and later. Use the following steps to locate and enable this setting.
Open the Group Policy Management Editor.
Create a new Group Policy Object (GPO) and call it “Intune MDM Enrollment.”
Right-click the new GPO and select Edit.
Under Computer Configuration, expand Policies.
Expand Administrative Templates.
Expand Windows Components.
Locate and select MDM.
Locate and edit the policy: Enable Automatic MDM Enrollment Using Default Azure AD Credentials.
Select the radio button next to Enabled, as shown in Figure 1-6.
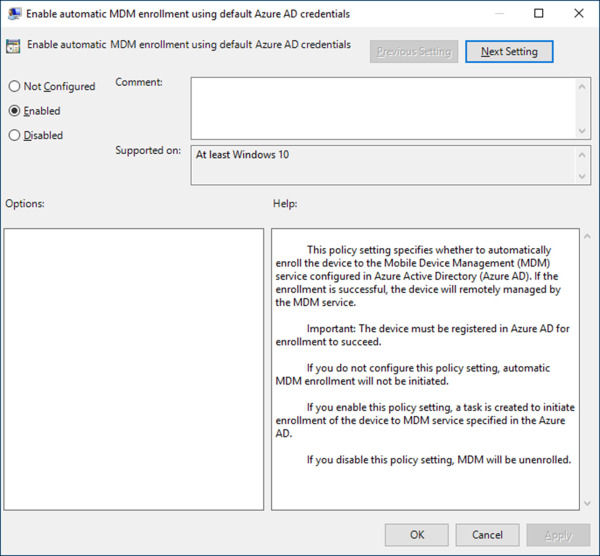
Figure 1-6 Group Policy preference editor
Click OK.
)
After applying this GPO, supported Windows 10 devices will begin enrolling into the MDM provider that you previously configured at the start of the chapter. For Intune, these devices should start appearing in the Devices blade of the Intune Azure portal.
Exam Tip
Windows 10 is an evolving operating system. Every six months a new feature update is released unlocking new capabilities. You should be familiar with when major features are introduced. For example, automatic MDM enrollment with Azure AD was not available in the Windows 10 operating system until Windows 10 1709.
Setup MDM integration using ConfigMgr
The policy settings described in the previous section can also be applied with ConfigMgr. The effect on the managed device is often the same, but ConfigMgr offers some additional flexibility for administrators. For example, if you want to test these settings on a small ring of devices, you can explicitly target those devices in ConfigMgr, as opposed to creating a new OU.
ConfigMgr is now releasing major product updates every four months. The features introduced with these updates will account for new features found in the Windows 10 operating system. For example, when MDM automatic enrollment was introduced with Windows 10 1709, support was introduced with ConfigMgr 1710
Here you will see how to enable the comparable settings for hybrid Azure AD join and MDM enrollment with ConfigMgr. This walkthrough assumes you already have a current version of ConfigMgr running in your environment. First, let’s examine enabling hybrid Azure AD join.
Click Start, search for Configuration Manager Console and select it.
In the Configuration Manager Console, click the Administration Workspace.
Under Overview, click Client Settings.
In the ribbon, click Create Custom Client Device Settings.
On the Create Custom Client Device Settings window, enter Azure AD join.
Select the Cloud Services checkbox and click Cloud Services in the navigation pane.
Under Device Settings, choose Yes from the dropdown next To Automatically Register New Windows 10 Domain Joined Devices With Azure Active Directory, as shown in Figure 1-7.
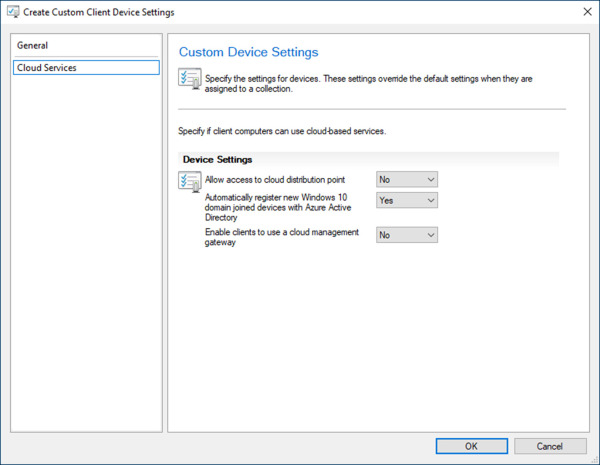
Figure 1-7 ConfigMgr custom client device settings
Click OK.
)
Before deploying these custom client device settings, be aware that you may need to increase the priority value in comparison to other device settings that are deployed. This will ensure these settings take priority over any conflicting deployments. Next, you can create a device collection with the devices you need to target, followed by a deployment for the custom client device settings.
Automatic MDM enrollment with ConfigMgr is the last configuration setting we will be reviewing in this section. This setting is controlled in the properties for Co-Management, a feature that was first introduced in the 1710 release of ConfigMgr. Because of this, you will need to have Co-Management enabled before you can configure this setting. We will go into more detail on Co-Management in Chapter 3, “Plan for devices and apps.” For now, let’s examine how automatic MDM enrollment is managed in ConfigMgr.
Click Start, search for Configuration Manager Console and select it.
Click the Administration Workspace.
Under Overview, expand Cloud Services.
Click Co-Management.
Right-click the Co-Management policy and select Properties (requires prior configuration of Co-Management).
On the Properties window, on the Enablement tab, review the available options in the dropdown for Automatic enrollment in Intune. The following options are available:
None Selecting this option will disable automatic enrollment. This option is preferred if you are not ready to enable automatic enrollment or you are managing it through another solution, such as Group Policy.
Pilot Selecting this option will enable automatic enrollment for the devices contained in a pilot collection, which you define on the Staging tab of the properties window. This option is preferred if you need to enable automatic enrollment on a select list of devices. If you choose this option, be sure to have your pilot collection created and ready for targeting.
All Selecting this option will enable automatic enrollment for all supported devices managed by ConfigMgr.
Select Pilot from the dropdown list. Refer to Figure 1-8 for an example of this setting configuration.
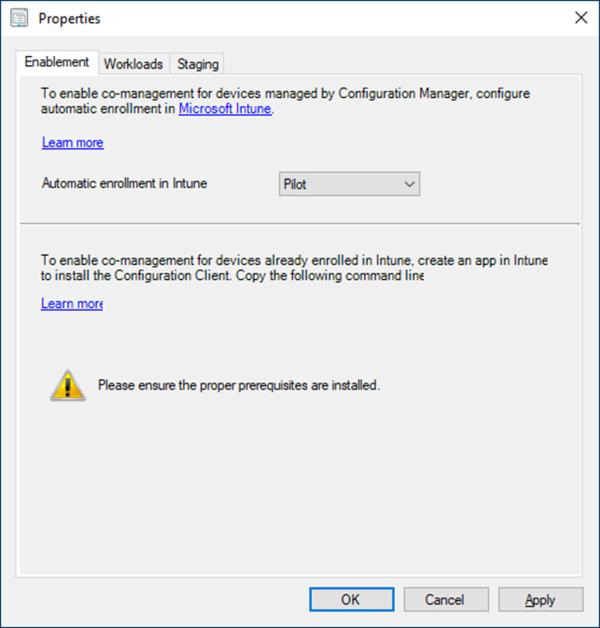
Figure 1-8 ConfigMgr Co-management properties
Click the Staging tab.
Under Pilot Collection, click Browse and select a device collection that you want to enable automatic enrollment for. This device collection should be closely monitored and only contain devices that you need to enroll.
Click OK.
)
EXAM TIP
MDM integration settings in ConfigMgr are not configured from the same location in the management console. Be prepared for questions that test your knowledge of the interface. For example, you are provided with a list of six steps to enable automatic MDM enrollment for Windows 10. You are asked to select the three steps required to accomplish the task and put them in the correct order. Client device settings and Co-Management are both listed as available options and you need to know which interface is the correct one.
Set an MDM authority
For the exam you will need to understand what role the MDM authority plays relative to your overall goals and objectives for device management. As the MDM administrator, you can’t enroll any devices until the MDM authority is configured, which highlights this as an important prerequisite. In its simplest form, the MDM authority that you assign determines which interface you will be administering devices from. Microsoft has a few configuration options available, and we will be reviewing each of these in greater detail.
Choose the MDM authority
Previously we discussed the steps for configuring MDM integration. Among those steps we discussed the need for Azure AD join and automatic enrollment, but before you can enable device enrollment you must assign an MDM authority. This is both a technical requirement, associating devices with the solution, but also a literal requirement in that the Intune portal requires an MDM authority defined before you can access other controls in the portal.
When it comes to choosing an MDM authority, the decision is centered around the products you are using in your environment and what subscription model you have chosen. For example, if you have a pre-existing subscription, such as Office 365, then you will have access to MDM for Office 365. At the time of this writing, there are three configuration options for assigning an MDM authority. Table 1-2 shows the breakdown of these options.
Table 1-2 Available MDM authorities
MDM Authority |
Capabilities |
Key Points |
|---|---|---|
Microsoft Intune |
Standalone cloud-based MDM No on-premises server requirements Support for all Intune management capabilities |
Requires an Intune or EMS subscription Support for Windows 10, Mac OS X, iOS and Android No server management Migration support from on-premises to the cloud using Co-management |
Microsoft Intune Hybrid |
Integration with on-premises ConfigMgr environment Supports a limited set of Intune capabilities Extended capabilities through ConfigMgr Single pane of glass for managing modern and legacy operating systems |
Requires an Intune or EMS subscription Solution is deprecated as of August 2018, support ending September 2019 Limited set of Intune capabilities New capabilities tied to support with ConfigMgr |
MDM for Office 365 |
Cloud-based MDM Integration with Intune Support for a limited set of Intune capabilities |
Requires an Office 365 subscription Limited set of Intune capabilities Support for iOS and Android Configured from the Office 365 Admin Center |
As mentioned in Table 1-2, at the time of this writing, the Microsoft Intune Hybrid solution is still available to customers. Support, however, will be ending in September 2019. Customers that are using the hybrid MDM solution today will need to start working on a retirement strategy.
Set the MDM authority
Next, we will walk through setting the MDM authority for standalone Intune and MDM for Office 365. While Intune Hybrid is still supported, do not expect to see any exam questions related to setup. The next two sections will include screenshots for the most important elements of the interface, but it is recommended that you follow along in your own lab. These exams will test your knowledge of the management interface.
Standalone Intune
In this first section we are working with standalone Intune. For this example, we are working in an environment where the MDM authority has not been configured yet.
Sign-in to the Microsoft Azure portal at https://portal.azure.com/.
Click All Services.
Search for Intune and select it.
Under manage, click Device Enrollment. Review the Device enrollment blade in Figure 1-9. Notice that the MDM authority field is blank, and the account status is active. Without an MDM authority assigned, the Choose MDM Authority blade will open automatically.
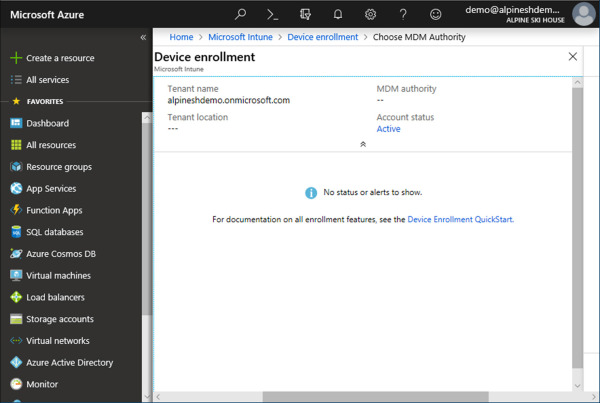
Figure 1-9 Device enrollment blade
On the Choose MDM Authority blade, select the radio button next to Intune MDM Authority, as shown in Figure 1-10.
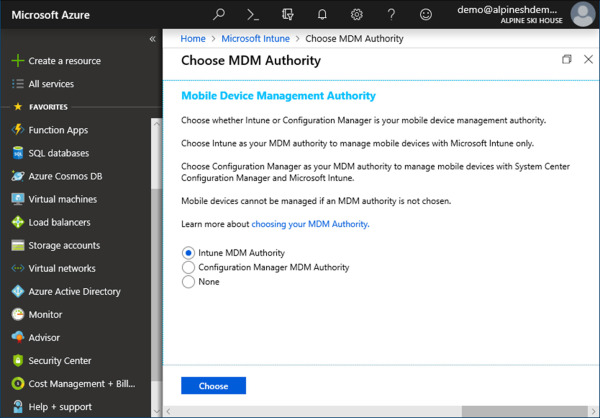
Figure 1-10 Choose MDM Authority blade
Click Choose to complete the configuration.
Review the Azure portal notifications to confirm that the MDM Authority was successfully chosen (see Figure 1-11).
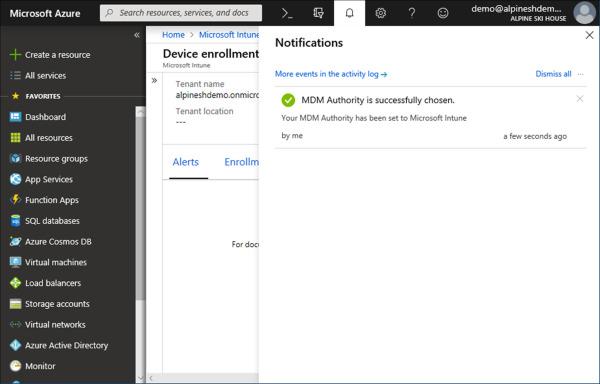
Figure 1-11 Azure Portal Notifications
)
)
)
Mdm For Office 365
Unlike standalone Intune, the MDM for Office 365 configuration change is done through the Microsoft 365 admin center. Sign-in to the Microsoft 365 admin center at https://admin.microsoft.com/.
On the Home page, type mobile device management in the search field and select it from the list of available options.
On the Set up Mobile Device Management for Office 365 page, review the list of available features, as shown in Figure 1-12. Click Let’s Get Started. This will start the setup process and can take a few hours to complete.
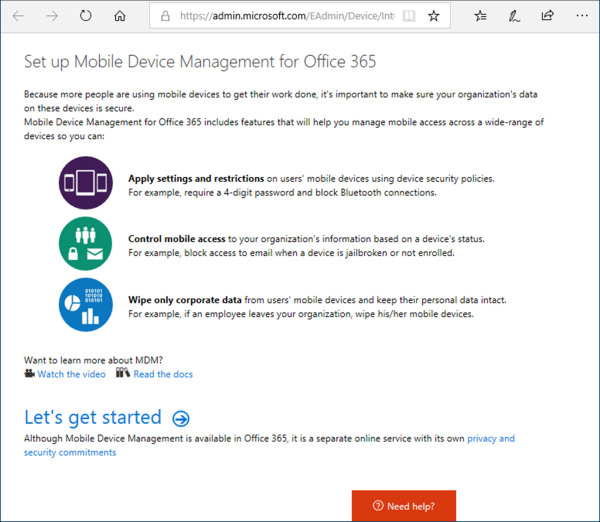
Figure 1-12 Set up MDM for Office 365
Once setup is complete, click Manage Devices or navigate to https://admin.microsoft.com/adminportal/home#/MifoDevices. All device management tasks will take place from the Microsoft 365 admin center.
To verify your MDM authority is set, sign-in to the Microsoft Azure portal at https://portal.azure.com/.
Click All Services.
Search for Intune and select it.
Under Manage, click Device Enrollment. Note that the MDM authority now shows Office 365.
)
Change the MDM authority
There are two scenarios where an administrator can change their MDM authority. These include the following.
Intune Hybrid In this scenario an administrator can change the MDM authority from standalone Intune to ConfigMgr, or from ConfigMgr to standalone Intune. Both of these actions are completed in the ConfigMgr management console.
Office 365 In this scenario an administrator can change the MDM authority from Office 365 to standalone Intune. This action is completed in the Azure portal.
Intune Hybrid
For this example, we are going to walk through changing the MDM authority from ConfigMgr to standalone Intune. This walk through assumes that your environment already has ConfigMgr set as the MDM authority and an active Intune subscription is configured in the ConfigMgr management console.
Click Start, search for Configuration Manager Console and select it.
Click the Administration Workspace.
Under Overview, expand Cloud Services.
Click Microsoft Intune Subscriptions.
Select the Microsoft Intune subscription. From the ribbon, click Delete.
On the Remove Microsoft Intune Subscription Wizard, review the available options (see Figure 1-13). Note that you have the option to remove the Intune subscription or change the MDM authority. Select the radio button next to Change MDM Authority to Microsoft Intune and click Next.
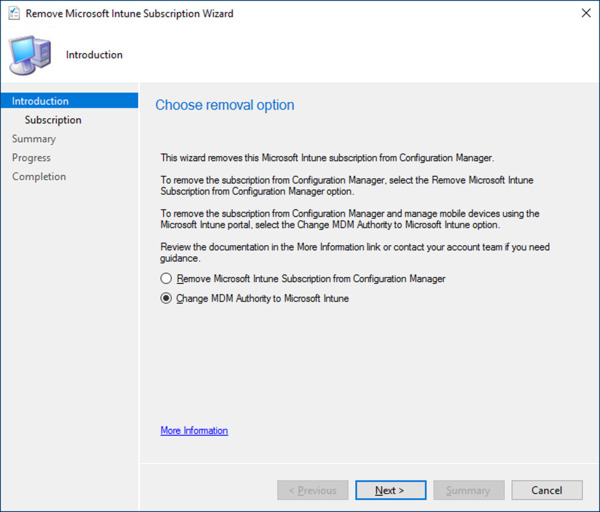
Figure 1-13 Remove Microsoft Intune Subscription Wizard
Review the warning presented before changing the MDM authority, as shown in Figure 1-14. This change will shift management from the ConfigMgr console to the Intune portal, and existing applications or policies will need to be recreated in Intune. Click Yes.
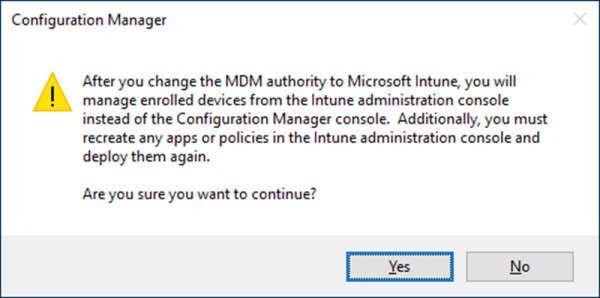
Figure 1-14 Change MDM Authority Warning
On the Subscription page, enter your credentials to sign-in to Microsoft Intune and click Next.
On the Summary page, review the requested changes and click Next.
On the Completion page, click Close.
To verify your MDM authority has changed, sign-in to the Microsoft Azure portal at https://portal.azure.com/.
Click All Services.
Search for Intune and select it.
Under Manage, click Device Enrollment. Note that the MDM authority now shows Intune.
)
)
Office 365
For this example, we are going to walkthrough changing the MDM authority from Office 365 to standalone Intune. This walkthrough assumes that your environment already has MDM for Office 365 set as the MDM authority and that you have an active Intune subscription.
Sign-in to the Microsoft Azure portal at https://portal.azure.com/.
Click All Services.
Search for Intune and select it.
Under manage, click Device Enrollment. With Office 365 set as the MDM authority, you will automatically be taken to the Add MDM Authority blade, as shown in Figure 1-15.
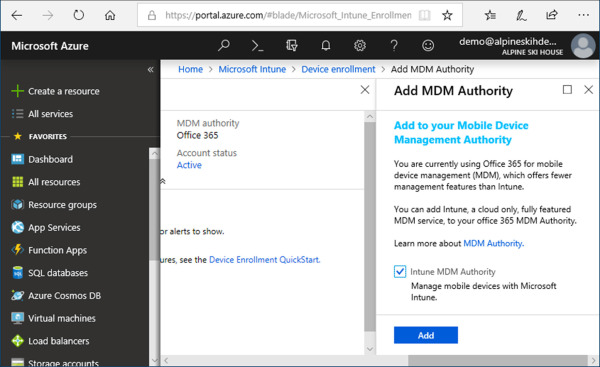
Figure 1-15 Add MDM Authority blade
Check the box for Intune MDM Authority and click Add.
Review the Azure portal notifications to confirm the MDM Authority was successfully changed to Intune (see Figure 1-16).
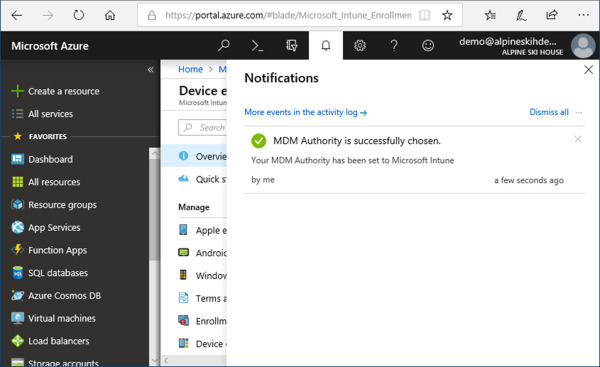
Figure 1-16 Azure Portal Notifications
)
)
Set device enrollment limit for users
This section covers the controls given to administrators to limit the number and type of devices a user can enroll. Why would you need to setup device enrollment restrictions for MDM? Limiting the number of devices assigned to a user can help with license constraints and organization. Restricting devices that are running an older operating system is a requirement for many organizations due to security and compliance. Blocking personally-owned devices may be a scenario you need to consider if your organization is not ready to support Bring Your Own Device (BYOD). These are a few of the examples that we’ll be reviewing.
Plan for device enrollment restrictions
We have covered three MDM solutions in this chapter, and each of them has some basic ability to restrict device enrollment. Hybrid Intune and MDM for Office 365, however, cannot leverage the same enrollment restrictions available in standalone Intune. There are additional capabilities available beyond limiting the number of devices a user can enroll. For this section we will focus on the controls in the standalone Intune solution. Table 1-3 describes each of the restriction types and what their capabilities are.
Table 1-3 Device Enrollment Restrictions
Restrictions |
Restriction Type |
Description |
|---|---|---|
Maximum number of enrolled devices |
Limit restriction |
Restrict the number of devices a user can enroll, ranging from 1 to 15. |
Allow or block based on device platforms |
Type restriction |
Restrict device enrollment by device platform, including Android, Android work profile, iOS, Mac OS, and Windows (MDM). |
Allow or block based on platform operating system |
Type restriction |
Restrict device enrollment by operating system, providing a minimum and maximum version number. |
Allow or block personally owned devices |
Type restriction |
Restrict device enrollment by corporate-owned, requiring additional steps to define a device as corporate-owned. |
Set device enrollment restrictions
With a high-level understanding of the possible enrollment restrictions, let’s examine the interface and explore the controls. Device enrollment restrictions are available in the Azure portal under the Microsoft Intune service.
Device Limit Restriction
In this walk-through, we will implement a restriction to limit the number of devices a user can enroll with.
The first enrollment restriction covered focuses on limiting the number of devices a user can enroll. Sign-in to the Microsoft Azure portal at https://portal.azure.com/.
Click All Services.
Search for Intune and select it.
Under Manage, click Device Enrollment.
On the Device Enrollment blade, under Manage, click Enrollment Restrictions.
On the Device Enrollment – Enrollment Restrictions blade, review the items under Device Type Restrictions and Device Limit Restrictions. Refer to Figure 1-17 for an example. Take note that there is a default enrollment restriction for each restriction. Both can be modified, but not deleted.
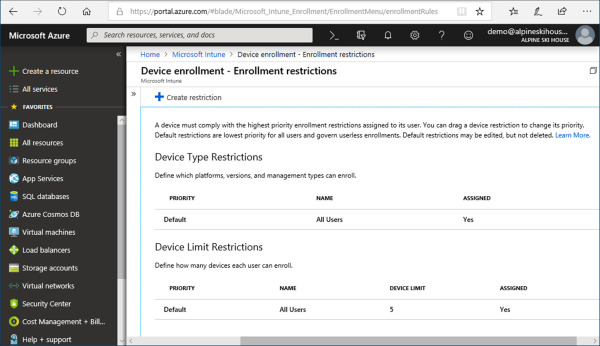
Figure 1-17 Device enrollment – Enrollment Restrictions
Click Create Restriction.
On the Create Restriction blade, fill in the following:
Name Custom device limit
Restriction Type Device Limit Restriction
Specify The Maximum Number Of Devices A User Can Enroll 3
Click Create.
Review the Azure portal notifications to confirm that the new enrollment restriction was created successfully.
)
At this stage you will have a new custom device restriction created and available on the Device Enrollment – Enrollment Restrictions blade. Here we worked with limit restrictions. Assigning a limit prevents users from enrolling more than the defined value. The default restriction allows users to enroll up to five devices. Attempting to enroll more than five will result in a notification. Now let’s take a look at Device Type Restrictions.
Device Type Restrictions
The second enrollment restriction we will work with is based on limiting enrollment by the type of device.
Sign-in to the Microsoft Azure portal at https://portal.azure.com/.
Click All Services.
Search for Intune and select it.
Under Manage, click Device Enrollment.
On the Device Enrollment blade, under Manage, click Enrollment Restrictions.
On the Device Enrollment – Enrollment Restrictions blade, click Create Restriction.
On the Create restriction blade, fill in the following:
Name Custom type limit
Restriction Type Device Type Restriction
Click Select Platforms.
On the Select Platforms blade, select the following options, as shown in Figure 1-18:
Android Block
Android Work Profile Block
iOS Allow
macOS Block
Windows (MDM) Allow
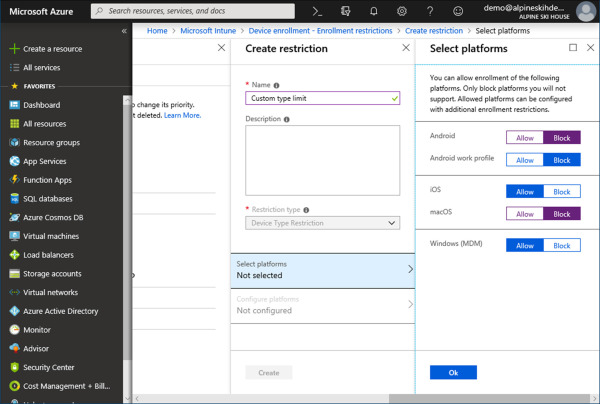
Figure 1-18 Create Restriction – Select Platforms
Click OK.
On the Create Restrictions blade, click Configure Platforms.
On the Configure Platforms blade, fill in the following, as shown in Figure 1-19:
iOS Min Version 12.0
iOS Personally Owned Block
Windows (MDM) Min Version 10.0.17134.345
Windows (MDM) Personally Owned Block
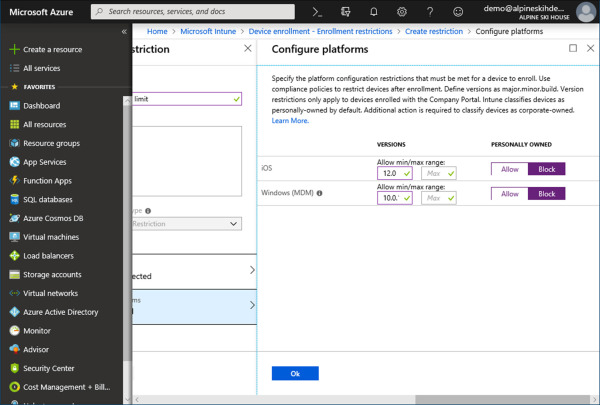
Figure 1-19 Create Restriction – Configure Platforms
Click OK.
Click Create.
Review the Azure portal notifications to confirm that the new enrollment restriction was created successfully.
)
)
With these steps complete, you should now have a custom device type restriction available on the Device Enrollment – Enrollment Restrictions blade. In this example we worked with platform restrictions. Platform restrictions provide a granular set of controls for approving specific device types and operating system versions. With an enrollment plan that supports BYOD, controlling the minimum and maximum operating system version can prevent known vulnerabilities or pre-release versions from entering your environment.
Assignment
Let’s examine the process for assigning enrollment restrictions. First, you need to understand the priority system. The priority value, shown on the Device Enrollment – Enrollment Restrictions blade, is for users that are members of multiple groups, but may have different enrollment restrictions assigned. You can change the priority value in the portal by dragging a device restriction up or down the list.
Enrollment restrictions are assigned to Azure AD groups. The following walkthrough assumes you already have an Azure AD group created with the users you need to target.
Sign-in to the Microsoft Azure portal at https://portal.azure.com/.
Click All Services.
Search for Intune and select it.
Under Manage, click Device Enrollment.
On the Device Enrollment blade, under Manage, click Enrollment Restrictions.
On the Device Enrollment – Enrollment Restrictions blade, select the custom device limit restriction that was previously created.
On the Custom Device Limit blade, click Assignments.
On the Custom Device Limit – Assignments blade, click Select Groups.
Select an Azure AD group that you want to target and click Select, as shown in Figure 1-20.
)
Figure 1-20 Enrollment Restriction Assignment
On the Custom Device Limit – Assignments blade, click Save.
Review the Azure portal notifications to confirm the device enrollment restriction was successfully assigned.
Once you have completed these steps you should have the device restrictions available in the portal and assigned to an Azure AD group of your choosing.