Using Windows 10
- By Ed Bott and Craig Stinson
- 4/9/2019
- An overview of the Windows 10 user experience
- Navigating Windows 10
- Using and customizing the taskbar
- Using and customizing Action Center
- Switching tasks
- Reviewing, revisiting, resuming with Timeline
- Switching between virtual desktops
- Managing and arranging windows
- Using a keyboard and mouse in Windows 10
- Using Windows 10 on a touchscreen device
- Using the Windows Ink workspace
- Working with fonts
Using and customizing the taskbar
The taskbar is that strip of real estate along one screen edge (bottom by default) that contains, from left to right, the Start button, the search box, the Task View button, program buttons, notification icons, icons for people, and a clock. The taskbar made its first appearance in Windows 95. In the years since, it has slowly evolved without changing its basic shape.
The Windows 10 taskbar continues to serve the same basic functions as its progenitors—launching programs, switching between programs, and providing notifications—with only subtle changes in functionality.
Every running program with a user interface has a corresponding taskbar button. When you close that program, the button vanishes as well, unless you pinned it to the taskbar. A faint line appears underneath the icon for a running program, and the program with the current focus has a subtle but noticeable transparent shadow to identify it.
The Windows 10 taskbar offers a limited selection of customization options, most of which are available through Settings > Personalization > Taskbar (or right-clicking an empty space on the taskbar or the Task View button and clicking Settings). Figure 3-5 shows the first group of options on that Settings page.
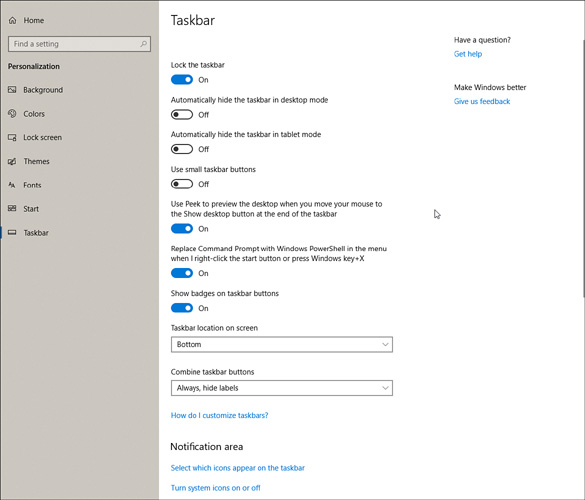
Figure 3-5 For most people, the options set here will be acceptable, especially Lock The Taskbar, which prevents you from accidentally dragging the taskbar to the side of the monitor.
Here is a rundown of the options shown in Figure 3-5:
Lock The Taskbar. On by default, this option prevents you from accidentally dragging the taskbar to the side of the monitor. Note that the shortcut menu that appears when you right-click the taskbar also includes this command. It’s there so that you can easily switch in and out of the locked mode when you need to adjust the size or position of the taskbar. Also note that locking the taskbar does not prevent you from rearranging taskbar icons. (If your Windows configuration includes multiple monitors, this command changes to Lock All Taskbars.)
Automatically Hide The Taskbar. By default, the taskbar remains visible at all times. If that’s inconvenient for any reason, you can tell it to get out of the way. The Settings page provides separate Hide options for Desktop and Tablet modes. With either option set, the taskbar retreats into the edge of the desktop whenever a window has the focus. To display the hidden taskbar, move the mouse pointer to the edge of the desktop where the taskbar normally resides. On a touchscreen, swipe from that edge toward the center of the screen.
Use Small Taskbar Buttons. Select this option if you want to reduce the height of taskbar buttons, making them similar in size to buttons in earlier Windows versions. In our experience, buttons of this size are too small for practical use. If you have the eyesight of a hawk, your opinion might differ.
Use Peek To Preview The Desktop. With this option on, moving your mouse to the extreme edge of the taskbar (beyond the Action Center button) hides all open windows temporarily, giving you the opportunity to see the underlying desktop. This option is off by default; we don’t see a good reason not to turn it on (and Figure 3-5 shows the option set to on).
Replace Command Prompt With Windows PowerShell. Leave this option on if you’re a PowerShell user. You’ll save some steps getting to the command line.
Show Badges On Taskbar Buttons. Badges are small circular notifications that can appear on the lower-right corner of certain taskbar buttons. In the following illustration, for example, badges on the Alarms & Clock, Weather, and Mail buttons indicate that an alarm has been set, that a weather alert is in effect, and that a stack of mail is waiting to be read.
Taskbar Location On Screen. The taskbar appears at the bottom of the screen by default. As you would expect, the alternatives are top, left, and right. You don’t have to visit Settings to change positions, however. Simply unlock the taskbar and drag it.
Combine Taskbar Buttons. The default setting for Combine Taskbar Buttons is Always, Hide Labels. This setting instructs Windows to always group multiple windows from a single application (such as Microsoft Word documents) into a single taskbar button. The Hide Labels setting for this option ensures that each running program has one and only one button, which consists of the program’s icon. With either of the other settings (When Taskbar Is Full or Never), Windows gives each window its own separate taskbar button and adds the name of the running program or open document as a label to the right of the program icon, if space permits. It groups windows only when the taskbar becomes too crowded or continues to shrink the size of taskbar buttons as you open more windows. We recommend the default setting here.
)
![]() If you have more than one display attached to a Windows 10 PC, some extra customization options are available for the taskbar. See “Configuring the taskbar with multiple displays,” later in this chapter, for details.
If you have more than one display attached to a Windows 10 PC, some extra customization options are available for the taskbar. See “Configuring the taskbar with multiple displays,” later in this chapter, for details.
Pinning programs to the taskbar
Pinning a taskbar button makes it easy to find and run favorite programs without the need to open Start or use the search box to find the program’s shortcut. To pin a program to the taskbar, simply drag its icon or a shortcut (from Start, from the desktop, or from any other folder) to the taskbar. Alternatively, right-click a program icon wherever you find it or the taskbar button for a running program and then click Pin To Taskbar.
To remove a pinned program from the taskbar, right-click the pinned icon and then click Unpin From Taskbar. This command also appears on other shortcuts to the program, including those on the desktop and on Start.
You can use taskbar buttons to launch a program that’s not currently running or to switch from one running program to another. You can also click a taskbar button to minimize an open window or to restore a minimized window. If those features sound too obvious, here’s a trick you might not know: You can open a new instance of a program that’s already running—a new Microsoft Word document, for example, or a fresh File Explorer window—by right-clicking the taskbar button and then clicking the program name; alternatively, hold Shift and click the program name.
Using Jump Lists for quick access to documents and folders
A Jump List is the official name of the menu that appears when you right-click a taskbar button or a tile pinned to Start. Each Jump List includes commands to open the program, to pin the program to the taskbar (or unpin it), and to close all open windows represented by the button.
In addition, for programs developed to take advantage of this feature, Jump Lists can include shortcuts to common tasks that can be performed with that program, such as New Window or New InPrivate Window on a Microsoft Edge Jump List. For Microsoft Office programs, Adobe Acrobat, and other similarly document-centric programs, Jump Lists also typically include links to recently opened files.
Figure 3-6 shows the default Jump List for File Explorer.
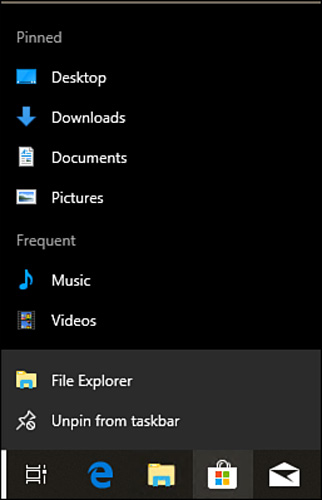
Figure 3-6 Right-click a taskbar button, such as File Explorer, to see a Jump List showing recently opened files and folders with the option to pin items for quick access.
Individual files and folders can’t be pinned directly to the taskbar, but you can add them to Jump Lists by using the following techniques:
To pin a document to the taskbar, drag its icon or a shortcut to any empty space on the taskbar. If the taskbar already has a button for the program associated with the document, Windows adds the document to the Pinned section of the program’s Jump List. If the document’s program is not on the taskbar, Windows pins the program to the taskbar and adds the document to the program’s Jump List.
To pin a folder to the taskbar, drag its icon or a shortcut to the taskbar. Windows adds the folder to the Pinned section of the Jump List for File Explorer.
To open a pinned document or folder, right-click the taskbar button and then click the name of the document or folder.
To remove a pinned document or folder from the Jump List, right-click the taskbar button and point to the name of the document or folder to be removed. Click the pushpin icon that appears.
Changing the order of taskbar buttons
To change the order of buttons on the taskbar, simply drag them into position. Pinned program icons retain their order between sessions, allowing you to quickly find your most used programs in their familiar (to you) location.
Pinning people to the taskbar
To simplify communication with your most important contacts, you can pin them to the area at the right side of your taskbar (in the typical left-to-right taskbar orientation), just to the left of the notification area. Windows displays a thumbnail image for a pinned person if such an image is available or initials if not. The resulting icon can serve as a drop target for a sharing operation (drag a document to a people icon and search options appear), or you can click an icon to review recent communication, see upcoming events for the selected contact, or initiate new communication.
To pin a contact to the taskbar, click the People icon, near the notification area of the taskbar. Then choose Find And Pin Contacts.
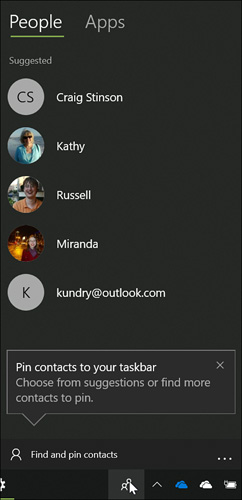
Windows displays a list of suggested contacts. To pin one of those, click it. To locate contacts not on the suggested list, click Find And Pin Contacts.
Pinned contacts appear just to the left of the People icon:
)
Note that if you use Focus Assist to squelch calls and notifications during particular hours of the day, any contacts you have pinned to the taskbar are automatically “white listed”; that is, their messages break through the Focus Assist screen. (We discuss Focus Assist in Chapter 4; see “Eliminating distractions with Focus Assist.”)
By default, you can pin up to three contacts on the taskbar. Windows will accommodate as many as ten, however. To allow for more than three, go to Settings > Personalization > Taskbar and change the number under Choose How Many Contacts To Show. Because adding a lot of contacts to the taskbar might crowd out your application icons, Windows provides an overflow area at the top of the pane that appears when you click the People icon. In this illustration, there are three people in the overflow area:
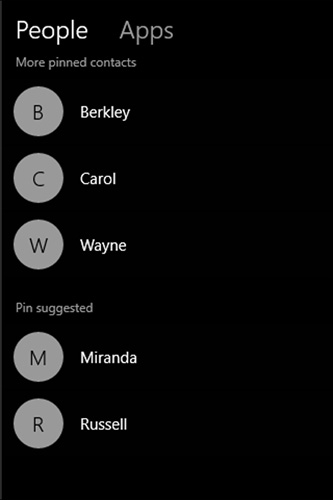
You can put as many people as you want in the overflow area, where they function exactly as they would on the taskbar.
To change the order in which taskbar contacts appear, simply drag and drop. You can also drag and drop to move a contact from the overflow area to the taskbar. Display the overflow area, grab the contact you want, and drag it to the taskbar. Windows moves one of the current taskbar occupants to the overflow area when you do this. To move an existing taskbar resident to the overflow area, drag it laterally. When your mouse reaches the People icon, the People pane appears, and you can deposit the contact in the overflow area. Windows responds by moving someone from the overflow area to the taskbar.
To remove a pinned contact, right-click it and choose Unpin From Taskbar.
Changing the taskbar’s size and appearance
The default height of the taskbar is enough to display one button. (If you switch to small buttons, the taskbar automatically shrinks its height to fit.) You can enlarge it—and given the typical size and resolution of computer displays these days, enlarging it is often a great idea. Before you can change the taskbar’s dimensions, you need to unlock it. Right-click an unoccupied area of the taskbar; if a check mark appears next to the Lock The Taskbar command, click the command to clear the check mark. Then position the mouse along the border of the taskbar farthest from the edge of the screen. When the mouse pointer becomes a two-headed arrow, drag toward the center of the screen to expand the taskbar. Drag the same border in the opposite direction to restore the original size.
Moving the taskbar
The taskbar docks by default at the bottom of the screen, but you can move it to any other edge. You do this by selecting the Taskbar Location On Screen option in Settings > Personalization > Taskbar.
As an alternative, you can manipulate the taskbar directly. Unlock it, and then drag any unoccupied part of the taskbar in the direction you want to go. (Don’t drag the edge of the taskbar closest to the center of the screen; doing that changes the taskbar’s size, not its position.)
Adding toolbars to the taskbar
A seldom-used feature of the taskbar is its ability to host other toolbars. Optional toolbars date back to much older versions of Windows, offering shortcuts to folders, documents, and applications. Third parties can also write add-ons that operate entirely within the confines of the taskbar. Built-in toolbars you can choose to install include the following:
Address. The Address toolbar provides a place where you can type an internet address or the name and path of a program, document, or folder. When you press Enter or click the Go button, Windows takes you to the internet address, starts the program, opens the document, or displays the folder in a File Explorer window. The Address toolbar is functionally equivalent to the Run command in Start or the address bar in File Explorer or the Microsoft Edge browser.
Links. The Links toolbar provides shortcuts to internet sites; its contents are drawn from the Favorites Bar in Internet Explorer.
Desktop. The Desktop toolbar provides access to all the icons currently displayed on your desktop. In addition, it includes links to your Libraries, This PC, Network, Control Panel, and other user profile folders. When you click the toolbar’s double arrow, a cascading menu of all the folders and files on your system appears.
To install a new toolbar or remove one you’re currently using, right-click any unoccupied part of the taskbar or any existing toolbar. Click Toolbars on the menu that appears, and then choose from the ensuing submenu. A check mark beside a toolbar’s name means that it’s already displayed on the taskbar. Clicking a selected toolbar name removes that toolbar.
In addition, any folder on your system can become a toolbar. To create a new toolbar, right-click an existing toolbar or a spot on the taskbar, click Toolbars, and then click New Toolbar. In the next dialog box, navigate to a folder and click Select Folder.
The folder’s name becomes the name of the new toolbar, and each item within the folder becomes a tool.
Configuring the taskbar with multiple displays
If your computer has more than one monitor attached, you have additional options for configuring the taskbar: You can show it on just the main display or on all displays, and you can vary its appearance on each display. To review these options, right-click the taskbar and choose Settings. The following illustration shows the multiple-display options. You’ll find them near the bottom of the page at Settings > Personalization > Taskbar.
)
)
)
Selecting the first option shows a taskbar on each monitor. If you set it to Off, the taskbar appears only on the main display. (You specify the “main display” in Settings > System > Display. For details, see “Configuring displays and graphics adapters” in Chapter 4, “Hardware and devices.”)
The Show Taskbar Buttons On setting determines where the taskbar button for a particular app appears—on all taskbars or only the one where that app’s window resides.
The last setting specifies how taskbar buttons are combined on displays other than the main display.
Customizing the notification area
The notification area extends from the right edge of your taskbar (on a left-to-right arrangement) to the People area and application tiles. Typically, this includes the Action Center icon, the clock, and a variety of system and application-specific items.
To customize the system icons, go to Settings > Personalization > Taskbar. Under the Notification Area heading, click Turn System Icons On Or Off to specify which icons appear. As Figure 3-7 shows, the available items are denoted by icons and switches.
)
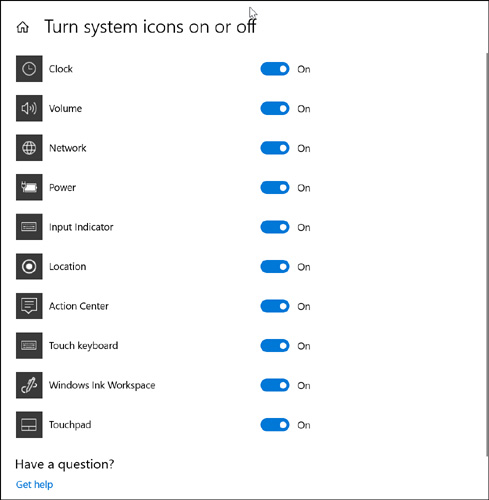
Figure 3-7 Each notification area icon shown here is currently turned on. With a flick of the switch, you can remove any that you don’t need or want.
To customize the rest of your notification area, click Select Which Icons Appear On The Taskbar. You’ll probably see a longer list, including some items specific to applications or devices on your system. Figure 3-8 shows an example.
)
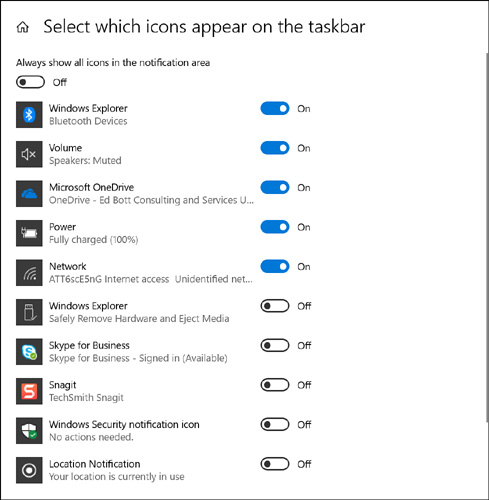
Figure 3-8 Some icons in this list provide status messages. Others are shortcuts to associated programs.
You can use the On-Off switches to add or remove items. In case you want them all, Windows provides a master switch at the top of the list.