Work with apps and notifications
- By Joan Lambert
- 2/20/2018
- Locate and start apps
- Explore built-in apps
- Install Store apps
- Manage app notifications
- Key points
- Practice tasks
Install Store apps
Windows 10 works across multiple form factors (desktop, laptop, tablet, and phone), which has two notable effects. First, the simplified Windows user interface adapts gracefully to different screen sizes; and second, developers can more easily create (and support) apps that provide the same user experience on multiple devices. As the relentless rush to become constantly connected, more mobile, and less tied to desktop computers continues, these changes benefit both the software companies and the software users.
You can install software on a Windows 10 computer from multiple locations. In the past, the most common installation source was a CD or DVD, but software distribution has rapidly moved toward an online installation model. You can purchase or subscribe to software and install it on your computer or device immediately.
Thousands of apps (and games, music, movies, and television programs) that are specifically designed and optimized for use on Windows 10 are available from the Store, many for free. You can also purchase and install apps from websites or use the old-fashioned method and install them from CDs or DVDs.
Shop in the Store
The Store was first introduced in Windows 8. It has been substantially updated in Windows 10 and changes frequently. This chapter includes some images for guidance, but it’s quite possible that by the time you read this book, the Store interface will be different from what’s depicted in this book. This section gives an overview of the Store and describes Store functionality that we think is likely to stay in place over time.
You access the Store by starting the Store app, which is installed by default and can’t be uninstalled (though it can be unpinned from your Start menu if you don’t want it there).
)
From the home page of the Store, you can search for specific apps, search by category, or browse through collections of apps such as the most popular free or paid apps or games, new music or movies, top-selling television shows, or various collections of apps that are related by a common feature (such as music, zombies, or productivity).
If you know the app, or the type of app, that you’re looking for, the simplest method of finding it is to enter the name or descriptive information into the search box located at the top of the Store window. Generally, the more text you enter into the search box, the more you limit the search results.
 TIP
TIP
At the time of this writing, the Store search engine doesn’t support Boolean search restrictions such as AND, OR, or wildcards.
Regardless of your choice of navigation method, the Store presents consistent information, including app tile, name, rating, and price for each app.
)
Most Windows apps are classified as Free. Some app developers accept donations. Some apps are free only for a trial period, or require that you purchase an upgrade or accompanying service to unlock the really useful functionality. Because there are variations of “free,” it’s a good idea to read the details before you actually install an app. You can select any app tile for more information.
Some of the useful details provided for apps in the Store include these:
Screenshots of the app user interface
Ratings and reviews that can be filtered by device type
Feature lists
The publisher’s name, website, support site, and privacy policy
Hardware and storage space requirements
Category and age rating
Supported processors and languages
The access permissions the app requires, which might include permission to use your location, access your internet connection, access your local network, act as a server, read data from other apps, use your device’s camera, record audio, and more
To start the Store app
On the taskbar, select the Store icon.
On the Start menu, select the Store tile.
On the Start menu, in the app list, select any index letter, and then select S. In the list of apps that have names beginning with S, select Store.
Manage your Store account and settings
The Store is linked to your Microsoft account, so you can access your purchased apps on any device that you sign in to by using that account. Information about business that you’ve transacted when signed in to a site or service with that account is stored with your account information. Transactions include those for free and paid apps, services, and subscriptions through entities such as the Store app, the online Microsoft Store, Xbox Live, Groove Music, Bing Rewards, Office 365, and OneDrive.
You can manage your Store settings from within the Store app, and you can also link from the Store account menu directly to specific areas of your online Microsoft account information.
 IMPORTANT
To use the Store, you must be signed in with a Microsoft account, or your local user account must be associated with a Microsoft account.
The Store settings you can configure at the time of this writing are whether to:
Automatically update apps.
Activate Live Tiles.
Run limited-license games and apps offline.
Require a password for app purchases.
The Settings window in the Store is similar to the pages of the Settings window in Windows 10. A toggle button controls each of the settings.
TIP
When you narrow the Store app window, a menu button appears in the upper-left corner. Selecting the menu button displays all the menu items that usually appear on the Store menu bar and all the items that usually appear on the Store account menu.
Selecting any link other than Downloads And Updates, Settings, My Library, or Send Feedback on the Store account menu starts or opens your default browser and displays information from your Microsoft account. You must sign in to your account (if you haven’t already) and reconfirm your credentials when accessing pages that contain financial information. The following table describes the actions you can take from these pages that are relevant to Store purchases.
| Menu item (page) | Description |
| Redeem a code | Enter a gift card number or promotional code to add credit to your Microsoft account. If your Microsoft account has a credit balance, Store purchases use the credit first and then charge only the difference to your selected payment option. |
| View account | Review recent purchases and your devices. Browse from here to any other account information. |
| Payment options | Add, edit, and remove payment options that are linked to your account. Valid forms of payment include credit cards (Visa, MasterCard, American Express, and Discover), debit cards, direct bank account debit, PayPal accounts, physical and digital gift cards, and Microsoft account credit that is added from a Bitcoin digital wallet. You can remove only payment options that aren’t associated with an active subscription. (If you want to remove a payment option that’s assigned to a subscription, you must first assign a different form of payment to the subscription.) |
| Purchased | Display the date, description, form of payment, and amount for transactions that are associated with your Microsoft account. |
 SEE ALSO
For more information about Microsoft accounts, see the sidebar “Use a Microsoft account or local account” in Chapter 1, “Get started using Windows 10.”
You can go directly to a specific page of your account information from the Store account menu, or navigate among the pages within the browser window. When you install an app or game from the Store on any Windows 10 device, you own that app and can install it on up to 10 devices. If you want to install the same app on another device, you can locate the app in your list of apps and install it from there.
To access your Microsoft account settings from the Store
On the Store menu bar, select the See more button (…), and then do any of the following:
To display the home page of your Microsoft account, select View account.
To display the Payment Options page, select Payment options.
To display the Purchase History page, select Purchased.
To display the gift card/promotional code–entry interface, select Redeem a code.
TIPAll these links display a page of the Microsoft account management website, and you can move to any other page of the website from there.
Install, reinstall, and uninstall apps
Most apps are free. When you purchase an app that isn’t free and doesn’t include a free trial, you select a payment method in the Payment & Billing section of your Microsoft account. Most require only a one-time payment, but some are managed on a subscription basis, and until you cancel the subscription, the payment option that you select is charged each month.
The Store tracks all the apps, games, music, movies, and television episodes that you purchase. From your library, you can display information about the items you’ve purchased, and you can install, reinstall, and share those items.
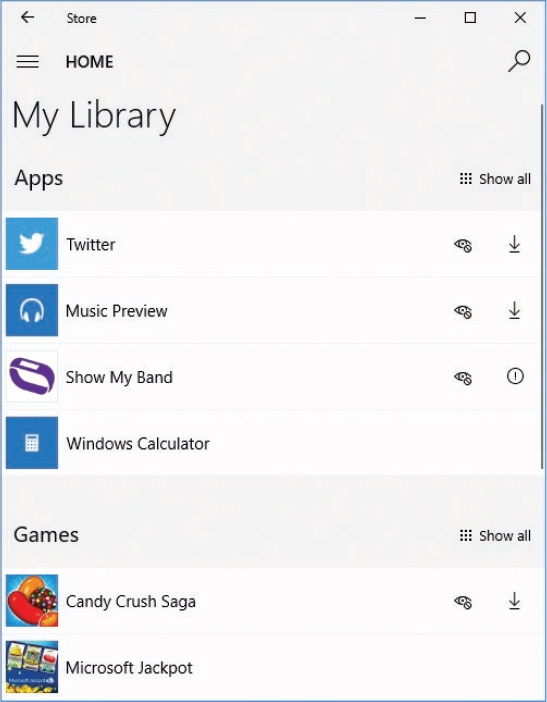
The My Library page displays recent purchases that you made when signed in with your Microsoft account, on any device, in order from most recent to least recent. Selecting the Show All link adjacent to any category heading displays all the items of that type that are installed on any device that is associated with your Microsoft account. Depending on your installation history, the entries on your My Library page might be divided into sections that are titled “Works on this device” and “Doesn’t work on this device.” For example, when you’re in the Store on your Windows 10 computer, Windows phone apps that were developed for versions of Windows Mobile earlier than Windows 10 appear in the “Doesn’t work” list because they won’t run on your Windows 10 computer.
You can start (launch) an app or game from your library if it’s already installed on your computer. Apps and games that work on your Windows 10 computer and aren’t already installed on it have an Install icon on the right side.
)
When you select the icon, the Store app checks your current installations to make sure that you haven’t exceeded the 10-device limit. It then assigns one of your 10 device licenses to the app, downloads the app, and installs it. During that process, the app appears on the Downloads And Updates page, which is an interim staging location for apps and updates that are pending installation on your computer.
To install an app or game for the first time
In the Store, search for or browse to the app or game you want to install.
Select the app or game thumbnail to display its information page.
On the information page, below the description, select the button labeled either Free or with the price of the app or game.
If you selected an app or game that requires a purchase, enter your Microsoft account password when prompted to do so. Then select a payment option and approve the purchase to install the app and add it to the app list.
)
By default, Store apps automatically download and install updates. If you would prefer to approve updates, you can turn off the automatic update option and manage the updates from this page. When an app or update is ready for installation, the installation icon appears on the Store menu bar, next to your user account icon.
To display your purchased and installed apps and games
On the Store menu bar, select the See more button (...), and then select My Library.
By default, the My Library pane displays recently installed apps and games. To display all apps or games, do either of the following:
Select the Show All link to the right of the Apps heading to display the Your Apps pane.
Select the Show All link to the right of the Games heading to display the Your Games pane.
To install a purchased app or game on a different computer
On the computer where you want to install the app or game, start the Store app.
On the Store menu bar, select the See more button (...), and then select My Library.
If the app or game you want to install doesn’t appear in this pane, display the Your Apps or Your Games pane.
Locate the app or game, and select the Install icon on the right side of its entry.
IMPORTANTIf there is no Install icon, then the app is already installed on or incompatible with the current device.
You can monitor the installation process from the Downloads And Updates pane.
To manage downloads and updates
On the Store menu bar, select the See more button (…), and then select Downloads and updates.
In the Queue area of the Downloads and Updates pane, do any of the following:
Select the Get updates button to search for any available updates that haven’t yet been registered on your computer.
Select an available update to download and install it.
Select the Pause or Restart button near the right end of an in-process update to pause or restart the process.
Select the Close button at the right end of an in-process update to remove the update from the queue.
To turn off automatic app updates
Start the Store app.
On the menu bar, select the See more button (…), and then Settings to display the Settings pane for the Store app.
In the Settings pane, turn off Update apps automatically to immediately implement the change.
To uninstall a Store app
Open the Start menu, and locate the app in the app list.
Right-click the app, and then select Uninstall.
IMPORTANTSome apps (such as Calculator, Calendar, and Camera) can’t be uninstalled, and the Uninstall option doesn’t appear on the shortcut menu.