Implement Software-Defined Networking (SDN)
- By Jeff Graves and Joel Stidley
- 1/22/2018
- Skill 4.1 Implement compute solutions
- Skill 4.2: Implement service templates
- Thought experiment
- Thought experiment answers
- Chapter summary
Skill 4.2: Implement service templates
Service templates are groups of virtual machines that make up the tiers of an application and are managed as a single entity in VMM. A service template contains information about the various tiers of the application, such as a web and database tier, and includes information about the virtual machine configuration and network settings. The template can also contain application installation and configuration settings.
Because a service template defines virtual machines in tiers, you can easily scale each tier of a service. By scaling out a service tier, VMM deploys additional virtual machines using customized guest and application configuration as defined in the template. Similarly, you can scale in to remove nodes from a tier which can run custom scripts inside the guest to ensure proper clean-up of the node as it is removed from service.
Service templates are versioned allowing you to update configuration and application settings for virtual machines in the service. Updates can be applied using in-place upgrades or by deploying new virtual machines for the tier.
Create and configure service templates
Service templates are defined using the template designer. This tool allows you to visualize the layout of a service, like a single-tier or multi-tier line-of-business application. The designer includes pre-defined configurations for single-tier, two-tier, and three-tier applications.
A service template uses other VMM library resources as part of its configuration, like VM templates, application profiles, guest operating system profiles, hardware profiles, and SQL Server profiles. Each tier contains settings that control the minimum, maximum, and default number of virtual machines as well as the servicing order, upgrade domains, and ability to create an availability set for the tier. Windows operating system configuration settings can be included to manage Roles and Features that should be installed on the guests in the respective tier.
Applications and scripts can also be configured as part of the service template which reference resource packages stored in the VMM library. When the tier is deployed and scaled, these application packages and scripts run to ensure applications are installed and configured appropriately. Scripts can be configured to run for the first VM, last VM, or only other VMs, as well as both pre- and post-application install and uninstall. Scripts can reference parameters that are configured at deployment time to ensure proper customization of the service.
 EXAM TIP
Because a tier can be scaled, use a pattern for the VM and computer name such as Server###, where ### will be an auto-incrementing number for each node that is deployed.
Follow these steps to create a service template:
In Library > Templates > Service Templates, select Create Service Template from the ribbon.
Give the service template a name and release value. Choose a default configuration for the base of the service template (Figure 4-7).
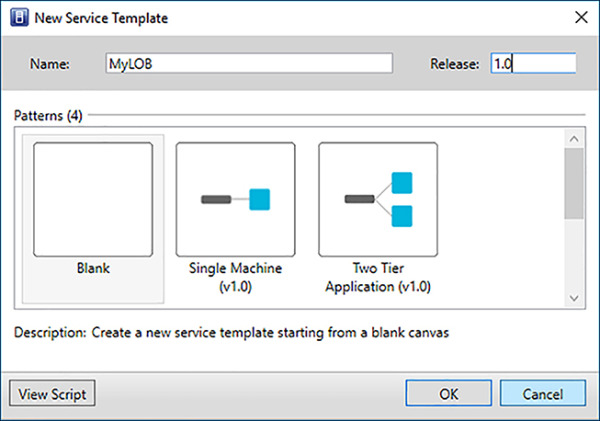
FIGURE 4-7 Use an existing pattern for a new service template
Use the designer to configure the service template (Figure 4-8). Add tiers of virtual machines and connect them to virtual networks. You can configure hardware settings as well as guest operating system and application configuration by right-clicking the tier and selecting properties.
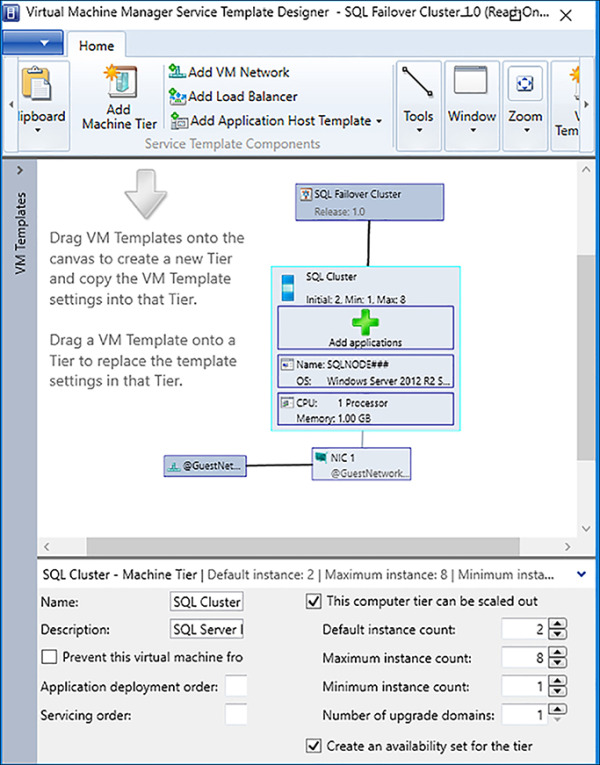
FIGURE 4-8 Create a service template using the designer
If the tier supports scaling, configure default, maximum and minimum instance counts, you can also create an availability set for the tier ensuring that VMs are spread across Hyper-V hosts in the cluster. Set the number of upgrade domains for the tier to ensure availability of the application during servicing.
After the service template has been configured, click Save and Validate to confirm the template has been configured appropriately. Resolve any errors before attempting to deploy the template.
)
)
Add tiers to a service template
Each tier in a service template represents a component of the application. For example, a web application may have a web tier for the web servers and a database tier for the backend database cluster. In the service template designer, you can add a tier by dragging a VM template to the canvas or by clicking the Add Machine Tier button in the ribbon to open the Create Machine Tier Template Wizard.
To add a tier using the wizard:
In the service template designer, click the Add Machine Tier button in the ribbon.
Select a VM template or hard disk as the source for the tier, and click Next.
EXAM TIPThe settings for the VM configuration are stored with the service template and do not impact the VM template. Similarly, changes made to the base VM template used for the service tier are not implemented in the service template.
On the Additional Properties tab, configure a name and description for the tier. Configure servicing, migration, and availability set configuration for the tier, and click next.
If customizing the hardware, guest operating system, or application configuration, enter appropriate settings or select pre-existing profiles on the respective screens.
On the summary tab, review the configuration, and click Finish to add the machine tier.
Click Save and Validate to confirm that the template has been configured appropriately.
Implement availability sets within a template
Availability sets are a mechanism to indicate that virtual machines are part of a cluster or server farm to ensure that VMM avoids placing those VMs on the same host. Availability sets can be configured automatically as part of a service tier in a service template, or can be manually added to the hardware properties of a VM. To create an availability set for a tier, check the Create An Availability Set For The Tier check box during the Create Machine Tier Template Wizard, or in the properties of an existing service tier.
EXAM TIP
You must have the Deploy permission to configure an availability set.
Add network components to a service template
The service template also includes network configuration for the service tiers. Network adapters on virtual machines can be connected to VM networks and you can configure VIPs for load balanced tiers. You can also configure the network settings such as IP address configuration of the network adapters attached to VMs in the service tiers and connect them to a load balancer.
Load balancers are configured using the VIP templates defined in the network fabric configuration. The load balancer configuration in a service template consists of the VIP template and client and service connections. The client connection represents the VM network of the VIP while the service connection represents the DIP of the network adapter.
EXAM TIP
Load balancing cannot be added to an existing service, it must be configured when the service template is deployed.
Follow these steps to add a VM network to a service template:
In the service template designer, click the Add VM Network button in the ribbon.
Click the Connector button in the ribbon, then select the VM Network object on the canvas, and connect it to a network adapter in a service tier.
Configure the associated virtual network by selecting the VM Network object in the canvas and clicking the Browse button in the context window. Use the radio buttons to choose between a VM network in VMM or a customizable parameter specified at deployment time.
Follow these steps to add a load balancer to a service template:
In the service template designer, click the Add Load Balancer button in the ribbon.
Click the Connector button in the ribbon, then select a VM Network object in the canvas. Connect the VM Network object for the VIP to the Client connection object of the load balancer.
Click the Connector button in the ribbon, then select the Server connection object in canvas and connect it to a network adapter in a service tier.
Select the VIP object in the load balancer on the canvas and use the Load Balancer VIP Profile setting to choose the appropriate profile for the VIP (Figure 4-9).
FIGURE 4-9 Configure networking for a service template in designer
)
Update and modify service templates
Service templates are versioned, allowing you to update settings inside of the service template and push those changes out to existing deployments. Each service template has a Release property that refers to the version of the template. Depending upon the changes to the template, you can then apply the changes to the virtual machines in the service, or deploy new virtual machines with the updated settings. You must first copy the existing service template and then make changes to the copied version using an updated Release value.
Follow these steps to update a service template:
In Library > Templates > Service Templates, select the service template, and click Copy from the ribbon.
A new template is created with the same name but an updated release. Right-click the new template and select properties.
Update the release value, and click OK.
Click the Open Designer button to modify the service template. Once you have finished modifying the template, click Save and Validate.
Click the Publish button from the ribbon.
Alternatively, you may need to update the resources associated with the service template:
In Library > Templates > Service Templates, select the service template, and click View Updated Resources from the ribbon to view the most recent version of the resources used by the template.
Right-click the template and select Copy and Update. A new template is created referencing the most recent resources from the same family.
Lastly, you can apply updates to the service by either updating the existing virtual machines or re-deploying the virtual machine tiers. VMM automatically calculates the upgrade domain for each virtual machine based on the upgrade domains settings of the service. All virtual machines in the same upgrade domain are updated at the same time.
To modify the configuration of an existing service:
In VMs and Services > All Hosts, select the Services view from the ribbon. Right-click the service and select Set Template.
If the service requires an updated template (Figure 4-10), select the Replace The Current Template With An Updated Template For This Service option and click Browse to select the updated service template. Otherwise, if you need to change the settings of the service using the existing template, select the Modify Application Settings For This Service Option, and click Next.
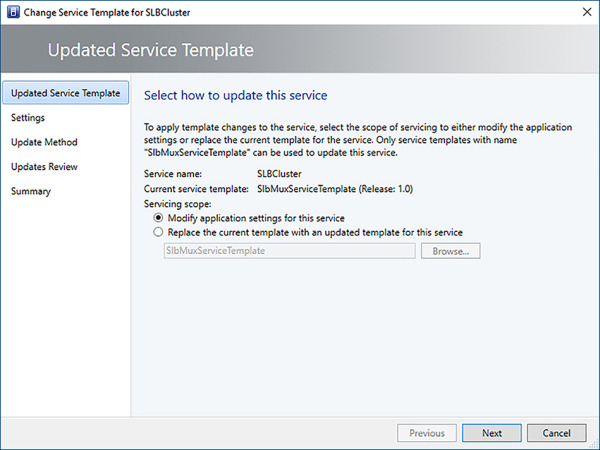
FIGURE 4-10 Configure the servicing scope for an updated service template
Update the values for the template settings, and click Next (Figure 4-11).

FIGURE 4-11 Changing the settings of an existing service template
Choose the method to update the service tier, and click Next (Figure 4-12).
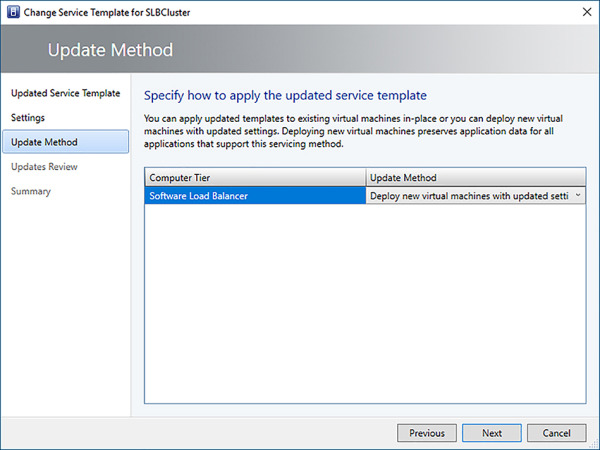
FIGURE 4-12 Selecting the update method for updating a service template
Review the updated settings and click Next.
EXAM TIPTo apply the updates immediately, select the check box to apply the updates immediately after the wizard completes.
Click Finish to apply the updates.
)
)
)
Export and import service templates
Service templates can be exported from VMM allowing you to backup and share the templates between different VMM servers. Exporting a service template creates an XML definition file that contains the service tiers, hardware and network settings, as well as guest and application configuration. You can include sensitive information like passwords or product keys, which can be encrypted using a password to protect it. Optionally, resource dependencies like scripts and hard disks can be included when exporting.
Similarly, you can import the service template definition using the generated XML file and dependent resources. If a service template includes sensitive information, you can import those settings by specifying the encryption password. During the import process, you map resource dependencies to objects in the library and map other VMM objects like profiles, RunAs accounts, and storage classifications as needed.
To export a service template:
In Library > Templates > Service Templates, select the service template, and click Export from the Ribbon.
Add additional templates using the Add/Remove buttons. Optionally, you can choose to export sensitive settings using the check box and specifying a password. Set the export location using the Browse button (Figure 4-13).
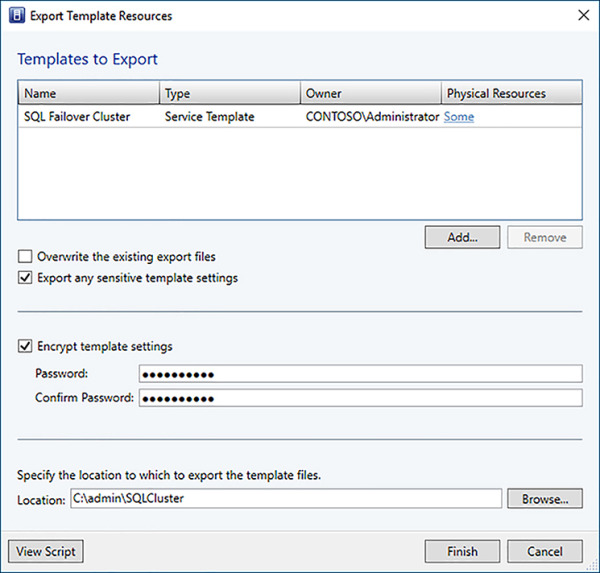
FIGURE 4-13 Exporting a service template
Add physical resources by clicking the link in the Physical Resources column. Select the resources you want to include with the template (Figure 4-14).
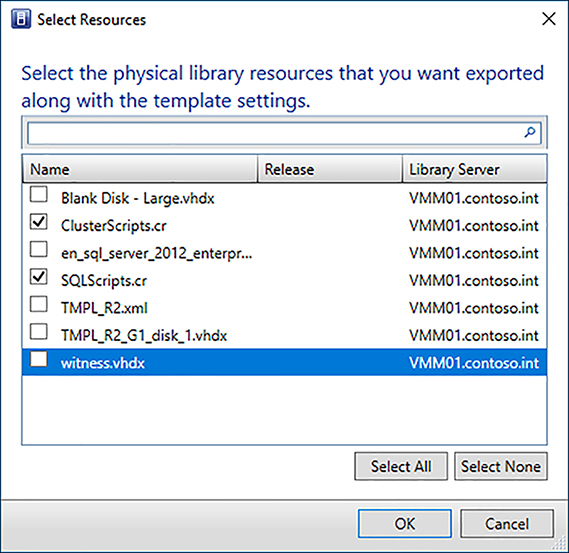
FIGURE 4-14 Select the resources to export with the template
Click Finish to export the service template and selected resources.
To import a service template:
In Library > Service Templates, click Import Template in the ribbon.
Select the service template XML definition file. Check the check box to import sensitive settings if needed, and click Next.
Assign a name and release to the service template (Figure 4-15).
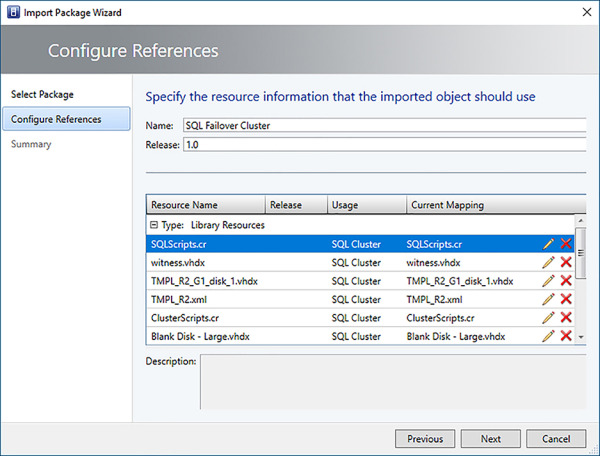
FIGURE 4-15 Map the resources during import of the service template
Configure the resource mappings for the template using the Edit buttons on each row. For resources included with the template, select the Upload The Resource In The Template Package radio button. VMM automatically uploads the resources from the package into the library (Figure 4-16).
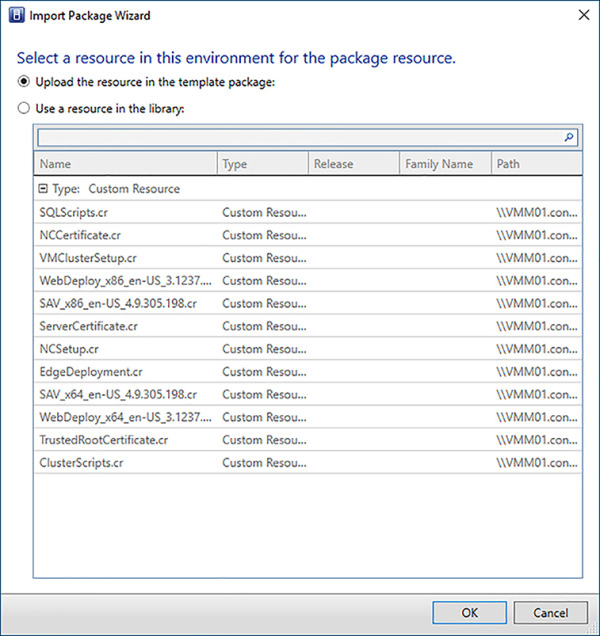
FIGURE 4-16 Select a library resource or upload a resource from the template package
EXAM TIPA template can be imported with missing references that can be updated later.
Click Import to begin the process of importing the service template and uploading any resource dependencies to the VMM library.
)
)
)
Deploy service templates
To use a service template, you must first configure a new deployment which will then be placed on a cloud or host group. VMM creates a service, the virtual machines in each tier of the service, and then installs applications for those tiers. During configuration of the deployment, any parameters you have set in the template can be customized. Additionally, you can customize the VM settings for each tier in the service like the VM name, network settings, virtual hard disk storage path, and storage QoS policy.
Optionally, you may save configurations and deploy them at a later time. Previously configured service deployments can be found in Library > Templates > Service Deployment Configurations.
Follow these steps to configure a new service deployment:
In Library > Templates > Service Templates, right-click the service template, and select Configure Deployment.
Set a name for the service, select a destination for placement, and configure any network settings for the deployment (Figure 4-17).
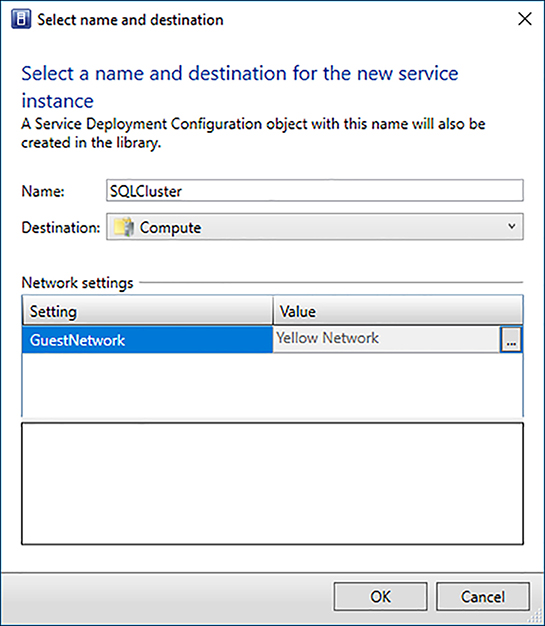
FIGURE 4-17 Set the Name, Destination and Network settings for the deployment of the service
Enter the settings for the service template as appropriate (Figure 4-18).
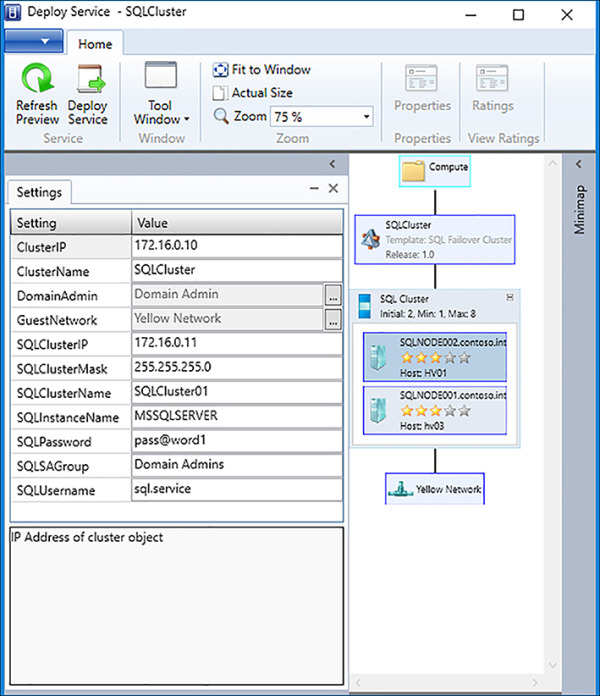
FIGURE 4-18 Configure the service settings for the template
Click the Refresh Preview button to ensure the service can be placed appropriately. Resolve placement issues prior to deploying the service.
EXAM TIPClosing the Deploy Service window before deploying the service prompts you to save the deployment, which can then be deployed at a later time.
Click the Deploy Service button to kick off the deployment process.
)
Implement guest clustering
VMM supports deployment of virtual machines that use clustering and shared virtual hard disks backed by VHDX files on either CSV of SOFS storage. No other type of backend storage, such as a third-party NAS device, is supported for storing a VHDX file share across a service tier. Alternatively, you can configure Virtual Fibre Channel or guest iSCSI connections to provide shared storage for the guest cluster. VMM uses storage classifications to determine placement of the VHDX on appropriate shared storage. You can manually configure the storage path by placing the guest cluster on a host group instead of a VMM cloud. The shared storage VHDX must use the same dedicated SCSI ID for all nodes in the tier.
VMM does not automatically configure the clustering service inside of the guest. Rather, you need to use scripts to configure the cluster and corresponding applications that execute at the appropriate times. For example, you need a script that runs on the first VM deployed to create the cluster. Subsequent VMs need a different script that join the VMs to the existing cluster. Similarly, you may need different scripts to support sequenced deployment of the application, like SQL Server or SharePoint. Review the scripts in the sample SQL Failover Cluster service template referenced later in this chapter for an example of creating a guest cluster.
When configuring guest clustering, you should use a static IP address configuration and create an availability set for the tier. Additionally, select the Enable Guest Specified IP Address option on the virtual network adapter for the cluster IP. This is required for virtual machines that use guest clustering with network virtualization.
EXAM TIP
You can pass service template parameters to scripts using the @SettingName@ syntax.
Follow these steps to configure shared storage for a service tier:
In the service template designer, right-click the service tier, and select Properties.
On the Hardware Configuration tab, click the New button, and add a SCSI adapter.
Click the New button, and add a Disk.
Select a SCSI ID from the Channel drop-down.
Click the Browse button and select the disk from the VMM library that will be shared across the service tier.
Check the Share The Disk Across The Service Tier check box.
Select a storage classification that maps to CSV or SOFS storage (Figure 4-19).
)
FIGURE 4-19 Create shared storage for the service tier
Follow these steps to configure scripts to form a cluster:
In the service template designer, right-click the service tier, and select Properties.
On the Application Configuration tab, click the Add button, and select Script To Application profile.
In the Script command type drop-down, select Creation: First VM.
Specify the executable and parameters for creating the cluster.
Click the Browse button to select the resource package that contains the scripts to create the cluster.
Click the Browse button to select a RunAs account for executing the script on the guest.
Set a timeout value with sufficient buffer to execute the script on the guest. If the script takes longer than this amount of time, VMM will fail the deployment job, which can be retried after resolving the issue (Figure 4-20).
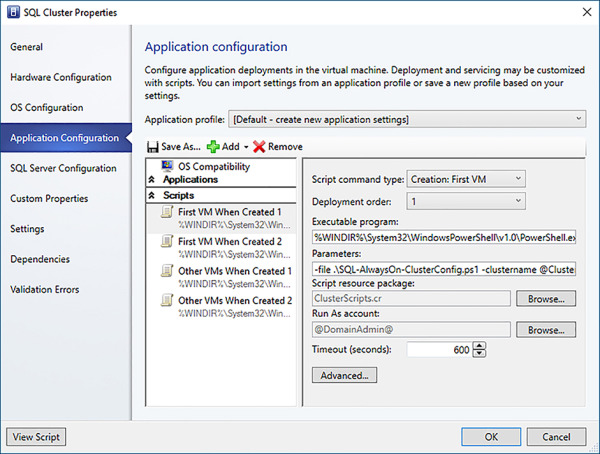
FIGURE 4-20 Configure scripts to create the cluster and install applications
Click the Advanced button to configure Guest Logging, Failure, and Restart Policy options (Figure 4-21).
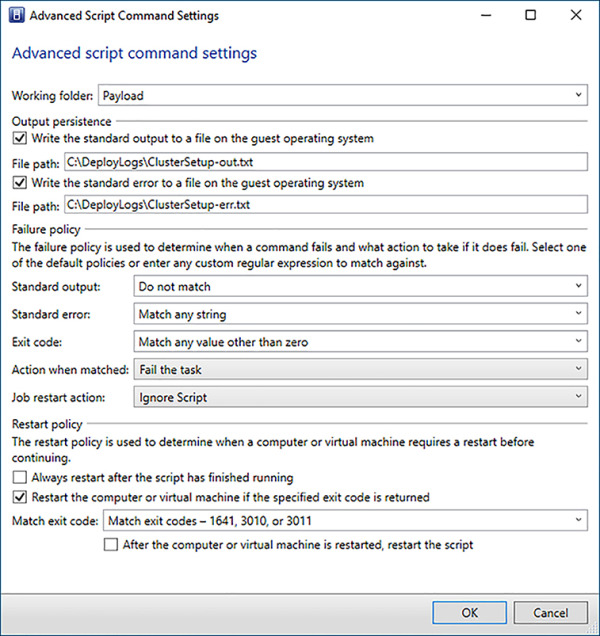
FIGURE 4-21 Configure advanced script command settings
)
)
)
)
Sample service templates
You can find several example service templates in the TechNet gallery. The following section outlines two sample service templates that can be imported to deploy Active Directory and SharePoint from the gallery. Additionally, a sample template is included with this book to demonstrate creating a cluster for a SQL Failover Cluster Instance using SQL 2012.
Implement Active Directory service template
This example demonstrates deployment of a single-tier service containing Active Directory domain controllers via a service template. This template uses simple application configuration scripts and a VM template to deploy the domain controllers. Review the included ReadMe file for detailed usage information.
Download the service template from the TechNet gallery: https://gallery.technet.microsoft.com/Virtual-Machine-Manager-cacc9fc8.
Import the ActiveDirectoryScripts.cr resource to the VMM library.
Import the XML service template definition file for Active Directory.
Map the resources and template configuration settings using appropriate VMM objects.
Configure a deployment of the Active Directory service template.
Implement SharePoint Server service template
This example demonstrates deployment of a three-tier SharePoint 2013 Enterprise farm via a service template. This complex template makes use of advanced features of service templates like application installation sequencing and load balancing of tiers to deploy the database tier, the web front-end tier and the application/central admin tier. You need to prepare base VHDs, as well as SQL and SharePoint data disks that contain installation files as outlined in the documentation included in the download. You may download trial versions of the software from the Microsoft website for testing purposes. Review the Service Template for SharePoint 2013 User Guide for detailed instructions.
Download the service template from the TechNet gallery at https://gallery.technet.microsoft.com/office/Virtual-Machine-Manager-77dea9d4.
Prepare the necessary pre-requisites and import resources into the VMM library.
Import the XML service template definition file for SharePoint 2013.
Map the resources and template configuration settings using appropriate VMM objects.
Configure a deployment of the SharePoint 2013 service template.