Implement Software-Defined Networking (SDN)
- By Jeff Graves and Joel Stidley
- 1/22/2018
- Skill 4.1 Implement compute solutions
- Skill 4.2: Implement service templates
- Thought experiment
- Thought experiment answers
- Chapter summary
In this sample chapter from Exam Ref 70-745 Implementing a Software-Defined DataCenter, take a deep dive into the inner workings of Virtual Machine Manager and how to customize processes to manage your Software-Defined Datacenter.
So far we have talked about deploying the core infrastructure and implementing both Software-Defined Networking and storage. At this point in the book we are going to deploy virtual workloads. Virtual Machine Manager (VMM) has many options for deploying and managing these workloads. Some of the functionality used to deploy these workloads includes features used in bare metal deployments, but also includes many features and concepts to complete the big picture.
In the first part of the chapter we discuss many of components and features that we need to understand to implement compute solutions. This includes building VM templates, application profiles, and how to handle conversions. In the second part of the chapter we discuss putting it all together using service templates. Using service templates to manage your virtual workloads provides a new level of managing more traditional on premises workloads using your Software-Defined Datacenter.
If you haven’t been following along with the examples in the book so far, please take the time to get into a lab environment and work through the examples in at least this chapter. If you spend the extra time to get hands-on experience with the skills in this chapter, you are going to be much better prepared for all the other skills covered in the exam.
Skills covered in this chapter:
Skill 4.1: Implement compute solutions
Skill 4.2: Implement service templates
Skill 4.1 Implement compute solutions
VMM provides many methods for customizing deployments. These include guest operating systems, applications, capabilities, and SQL server profiles. These profiles enable customization of the virtual machine deployment.
It may seem a little like magic that VMM is able to contort the deployment process in so many ways. However much of the deployment wizardry is done through customization of the unattend.xml file. VMM uses profiles, templates, and scripts to give you the interface for customizing the deployments. It also provides you with the option to use your current answer files to customize the profiles.
In Chapter 1, “Plan and implement System Center Virtual Machine Manager core infrastructure” we reviewed the profile types stored in the VMM library. These profiles are used to define a virtual deployment. The profiles specific for defining virtual deployments are:
Application profiles define how an application is deployed in a service template, application settings for SQL Server data-tier apps (DAC) and Web Deploy. These profiles can also include information for running scripts created for Windows installer, Windows PowerShell Desired State Configuration (DSC), Puppet, and Chef.
Capability profiles define VM capabilities that will be accessible within a cloud. This enables you to limit the number of processors, memory, storage, and network adapters. The limits available are controlled by whether the profile is for ESX Server or Hyper-V. These profiles are useful when users have been given access to VMM, because it enables the administrator to provide limits for each VM. Used in conjunction with limits provided by the Cloud settings, limits can also be set on overall resource usage.
Guest operating system profiles define operating system settings to be applied when a VM is created from a template.
Hardware profiles define the hardware configuration such as processor and memory use for deploying a VM.
SQL Server profiles define customizations for installing SQL Server to use a DAC package.
In this chapter, we are focusing on application, guest operating system, and hardware profiles because these are the most common profile types you use in your Software-Defined Datacenter.
Configure hardware profiles
A hardware profile is like the physical computer profiles we used in Chapter 1 to deploy bare metal servers, because it defines the virtual hardware configuration for a VM. On the General page, you must choose the generation of the virtual machine. On the Hardware Profile tab, you must define the type of cloud for which the virtual machine can be deployed.
In the following example, we create a hardware profile for a simple Generation 2 virtual machine.
Open VMM console and click the Library workspace.
On the Home tab, click Create, and then click Hardware Profile.
In the New Hardware Profile page, click the General tab. In the Name field type Simple VM, select Generation 2 from the Generation drop-down list, and then click the Hardware Profile tab (Figure 4-1).
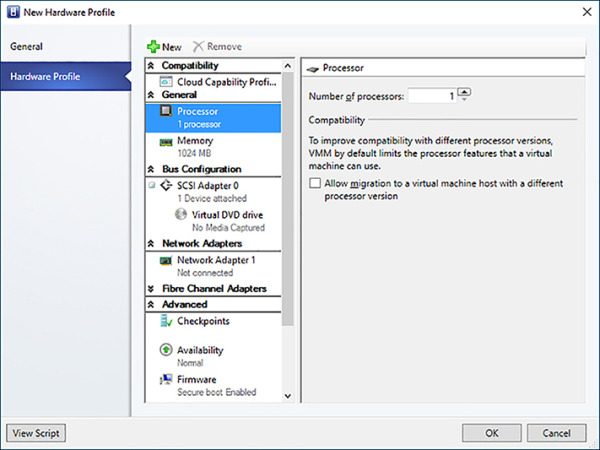
FIGURE 4-1 Configuring the processor settings on a new hardware profile
In the General workspace, modify the processor and memory settings. Expand the Advanced workspace, and click Availability. In the details pane, select the Make This Virtual Machine Highly Available check box (Figure 4-2).
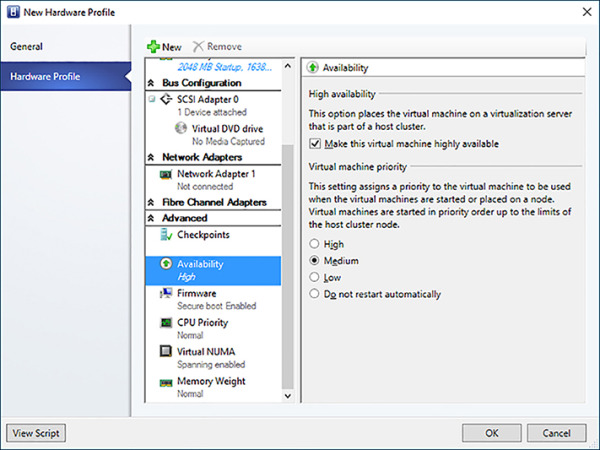
FIGURE 4-2 Modifying the Availability settings for the hardware profile
Click OK to close the wizard and create the hardware profile.
)
)
The hardware profile you created can now be used as a predefined list of settings for creating virtual machines, virtual machine templates, and service templates. This standardization allows you to create uniform virtual machines without forgetting to adjust a setting manually.
Configure guest operating system profiles
Like a hardware profile, the guest operating system profile enables you to create a standardized configuration for guest operating systems. To provide more control over the guest operating system deployment, you can create a guest operating system profile in the VMM library. Most of the customization that VMM can complete is by manipulating the Sysprep.inf and unattend.xml settings that are available for Windows deployments. To use a guest operating system profile, you must be associated with a template to apply it with. The guest operating system profile includes the following settings:
GUIRunOnce commands are specified in the answer file to run commands when the GUI portion of setup begins. This enables you to install additional software, or run other processes to complete the customization of the deployed virtual machine.
Administrator password specifies the local administrator password for the virtual machine.
Answer File specifies a predefined answer file to customize the installation.
Computer name can specify a hardcoded name, a standardize name with variable numbers, or a random name. This is not the virtual machine name. To create a computer name of WWW001, you would specify WWW### for the computer name. Virtual Machine increments the numbers to make sure that the names are unique. The default value is * which indicates that VMM should generate a random computer name.
Domain specifies the Active Directory domain for which the computer account will be created.
Domain user specifies the domain user account that is used to create the computer account.
Domain user password is for the user account that creates the computer account in the domain.
Full name is the name of the user for which the operating system will be registered.
Organization name is the name of the company or organization for which the operating system will be registered.
Product key is the product key used to activate and license the Windows operating system.
Time zone specifies the time zone for which to set the Windows virtual machine.
Workgroup can specify the workgroup that the virtual machine is in, if the virtual machine is not part of an Active Directory domain.
Windows Server roles and features can be selected to install during deployment.
You can import a guest operating system profile into a template to change settings on either the profile itself or on the template (Figure 4-3). If you make changes to the template, it does not affect the imported guest operating system profile. If you make changes to the imported guest operating system profile, it does not affect the template or any already deployed virtual machines.
)
FIGURE 4-3 Creating a new guest operating system profile
Customizing the installation with guest operating system profiles allows a single virtual disk to be deployed in a variety of ways. You can create multiple operating system profiles to have default settings for virtual machines that are deployed to different domains or require different roles and features. For example, you can have a guest operating system profile for your web servers that are installed in an isolated perimeter network Active Directory domain, and another profile for departmental database servers running within a local office in your corporate domain. This is possible with a single virtual hard disk containing Windows Server, and the customization of guest operating system profiles.
Configure application profiles
Application profiles are primarily used in conjunction with service templates. In the second half of this chapter, we cover how to create service templates. An application profile defines how to configure an application on the virtual machine, specifically to automate the installation, setup, and configuration of the application for production. There are three compatibility settings for an application profile and they are as follows:
Web application host settings define web-based application settings. This includes web deploy packages and IIS settings.
SQL Server application host settings define SQL Server Data-Tier application packages and SQL Server scripts to load the data and make configuration settings for the SQL Server.
General application host settings allow the profile to have access to both the web application host and SQL Server application host settings. Additionally, the profile can include application installation scripts. The scripts can be configured to run in a specific order and also to run at defined times during the life cycle of the application including the following:
Creation of the first virtual machine in the service template.
Creation of any virtual machines after the first virtual machine in the service template.
Before installing other applications.
After installing other applications.
Before uninstalling other applications.
After uninstalling other applications.
Deleting any any virtual machine in the service template.
Deleting the last virtual machine in the service template.
Create and configure virtual machine templates
You can create a new virtual machine template from an existing virtual machine, a virtual hard disk store in the library, or an existing virtual machine. When creating a template from a virtual hard disk, the disk should be prepared using SysPrep. This removes any of the unique settings for that computer, and enables Virtual Machine Manager to properly customize the operating system as it is deployed. Complete the following steps to create a new virtual machine template based off of a virtual hard disk already stored in the library:
Open the VMM console, and then click the Library workspace.
On the Home tab, click Create VM Template.
On the Select Source page of the Create VM Template Wizard, click Use An Existing VM Template Or A Virtual Hard Disk Stored In The Library, and then click Browse.
In the Select VM Template Source window, click the virtual hard disk for the template, click OK, and then click Next.
On the Identity page, type Windows Server 2016 in the VM Template Name field. Select Generation 2 from the Generation drop-down, and then click Next.
On the Configure Hardware page, select the hardware profile you created earlier from the Hardware profile drop-down, click Next.
On the Configure Operating Systems page (Figure 4-4), select the guest operating system profile you created earlier from the guest operating system profile drop-down, and click Next.
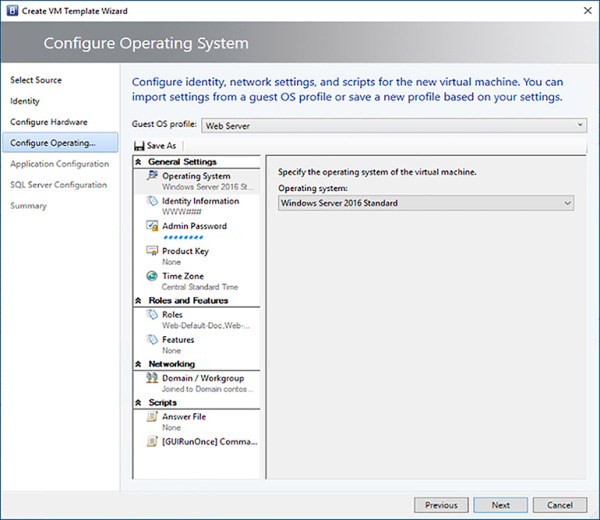
FIGURE 4-4 Creating a virtual machine template
On the Application configuration page, you can select an application profile from the library, or make changes directly to the template. Application configuration settings are only applied if the virtual machine template is part of a service template. Click Next.
On the SQL Server configuration, you can define a SQL Server deployment and configuration. SQL Server settings are only applied if the virtual machine template is used as part of a service template.
On the Summary page, confirm the settings, and then click Create to complete the creation of the template.
)
Manage custom properties and placement rules
Custom Properties are properties that you can assign to objects within VMM. From this page, you are able manage custom properties for virtual machines, virtual machine templates, hosts, host clusters, host groups, service templates, service instances, computer tiers, and clouds. These custom properties can be used in Windows PowerShell scripts, monitoring thresholds, and elsewhere to help you define and keep track of the components and objects within your Software-Defined Datacenter.
Placement rules are user-defined rules to control which hosts a new virtual machine will be placed. Although VMM has preconfigured placement rules, custom placement rules allow you to apply more control to the automatic placement process. The custom placement rules can either be inherited from the parent host groups, or defined specifically for the host group. All hosts within the host group inherit the rules defined on its host group. Each rule is evaluated using one of the 10 custom properties of the host with the same custom property on the virtual machine. If a rule is defined with the “must match” or “must not match” requirement, the rule can block the VM from being deployed to the applicable host. However, if a rule is defined with the “should match” or “must not match” requirement, the rule may affect the placement rating a host receives, however it would not block the VM from being deployed to the host.
Implement and manage Linux virtual machines
Microsoft has made strides in many areas over the years to shed the stigma that they don’t like Linux. Much work has gone into making sure that Linux workloads run great on Hyper-V, and in turn are supported within VMM.
Linux Integration Services (LIS) must be installed on the virtual machine. Many Linux distributions now include LIS; you must make sure they are installed and enabled. For more information please refer to Supported Linux and FreeBSD virtual machines for Hyper-V on Windows at https://aka.ms/LinuxOnHyperV.
The VMM guest agent for Linux must be installed on the virtual machine. It is required for service template integration, and it allows you to modify properties on the Linux computer such as the host name.
VMM doesn’t verify that the VM meets these requirements. However, if it doesn’t, VM deployment will fail.
If the latest LIS is not included with the distribution of Linux, it needs to be installed manually. You also need to install the VMM guest agent.
Copy all the correct agent installation files from the c:\Program Files\Microsoft System Center 2012\Virtual Machine Manager\agents\Linux folder to the Linux virtual machine.
From the virtual machine, make the installation script executable by running the following command:
chmod +x install.
Then run the installation script using the following command for a 64-bit operating system:
./install scvmmguestagent.1.0.0.544.x64.tar
The agent installation creates the following files and folders:
/opt/microsoft/scvmmguestagent The default installation folder.
/opt/microsoft/scvmmguestagent/scvmm-install.log The installation log file.
/var/opt/microsoft/scvmmagent/log The default log files folder.
scvmm.log The specialization log file that is created when the virtual machine is deployed and specialized.
scvmm.conf The configuration file that contains the location of the log file and is used to control logging during deployment and specialization.
Once the VMM agent is installed, you can shut down the Linux virtual machine and copy it to the library and create a virtual machine template from it so that you can deploy other virtual machines.
Manage checkpoints
Checkpoints enable creation of a point in time copy of a virtual machine that can be used to recover the virtual machine back to the point in time. Checkpoints have been a part of Hyper-V Server since the first version, and in the latest release of Windows Server 2016, there are two types of checkpoints: standard and production.
Production checkpoints leverage backup technology inside the guest to create an application consistent data copy. This technology coordinates with the applications running within the guest to make sure they are ready for the checkpoint. Windows virtual machines use Volume Snapshot Service (VSS) to coordinate the checkpoints. Linux virtual machines are instructed to flush the file system buffers to disk so that the file system is consistent for the checkpoint.
Standard checkpoints save the memory state, hardware configuration, and storage state of the virtual machine at a point in time. The checkpoint is not coordinated with the applications, therefore any processes occurring when the checkpoint is created may lead to data corruption or unexpected results. Therefore, standard checkpoints are typically not used in a production environment. Standard checkpoints are quick to restore from and are typically used for testing environments. When you use the Set-SCVirtualMachine with the CheckpointType parameter you must specify: Disabled, Production, ProductionOnly, or Standard. One of these available checkpoint types:
Disabled Disables checkpoints, so that when a checkpoint is requested no checkpoint is created.
Production Primarily enables production checkpoints on the virtual machine, however if a production checkpoint is unsuccessfully, a standard checkpoint is created.
ProductionOnly Enables production checkpoints, however if a production checkpoint fails, it does not attempt to create a standard checkpoint.
Standard Enables standard checkpoints.
Modifying the checkpoint behavior for a virtual machine within VMM console, you must view the properties of the virtual machine and click the Hardware Configuration tab. Under the Advanced section, click Checkpoints, as shown in Figure 4-5. From this page, checkpoints can be configured to behave the same way as they would if one of the four options configured using Set-SCVirtualMachine -CheckpointType. Instead of changing the checkpoint configuration for your virtual machines after they have been deployed, you can configure a default setting in a hardware profile, or a virtual machine template that you use to deploy new virtual machines.
)
FIGURE 4-5 The Checkpoint configuration available on the virtual machine properties
Checkpoints are managed from the Checkpoints page of the virtual machine properties in VMM console, as shown in Figure 4-6. You can quickly get to the Checkpoints page from the VMs and Services workspace, by clicking the virtual machine in the details pane, and then clicking Manage Checkpoints in the Virtual Machine ribbon.
)
FIGURE 4-6 Managing checkpoints in VMM console
You can create multiple checkpoints to keep point in time copies of your changes. When you no longer need the checkpoints, you can click Delete and confirm the deletion of the checkpoint.
Clone virtual machines
You may want to create an identical copy of a virtual machine. You may want to do this to test changes you would like to make, or it could be to deploy multiple copies of the same VM. To create a clone of a virtual machine, you must be an administrator or a delegated administrator on the VMM server, or a self-server user. A self-service user must have permission to deploy and must have the store and redeploy actions assigned. The self-service user will also only be able to clone the virtual machine to a private cloud to which they have permissions and then they can copy the virtual machine to a library share.
When a clone is created, the source virtual machine is not modified. The cloned virtual machine has the same network settings, system name, and files stored on disk. If the cloned machine is powered on with that same configuration, IP address conflicts and Active Directory computer account issues will occur. If you are going to use the cloned virtual machine on the same network as the original virtual machine, you should run SysPrep to reset the cloned virtual machine so that it can be joined to the same domain, with a different computer account name. If you are creating a clone to reproduce an issue, you may choose to not change any settings or run SysPrep because you will start the virtual machine in an isolated environment to work with it.
Cloning a VM to a new VM
Follow these steps to clone an existing VM to a new VM.
Open VMM console, and then click VMs And Service, and click Create Virtual Machine.
On the Create Virtual Machine Wizard page, under Select Source, select Use An Existing Virtual Machine, VM Template, Or Virtual Hard Disk. Click Browse and then select an existing VM. Click Next.
On the Configure Hardware page, view the settings and make changes as needed and then click Next.
At this point in the process you specify where the virtual machine should be deployed: private cloud, on a host, or stored in the library.
Migrate existing virtual machine deployments to VMM
There are many reasons to move VMs from another hypervisor or platform. It could be that you want to consolidate management to a single platform to simplify management or to save money on maintenance. Also, it could be that your current virtualization environment is running on older hardware, and you need to migrate to new hardware running Windows Server 2016.
Although you can manage VMware virtual machines using VMM, you may want to migrate some to Hyper-V. Virtual Machine Manager Console includes the Convert Virtual Machine Wizard, however it has the following parameters:
Supports vSphere (ESXi) 4.1, 5.0, 5.1, 5.5, 6.0.
Does not convert VMware workstations.
Does not convert VMs with virtual hard disks connected to an IDE bus.
Does not convert online VMs, they must be shutdown.
You must manually uninstall the VMware tools from the VM.
You might have also heard about Microsoft Virtual Machine Converter, which is a standalone tool that converts VMware VMs to Hyper-V or Azure VMs and physical machines and disks to Hyper-V VMs. Although it is still available to download and use, this tool is no longer supported. Microsoft recommends using Azure Site Recovery (ASR) service for migrations, however it does not migrate VMware virtual machines directly to Hyper-V.
To convert a VMware VM using the Convert Virtual Machine Wizard, complete the following steps:
Open VMM Console and open the VMs And Services workspace.
On the Home ribbon click Create Virtual Machines, and the click Convert Virtual Machine.
On the Select Source page of the Convert Virtual Machine Wizard, click Browse. On the Select Virtual Machine Source page select the VMware VMs to convert. Click OK and Next.
On the Specify Virtual Machine Identity page, type in the machine name and description, and click Next.
you can manage VMware virtual machines using VMMOn the VM Configuration page, adjust the processor and memory settings for the converted VM, and then click Next.
On the Select Host page, select a Hyper-V host for the converted VM, and click Next.
On the Select Path page, select the storage location for the converted VM files and click Next.
On the Select Networks page, set the network settings, and then click Next.
On the Add Properties page, configure the properties, and click Next.
On the Summary page, select Start The Virtual Machine After Deploying It, and then click Create to start the conversion.
Deploying containers via VMM templates
There are two types of Windows containers: Windows Server and Hyper-V containers. Both container types function the same way and are created and managed the same way. The type of isolation is how they differ. For example, all the Windows Server containers on the host share the same kernel. Isolation is achieved through namespace and process isolation and resource management. In contrast Hyper-V containers each have a copy of the Windows kernel and memory assigned. Using Hyper-V technologies to deliver the same level of isolation found in VMs.
Because both container technologies use the same images, you can create one image for both. The next section discusses how to create and prepare a Nano server image.
Deploy and manage Nano server containers
One of the most talked about virtualization technologies of the time is containers. Because containers are part of the System Center 2016 and Windows Server 2016 releases, many more people can take advantage of containers on premises as well as in the cloud. Being a stripped down and lightweight container operating system, Windows Nano server does not have all the customization features that Windows Server has. This means that the setup and deployment of Nano server is a little different than a typical Windows Server operating system deployment.
To prepare for deploying Nano server, you first need to create a Nano server virtual hard disk image. To create a generation 2 Nano server VM, complete the following steps:
Copy NanoServerImageGenerator.psm1 and Convert-WindowsImage.ps1 from the NanoServer folder (D:\NanoServer) on the Windows Server 2016 installation media to a temporary folder (C:\Temp).
Start Windows PowerShell as an administrator, navigate to the temporary folder, and then import the NanoServerImageGenerator script module by running the following command:
Import-Module NanoServerImageGenerator.psm1 -Verbose.
Create the Nano server VHDx that includes the SCVMM packages. The following command creates a new VHDx named NanoVM1.vhdx in C:\Temp\Tempate\NanoVM1 using the installation media mounted at D:\ by running the following command:
New-NanoServerImage -MediaPath D:\ -BasePath .\Template -TargetPath .\NanoVM1\NanoVM1.vhdx -ComputerName NanoVM1 -GuestDrivers -Package Microsoft-NanoServer-SCVMM-Package,Microsoft-NanoServer-SCVMM-Compute-Package
You are prompted to supply the administrator password for the new VHD. Type in the password and continue.
 EXAM TIP
If you want to create a generation 1 Nano virtual machine, specify the .vhd file extension for the target path of the virtual hard disk. If you want to create a generation 2 Nano virtual machine, specify the .vhdx file extension for the target path of the virtual hard disk.
Another way to create a Nano server image is to use the Nano Server Image Builder tool from Microsoft. This graphical interface provides a wizard for customizing and creating a Nano server image. You can download the tool from https://www.microsoft.com/en-us/download/details.aspx?id=54065.