How to Combine Data from Multiple Sources in Microsoft Excel 2016
- By Curtis Frye
- 10/16/2015
- Use workbooks as templates for other workbooks
- Link to data in other worksheets and workbooks
- Consolidate multiple sets of data into a single workbook
- Skills review
- Practice tasks
Excel 2016 gives you a wide range of tools with which to format, summarize, and present your data. After you have created a workbook to hold data about a particular subject, you can create as many worksheets as you need to make that data easier to find within your workbook. To ensure that every year’s workbook has a similar appearance, you can create a workbook with the characteristics you want, and save it as a pattern, or template, for similar workbooks you will create in the future.
A consequence of organizing your data into different workbooks and worksheets is that you need ways to manage, combine, and summarize data from more than one Excel document. You can always copy data from one worksheet to another, but if the original value were to change, that change would not be reflected in the cell range to which you copied the data. Rather than remembering which cells you need to update when a value changes, you can create a link to the original cell. That way, Excel will update the value for you whenever you open the workbook. If multiple worksheets hold related values, you can use links to summarize those values in a single worksheet.
This chapter guides you through procedures related to using a workbook as a template for other workbooks, linking to data in other workbooks, and consolidating multiple sets of data into a single workbook.
Use workbooks as templates for other workbooks
After you decide on the type of data you want to store in a workbook and what that workbook should look like, you probably want to be able to create similar workbooks without adding all of the formatting and formulas again. For example, you might have established a design for your monthly sales-tracking workbook.
When you have settled on a design for your workbooks, you can save one of the workbooks as a template for similar workbooks you will create in the future. You can leave the workbook’s labels to aid in data entry, but you should remove any existing data from a workbook that you save as a template, both to avoid data entry errors and to remove any confusion as to whether the workbook is a template. You can also remove any worksheets you and your colleagues won’t need by right-clicking the tab of an unneeded worksheet and, on the shortcut menu that appears, clicking Delete.
TIP

You can also save your Excel 2016 workbook either as an Excel 97–2003 template (.xlt) or as a macro-enabled Excel 2016 workbook template (.xltm). For information about using macros in Excel 2016 workbooks, see Chapter 12, “Automate repetitive tasks by using macros.”
After you save a workbook as a template, you can use it as a model for new workbooks.
Important

Be sure to save your Excel template file in the Custom Office Templates folder so it’s available for you to use later.
)
When you create a new workbook by using the tools found in the Backstage view, the New page displays the blank workbook template, built-in templates, a search box you can use to locate helpful templates on Office.com, and a set of sample search terms.
From the list of available templates, you can click the template you want to use as the model for your workbook. Excel creates a new workbook (an .xlsx workbook file, not an .xltx template file) with the template’s formatting and contents in place.
In addition to creating a workbook template, you can add a worksheet based on a worksheet template to your workbook by using the Insert dialog box.

Add specific worksheet types by using the Insert dialog box
The Insert dialog box splits its contents into two tabs. The General tab contains icons you can click to insert a blank worksheet, a chart sheet, and any worksheet templates available to you.
TIP
The other two options on the General tab, MS Excel 4.0 Macro and MS Excel 5.0 Dialog, are there to help users include solutions built in earlier versions of Excel into Excel 2016.
The Spreadsheet Solutions tab contains a set of useful templates for a variety of financial and personal tasks. If you want to create a worksheet template, as opposed to a workbook template, delete all but one worksheet from your file and save it as a template.
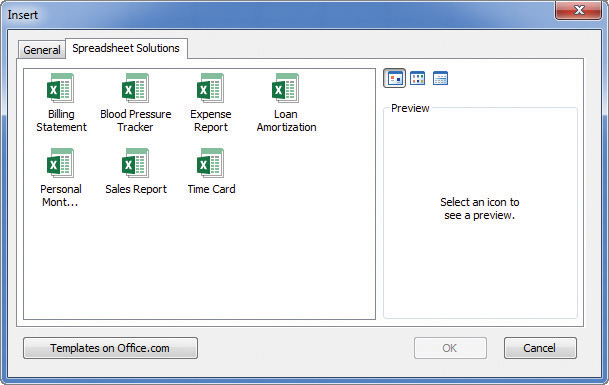
Create useful worksheets from the Spreadsheet Solutions tab
To create a workbook by using an existing template
- Click the File tab to display the Backstage view.
- Click New.
- If necessary, enter a search term in the Search for online templates box and press Enter.
- Click the template you want to use.
- Click Create.
To insert a worksheet template into a workbook
- Right-click any sheet tab and, on the shortcut menu that appears, click Insert.
- In the Insert dialog box, click the tab that contains the worksheet template you want to use.
- Click the worksheet template.
- Click OK.
To save a workbook as a template
- Create the workbook you want to save as a template.
- In the Backstage view, click Save As.
- Click Browse.
Click the Save as type arrow, and then click Excel Template.
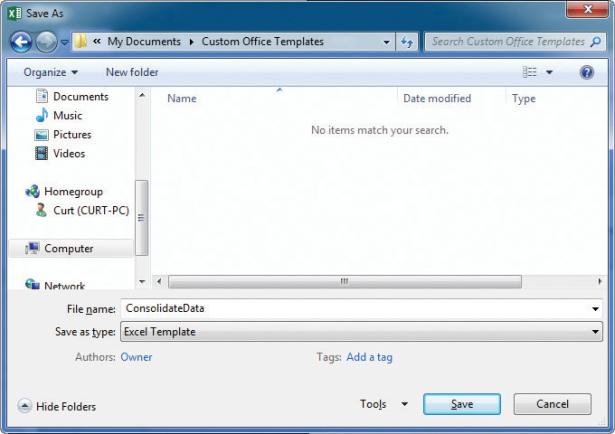
Click the Excel Template file type to use your file as a pattern for other workbooks
- In the File name box, enter a name for the template workbook.
- Click Save.
)
To save a workbook as a macro-enabled template
- Create the workbook you want to save as a macro-enabled template.
- In the Backstage view, click Save As.
- Click Browse.
- Click the Save as type arrow, and then click Excel Macro-Enabled Template.
- In the File name box, enter a name for the template workbook.
- Click Save.