Make an active site
- By Rob Miles
- 7/3/2023
In this sample chapter from Begin to Code: Building apps and games in the Cloud, you will learn how a JavaScript program can accept and store values between browsing sessions and how to write code that can generate web page content dynamically.
What you will learn
We now know how to create JavaScript applications and deploy them into the cloud as part of HTML-formatted web pages. We have seen how a JavaScript code can communicate with the user by changing the document element properties held in the Document Object Model (DOM) created by the browser from the original HTML. We made a ticking clock in which our JavaScript code changed the textContent property of a paragraph displaying the time. We can also deploy our web pages and their applications in the cloud so anyone with a web browser can use them.
In Chapter 2, we also discovered how a program could receive input from the user through button presses. In this chapter, we will discover how a JavaScript program can accept numbers and text from the user and store their values between browsing sessions. Then, we will start writing code that can generate web page content dynamically. And on the way, we will learn about a bunch of JavaScript heroes.
Don’t forget that you can use the online glossary at https://begintocodecloud.com/glossary.html to look up unfamiliar things.
Get input from a user
Storing data on the local machine
JavaScript Heroes: let, var, and const
Making page elements from JavaScript
What you have learned
Get input from a user
You might find it strange, but people seem to quite like the idea of our time travel clock. However, like most people who like something you’ve done, they also have suggestions to improve it. In this case, they think it would be a good idea to be able to set how fast or slow the clock is. We know web pages can read input from the user. We have been entering numbers, text, and passwords into web pages since we started using them. Let’s see how we can do this to make an “adjustable” clock.
Figure 3-1 shows that the time offset is entered as an input in the bottom-left part of the page. The entered value is set when the Minutes offset button is pressed. In this example, the user has entered 10 and pressed the Minutes offset button. Now, the clock is 10 minutes fast.
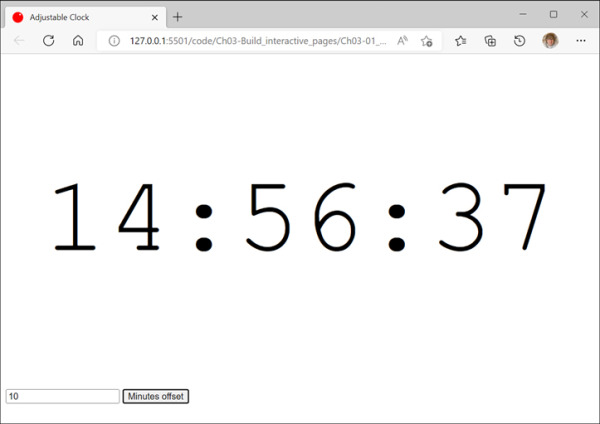
FIGURE 3.1 Adjustable clock
The HTML input element
First, we will need a place on the web page where the user can enter text. HTML provides the input element, which is used in two ways. It can send input back to the web server (we will do this in Chapter 8 when post a web form back to the server), and it can receive input from the user, which can be read by a JavaScript program and is what is happening here:
<input type="number" id="minutesOffsetInput" value="">
The HTML statement above creates an input element. The element has been given three attributes. The first attribute, input type, specifies the input type and has been set to number, which tells the browser to accept only numeric values in this input.
The second attribute, id, allows the JavaScript program to find this element and read the number out of it. This attribute has been set to "minutesOffsetInput".
The third element, value, is the initial value of the input and is set as an empty string—"".
Next, we need a button to press to set the new offset value. This will call a function to set the value when the button is pressed:
<button onclick="doReadMinutesOffsetFromPage();">Minutes offset</button>
We’ve seen buttons before for setting the clock modes in Chapter 2. A button can have an onclick attribute that specifies JavaScript to be run when the button is pressed. This button will call the function doReadMinutesOffsetFromPage when it is pressed:
You can see the doReadMinutesOffsetFromPage function above. It does what you might expect:
Finds the input element into which the user has typed the number
Gets the value property of that element containing the text of the number entered
Converts the number text to a number
Sets a global variable called minutesOffset to hold the new value
Input types
Figure 3-2 shows some of the input types available and what they look like on a web page when you enter data into them. Each input item in Figure 3-2 has a paragraph containing an input field with the appropriate type and a button that is used to call a function that will display the input that the browser will receive. You can enter input data into an input and then click the button next to it to display the value produced. The passwordIinput element has just been used to enter topsecret, and the password button has been clicked to display the value in the input element. Note that the browser doesn’t display the characters in the password as it is entered.
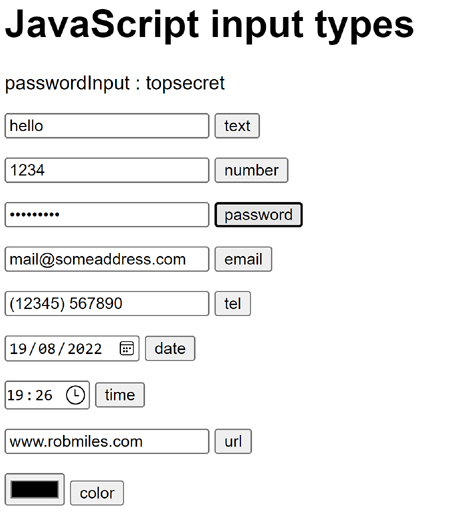
FIGURE 3.2 Input types
Below, you can see the HTML that accepts the password input. The outer paragraph encloses input and button elements. The onclick event for the button element calls a function called showItem with the passwordInput argument.
<p>
  <input type="password" id="passwordInput">
  <button onclick='showItem("passwordInput");'>password</button>
</p>
Note that the program uses two kinds of quotes to delimit items in the string containing the JavaScript to be performed when the button is pressed. The outer single quotes delimit the entire JavaScript text, and the inner double quotes delimit the "passwordInput" string, which is the argument to the function call. There are similar paragraphs for each of the different input types. The showItem function must find the entered value and display it on the output element.
The showItem function uses the document.getElementByID method to get the inputElement and outputElement values. It then builds the message to be displayed by adding the value in the inputElement to the end of the itemName. This message is then set as the content of the outputElement, causing it to be displayed.
The input types work differently in different browsers. Some browsers offer to auto-fill email addresses or pop up a calendar when a date is being entered. However, it is important to remember that all these inputs generate a string of text that your program will need to validate before use. The email input doesn’t stop a user from entering an email address that doesn’t exist. You can investigate their behavior by opening the HTML page in the Ch03-03_Input_Types sample folder.


 MAKE SOMETHING HAPPEN 12