Create and manage documents
- By Joan Lambert
- 7/3/2023
- Create documents
- Open and move around in documents
- Display different views of documents
- Display and edit file properties
- Save and close documents
- Key points
- Practice tasks
Open and move around in documents
In addition to templates, the Home page displays documents you’ve worked in recently, documents you’ve pinned to the page so they’re always available, and documents other people have shared with you.
Open existing documents
If the document you want to open appears on the Home page, you can open it directly from there. Otherwise, you can open documents stored locally on your computer or in a remote storage location such as a Microsoft OneDrive folder or a Microsoft SharePoint document library, either from within Word or from the document storage location.
 TIP
TIP
If you receive a Word document as an attachment to an email message, you can open the attached document and start Word, if it isn’t already running, from within Outlook, or you can preview the document content directly in the Outlook Reading pane without starting Word.
 IMPORTANT
Never open a Word document attached to an email message if you do not know the sender because malicious users can embed malware within Word files. Even if you know the sender, if you weren’t expecting the Word document, it’s best to check with the sender to make sure the file was sent legitimately (and not, say, by a malicious user having hijacked or spoofed that person’s email). For more information, see the sidebar “Open documents in Protected View” later in this chapter.
)
The Open page includes all the locations you’ve linked to from Microsoft 365 apps
The Open page displays only documents saved in the Word-specific file formats (.docx and .doc) and templates created for those standards. For more information about file formats, see “Save and close documents” later in this chapter.
The Recent list in the right pane of the Open page provides quick access to the documents you’ve worked with recently. The Recent list includes locally stored documents and documents that you’ve worked with while signed in with your current account on any computer, tablet, or other device, if the documents are stored in a shared location. This is one of the tremendous benefits of the Microsoft 365 subscription model and the cloud storage that comes with it: you can be up and running on a new computer in minutes, without having to move files or configure settings and preferences. If you use multiple computers, you can use this very convenient feature to seamlessly transition between computers without having to transport files (on a USB flash drive or hard drive) or maintain multiple copies of files in different locations.
 SEE ALSO
For more information about Microsoft 365 apps, see the sidebar “About Microsoft 365 Apps” in Chapter 1, “Word basics.”
To ensure that you can find a specific document quickly regardless of whether you’ve worked with it recently, you can pin it to your document list. On the Open page, pinned files appear in the Pinned section at the top of the list and are indicated by a thumbtack. On the Home page, they appear on the Pinned tab.
To open a recent document
Start Word.
On the Home page, in the Recent list, select the file name of the file you want to open.
Or
With Word running, select the File tab to display the Backstage view.
In the left pane of the Backstage view, select Open to display the Open page.
With Recent selected at the top of the left pane of the Open page, scroll through the file list in the right pane if necessary to locate the document you want to open. Then select the file name to open it.
To pin a document to the Recent file list
Display the Recent list on the Open page of the Backstage view.
If necessary, scroll through the list to locate the file you want to pin.
Point to the file name, and then select the Pin button that appears to the right of the file name to add the file to the Pinned area at the top of the Recent list on the Open page and to the Pinned tab on the Home page.
To open any existing document from within Word
Do either of the following to display the Open page of the Backstage view:
Start Word, and then select Open.
With Word running, display the Backstage view, and then select Open.
In the location list, select the local or network storage location where the file is stored.
Navigate to the file storage folder you want by using one of the following methods:
In the right pane, select Folders. Then select pinned or recently accessed folders until you reach the folder you want.
In the left pane, select Browse to display the Open dialog. Then select folders in the Navigation pane, double-click folders in the file pane, or enter the folder location in the Address bar.
Double-click the document you want to open.
TIP
In the Open dialog, selecting a file name and then selecting the Open arrow displays a list of alternative ways to open the selected document. To look through a document without making any inadvertent changes, you can open the document as read-only, open a copy of the document, or open it in Protected View. You can also open the document in a web browser. In the event of a computer crash or other similar incident, you can instruct the app to open the document and try to repair any damage.
To open a file directly from a OneDrive storage site
In your web browser, navigate to the OneDrive folder.
Browse to and select the file you want to open.
If prompted to do so, enter the Microsoft account credentials associated with your OneDrive, and then select Sign in.
Or
In File Explorer, navigate to the OneDrive folder.
Browse to and double-click the file you want to open.
If prompted to do so, enter the Microsoft account credentials associated with your OneDrive, and then select Sign in.
Move around in documents
If you open a document that is too long or too wide to fit in the content pane, you can bring off-screen content into view without changing the location of the cursor by using the vertical and horizontal scroll bars. The scroll bars appear only when the document is longer or wider than the content pane. To remove distractions, the scroll bars and pointer fade from sight when you’re not using the mouse. You can make them reappear by moving the mouse.
You can also move around in a document by moving the cursor. You can place the cursor in a specific location by clicking or tapping there, or you can move the cursor different distances and in different directions and by pressing keyboard keys.
The cursor location is displayed on the status bar. By default, the status bar displays the page the cursor is on, but you can also display the cursor’s location by section, line number, and column, and in inches from the top of the page.
SEE ALSO
For information about displaying information on the status bar, see “Work with the ribbon and status bar” in Chapter 1.
In a long document, you might want to move quickly among elements of a certain type—for example, from heading to heading, from page to page, or from graphic to graphic. You can do this from the Navigation pane.
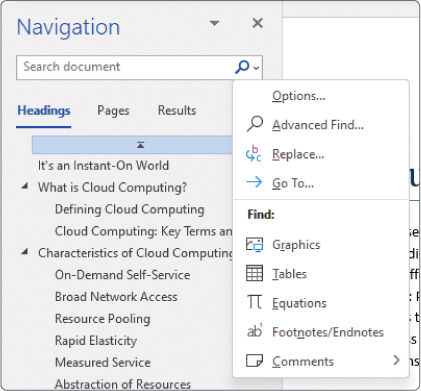
In the Navigation pane, you can move to the next object of a specific type
SEE ALSO
For information about working in the Navigation pane, see “Display different views of documents,” later in this chapter. For information about using the Navigation pane to search for specific content in a document, see “Find and replace text” in Chapter 3, “Enter and edit text.”
A greater variety of browsing options is available from the Go To tab of the Find and Replace dialog. From this tab, you can locate pages, sections, lines, bookmarks, comments, footnotes, endnotes, fields, tables, graphics, equations, objects, or headings. You can jump directly to a specific object if you know its position within the sequence of that type of object in the document (for example, if it is the fifth equation), move forward or backward a specific number of objects, or browse from one object to the next.
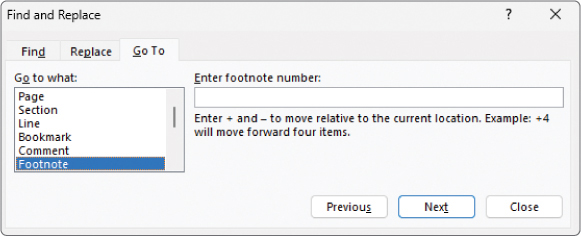
From the Go To tab of the Find and Replace dialog, you can move to a specific object
To change the area of a document that is displayed in the content pane
On the vertical scroll bar, do any of the following:
Click or tap the scroll arrows to move up or down one line.
Click or tap above or below the scroll box to move up or down by the height of one screen.
Drag the scroll box on the scroll bar to display the part of the document corresponding to the location of the scroll box. For example, dragging the scroll box to the middle of the scroll bar displays the middle of the document.
On the horizontal scroll bar, do any of the following to move side to side:
Click or tap the scroll arrows.
Click or tap to the left or right of the scroll box.
Drag the scroll box on the scroll bar to display the part of the document corresponding to the location of the scroll box.
To move the cursor by using the keyboard keys
Move the cursor by pressing the key or key combination described in the following table.
To move the cursor
Press
Left one character
Left Arrow
Right one character
Right Arrow
Up one line
Up Arrow
Down one line
Down Arrow
Left one word
Ctrl+Left Arrow
Right one word
Ctrl+Right Arrow
Up one paragraph
Ctrl+Up Arrow
Down one paragraph
Ctrl+Down Arrow
To the beginning of the current line
Home
To the end of the current line
End
To the beginning of the document
Ctrl+Home
To the end of the document
Ctrl+End
To the beginning of the previous page
Ctrl+Page Up
To the beginning of the next page
Ctrl+Page Down
Up one screen
Page Up
Down one screen
Page Down
To show or hide the Navigation pane in a document
On the View tab, in the Show group, select the Navigation Pane checkbox.
To browse by object from the Navigation pane
Open the Navigation pane, and then do any of the following:
At the top of the Navigation pane, select Headings. Then select any heading to move directly to that location in the document.
At the top of the Navigation pane, select Pages. Then select any thumbnail to move directly to that page of the document.
At the right end of the search box, select the arrow. In the Find list, select the type of object you want to browse by. Then select the Next and Previous arrows to move among those objects.
To display the Go To tab of the Find and Replace dialog
On the Home tab, in the Editing group, select the Find arrow, and then Go To.
In the Navigation pane, select the Search arrow, and then in the Search for more things list, select Go To.
Press Ctrl+G.
To browse by object from the Go To What list
Display the Go To tab of the Find and Replace dialog.
In the Go to what list, select the type of object you want to search for. Then do any of the following:
Select the Next button to move to the next object of that type.
Select the Previous button to move to the previous object of that type.
In the text box (the name of which varies depending on what you select in the Go to what list), enter either of the following, and then select the Go To button:
Enter a number identifying the position of the object within the total objects of that type in the document. (For example, if you select Footnote in the Go to what list, enter 4 to move to the fourth footnote in the document.)
Enter + (plus sign) or – (minus sign) and then a number to move forward or backward by that many objects of the selected type.