Security patterns
- By Michael Howard, Simone Curzi, Heinrich Gantenbein
- 6/26/2023
Authorization patterns
Authorization is another fundamental property of any secure solution. It comes after authentication. Authorization focuses on allowing users to perform actions they are entitled to perform and on preventing them from performing actions they are not entitled to perform. This section focuses on some common patterns for securing your solution through authorization.
We mentioned that authentication does not represent a value per se, but it is instrumental in securing your application and data. The same applies to authorization.
Adopt just-in-time administration
Intent and motivation
Accounts are not all equal. Some have considerable privileges assigned to them, making them a juicy target for malicious actors. For example, highly privileged administrators, like those assigned the roles of Global Administrator or User Administrator, are powerful, and it would cause significant damage to the organization if their user accounts were abused. For this reason, the most common recommendation is to apply the principle of least privilege by assigning the various roles only to those users who require them for a legitimate business reason and only when there is no other alternative that would allow for the assignment of fewer rights. For example, suppose one user needs to read security reports because she works on the security team. In that case, you should assign her the Security Reader role instead of Secure Administrator or Global Administrator.
This approach is a critical best practice, so there is a good chance your organization already applies it. Still, too many organizations struggle to adopt this approach due to the many roles defined in Azure AD and Azure Services. That is to say, sometimes the “best” role for a user—the one that most closely meets that user’s needs—is not the most secure one. This pattern ensures that no unnecessary rights are assigned that could be exploited by an attacker or a malicious insider. Still, the rights that are assigned could be enough to cause significant losses.
A study by IBM Security and ObserveIT, published in 2020, found that the average cost of a security breach caused by an insider was $11.45 million. The study also found that, on average, the companies interviewed during the course of the study experienced 3.2 such incidents per year. Finally, the study determined that it’s possible to reduce these losses by about $ 3 million by adopting a privileged access management (PAM) tool.
 NOTE
NOTE
You can download the study mentioned here from https://azsec.tech/56t. For a discussion of the study, see https://azsec.tech/au8.
The idea behind PAM tools is that users do not need privileges 24×7. Rather, they need them for only a limited time. So, a privileged account represents a potential risk only when someone uses it to perform necessary actions. Outside that period, a PAM tool can revoke the rights, such that the user in question has no assigned privileges. PAM tools also deter malicious use because they require users to specify a business reason to obtain a particular privilege. They can also be used to require the approval for a third party to assign a particular right, in accordance with the separation of duties principle.
Description
Azure AD PIM is the primary tool within Azure for just-in-time administration. This tool extends how you assign roles to users or groups. With plain Azure AD, you assign roles globally or within a specific context, depending on the scope of the role. The role is then assigned forever. With Azure AD PIM, you can mark a role as eligible and then assign policies to that role. An eligible role remains dormant until it is activated. Activation can be subject to approval and could require additional authentication with MFA as well as the specification of a business reason. Activation can also be temporary and automatically removed after a set time.
 TIP
TIP
Azure AD PIM is not something you implement for the purposes of application development. It is part of a broader initiative that is typically the responsibility of those who manage your Azure AD tenant. If you decide you need Azure AD PIM to limit the exposure of privileged accounts for your application, you might want to ask the owners of the tenant to adopt it. If your organization has already adopted it, you can ask to define the rules you require for your application.
Example
Sometimes developers need access to production data to troubleshoot problems. While this is understandable, you should try to avoid it. That being said, in an emergency, you might not be able to avoid this, as developers will need to access this data to quickly identify a solution. The best way to handle these types of situations is to plan for them. In this effort, Azure AD PIM may play a significant role by enabling you to define an authorization process that requires a valid reason and approval by a third party.
Related security principles
Attack surface reduction
Defense in depth
Least privilege
Leveraging existing components
Separation of duties
Related patterns
Use a centralized identity provider for authentication
Use role-based access control (RBAC)
Assign roles to groups
Intent and motivation
Let’s face it: determining what access rights are required is not always a trivial matter. In many cases, identifying the right blend of rights is a matter of trial and error. It’s very tempting to assign full rights and call it a day!
This behavior is a consequence of many factors, not least of which is the number of built-in roles provided with Azure. There are currently more than 80 built-in roles for Azure AD and more than 240 built-in roles for Azure services! No wonder it is so difficult to find the right roles to assign.
Still, it is imperative to identify a feasible approach to guarantee that users are assigned the most limited rights possible. Focusing on feasibility might be the difference between having an academic requirement and effectively making a difference.
Description
The critical point here is to apply least privilege without sacrificing manageability. One way to achieve this is by using groups. The idea is to define whatever usage scenarios you need and then create groups to support them. Once that’s done, you can assign the required roles to each group and then assign users to groups as needed.
This approach is helpful for two reasons:
It minimizes management because it aligns groups according to how the organization works.
It enables you to minimize the number of role assignments. This is essential because Azure restricts you to 2,000 role assignments per subscription. For more on this, see https://azsec.tech/ad8.
Common exceptions to this rule are service principals and managed identities, which are typically assigned the required roles directly.
TIP
Designing a suitable authorization model is a matter of business requirements, which must be agreed upon in advance among business, architecture, and operations stakeholders, per the organization’s current policies and with requirements from security and operation. Many aspects are common to all projects, but the details will depend on your solution.
Example
If you have a data lake, you might want to guarantee different levels of visibility, depending on your area. You can address this requirement by assigning the required permissions. The easiest way to do this is to define a group for each category of users—like HR, research, and marketing—and then assign the required rights to various branches in the data lake, based on the desired visibility. You can even reuse the same groups for many applications simply by assigning additional rights to them when required.
Related security principles
Least privilege
Related patterns
Use a centralized identity provider for authentication
Use role-based access control (RBAC)
Isolate from the internet
Intent and motivation
Chapter 2 showed that zero trust has been designed to address the many shortcomings of walled-in defenses. For example, suppose that for your security, you rely only on controls blocking external users from accessing the internals of your solution. In that case, you could be compromised as soon as some-one figures out how to circumvent your layer of protection.
So, the answer would be to not rely on firewalls and similar protections, right? Wrong! The defense-in-depth principle states that every single control you can put in place can be circumvented. This principle doesn’t imply, however, that you should give up your hopes of protecting your solution or that you should ditch controls like firewalls because they can’t fully protect you on their own. It simply means that you need to integrate them with other controls to make your solution more secure. The bottom line is that network isolation still plays a significant role in Azure.
Description
So, how can you protect your solution using network defenses? The first step is to identify the parts of your solution that you must expose to the internet, as well as the parts of your solution that must remain internal. Then, you need to focus on these parts that should not be exposed to ensure that no unauthorized entities can reach them from the internet.
There are a couple of ways to achieve that:
Define firewall rules Most services can define firewall rules. Once these rules are defined, you can use them to block access from the internet. This approach is simple and requires minimal configuration. But it has a downside: your resource or service is exposed. In other words, the firewall rules blocking unwanted traffic are your only protection against external malicious actors.
Define private endpoints As with firewall rules, most services can define private endpoints. With private endpoints, there is no exposure over the internet, because the endpoint gets a private IP address. You can then connect to the private endpoint using private links. Configuring private endpoints and private links requires more work than configuring firewall rules, but it is more secure.
NOTE
Chapter 15, “Network security,” includes additional information and details on implementing this pattern and on networking in general.
Examples
If you have a web application or a web API that is internal to your organization and you do not want to expose it on the internet, you can host it with App Service Environment (ASE). An ASE is a high-performance isolated environment to host your web applications and APIs. ASE is the only way to deploy web applications and APIs based on App Service to a VNet.
You can configure Azure SQL with firewall rules to prevent direct access from the internet as a whole but still allow access from specific IP addresses. If you instead want to prevent all access from the internet, you might want to use a private endpoint.
Related security principles
Attack surface reduction
Defense in depth
Related patterns
Create secure channels
Isolate with an identity perimeter
Isolate with an identity perimeter
Intent and motivation
You learned from the preceding pattern, isolate from the internet, that network isolation is a key mitigation that you should not disregard. The same goes for identity. Both should be applied simultaneously, per the defense-in-depth principle.
NOTE
This pattern is specular and complementary to the previous one.
Description
Identity can represent a perimeter that a user must cross to access protected resources. In this way, it is similar to networking. With networking, you can use rules to allow specific IP addresses to access your solution but not others. Similarly, you can use identity authentication and authorization to control who can access your resources and what they can do with them.
These approaches are both different and complementary, providing different capabilities due to their respective limitations. For example, with IP filtering, you can allow requests from specific geographies or buildings and deny everything else. With authentication and authorization, you can define rules for a specific user or account and establish its rights with regard to your solution or its components.
Example
Azure Front Door, App Gateway, and API Management Gateway are three network virtual appliances (NVAs) that you can configure to provide network perimeter defenses via private networking. The private networking approach is often considered enough for many solutions, but is that really so? As usual, the defense-in-depth principle says no. Rather, the recommendation is to add an identity perimeter defense as an additional layered defense. Adding an identity perimeter is typically achieved with TLS mutual authentication. With this approach, the NVA presents its client certificate to the back end. In turn, the back end verifies the certificate and its validity to ensure that the connection comes from the expected NVA and not from a malicious or accidental source.
Related security principles
Zero trust
Defense in depth
Related patterns
Use a centralized identity provider for authentication
Isolate from the internet
Use role-based access control (RBAC)
Intent and motivation
Managing authorization can be complicated. There are many resources and applications, and each of them defines multiple actions that must be authorized. With thousands of actions that can be authorized, you need some way to group and manage them. Moreover, you need a mechanism for use with custom solutions. The idea is that by taking a widely used approach, you can have a more reliable and secure method for authorization than what you could have with a custom authorization process.
Description
Azure RBAC is a common approach that you can use for Azure AD and Azure Services. It provides a structured way to assign users prebuilt sets of rights designed to address everyday needs. Azure AD currently provides more than 120 built-in roles you can choose from. For example, the Reader role allows the user to read the configuration of a service but typically not its data. In contrast, the Contributor role allows the user to change the configuration of a service or create new resources, depending on where the role is assigned. You can also create custom roles, but these are rarely necessary and often create management issues.
A fundamental advantage of using Azure RBAC is that it allows for a centralized view of all the rights assigned to users. This is essential in the event of a compromise because it enables you to browse for affected user accounts to grasp the security implications of their compromise. If you instead use credentials local to the resources and assign rights without using RBAC, you must inspect each resource to obtain the same information. Using RBAC also enables the execution of access reviews to periodically verify that the granted access is still required. And adopting Azure AD credentials and RBAC allows you to leverage a growing set of tools to analyze identities, like Azure AD Identity Protection and Sentinel.
TIP
Azure RBAC is not the only approach to authorization. Sometimes you might need something different, like a custom database representing your authorization matrix. Before searching for an alternative solution, however, you should determine whether you can leverage Azure RBAC to achieve the desired result.
Example
Suppose you need to create a multilevel authorization hierarchy. Your organization has multiple departments, including one called the Commercial department. The top level of this department is Global Commercial, which controls various regions. For example, as shown in Figure 3-1, there’s a region called ATZ, another called Europe, and others. Several countries comprise each region. So, for instance, ATZ includes the USA, Canada, Mexico, and other countries. Each user in Global Commercial has complete visibility; each user associated with a particular region can see everything within that region; and users associated with a particular country can see only the information pertaining to that country.
)
FIGURE 3-1 The hierarchy of the Commercial department.
How might you handle this scenario with Azure RBAC? At a minimum, you would need to rely on a database to represent the hierarchy and on custom code to enforce it. But you can do better. For example, you could do the following (see Figure 3-2):
)
Create a group for each country, a group for each region, and a group for the “global” level.
Make the group for a particular region a member of each country group within that region.
Make the global group a member of each region group.
Use RBAC to assign the required rights to each country and region group, as well as to the global group. This way, each region group will inherit the rights of the country groups within it, and the global group will inherit the rights of each region group.
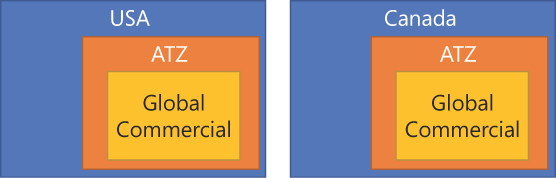
FIGURE 3-2 How the groups must be nested: Global Commercial is a member of ATZ, which is a member of both USA and Canada.
Related security principles
Leveraging existing components
Related patterns
Use a centralized identity provider for authentication
Assign roles to groups