Preparing your environment for the cloud
- By Aaron Guilmette, Ed Fisher, Darryl Kegg
- 6/26/2023
- Setting up your subscription
- Assigning administrators
- Configuring DNS, firewalls, and proxy servers
- Preparing your directories
- Updating and deploying client software
- Synchronizing your users
- Licensing your users
- What's next?
Configuring DNS, firewalls, and proxy servers
As discussed in Chapter 1, several network devices could affect your Microsoft 365 deployment, connectivity, and continued success with the services provided. Therefore, it is strongly recommended that all network devices be updated to their latest versions, and each device vendor should be contacted to ensure that your device supports Microsoft 365 connectivity.
Often, it is merely a matter of upgrading your existing devices to support Microsoft 365. However, this upgrade process can be time-consuming and disruptive if not done correctly. Therefore, it is strongly recommended that any infrastructure changes required to support Microsoft 365 be made before starting your Microsoft 365 deployment.
Public DNS records
The first necessary configuration changes will be to your public DNS records, which will allow you to verify any domain names and configure the necessary DNS records for things like mail exchange (MX), Exchange AutoDiscover, and Teams.
Proof of domain ownership
When setting up your domain name, as discussed in Chapter 1, the Microsoft 365 admin center configuration steps will walk you through making the necessary DNS changes with your registrar to provide domain ownership proof, typically in the form of a TXT record.
This TXT record can be removed once ownership is verified, and in many cases, the admin center configuration will automatically connect to your registrar and make the necessary addition if you provide credentials.
The network changes will need to be made manually by an authorized administrator if your public DNS infrastructure is managed internally or hosted on Microsoft Windows Server via the Domain Name Services role or another network appliance.
MX, SRV, and other DNS records
Once you have completed the setup process described previously using the Microsoft 365 admin center, your domain will automatically be registered in Microsoft 365, and it can be used as the domain suffix for the UserPrincipalName for the user login and Exchange Online mail routing. This is because the automated configuration process will add MX records to your DNS configuration, allowing email to be delivered to Microsoft 365 automatically.
Additionally, the Exchange AutoDiscover, Sender Policy Framework (SPF), and required Server Resource (SRV) records will exist in Microsoft 365 tenant’s initial domain namespace (tenant.onmicrosoft.com). These will allow Outlook and mobile client connectivity to your tenant and Teams client. Also, they will allow you to send and receive email directly to or from your tenant or communicate using Instant Message (IM) and Voice Over IP (VOIP) communications via Teams.
Firewall configurations
Microsoft 365 is a cloud-based solution, so it is a requirement that your internal infrastructure can communicate with your tenant without any connectivity issues introduced by your networking infrastructure.
If your internal infrastructure cannot communicate with Azure, your Microsoft 365 experience will be impacted—possibly resulting in email delays. Also, this can prevent you from authenticating and using services or provisioning or licensing users. It can even prevent access to cloud data.
It is strongly recommended that all network devices responsible for packet filtering, load balancing, and network port access control be configured to allow unrestricted outbound traffic to the Microsoft datacenters.
The Microsoft datacenter IP ranges include all the Microsoft 365 services and are maintained on the Microsoft 365 support site. The IP ranges can be viewed and downloaded here: https://aka.ms/M365_IPs
Proxy servers
Traditionally, proxy servers are used to relay requests to the Internet via a single host, though this behavior can create issues when setting up certain services for Microsoft 365 connectivity.
Primarily, traffic to Microsoft 365 is outbound traffic. Some services, like Exchange AutoDiscover, AD FS authentication, and mail routing, might be an exception; however, it is important to understand that proxy server configurations can cause interruptions.
Many proxy servers or services rely on some form of user authentication (either explicit or implicit) to allow the infrastructure to track users and filter requests according to business requirements. This proxy authentication feature primarily impacts directory synchronization.
The directory synchronization process, performed by the AAD Connect tool, connects to Microsoft 365 every 30 minutes to synchronize any directory updates. Additionally, depending on the AAD Connect tool’s configuration, it will retrieve password changes and other data. If the connectivity between AAD Connect and Microsoft 365 is affected, the synchronization might fail, resulting in incomplete data in Microsoft 365.
Therefore, we recommend the AAD Connect tool be exempted from any proxy server configurations and allowed to communicate with Azure without any proxy configuration.
If you cannot bypass proxy servers for the AAD Connect implementation, we recommend configuring both Internet Explorer and the shell to use the same proxy server. Both methods are used during the AAD Connect setup for communication with Microsoft 365, so failure to enable both might result in a failed installation.
To set up Internet Explorer on the server where the synchronization tool will be installed, you will need to do the following:
Launch Internet Explorer.
Select Tools and Internet Options from the Internet Explorer main menu.
Select Connections > LAN Settings from the Internet Options menu.
Make sure the Proxy Server box is checked and a proxy server and port are provided in the Address and Port fields, as shown in Figure 2-9.
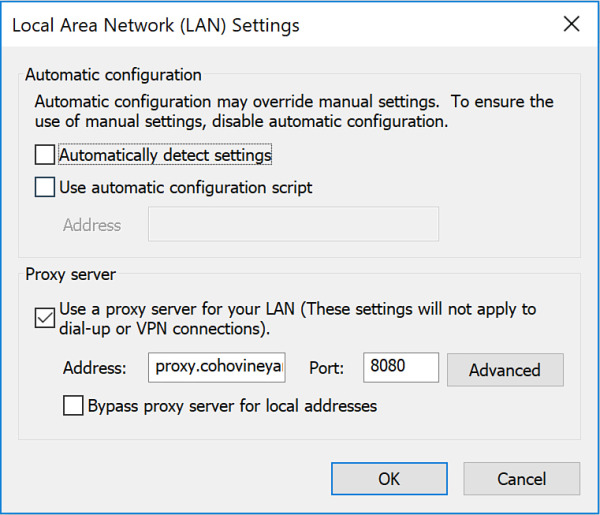
Figure 2-9 Configuring Internet Explorer proxy server
Click OK to close the Local Area Network (LAN) Settings dialog box and OK again to close the Connections dialog box.
)
Once the proxy server has been properly configured in Internet Explorer, perform the following steps to configure the proxy server for the Windows Shell:
Open an administrative command prompt by clicking Start, Run (or Win+R), typing CMD.EXE, and pressing Enter.
Enter the netsh winhttp show proxy command and press Enter.
If the command returns the Direct access (no proxy server) result, as shown in Figure 2-10, proceed to the next step to configure the proxy server.
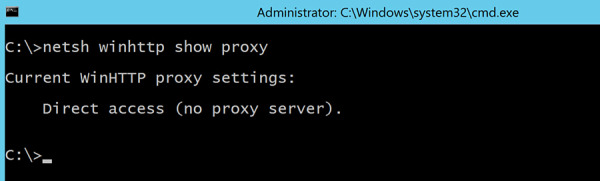
Figure 2-10 Displaying current WinHTTP proxy server configuration
Enter the Netsh WinHTTP Import proxy Source=IE command and press Enter.
If the command completes successfully, it should display the same proxy server that is configured in Internet Explorer, as seen in Figure 2-11.
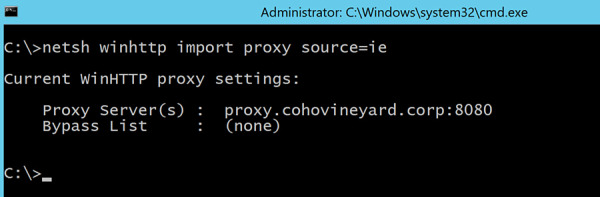
Figure 2-11 Configuring Netsh proxy using Internet Explorer
Finally, in some circumstances, it might also be necessary to modify the machine.config file used by the Windows.Net configuration to also define the proxy server that should be used by any .Net applications.
)
)
If the AAD Connect setup fails to properly communicate with Azure—even after the settings in Internet Explorer and the Windows Shell have been configured—the .Net configuration file can be modified via the following steps:
On the AAD Connect server, navigate to C:\Windows\Microsoft.Net\Framework64\v4.xxxxxxx\Config, where x4.xxxxx is the v4.0 or v4.5 directory located under the Framework64 folder. This directory name will depend upon the .Net 4 version installed on your AAD Connect server.
Edit the machine.config file, shown in Figure 2-12, using Notepad.
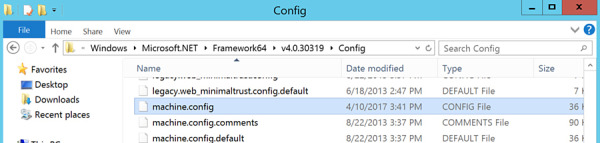
Figure 2-12 The Microsoft .Net machine.config file location
At the bottom of the file, insert the following block of text before the </configuration> line, substituting <PROXYADDRESS> with the name or IP address of your proxy server and <PROXYPORT> with the correct port number:
<system.net>
    <defaultProxy enabled="true" useDefaultCredentials="true">
      <proxy
      usesystemdefault="true"
      proxyaddress="http://<PROXYADDRESS>:<PROXYPORT>"
      bypassonlocal="true"
      />
    </defaultProxy>
  </system.net>
Save the updated file, as shown in Figure 2-13.
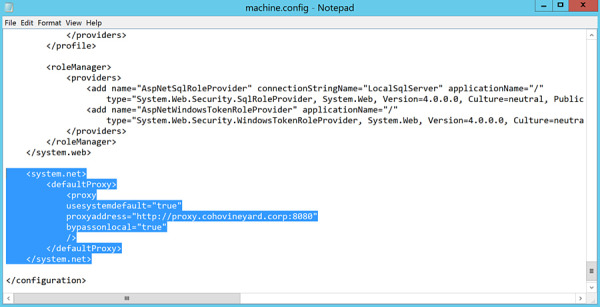
Figure 2-13 The machine.config file, updated to include default proxy information
Once the proxy server configurations have been made to Internet Explorer, the Windows Shell, and the .Net configuration, you may proceed with installing and configuring the AAD Connect tool for directory synchronization.
)
)
Network tracing
Occasionally, during the implementation or configuration of proxy server or network firewall changes, it might be necessary to review the communication between your application and Microsoft 365. Understanding the route that Microsoft 365 communication must take to reach Azure will help troubleshoot network connectivity issues.
Other than mailbox moves, the synchronization process is the most common reason for connectivity tracing with Microsoft 365. Unless configured differently, the AAD Connect sync engine will connect to Azure every 30 minutes to synchronize directory changes from on-premises to the cloud.
Depending on the additional features selected during installation, the AAD Connect engine might connect as frequently as every 1 to 2 minutes to retrieve password change and other authentication requests from the Azure service bus.
If you need to review traffic between your AAD Connect server and Microsoft 365, you can use tools like NetMon3, Fiddler, or WireShark to capture network traces from the server to ensure no other devices are preventing proper communication.
In the example below, we are using Fiddler to capture and import from the Microsoft 365 tenant using the AAD Connect tool. Fiddler is installed on the AAD Connect server and has been configured to decrypt HTTPS traffic.
The trace was captured by using the following steps:
Download and install Fiddler (https://www.telerik.com/fiddler/fiddler-everywhere).
Launch Fiddler and press F12, or select File and choose Capture Traffic.
Start the AAD Connect Synchronization Service Manager.
Select Connectors.
In the Connections window, select the Windows Azure Active Directory connector.
In the Actions pane, select Run.
Choose Full Import and click OK, as shown in Figure 2-14.
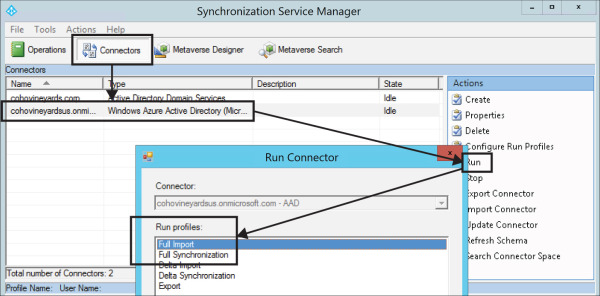
Figure 2-14 Starting a Full Import on the Azure Connector in AAD Connect
Once the Full Import has been completed, review the results of the Fiddler trace, as shown in Figure 2-15.
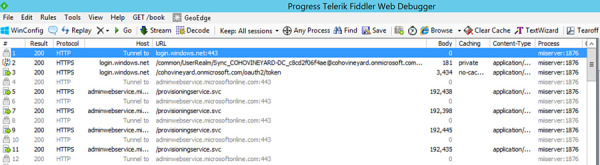
Figure 2-15 Fiddler trace of the AAD Connect Full Import run step
)
)
In the screen capture above, each line represents a packet in the communication between the AAD Connect server and Azure Active Directory. The packets are performing the following actions:
Communication is established between the synchronization engine and Azure via the login.windows.net URL over secure SSL port 443.
Home realm discovery is initiated using the Sync_COHOVINEYARD-DC_c8cd2f06f4ae@cohovineyard.onmicrosoft.com account. This account, discussed in detail in Chapter 4, is the account used to authenticate with Microsoft 365 for synchronization.
The home realm discovery process results in an authentication token with the cohovineyard.onmicrosoft.com tenant.
The synchronization engine is redirected to the adminwebservice.microsoftonline.com URL over secure SSL port 443.
The synchronization engine begins reading data from the adminwebservice.microsoftonline.com/provisioningservice.svc endpoint URL, which returns the tenant data to the sync engine.
The process continues until all the directory data has been read from the Microsoft 365 tenant into the Azure connector in the synchronization engine, at which point, communication ceases.
As you can see from the preceding example, despite the existence of a proxy server in the configuration, there was no effect on the traffic between the synchronization engine and the Microsoft 365 tenant. If there had been issues with the traffic, you would have experienced retransmissions or transmission failures like the example in Figure 2-16.
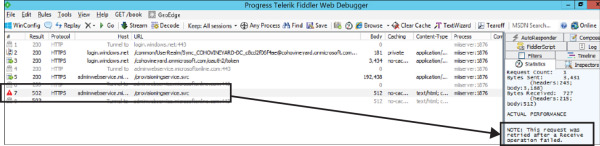
Figure 2-16 A transmission failure in a Fiddler trace
)
In the example shown in Figure 2-16, communication with Azure AD was initiated, and the sync account was authenticated properly. However, the transmission was interrupted, resulting in a retry operation, which failed and stopped the Import from Azure.
Tools like Fiddler and NetMon3 can be invaluable when you first set up the synchronization process because they ensure communication is working properly and none of your network devices are affecting performance or connectivity. Therefore, it is strongly recommended that you become familiar with the proper functionality of the synchronization process and any other service-related connectivity (such as mailbox moves and Office application activation) to ensure the best possible Microsoft 365 experience.
ExpressRoute
ExpressRoute is a secure connection between your on-premises network and the Azure cloud. It provides managed connectivity to the Microsoft datacenters via a secure and private connection and eliminates the need to traverse the public Internet for your Microsoft 365–related traffic.
In addition to bypassing the public Internet for Microsoft 365 traffic, ExpressRoute provides a fast and reliable connection to Azure, making replication, high-availability, and data migration scenarios easier to implement.
If you are considering ExpressRoute connectivity to the Microsoft cloud during your implementation of Microsoft 365, we strongly recommend implementation be done before the rest of your Microsoft 365 readiness milestones. An ExpressRoute implementation changes your network routing internally and affects things like load balancers, proxy servers, and firewalls. These changes will affect communication, so they should be made before establishing synchronization and starting mailbox migrations.