Implement an authentication and access management solution
- By Razi Rais, Jeevan Bisht, Padma Chilakapati, Ilya Lushnikov, Vinayak Shenoy
- 6/26/2023
- Skill 2.1: Plan, implement, and manage Azure Multifactor Authentication (MFA) and self-service password reset
- Skill 2.2: Plan, implement, and manage Azure AD user authentication
In this sample chapter from Exam Ref SC-300 Microsoft Identity and Access Administrator, learn how to protect your organization from cyber attacks and data breaches with Azure Multifactor Authentication (MFA). Gain practical insights on planning, implementing, and managing MFA, along with additional access management solutions.
Attacks on user accounts/passwords have increased significantly in recent years. Common brute force and password spray attacks are extremely effective against plain text passwords. Furthermore, leaked credentials are sold on the dark web, allowing anyone to instantly gain access to tens of thousands of user accounts and passwords. The root cause of these attacks is that passwords alone are ineffective in countering the level and sophistication of attacks against them. Azure AD offers robust multifactor authentication mechanisms that help safeguard access to critical organizational resources by adding another layer of security through the use of a secondary form of authentication. Azure AD also offers fine- and coarse-grain access management solutions, such as condition access, which enables organizations with varying security posture requirements to implement policies that meet their business requirements.
Skills covered in this chapter:
Skill 2.1: Plan, implement, and manage Azure Multifactor Authentication (MFA) and self-service password reset
Skill 2.2: Plan, implement, and manage Azure AD user authentication
Skill 2.3: Plan, implement, and manage Azure AD conditional access
Skill 2.4: Manage Azure AD Identity Protection
Skill 2.5: Implement access management for Azure resources
Skill 2.1: Plan, implement, and manage Azure Multifactor Authentication (MFA) and self-service password reset
To improve the security posture of an organization and to mitigate threats associated with passwords, it is highly recommended to incorporate a multifactor option to authenticate the user. Adding an additional factor to user authentication immediately improves account security because a hacker must compromise additional factors to compromise the account.
Azure provides a range of options for configuring multifactor authentication (MFA) which requires careful planning and administration.
Plan Azure MFA deployment, excluding MFA Server
Azure Multifactor Authentication (MFA) requires you to authenticate using two or more factors to establish identity successfully. These factors follow this pattern:
Something you know: this could be a password, a passphrase, or a security question.
Something you possess: this could be a token-generating device or a software-based application, such as a mobile app.
Something you are: this could be a biometric property of a person, such as a face scan, fingerprint, or retina scan.
Azure MFA offers several options for user authentication to enable two-step verification. The underlying theme of two-step verification is to protect the sign-in process by making it incrementally more difficult for a malicious actor to compromise the account while also ensuring that the sign-in process is not cumbersome. For example, during a sign-in process, some users might prefer to enter their password followed by receiving a push notification on their device, whereas others might prefer to make a phone call because they do not have access to a smart device. As you will see in the following sections, carefully evaluating various authentication options is critical for Azure MFA end user adoption.
Determining a rollout strategy for Azure MFA
You need to think strategically about the rollout of Azure MFA within an organization. Striking a right balance between deployment velocity and its scope is the key to a successful rollout. Following are key points to keep in mind:
Plan the deployment in small iterations by starting with a small subset of users who are receptive to change and whose daily tasks are least impacted by the rollout.
Provide users with clear guidance regarding the registration process along with the MFA methods available to them for authentication.
Continuously monitor for any issues reported by users, including steep learning curves, lack of preferred authentication methods, and technical challenges that may hamper the adoption.
Ensure that support staff are trained well in advance before the rollout.
Anticipate some resistance from a subset of users due to the change in their daily routine.
Licensing requirements for Azure MFA
Azure MFA licensing can be configured in a variety of ways. Understanding how licensing affects the availability of various MFA features to end users is an important part of planning. Table 2-1 provides a high-level breakdown of various Azure MFA features along with Azure AD and Microsoft 365 license requirements.
TABLE 2-1 Azure AD licenses and high-level MFA features
License Type |
Description |
Azure Active Directory Free |
Includes security default features that prompt users for MFA as needed and provides baseline security to user accounts. |
Azure Active Directory Premium P1 |
Same as Azure Active Directory Free. Includes the Azure AD Conditional Access feature, which allows implementation of fine-grain organization policies for MFA. |
Azure Active Directory Premium P2 |
Same as Azure Active Directory Premium P1. Includes support for risk-based conditional access policies. |
EMS E3, Microsoft 365 E3, and Microsoft 365 Premium |
Includes Azure Active Directory Premium P1 features (as described above). |
EMS E5 and Microsoft 365 E5 |
Includes Azure Active Directory Premium P2 features (as described above). |
Table 2-2 lists the commonly used Azure AD MFA and access management features, as well as the Azure AD licenses that support them.
TABLE 2-2 Azure AD licenses and specific MFA features
Feature |
Azure AD Free |
Azure AD P1 |
Azure AD P2 |
|---|---|---|---|
Mobile app as a second factor |
Yes |
Yes |
Yes |
Phone call as a second factor |
No |
Yes |
Yes |
SMS as a second factor |
No |
Yes |
Yes |
Custom greetings for phone calls |
No |
No |
Yes |
Custom caller ID for phone calls |
No |
Yes |
Yes |
Conditional Access |
No |
No |
Yes |
Risk-based conditional access |
No |
No |
Yes |
Configure and deploy self-service password reset
Self-service password reset (SSPR) is a feature in Azure AD that allows users to change their password without seeking help from support or an IT administrator. With SSPR, users can follow a series of prompts to reset their password to unlock their account if they forget their password. It also helps the organization in saving costs because support staff can focus on other urgent matters.
To enable service-service password to reset:
Sign in as a Global Administrator to the Azure portal at http://portal.azure.com.
Navigate to Azure Active Directory.
Select Password Reset from the left-side pane, as shown in Figure 2-1.

FIGURE 2-1 Password reset option in Azure AD.
On the Properties page, under the Self service password reset enabled option, select All, as shown in Figure 2-2. This will enable all users in the tenant to reset their password using SSPR. You can also choose a specific group by selecting the option Selected, which will only allow users in that group to reset their password.
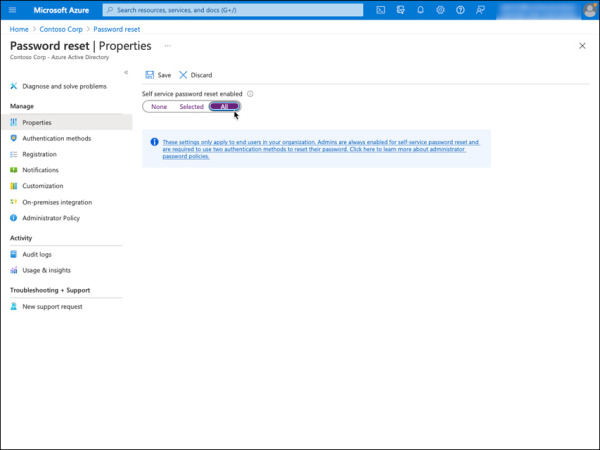
FIGURE 2-2 Password reset properties.
Click Save.
)
)
Register an authentication method for self-service password reset
Follow the steps below to sign in as a user and register a phone number that will be used during SSPR.
Sign in as a user to the My Sign-Ins portal at: https://mysignins.microsoft.com.
On the Keep your account secure page, enter the phone number and click Next, as shown in Figure 2-3. A text code will be sent to the phone number provided.
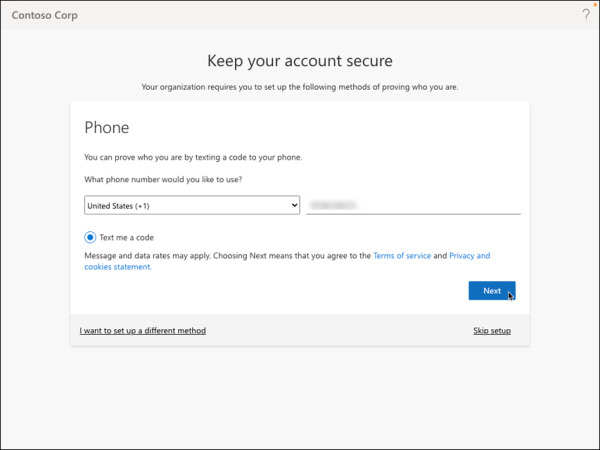
FIGURE 2-3 Phone number validation via SMS message.
Enter the text code received on the phone number and click Next. Figure 2-4 shows a sample text code sent to the phone number registered in the previous step.
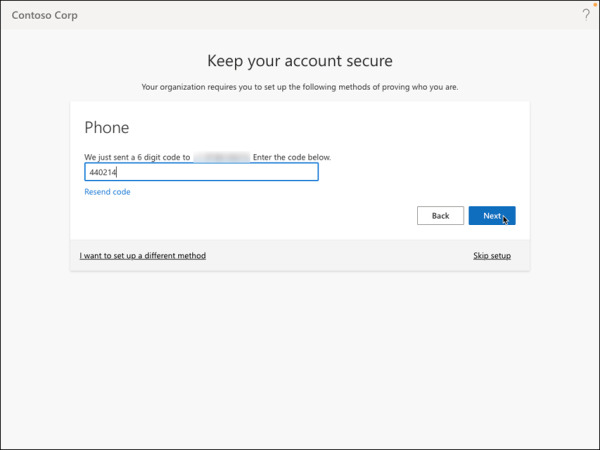
FIGURE 2-4 Phone number verification via 6-digit code.
You should see SMS verified. Your phone was registered successfully message, as shown in Figure 2-5. Click Next.
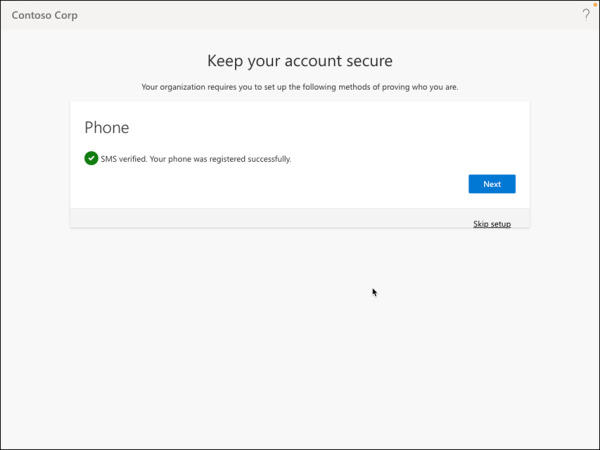
FIGURE 2-5 Phone number registration success.
Click Done to complete the phone number registration process for SSPR, as shown in Figure 2-6.
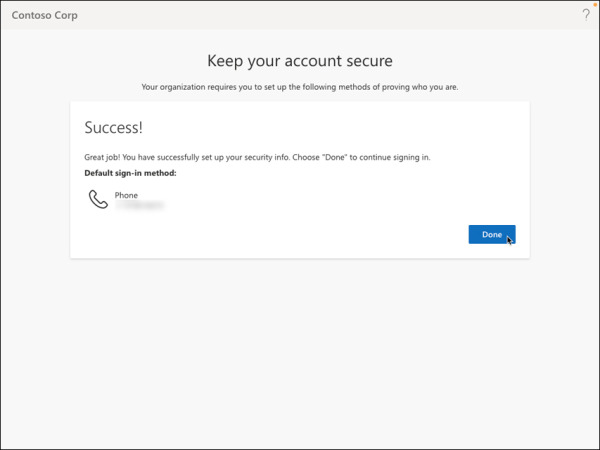
FIGURE 2-6 Security configuration information completion success message.
You can close the browser. You don’t need to finish the sign-in process at this time.
)
)
)
)
Reset password using Self Service Password Reset
Follow the steps below to reset the user’s password using Self Service Password Reset:
Navigate to the URL https://passwordreset.microsoftonline.com/ using an InPrivate or Incognito browser session.
Enter the user’s Email or Username and complete the CAPTCHA check, as shown in Figure 2-7, and then click Next.
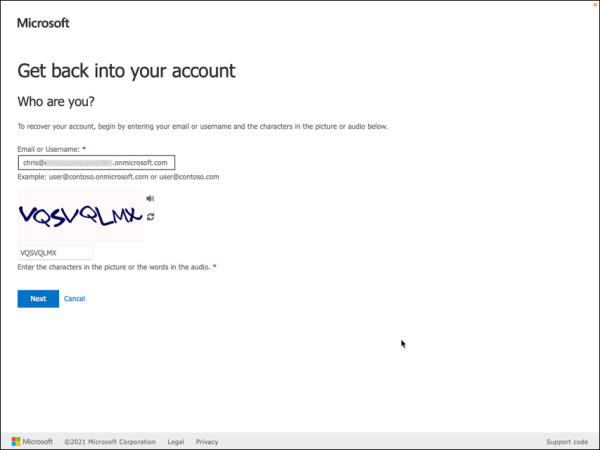
FIGURE 2-7 Get back into your account using email or username.
Enter the phone number associated with the account, as shown in in Figure 2-8, and then press Text. A text message with a verification code will be sent to this phone number.
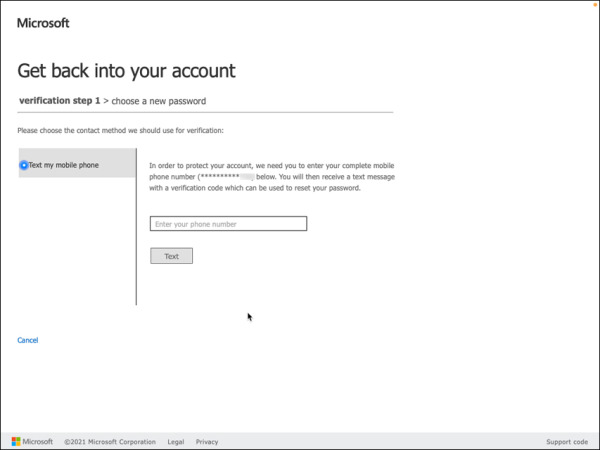
FIGURE 2-8 Enter a phone number.
Enter the verification code, as shown in in Figure 2-9, and then then press Next.
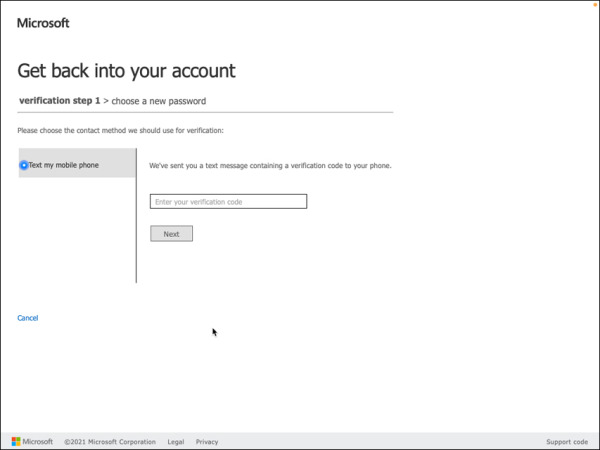
FIGURE 2-9 Phone number verification.
Enter the new password, as shown in in Figure 2-10, and then click Finish.
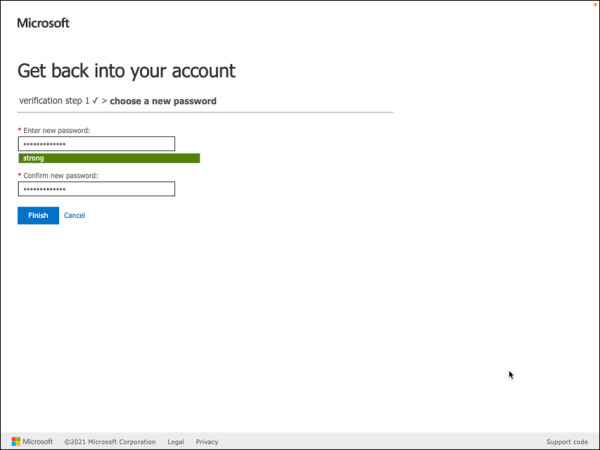
FIGURE 2-10 Enter new password.
The success message “Your password has been reset” will appear on the page, as shown in Figure 2-11. This confirms that the user account password has been reset successfully. You can now close the browser.
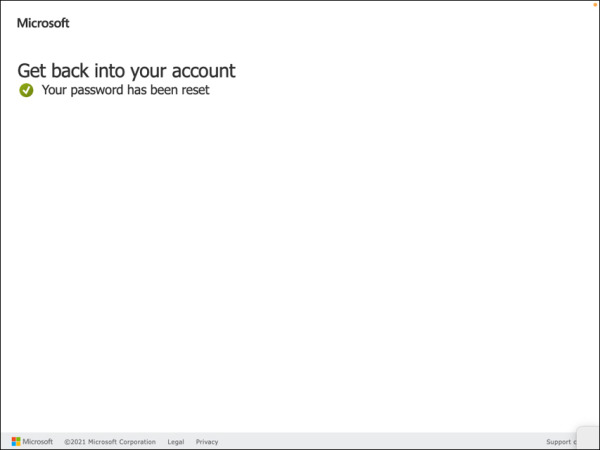
FIGURE 2-11 Password reset success.
)
)
)
)
)
Implement and manage Azure MFA settings
The steps below demonstrate how to set up and manage Azure MFA settings. Please note that you must have an active Azure subscription in order to complete the tasks in this skill and the others in this chapter. To sign up for a free trial subscription, visit https://azure.microsoft.com/en-us/offers/ms-azr-0044p/.
Sign in to the Azure portal, https://portal.azure.com, using a Global Administrator account.
Navigate to the Azure Active Directory dashboard by using the Azure Active Directory option available in the sidebar of the Azure portal.
Select the Security option located under the Manage section on the left side, as shown in Figure 2-12.
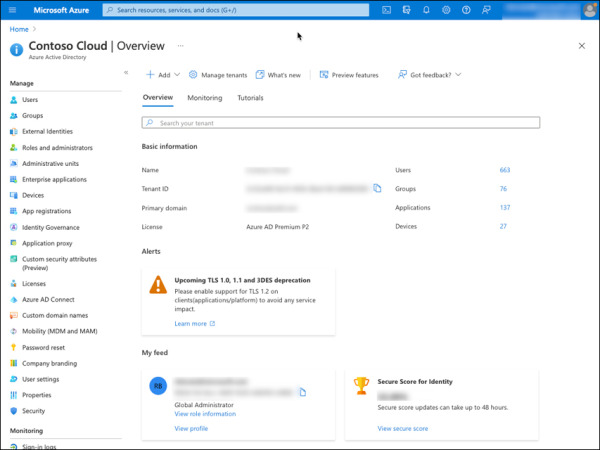
FIGURE 2-12 Azure AD home page with Security option.
Select the MFA option located under the Manage section on the Security page, as shown in Figure 2-13.
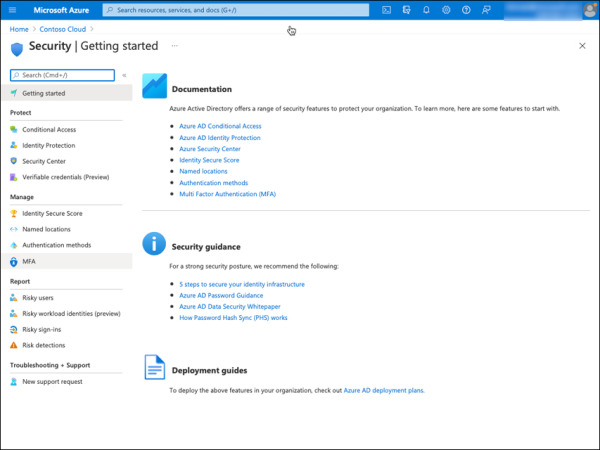
FIGURE 2-13 Azure AD Security page with MFA configuration options.
Select the Additional cloud-based MFA settings link located under Configure, as shown in Figure 2-14. This will open a new page with all available options for MFA.
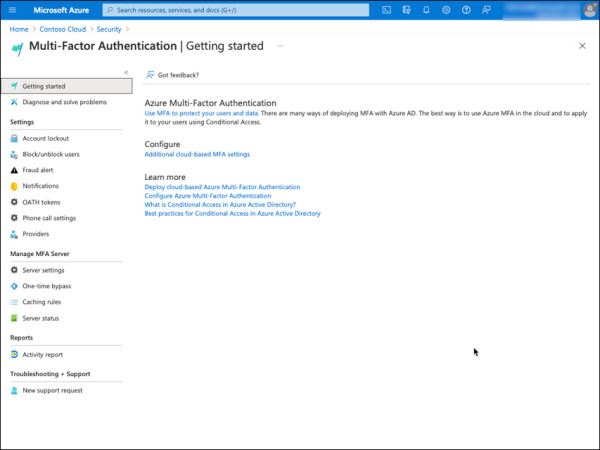
FIGURE 2-14 Azure AD Multi-Factor Authentication (MFA).
By default, all available MFA verification options are selected, as shown in Figure 2-15. You can deselect one or more of these verification options as needed based on your MFA planning. It is recommended that users have at least more than one MFA method available to them in case the primary method is unavailable. Please review Table 2-3 for more details about each MFA setting available on this page.
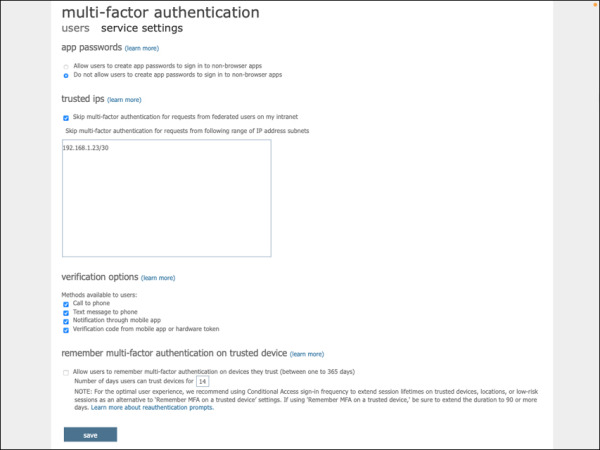
FIGURE 2-15 Azure AD MFA service settings.
)
)
)
)
TABLE 2-3 Azure AD MFA service settings
Setting |
Description |
App passwords |
|
Trusted IPs |
Allow bypass of multifactor authentication prompts for users who sign in from a defined IP address range |
Verification Options |
These are all the available verification options available for MFA:
|
Remember MFA on trusted device |
When enabled, this option allows users to skip subsequent MFA verifications for a set number of days (up to 365 days) after successfully signing in using MFA on a trusted device. |
In addition to MFA service settings, Azure AD also provides miscellaneous configuration options for MFA, as summarized in Table 2-4.
TABLE 2-4 Azure AD MFA settings
Setting |
Description |
Account lockout |
Temporarily lock accounts using MFA service when there are many denied authentication attempts in a row. This applies only to users who enter a PIN to authenticate. The following settings are available:
|
Block/unblock users |
Blocked users will not receive MFA requests. Users will remain blocked for 90 days from the time they are blocked. Blocked users can be manually unblocked by the administrator using the “Unblock” action. |
Fraud alert |
The fraud alert allows users to report fraudulent MFA attempts because of a suspicious MFA prompt—for example, when an MFA prompt is from an unknown source. Users can use their phone or the Microsoft authenticator app to report the fraudulent MFA attempt. There are two configuration options available:
|
Notifications |
Email notifications are sent to identity administrators when users report a fraud alert. |
OATH tokens |
OATH time-based one-time password (TOTP) SHA-1 tokens that refresh codes every 30 or 60 seconds are supported. OATH tokens are uploaded in a comma-separated values (CSV) file format. See https://docs.microsoft.com/en-us/azure/active-directory/authentication/howto-mfa-mfasettings#oath-tokens. |
Phone call settings |
Enables customization of the caller ID and voice greeting message that the user receives during an MFA attempt. When the caller ID is not customized, by default voice calls come from the phone number “+1 (855) 330-8653” within the United States. Make sure the user is aware of this number and that it is excluded from any spam filters. |
Manage MFA settings for users
Administrators can manage the following MFA settings for a specific user:
Phone number: Configure phone number used by the user to perform MFA via either SMS or a voice call.
Email address: Configure the email address of the user. The email can be used for self-service password reset (SSPR) but not for an MFA option.
Revoke existing MFA session: Remove any existing MFA sessions for the user and force MFA the next time the policy on the device requires it.
Force re-registration of MFA: Clears the user’s remembered MFA sessions and requires them to perform MFA the next time it’s required by the policy on the device.
Reset Password: Assigns a temporary password to a user account, which must be changed by the user during their next sign-in.
To configure phone authentication methods and the email address of a user:
Sign in as an administrator to the Azure portal at http://portal.azure.com.
Navigate to Azure Active Directory.
Select Users from the left pane, as shown in Figure 2-16.
FIGURE 2-16 Azure AD Users option.
On the Users page, select the user you’d like to configure the authentication method for MFA. You can use the search bar, as shown in Figure 2-17.

FIGURE 2-17 Azure AD All users.
Select Authentication methods from the left side, as shown in Figure 2-18.
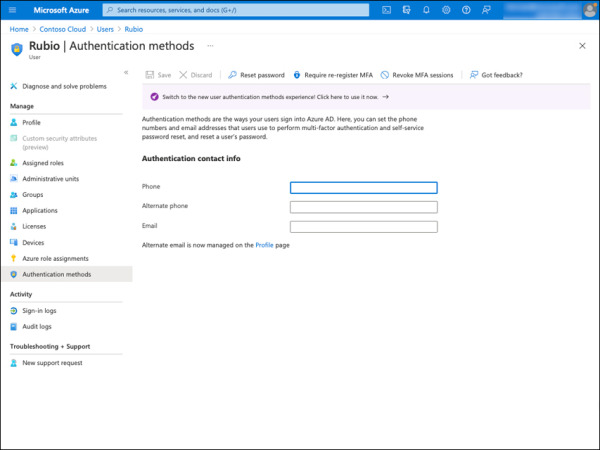
FIGURE 2-18 Azure AD Authentication methods.
Fill in the following information:
Phone: This is the phone number used during the MFA authentication. Make sure there is a space between the region/country code and the phone number. For example, +1 1224567890.
Phone: This is the alternate phone number used during the MFA authentication in case the primary phone number is not available.
Email: The email address used during MFA authentication. An email address alone cannot be used for MFA.
Click the Save button located on the top row, as shown in Figure 2-19.
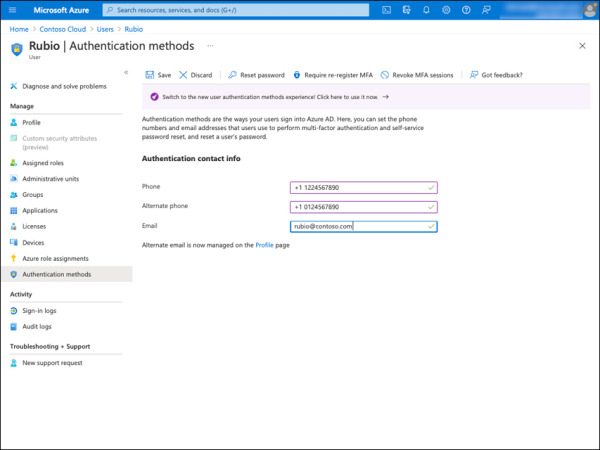
FIGURE 2-19 Azure AD Authentication contact info.
)
)
)
)
Extend Azure AD MFA to third-party and on-premises devices
To help you safeguard third-party and on-premises devices, Microsoft Intune can be used with Azure Active Directory (Azure AD) Conditional Access to mandate multifactor authentication (MFA) for device activation. MFA functions by requiring any two or more of the verification techniques listed below:
Something you are aware of (typically a password or PIN)
Something you possess (a reliable item that is difficult to copy, such as a phone)
Something that identifies you physically (biometrics, such as a fingerprint)
MFA is supported for iOS/iPadOS, macOS, Android, and Windows 8.1 or later devices. Please note that when end users enroll their device, they now must authenticate with a second form of identification, such as a PIN, a phone, or biometrics. More information about extending MFA on devices can be found at https://learn.microsoft.com/en-us/mem/intune/enrollment/multi-factor-authentication#configure-intune-to-require-multifactor-authentication-at-device-enrollment.
Monitor Azure AD MFA activity
The Azure Active Directory (Azure AD) sign-ins report can be used to review and understand Azure AD Multi-Factor Authentication events. This report provides the following insights:
Was the sign-in hampered by MFA?
How did the user finish MFA?
Which methods of authentication were used during a sign-in?
Why couldn’t the user complete MFA?
How many users were asked to provide MFA?
How many users failed the MFA challenge?
What are the most common MFA issues that end users face?
Step-by-step instructions on how to access the sign-ins report can be found at https://learn.microsoft.com/en-us/azure/active-directory/authentication/howto-mfa-reporting#view-the-azure-ad-sign-ins-report.