Design and implement core networking infrastructure
- By Charles Pluta
- 11/5/2022
- Skill 2.1: Design and implement private IP addressing for virtual networks
- Skill 2.2: Design and implement name resolution
In this sample chapter from Exam Ref AZ-700 Designing and Implementing Microsoft Azure Networking Solutions, you will review the primary components of a network infrastructure in Azure, which starts with virtual networks.
In this chapter we discuss the primary components of a network infrastructure in Azure, which starts with virtual networks. The virtual network provides the connectivity to virtual machines that are deployed in each Azure region, as well as private connectivity through service and private endpoints. Most applications (and people) prefer to use names instead of IP addresses, so the ability to resolve names to IP addresses becomes a critical component of the core network. As the environment grows with additional virtual networks, the need to facilitate communication between networks becomes important and can be addressed with peering. Finally, for a managed hybrid solution, you can use Virtual WAN to have cross-site transitive connectivity through a cloud service.
Skills in this chapter:
Skill 2.1: Design and implement private IP addressing for virtual networks
Skill 2.2: Design and implement name resolution
Skill 2.3: Design and implement cross-VNet connectivity
Skill 2.4: Design and implement an Azure Virtual WAN architecture
Skill 2.1: Design and implement private IP addressing for virtual networks
The core networking infrastructure in Azure revolves around virtual networks. Virtual networks define the address space for both IPv4 and IPv6 networks that you will use with your Azure services. Virtual networks are required for virtual machines, firewalls, application gateways, virtual network gateways, and more. This skill section focuses on the private connectivity provided by virtual networks and how to integrate the network with other Azure services.
Create a virtual network
A virtual network is one of the foundational services that is deployed in a subscription to facilitate communication for virtual machines, hybrid connectivity, and private communication to Platform as a Service (PaaS) resources. When you create a virtual network, you must specify the Azure region in which to deploy the virtual network. Individual virtual networks span only the single region you deploy them in. If you plan to have a highly available deployment across multiple regions, you will need to deploy at least one virtual network in each region. For larger-scale deployments, you might even deploy multiple virtual networks in a single region for hub-and-spoke type design models.
The process of creating a virtual network is relatively easy. However, the planning and design leading into its creation is much more complex. Some Azure services, such as virtual network gateways and Azure Bastion, require dedicated subnets. We’ll discuss subnetting for specific services in the next section.
When you create a virtual network, the two primary planning pieces that the create wizard will ask for are the address space and the first subnet. The address space is at least one IPv4 range and can also include multiple IPv6 ranges. The address ranges that you specify can then be used to create subnets within the virtual network. A best practice is not to overlap address spaces when you plan to deploy multiple virtual networks, even across other subscriptions. Virtual networks that have overlapping IP address spaces cannot be peered.
The second component of a virtual network that is defined when you create it is the first subnet.
To create a virtual network, follow these steps:
Sign in to the Azure portal at https://portal.azure.com.
In the search bar, search for and select Virtual networks.
On the Virtual networks page, click Create.
In the Subscription dropdown menu, select the subscription that the virtual network should be created in.
In the Resource group dropdown menu, create a new, or select an existing, resource group for the virtual network.
In the Name field, provide a name for the network, such as hub-vnet-eus-01.
In the Region dropdown menu, select the region where the virtual network will be used with other resources. For this example, select East US.
Click Next: IP Addresses.
Note that the IPv4 address space is already populated with a default address space of 10.0.0.0/16. You can modify or add address spaces if necessary for the virtual network. There is also a subnet named “default” using the first /24 address space. Accept the default, as shown in Figure 2-1, and then click Next: Security.
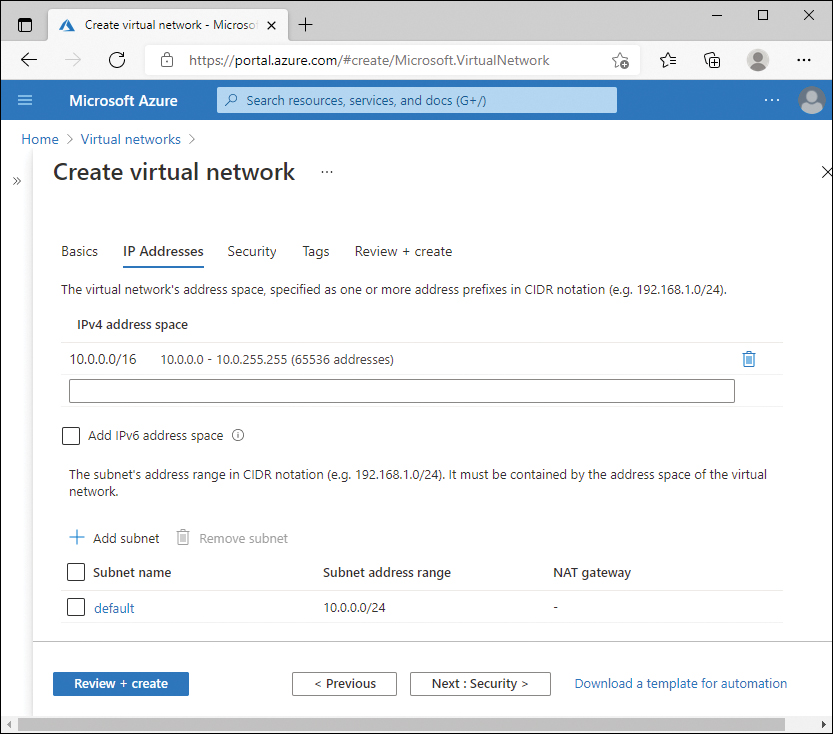
FIGURE 2-1 Virtual network IP addresses
 Exam Tip
This Exam Ref and the exam assume that you are already familiar with networking fundamentals, including subnetting, CIDR notation, TCP/IP, and more. If these are new concepts, you should spend additional time preparing with the Fundamentals of computer networking module on Microsoft Learn at https://docs.microsoft.com/en-us/learn/modules/network-fundamentals/.
The Security tab of the Create virtual network page displays the available security services that you can deploy and configure at the same time as the virtual network: BastionHost, DDoS Protection Standard, and Firewall. These are all set to Disable by default and can be configured after the virtual network is created. Access the defaults and click Review + Create.
)
Plan and configure subnetting for services
The full name of the objective in the skill is Plan and configure subnetting for services, including VNet gateways, private endpoints, firewalls, application gateways, and VNet-integrated platform services. We’ve shortened the title of this section and will look at the various Azure services that either require integration to subnets or require a dedicated subnet.
Virtual network gateways
Chapter 1 discusses virtual network gateways, VPNs, and ExpressRoute in more detail. From a virtual network perspective, a virtual network gateway requires a dedicated subnet specifically named GatewaySubnet to be configured. At a minimum, the size of the GatewaySubnet must be at least a /29 in CIDR notation, for example, 10.0.100.0/29. However, a small subnet like /29 is useful only for a single site-to-site VPN. For future planning, it is recommended to assign a larger address space, such as a /27, to the GatewaySubnet.
The reason that the minimum address range is /29 for the GatewaySubnet is because of how virtual networks allocate IP addresses per subnet. Each subnet has five reserved addresses that cannot be used by resources in your subscription:
Network identifier
Broadcast address
Three Azure-specific services
The network identifier and broadcast address are standard TCP/IP functions that occur in any type of subnetting scenario. The three Azure-specific services are what enables the software-defined virtual network and facilitates routing and DNS services within the subnet.
Using the same 10.0.100.0/29 example earlier, this would result in only three usable addresses:
10.0.100.0 – Network identifier, not usable
10.0.100.1 – 10.0.100.3 – Azure-specific services, not usable
10.0.100.4 – 10.0.100.6 – Usable IP addresses
10.0.100.7 – Broadcast address, not usable
When you click + Gateway Subnet from the virtual network, the subnet Name field prepopulates with the name GatewaySubnet and cannot be changed. Figure 2-2 displays the gateway subnet with the example configuration.
)
FIGURE 2-2 GatewaySubnet configuration
Firewalls
Azure Firewalls are managed PaaS firewalls that you can associate with a virtual network to protect the resources in the network. The Azure Firewall service is discussed in more detail in Chapter 4, but it is another service that requires a dedicated subnet, specifically named AzureFirewallSubnet.
The recommended size of the AzureFirewallSubnet is a /26 in CIDR notation. Azure Firewalls can be set to auto-scale based on CPU percentage or throughput, and each instance requires an additional internal IP address in the AzureFirewallSubnet. A /26 ensures that there are enough IP addresses in the subnet for any possible scaling actions that are taken by the service.
If you try to create a firewall using an existing virtual network, the Azure portal will require that the AzureFirewallSubnet be created before you can create the firewall. Figure 2-3 displays the Create a firewall screen with an error indicating that the existing virtual network must have a subnet named AzureFirewallSubnet.
)
FIGURE 2-3 Azure Firewall missing subnet
Additionally, if you create the AzureFirewallSubnet with a subnet size smaller than /26, you will receive an error. Figure 2-4 shows using an existing virtual network that contains a subnet named AzureFirewallSubnet, but the subnet is not a sufficient size. The error can be confusing, as it says the prefix must be smaller than or equal to 26; meaning the actual integer used for the prefix must be lower—for example a /25, resulting in a larger subnet.
Application gateways
Azure Application Gateway is another PaaS resource that is associated with your virtual networks to protect resources, and is discussed more in Chapter 3. Application gateways require a dedicated subnet within the virtual network, but the subnet does not need to have a specific name. However, the subnet must be empty and not contain any virtual machines or other Azure resources. The recommended size of the subnet depends on the SKU of the application gateway that you use.
Application gateways come in two versions of SKUs—for example, Standard and Standard_v2. First-generation application gateways can scale up to 32 instances; therefore, a /26 is the recommended subnet size. Application gateways with the v2 SKU can scale up to 125 instances, so a minimum subnet size of /24 is recommended. Unlike with Azure Firewalls, the Azure portal will not give you an error if you happen to create a smaller subnet than recommended. This would then prevent the service from scaling beyond the available IP addresses in the subnet.
)
FIGURE 2-4 Azure Firewall incorrect subnet size
You can reuse the same subnet for additional application gateways. However, the gateways in the subnet must be the same version of SKU. For example, you can have two different application gateway deployments using the Standard_v2 SKU. But you cannot have two application gateways in the same subnet: one with Standard and the other at Standard_v2. Figure 2-5 shows the Create application gateway screen with an existing virtual network and subnet selected.
)
FIGURE 2-5 Application gateway with existing network selected
Bastion
Azure Bastion is not specifically named in any of the exam objectives, but it could be categorized as a “virtual network integrated platform service.” Bastion is a PaaS service that provides secure management connectivity, either RDP or SSH, to virtual machines on a virtual network. This secure access is provided by opening HTTPS port 443 to the Bastion service, but it does not require any ports or IP addresses opened to the internet from individual virtual machines.
Bastion requires a dedicated subnet on the virtual network with the specific name of AzureBastionSubnet, with a subnet prefix of at least /27. Figure 2-6 displays the error from the Azure portal if you attempt to use an existing virtual network that does not have the subnet predefined.
)
FIGURE 2-6 Bastion service without AzureBastionSubnet
As with Azure Firewalls, if you create the AzureBastionSubnet manually with an address range that is too small, the Azure portal will give you an error indicating that the prefix must be at least /27. Figure 2-7 displays the error message from the portal when the AzureBastionSubnet exists but is misconfigured.
)
FIGURE 2-7 Bastion service with too small a subnet
Private endpoints
Private endpoints offer a method of using Azure PaaS services, which are typically public endpoints, and assigning that service a private IP address on a subnet within a virtual network. For example, in a default configuration, if a virtual machine connects to an Azure storage account for a blob file, the virtual machine would contact storageaccount.blob.core.windows.net, with the DNS name resolving to a public IP address.
If you configure a private endpoint with the storage account, you can then associate that storage account with a subnet. Then, virtual machines on the same virtual network would resolve and connect to the storage account using the assigned private IP address. Virtual machines or services outside the virtual network would still resolve and connect to the public IP address. Private and service endpoints are discussed in more detail in Chapter 5.
Plan and configure subnet delegation
Azure resources, including virtual networks, are managed by using role-based access control (RBAC). As a resource owner, if you need to allow other administrators to perform management actions on the resource, you must assign a role to the user or group. If you need to assign permissions to the resource to another Azure service, you can delegate that management, enabling the integration of Azure services with a subnet.
Delegating a subnet is similar to assigning a user a role that has permissions to change the resource. By delegating the subnet to another Azure service, that service can then modify the configuration of the subnet to provide a managed and recommended configuration.
Subnet delegation can be configured during the creation of the subnet or after the subnet has been created. The Network Contributor role is the lowest-level role that has appropriate permissions to delegate the subnet to a service. Figure 2-8 displays the Delegate subnet to a service dropdown menu of an existing subnet.
)
FIGURE 2-8 Subnet delegation
Plan and configure subnetting for Azure Route Server
Azure Route Server is a service that simplifies the routing for hybrid connectivity. From a virtual network perspective, it is similar to the other services discussed in this skill section in that it requires a dedicated subnet with a specific name: RouteServerSubnet. Additionally, the minimum size of the subnet is /27. The virtual network that contains this subnet must be in the same Azure region as the route server that you plan to deploy.