Set up a team
- By Paul McFedries
- 10/25/2022
Manage your team
Although it takes only a few steps to create a team, as the team owner, your responsibilities are only just beginning. There are quite a few team management tasks that are part of the day-to-day experience of owning a team. And the larger the team, the greater the management responsibility of owning the team. Ideally, for your larger teams, you’ve designated one or two members as team co-owners to share the managerial load.
Generate a team code or link
You can populate your team with members and guests either when you create the team or by using the team’s management interface. In these cases, Teams adds the members and guests automatically and sends each person a notification (in Teams for members or via email for guests). Rather than automatically adding members, you might prefer to invite one or more people to your team and let them decide whether they want to join.
Teams offers two methods for sending an invitation to join a team:
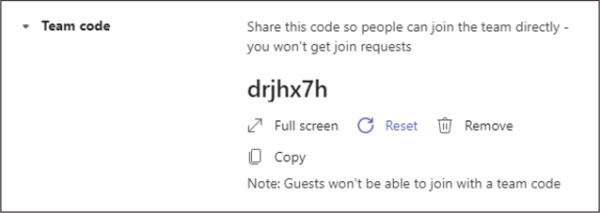
Team code A seven-character code that a potential member can type into the Join a team with a code box (displayed by selecting the Join or create a team link in the Teams panel). Whether your team is public or private, a user who joins with a code is automatically added to the team.

Type a team code into the Join a team with a code box.
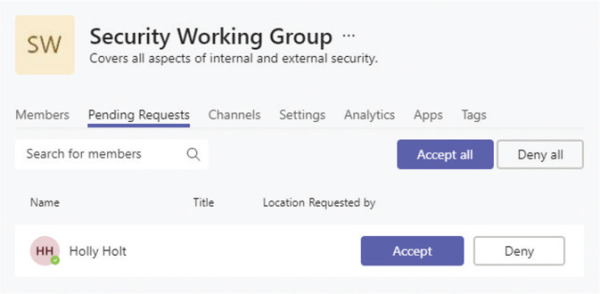
Team link A web address that a potential member can copy and paste into a web browser. The browser then opens the Teams app, which attempts to join the team. If your team is public, a user who joins with a link is automatically added to the team; if your team is private, you’ll receive a join request that you can approve (or deny if the request came from someone you don’t know or don’t want on your team).
You can distribute team codes or links in any way that makes sense for you and for the people you want to invite, such as via email, text message, or social media. In Teams, you can distribute a team code or link via a chat or channel conversation.

You can distribute a team code or link via email, text, social media, chat, or channel conversation.
To display the Settings page for a team
In the app bar, select Teams.
To the right of the team name, select More options (...), and then select Manage team to open the team’s management interface with the Members tab selected.
Select the Settings tab.
To generate a team code
Display the Settings page for the team.
Select Team code. Teams generates a seven-character code for the team.
Select Copy and then distribute the code as needed.
To generate a team link
In the Teams panel, to the right of the team name, select More options (...), and then select Get link to team. Teams generates the link and displays it.
Select Copy and then distribute the link as needed.
To accept or deny join requests
In the Teams panel, to the right of the team name, select More options (...), and then select Manage team.
Select the Pending Requests tab.
To add a person to the team, select that person’s Accept button; otherwise, select that person’s Deny button.
Do either of the following:
Repeat Step 5 as needed to handle all your pending requests.
Select either Accept all or Deny all if you have a lot of requests and you want to handle them all the same way.
Modify a team
Your team management duties might also require you to make modifications to your team. These modifications can include changing the team name, editing (or adding) its description, and changing the team type (Private, Public, or Org-wide).
Teams also gives you several ways to manage the list of teams in the Teams section of the app:
Hide a team If you have a long list of teams and there’s a team you don’t follow or participate in often, you can hide the team. When you hide at least one team, Teams creates a Hidden teams section of the Teams panel and moves the hidden team there. To access a hidden team, you select Hidden teams and then select the team. If you later decide you no longer need the team to be hidden, you can show it again.
Archive a team If you have a team that’s no longer active but still contains valuable content, you can archive that team. To archive a team means that all the team’s content becomes read-only and can’t be changed. The team is also hidden. If needed, however, you can still add or remove members and change member roles. You can also still access and search the content. If you later decide you no longer need the team to be archived, you can restore it.
Delete a team If you have a team that you no longer need and that contains no content that you want to archive, you can delete the team to reduce clutter in the Teams panel.
To edit a team’s name, description, or type
To the right of the team name in the Teams panel, select More options (...), and then select Edit team.
Edit the team name.
Edit the team description.
In the Privacy list, select a new team type: Private, Public, or Org-wide.
Select Done. Teams updates the team info.
To hide a team
To the right of the team name in the Teams panel, select More options (...), and then select Hide. Teams moves the team to the Hidden teams section.
To show a hidden team
At the end of the list of teams in the Teams panel, select Hidden teams.
To the right of the team name, select More options (...), and then select Show. Teams unhides the team.
To archive a team
In the app bar, select Teams.
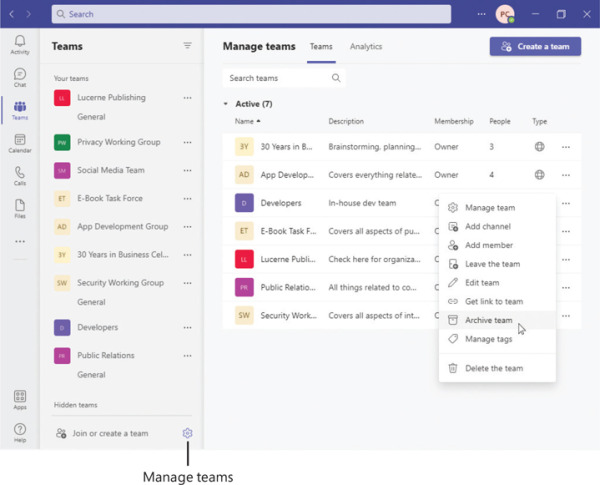
In the lower-right corner of the Teams panel, select Manage teams.
On the Manage teams page, to the right of the team name, select More options (...), and then select Archive team. Teams asks you to confirm.
In the Want to archive “Team Name” dialog, do one or both of the following:
If you believe team members might still try to modify the team content using the team’s associated SharePoint site, select the Make the SharePoint site read-only for team members checkbox.
Select Archive. Teams archives and hides the team.
To restore an archived team
In the app bar, select Teams.
In the lower-right corner of the Teams panel, select Manage teams.
On the Manage teams page, select the Archived section heading to display the list of archived teams.
To the right of the team you want to restore, select More options (...), and then select Restore team. Teams restores the team but leaves the team hidden.
In the Teams panel, at the end of the list of teams, select Hidden teams.
To the right of the team name, select More options (...), and then select Show. Teams unhides the team.
To delete a team
In the Teams panel, to the right of the team name, select More options (...), and then select Delete the team. Teams asks you to confirm.
Select the I understand that everything will be deleted checkbox.
Select Delete team. Teams deletes the team.
Customize team settings
Unless you use an existing team as the basis of a new team, each team you create comes with a collection of default settings. These settings fall into the following seven categories:
Team picture Customize the team avatar with a photo or other artwork.
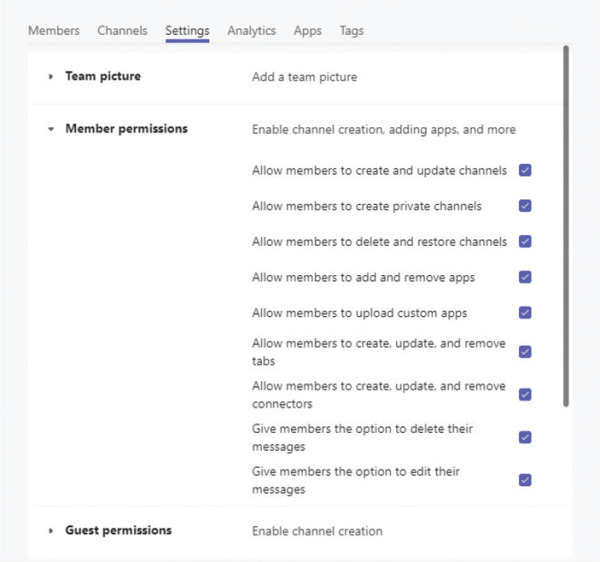
Member permissions Set the specific permissions given to team members. These permissions determine whether each member can perform specific tasks, such as create and update channels; delete and restore channels; add and remove apps; create and remove tabs; and delete and edit their own messages.
Guest permissions Set the specific permissions given to team guests. These permissions determine whether guests can create and update channels and whether guests can delete channels.
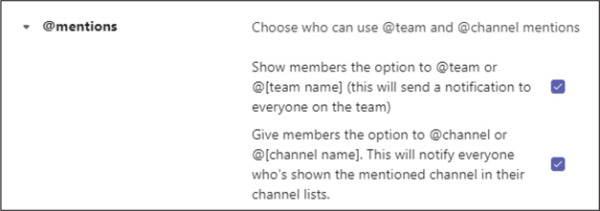
@mentions Determine whether team members can use @team, @[team name], @channel, and @[channel name] mentions. @team and @[team name] mentions notify every person on the team, while @channel and @[channel name] mentions notify everyone in the current channel or the specified channel name, respectively.
Team code Generate a team code (see “Generate a team code or link” earlier in this chapter).
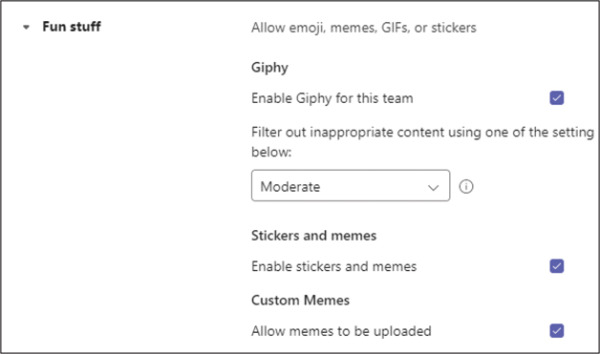
Fun stuff Determine whether team members can use animated GIFs, stickers, memes, and custom memes.
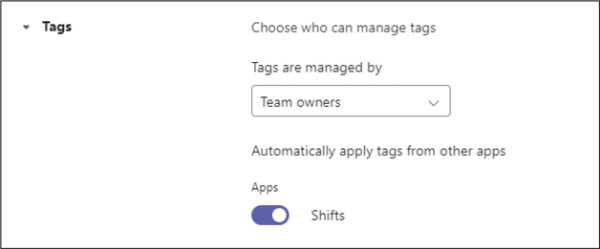
Tags Determine which team roles can manage tags: team owners only or both team owners and team members.
To customize the team picture
Display the Settings page for the team.
Expand the Team picture section and select Change picture.
In the Change picture dialog, select Upload picture.
In the Open dialog, select the image file you want to use for the picture, and then select Open.
In the Change picture dialog, select Save to update the team picture.
To customize the team member permissions
Display the Settings page for the team.
Expand the Member permissions section.
Clear the checkbox for each permission you want to disallow to members.
To customize the team guest permissions
Display the Settings page for the team.
Expand the Guest permissions section.
For each permission you want to allow to guests, select the checkbox.

In the Settings tab, select Guest permissions to customize the permissions given to each team guest.
To customize the team @mentions
Display the Settings page for the team.
Expand the @mentions section.
For each type of @mention you want to disallow to members, clear the checkbox.
To customize the usage of animated GIFs, stickers, and memes
Display the Settings page for the team.
Expand the Fun stuff section.
If you don’t want team members to post animated GIFs, clear the Giphy checkbox.
If you leave the Giphy checkbox selected, use the dropdown list to select a filter setting for inappropriate content: Moderate or Strict.
If you don’t want team members to post stickers and memes, clear the Stickers and memes checkbox. Teams also clears and hides the Custom Memes checkbox.
If you leave the Stickers and memes checkbox selected, but you don’t want team members to upload their own memes, clear the Custom Memes checkbox.
To customize who can manage tags
Display the Settings page for the team.
Expand the Tags section.
In the Tags are managed by dropdown list, select Team owners or Team owners and members to specify who can manage tags.
Turn off the toggle beside each app that you don’t want to automatically apply tags.

