Azure App Service
- By Avinash Valiramani
- 9/24/2022
- Overview
- Planning deployment and operations
- Networking considerations
- Backup and restore
- Disaster recovery
- Cost considerations
- Security recommendations
Planning deployment and operations
There are three main components to take into consideration when planning a deployment to Azure App Service:
Deployment sources
Build pipelines
Deployment mechanisms
Each of these is used differently in every environment, as each environment has unique use cases and development needs. It is difficult to take a one-size-fits-all approach when planning a deployment, so it will serve you well to understand these three main components. First, though, let’s discuss appropriate deployment sources.
Select an appropriate deployment source
One of the first steps in the deployment process is to identify the location where the application code will reside during the development, test, and production phases. There are two main options for this:
A single centralized source for all phases This approach involves using a centralized source such as GitHub, Azure Repos, or Bitbucket, where all the code can reside for deployments as needed.
A hybrid approach This approach involves using a combination of sources: a centralized source for testing and production and a local source on the developer’s local storage for development.
The recommended approach for any enterprise environment is to identify a centralized source so that all the code repository structures can be built and maintained centrally, and code backups can be performed on a regular basis. For example, App Service has built-in integration with GitHub, which can be easily set up when the GitHub environment is online.
Deployment source walkthrough
The following sections step you through the process of setting up a different deployment source for the static web app you created earlier using the Azure Portal, Azure PowerShell, and Azure CLI. If you are following along, then make sure to adjust the web app name and variables as needed for each deployment.
Using the Azure Portal
To select a deployment source using the Azure Portal, follow these steps:
In the Azure Portal, select the web app you created earlier.
In the left pane, under Deployment, click Deployment Center.
In the Settings tab, click the Source drop-down list and choose GitHub. (See Figure 3-19.)
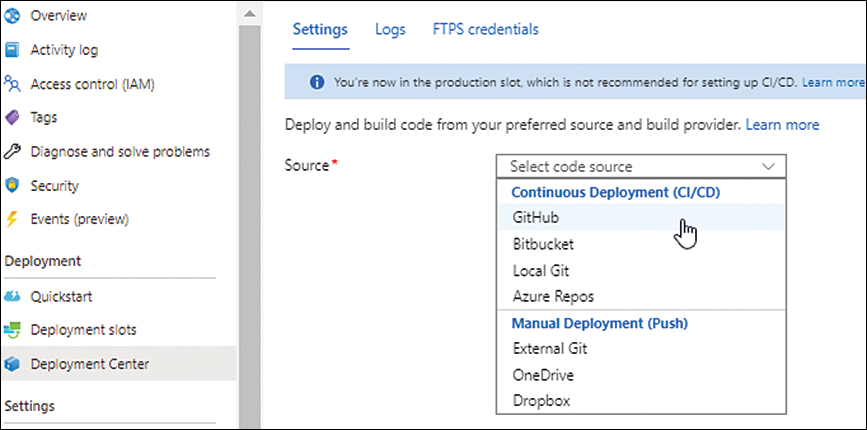
FIGURE 3-19 Selecting a new deployment source.
Click the Authorize button. (See Figure 3-20.)
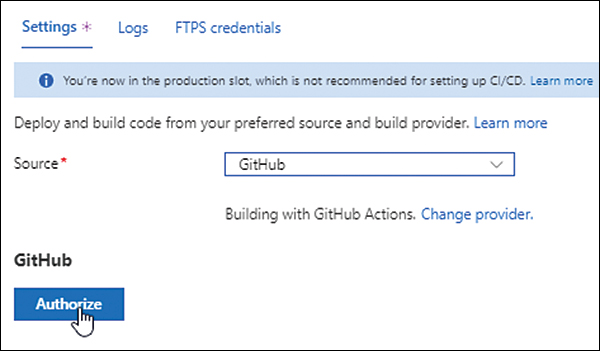
FIGURE 3-20 Authorizing the deployment source (in this case, GitHub).
In the Authorize Azure App Service dialog box, click the Authorize AzureAppService button. (See Figure 3-21.)
In the GitHub login window that opens, enter your login credentials to begin the integration process. This may take a few minutes. When the integration process is complete, you’ll see the options shown in Figure 3-22.
Open the Organization drop-down and choose the appropriate organization.
Open the GitHub Repository drop-down and choose the desired repository.
Open the Branch drop-down list and choose the branch you want to connect the app to.
Under Build, open the Runtime Stack drop-down list and choose the appropriate runtime stack based on your environment. Then open the Version drop-down list and select the appropriate version. (See Figure 3-23.) Finally, click Save.
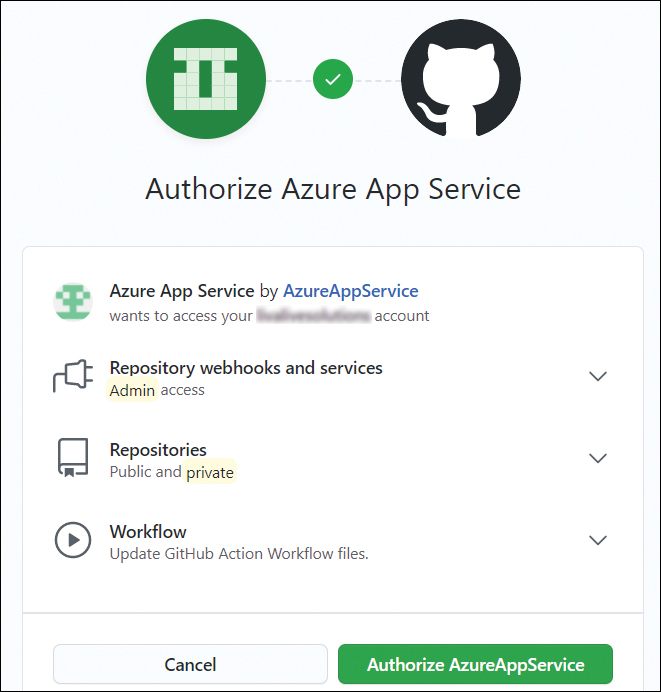
FIGURE 3-21 Authorizing the deployment source (GitHub).
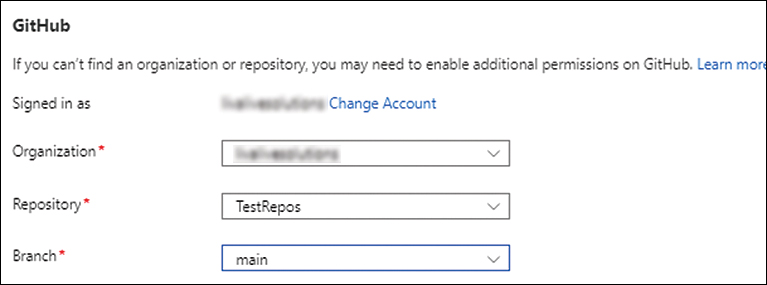
FIGURE 3-22 Setting the organization, repository, and branch under GitHub.
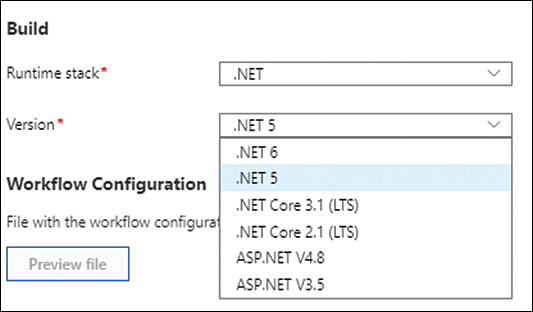
FIGURE 3-23 Selecting the runtime stack and version.
Azure shows a summary of the configuration settings. (See Figure 3-24.)
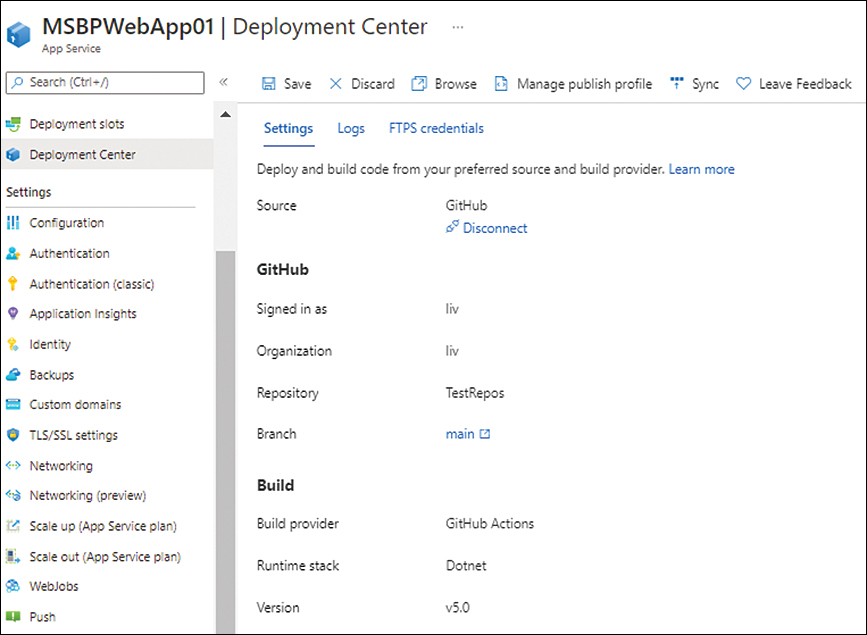
FIGURE 3-24 Summary of the final config is shown.
)
)
)
)
Using Azure PowerShell
You can use Azure PowerShell to select a deployment source, as shown here. (Remember to adjust the value of each variable as needed for your environment.)
#Set the Webapp and GitHub variables
$githubrepository="{URL-of-required-GitHub-repo}"
$githubtoken="{GitHub-access-token}"
$webappname="{Name-Of-WebApp}"
$webapplocation="{WebApp-Azure-Region}"
# Setup GitHub token
$PropertyObject = @{token = $githubtoken;}
Set-AzResource -PropertyObject $PropertyObject -ResourceId /providers/Microsoft.Web/sourcecontrols/GitHub -ApiVersion 2015-08-01 -Force
# Configure GitHub deployment from the required GitHub repo
$PropertyObject = @{
    repoUrl = "$githubrepository";
    branch = "master";
}
# Set the Webapp with the GitHub configuration
Set-AzResource -PropertyObject $PropertyObject -ResourceGroupName {resource-group-name}
-ResourceType Microsoft.Web/sites/sourcecontrols -ResourceName $webappname/web
-ApiVersion 2015-08-01 -Force
Using the Azure CLI
You can use the Azure CLI to select a deployment source, as shown here. (Remember to adjust the value of each variable as needed for your environment.)
#Set the Webapp and GitHub variables
githubrepos={URL-Of-GitHub-Repository}
githubtoken={GitHub-Access-Token}
WebApp={WebAppName}
ResourceGroup={ResourceGroupName}
# Configure continuous deployment from GitHub.
az webapp deployment source config --name $WebApp --resource-group $ResourceGroup
--repo-url $githubrepos --branch master --git-token $githubtoken
Build pipelines
A build pipeline helps automate the process of compiling, testing, and packaging source code for deployment. The pipeline reads the source code data from the deployment source and performs a series of predefined steps to prepare it for deployment.
The programming language used for the app build will determine the commands employed during the build process. This process can be executed using Azure Pipelines, a third-party solution, or locally.
Deployment mechanism
After an application package has been built, it is deployed into the web app. This action is called the deployment mechanism. App Service supports multiple deployment mechanisms:
Kudu This open-source engine handles continuous deployments, provides HTTP endpoints, and manages all Git deployments in Azure App Service.
FTP You can use this protocol to upload files from a source website directly to the web app.
WebDeploy This client-server tool, designed by Microsoft, syncs application content and configuration to web apps.
After the selected deployment mechanism copies the code to the web app, every VM instance running the app receives a notification regarding the availability of the new files. Each instance syncs the new files from the shared location in the web app’s /wwwroot directory.
Best practices
Following are several best practices that relate to deployment.
Deployment slots
Deployment slots provide an easy way to deploy and manage code rollouts. A deployment slot creates a live App Service inside the App Service plan. You can use this to load code for testing; then, when testing is complete, you can swap the slot so the code moves to staging or production.
In the back end, the deployment slot is already live on worker instances, ready to receive connections. After the swap is performed, all settings applied to the staging or production slot will be applied to the code in the test slot (depending on which slot is selected). This makes it important to use App Service settings and connection strings to store all the required database and unique app settings required for staging or production. If this configuration is stored in the application code, the staging or production application will write to the test database instances.
It is highly recommended to use deployment slots when deploying new code to staging or production because it makes it easier to swap the previous version of the code in case of any issues. This can reduce downtime while also automating the entire DevOps pipeline workflow to build, test, and validate new code before rolling it out into production.
Deployment slots are not supported on the Free, Shared, or Basic tier plans; they are supported, however, on all plans from the Standard plan onward. For enterprise environments in which DevOps processes are in place, this would generally be the minimum plan selected. Each deployment slot has its own unique URL, which you can use to access the code in that slot for testing at no additional cost.
Along with the codebase is a group of settings that get swapped, as follows:
General application settings, such as the framework version, web sockets, and so on
Connection strings (you can configure these to remain with the slot)
App settings (you can configure these to remain with the slot)
Public certificates
WebJobs content
Handler mappings
There are also settings that are not transferred during a swap. You should take these into consideration and manage the code accordingly to ensure that the right settings are applied at the time of the swap. Following is a list of some of these settings:
Publishing endpoints
Custom domain names
Non-public certificates and TLS/SSL settings
Scale settings
WebJobs schedulers
IP restrictions
The Always On setting
Diagnostic settings
Deployment slots walkthrough
The following sections step you through the process of setting up deployment slots for your web app using the Azure Portal, Azure PowerShell, and the Azure CLI.
Using the Azure Portal
To set up deployment slots using the Azure Portal, follow these steps:
In the Azure Portal, display the page for the web app you created earlier.
In the left pane, under Deployment, click Deployment Slots. (See Figure 3-25.)
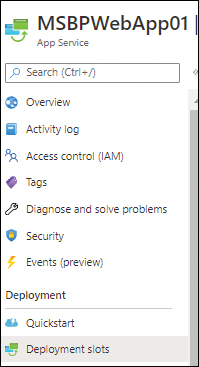
FIGURE 3-25 Setting up deployment slots.
If the web app is on the Free, Shared, or Basic tier, you will see the message shown in Figure 3-26. Click Upgrade to upgrade to a Standard or Premium plan. Then, in the Spec Picker window (see Figure 3-27), select a Standard or Premium plan that supports deployment slots, and click Apply.
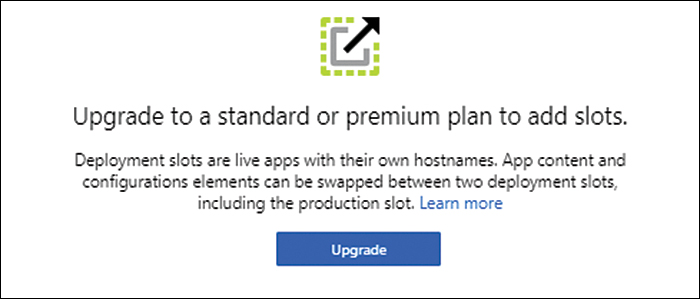
FIGURE 3-26 Upgrading the App Service plan for slot support.
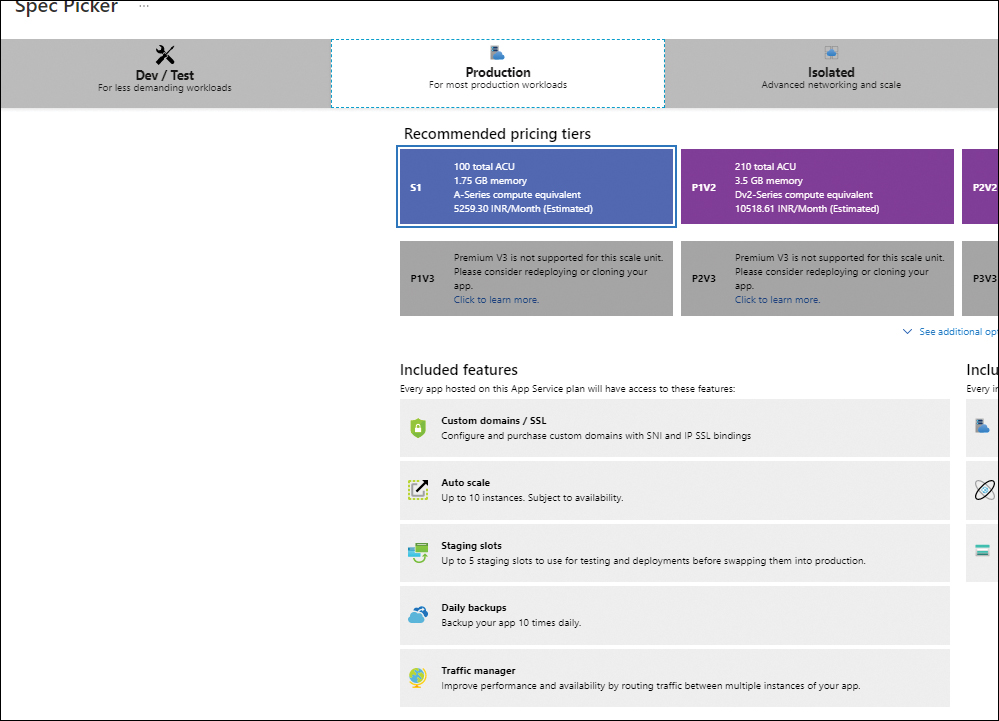
FIGURE 3-27 Selecting a Standard or Premium App Service Plan.
Click the Add Slot button to start the Add a Slot wizard. (See Figure 3-28.)
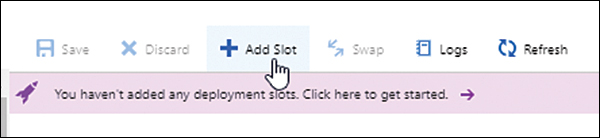
FIGURE 3-28 Adding a new slot.
In the Add a Slot wizard (see Figure 3-29), enter a unique name for the new slot in the Name box. Then open the Clone Settings From drop-down list and specify whether the settings for the slot should be cloned from an existing web app or slot, and if so, which one. Finally, click Add.
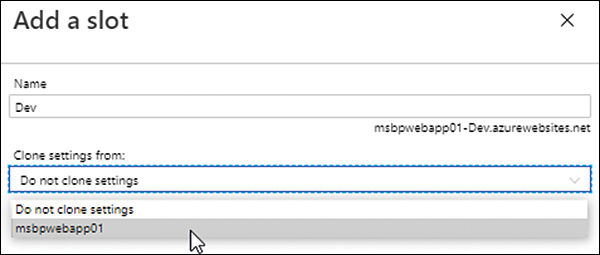
FIGURE 3-29 Selecting the new slot settings.
The new slot appears under the main production slot and any other existing slots for the web app. (See Figure 3-30.)

FIGURE 3-30 Multiple deployment slots.
Obtain the slot’s URL by clicking the slot’s name. The URL is displayed in the upper-right corner of the slot’s Overview tab. (See Figure 3-31.)

FIGURE 3-31 The new deployment slot’s URL.
Click the URL to load the default App Service website in your web browser rather than the custom HTML site you built earlier. (See Figure 3-32.)
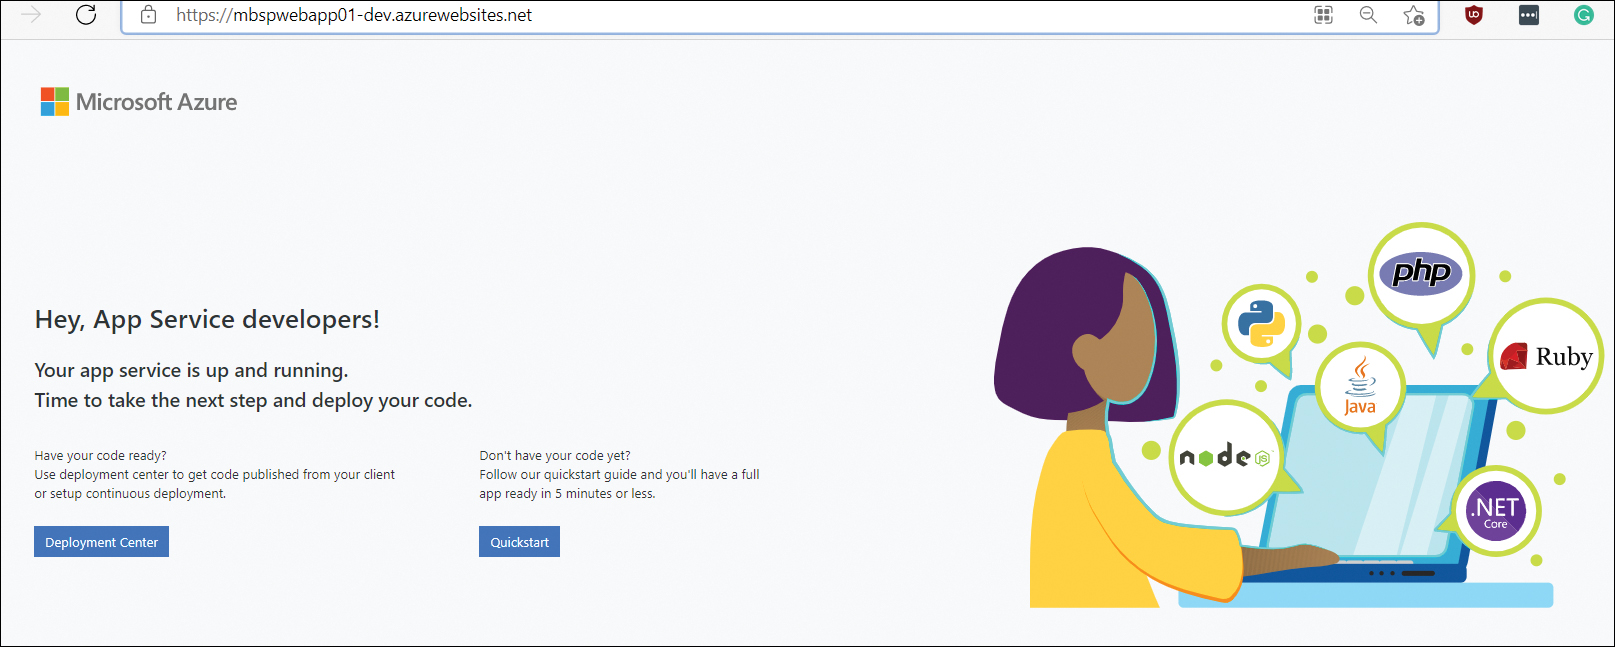
FIGURE 3-32 The website associated with the new deployment slot’s URL.
Click the Deployment Center button on the web page to open the slot’s Deployment Center page with the Settings tab displayed. Notice that the Source setting is blank. (See Figure 3-33.)
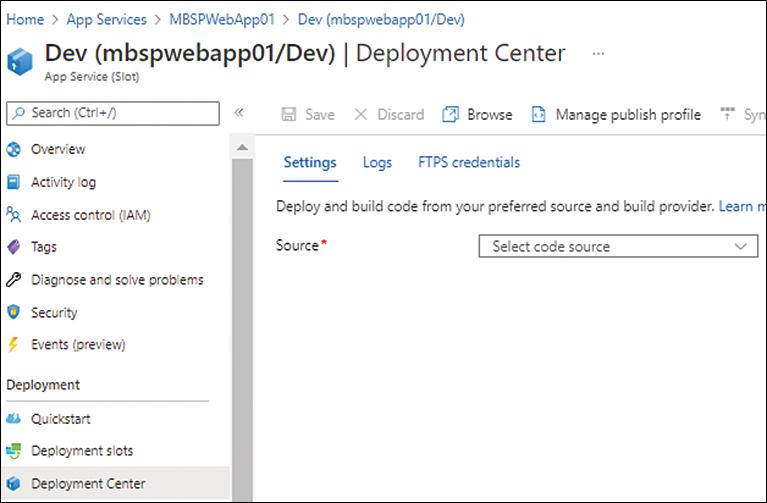
FIGURE 3-33 The slot’s Deployment Center page.
Open the Source drop-down list and choose the same GitHub account you used earlier, but with a different branch.
)
)
)
)
)
)
Using Azure PowerShell
You can create a deployment slot with Azure PowerShell by using the New-AzWebAppSlot command. The following code shows you how to perform this configuration for an existing web app:
$ResourceGroup = “AppServiceRG01”
$WebApp = “MBSPWebApp01”
New-AzWebAppSlot -ResourceGroupName $ResourceGroup -name $WebApp -slot dev
Using the Azure CLI
You can create a deployment slot with the Azure CLI using the az webapp deployment slot create command. The following Bash script shows you how to perform this configuration for an existing web app:
az webapp deployment slot create --name MBSPWebapp01 --resource-group AppServiceRG01
--slot Dev
Deploy code continuously only in staging or testing
You should set up the continuous deployment of code only for staging or testing slots. Setting up continuous deployment for production slots can result in code going live without proper controls.
You should also set up production branch integrations against a dummy slot in the App Service. After the code is deployed in the slot, performing a swap to make the code live is a better approach, as it provides more control over the deployment and allows easy rollback in case of issues.
Use Azure DevOps
Azure DevOps can help with the automated continuous deployment of containers to the App Service. Similarly, you can use the Deployment Center for the continuous delivery of containers to the App Service. After the integration is performed, new commits to the branch will result in the automated building, tagging, and deployment of the updated container.
GitHub Actions
GitHub Actions makes it easy to build, test, and deploy code directly from GitHub to App Service. You should employ GitHub Actions if you are using GitHub as a deployment source to help automate code deployments with proper controls and change tracking.
Multiple instances for production applications
For production applications, it is highly recommended that when you design and code the app, you keep in mind that multiple instances of the application will need to run simultaneously. This might require you to code the app to handle multiple VM instances running the app without sync issues when reading or writing data.
Running a production app with one VM instance creates a single point-of-failure. Instead, you should try to run the application with at least two or three instances, splitting your resource requirements across them, instead of one large instance. This will also help you when any upgrades are performed on the underlying VM instances, because the load will be redirected to the other available instances, preventing any downtime. Fortunately, you can easily achieve this by using the scale-out services provided by your App Service plan. (See Figure 3-34.) It is recommended that you set up automated scaling when handling increased resource or load requirements; setting up a minimum number of instances for the app up front can help mitigate a lot of basic issues.
)
FIGURE 3-34 Scaling for multiple instances.
Collocation
It is a good practice to host all interconnected workloads in the same region—in other words, to collocate them. This helps reduce the following:
Latency between workloads
Costs incurred due to data transfer between regions
Complexity in design and high-availability builds
Enable Always On
Always On is an App Service feature that ensures that VM instances are kept alive, even if there are no ingress requests or traffic to the VM instances for more than 20 minutes. This can help prevent the instance from going offline due to an idle timeout, thereby creating a cold-start situation that leads to delayed response times. Always On is disabled by default, but you easily enable it using the Azure Portal (see Figure 3-35), Azure PowerShell, or Azure CLI.
)
FIGURE 3-35 Enabling the Always On setting.
Disable ARR Affinity
When a client session is unexpectedly disconnected from an app, the general practice is to reconnect the user to the same app instance so the previous session can be continued. One way to do this is to enable the Application Request Routing (ARR) Affinity setting. However, when ARR Affinity is enabled, the app uses affinity cookies, which cause some VM instances to become overloaded with sessions and create load-balancing issues.
To avoid this scenario, it is recommended that you either build a stateless application or store the state information in a back-end service like a database or cache. Once that is in place, you can disable the ARR Affinity setting (see Figure 3-36), which should improve app performance.
)
FIGURE 3-36 Disabling ARR Affinity.
Production hardware for production apps
As discussed, there are various App Service tiers available for deployment, and each tier offers specific hardware SKUs to meet different requirements. If the App Service plan is being used for a production application deployment, it is advisable to select hardware in the Production tier. (See Figure 3-37.) This ensures that the hardware resources available to the application are consistent and can be scaled automatically as required.
Define Health Check parameters
App Service has a Health Check feature that monitors the health status of running instances and automatically removes unhealthy instances from the load balancer to avoid disruption in service. This feature is disabled by default; however, it is recommended that you enable it. After you do, define the path that the service should poll on a regular basis to identify unhealthy instances. Be sure the path you select is available on all instances and is critical for the functioning of the application. This will help determine the accurate status of the application. (See Figure 3-38.)
)
FIGURE 3-37 Selecting the production tier.
)
FIGURE 3-38 Configuring Health Check.
Application Initialization
Application Initialization is a great feature to warm up a new application instance before it is made available to users. You can query a single URL path or multiple URL paths in the application to warm them up or trigger a script to preload cache. If not set, it can result in application instances being put into service at the time of any restart or scale-out operation, without being ready to service clients.
In such cases, the recommended approach is to set App Initialization in the web.config file to define the different custom URL paths that need to be queried to confirm that the application is completely online before the instance is put into service. If multiple URL paths are defined, App Service will wait for all the paths to confirm their status (success or failure) before the instance is made live.
Auto-Heal
Auto-Heal is an App Service feature that enables you to trigger custom actions based on high memory usage, high CPU usage, and so on. The custom actions currently supported include the following:
Email alerts to admins or stakeholders
Automated worker process recycling
Memory dump collection for investigation
This is a great feature, and you can configure it using the web.config tool, the Azure Portal, Azure PowerShell, or the Azure CLI.
Auto-Heal walkthrough
The following section steps you through the process of setting up Auto-Heal using the Azure Portal.
Using the Azure Portal
To set up Auto-Heal using the Azure Portal, follow these steps:
In the left pane of the web app’s configuration page, click Diagnose and Solve Problems. Then, in the right pane, click Diagnostic Tools. (See Figure 3-39.)
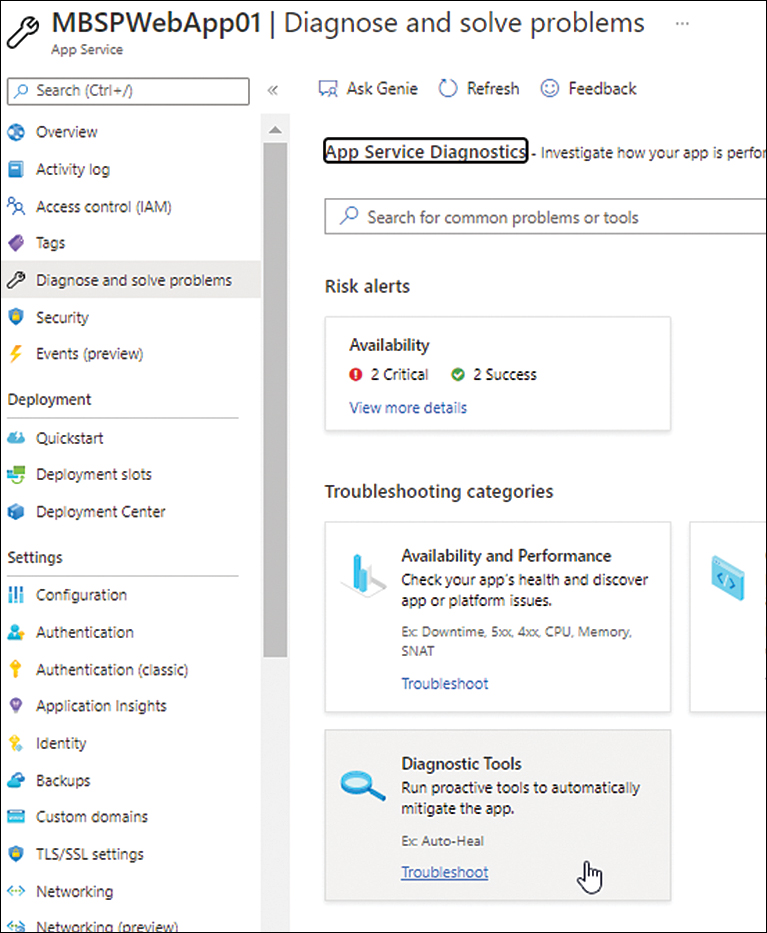
FIGURE 3-39 Selecting the Diagnostic Tools option.
Click Auto-Heal. (See Figure 3-40.)
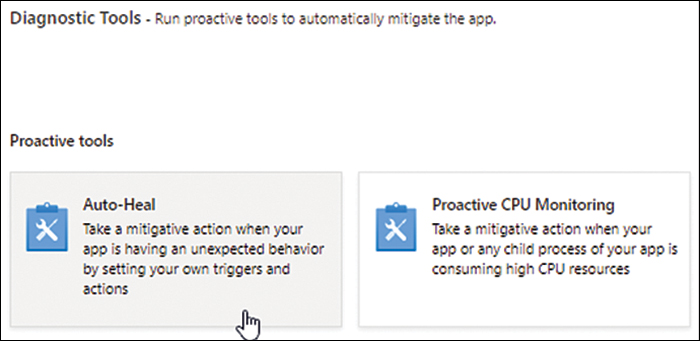
FIGURE 3-40 Selecting Auto-Heal.
Next to Custom Auto-Heal Rules Enabled, click On. Then define the desired conditions, actions, and override options based on your app requirements and click Save. (See Figure 3-41.)
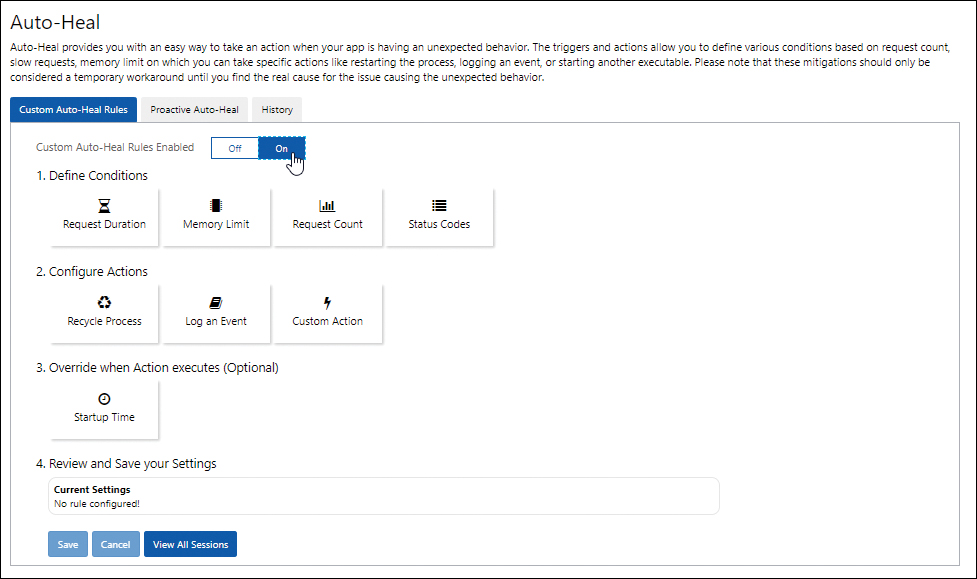
FIGURE 3-41 Enabling Auto-Heal.
)
)
)
Monitor disk space usage
The Azure Portal has an option to monitor App Service quotas, which you can use to monitor an app’s file system usage. For example, you might monitor this to ensure that the web folder has a minimum of 1 GB of free disk space for faster application restarts and scale-outs. (See Figure 3-42 and Figure 3-43.)
)
FIGURE 3-42 Quota check.
)
FIGURE 3-43 File system storage usage.
Enable Application Insights
Application Insights is an Azure Monitor feature to detect and analyze performance anomalies, debug code errors, and provide a better understanding of user behavior when using the app.
App Insights includes a feature called the Profiler. This feature enables you to capture the performance of the application and obtain detailed traces to identify hot code paths. (A hot code path is the one that take the longest to respond when handling a web request.) This can help you identify bottlenecks within an app and any dependencies. It also allows you to target development or troubleshooting efforts more appropriately.
Configure monitoring and alerts
Set up monitoring for important parameters and define alerts based on appropriate thresholds. These alerts can be defined on the App Service or the App Service Plan level. There are a few recommendations for monitoring and alerting that can be configured as follows:
Average Working Memory Set This helps identify the average amount of memory in MiBs used by the app. It’s recommended to set this value based on the expected average memory requirements so that any breach is alerted.
Average CPU Percentage This helps identify the average CPU used across all the app instances. It’s recommended to set this value high enough that alerts can help either scaling or remediation actions to be taken before any service interruptions.
HTTP Server Errors This helps to monitor specific HTTP status codes to identify errors or issues being encountered in web requests. It’s recommended to set the value to monitor and alert for high instances of HTTP status codes greater than or equal to 400 and less than 500.
Average Response Time This helps to monitor app responsiveness. If this value is too high, then it might indicate ongoing or imminent problems with the app. It’s recommended to set this value for alerting based on stress testing to identify appropriate thresholds for the hosted app.
Average Memory Percentage This helps to monitor the average memory used in all the instances of the app. It’s recommended to set this value high enough that alerts can help either scaling or remediation actions to be taken before any service interruptions.
Deploy in multiple regions
One of the best ways to achieve high availability and ensure disaster recovery for an app is to deploy it across multiple regions. Doing so can help ensure that any regional outage does not impact app availability. This will require various other considerations as we’ve covered in the Disaster Recovery section later in this chapter.
However, if possible, incorporate this into the application design at the earliest stage possible.
A multi-region design can also help in routing requests to the closest datacenter based on the user’s region. This can be achieved using Azure Front Door or Azure Traffic Manager to manage all the ingress traffic and route it appropriately. This can also help load-balance traffic between multiple geographies providing global load-balancing.
Plan new app deployments in existing plans
Generally, when a new workload is deployed, there is a temporary spike in resource requirements while the workload is completely online and servicing requests, at which point things stabilize and return to earlier levels until user traffic hits the new workload. If you are deploying a new workload using an existing App Service plan, you should check the CPU and memory usage to make sure there is enough spare capacity to handle this deployment spike.
If CPU or memory utilization reaches or exceeds 90%, you should bring additional VM instances online so the overall load goes down. Then you can deploy the new workload. After deployment, the App Service plan can be scaled down based on the new average resource requirements.
Scaling
Scaling is critical for applications using App Service. It can provide both performance benefits and cost savings—which can be maximized if the scaling occurs automatically.
You can achieve scaling (up or down) by changing your App Service plan tier. Be aware, however, that while a lower-tier plan will reduce your costs, it could have an impact on performance and feature availability. Therefore, it is important to identify which features you need in order to meet your application performance requirements and use this information when selecting your plan. For example:
Dev and test phase Use the Free tier so no compute charges are levied.
General testing/pre-production release Use the Shared tier to leverage additional features such as custom DNS and various resources.
Production release Use the Basic Dedicated tier to use SSL/TLS with more resources for scaling.
Scaling up or down by changing plans occurs almost immediately and requires no changes to the code or application configuration. All apps in the App Service plan are affected when scaling occurs; if you update to a higher-tier plan, each app in the plan will be able to use the new features that become available. Generally, scaling up provides access to features including (but not limited to) the following:
More CPU, memory, and disk space
Autoscaling
Custom domains and SSL/TLS certificates
Deployment slots
In contrast, scaling down by changing plans removes or reduces the feature set, depending on which plan you choose.
In addition to scaling up or down, you can also scale out or in. Scaling out increases the number of VM instances allocated to run your app(s). For example, in the Dedicated tier, with the Premium V2 and V3 plans, you can deploy 30 VM instances, whereas in the Isolated tier, you can scale out to 100 VM instances. Scaling in is the reverse of these scenarios; you might scale in to reduce costs or unused capacity.
All scaling operations can be performed manually or automatically—if your App Service plan tier supports this. Autoscaling is available only in the Standard and Premium plans on the Dedicated tier and the ASE hosted on the Isolated tier. You can perform automatic scaling based on schedules and/or metric-based rules that trigger the scaling operation.
Scaling walkthrough
The following sections step you through the process of setting up scaling for your web app using the Azure Portal, Azure PowerShell, and Azure CLI.
Using the Azure Portal
To set up scaling using the Azure Portal, follow these steps:
In the left pane of the web app’s configuration page, under Settings, click Scale Up (App Service Plan). Then, in the right pane, do one of the following:
Click the Manual Scale option button. Then, in the Manual Scale settings, drag the Instance Count slider to 2. (See Figure 3-44.)
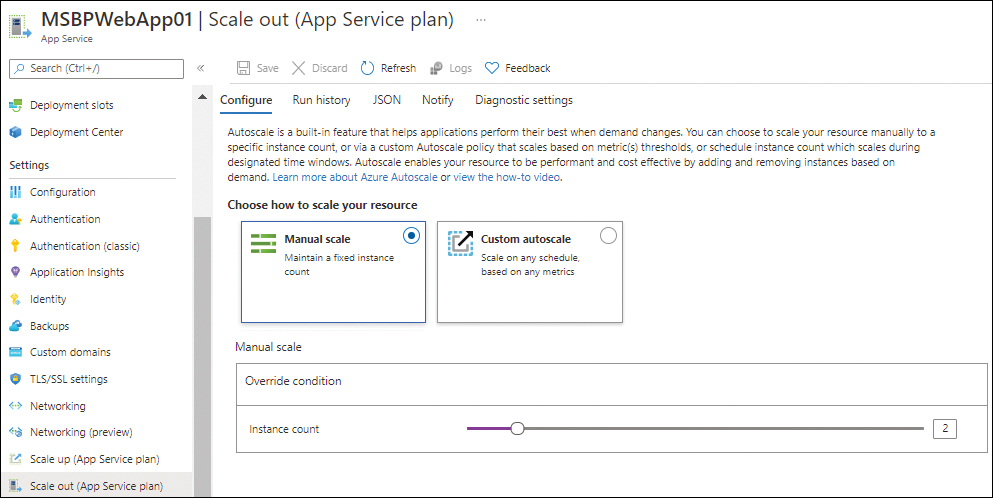
FIGURE 3-44 Manual scale configuration.
If you require a more advanced or custom configuration, select the Custom Autoscale option button and specify when you want the custom autoscaling operation to be automatically performed. (See Figure 3-45.)
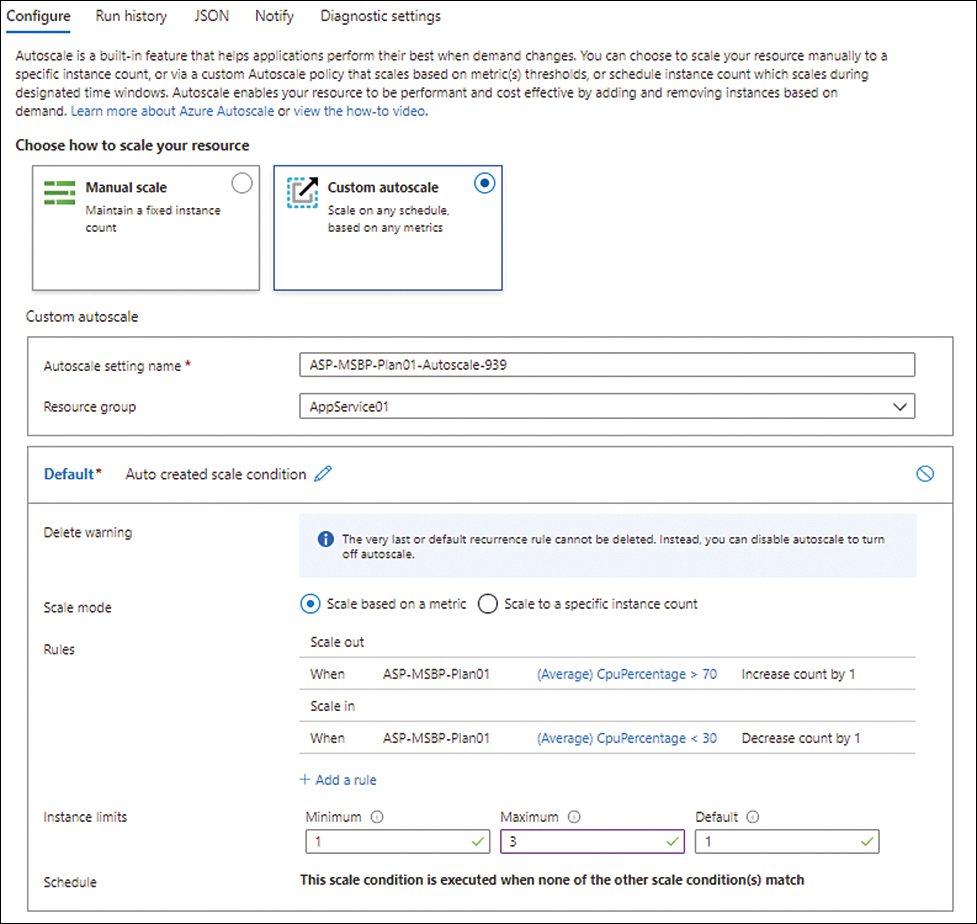
FIGURE 3-45 Custom autoscale configuration.
)
)
)
)
)
)
)
Using Azure PowerShell
You can set up scaling with Azure PowerShell when you use the New-AzAppServicePlan command to create the App Service plan and employ the -NumberofWorkers and -PerSiteScaling switches. The following code shows you how:
#Define the variables for your environment
$ResourceGroup = “{ResourceGroupName}”
$AppServicePlan = “{Name-Of-AppServicePlan}”
$Location = “{AzureRegionName}”
#Set scaling config during plan creation
New-AzAppServicePlan -ResourceGroupName $ResourceGroup -Name $AppServicePlan
-Location $Location -Tier Standard -WorkerSize Small -NumberofWorkers 3
-PerSiteScaling $true
Using the Azure CLI
You can set up scaling with the Azure CLI when you use the az appservice plan create command to create the App Service plan and employ the --per-site-scaling and --number-of-workers switches. The following Bash script shows you how:
#Set the web app variables
WebappName="AppService$random"
Location="EastUS"
ResourceGroup = “ResourceGroup01”
# Set scaling config during plan creation
az appservice plan create --name $WebAppName --resource-group $ResourceGroup
--location $Location --sku S1 --number-of-workers 3 --per-site-scaling
Migrate to Azure App Service
One of the key questions in any environment is how best to migrate an existing on-premises app to App Service. To aid with this, Azure provides a free service called App Service Migration Assistant. (See Figure 3-46.) You can use this service to quickly scan and assess an existing web app to determine if it is suitable for migration. If the Migration Assistant service determines that the app is suitable for migration, you can use it to migrate the app to App Service. It is highly recommended that you use this free service to speed up and streamline app migrations.
)
FIGURE 3-46 Azure App Service Migration Assistant.