Azure App Service
- By Avinash Valiramani
- 9/24/2022
Azure App Service is a compute service within Azure that enables you to host web applications, mobile application back ends, and REST APIs. In this sample chapter from Microsoft Azure Compute: The Definitive Guide, you will explore the key features of Azure App Service.
Overview
Azure App Service is a compute service within Azure that enables you to host web applications, mobile application back ends, and REST APIs. Some key features of Azure App Service include the following:
It provides DevOps integration capabilities to allow for continuous deployment of code using Azure DevOps, Docker Hub, GitHub, and other third-party solutions.
It allows for development in different programming languages like .NET Core, .NET, Node.js, PHP, Python, Java, and others.
It allows for both Windows- and Linux-based applications to run at scale.
Although App Service can help address the requirements of most app deployments, there are a few key points to consider when deciding it is the best service for hosting an app. Some primary reasons to use Azure App Service are as follows:
Automated management OS management activities, including patching and maintenance, are automated. This applies even to the language frameworks supported by the service. This frees development and engineering resources from the burden of managing the back-end platform so they can focus on more business-critical application-development activities.
Support for multiple frameworks In addition to the different programming languages that can be used by App Service, it can also leverage PowerShell scripts and other types of executables for background services.
Robust scaling Both manual and automated scaling operations are supported—including scaling up, down, in, and out. This can help organizations of all sizes embarking on their cloud journey obtain the maximum benefit from their cloud spends.
Global deployment App Service deployments are supported across Microsoft’s globally dispersed regions and datacenters. This allows for app hosting in regions closest to the users.
High availability and uptime guarantees In addition to workloads hosted on the free and shared tiers of services, App Service workloads are guaranteed a 99.95% uptime.
Optimized for DevOps builds Continuous integration and deployment can be achieved by leveraging App Service in conjunction with Azure DevOps, Azure Container Registry, GitHub, Bitbucket, and Docker Hub. This allows for multiple staging and dev/test environments that can be used for testing, validation, and production.
Support for PowerShell and CLI management Apps can be managed using Azure PowerShell, the command-line interface (CLI), or the Azure Portal to help in DevOps and automation activities.
Integration with Docker and containers Apps can be dockerized and hosted as custom containers in App Service. Both Windows- and Linux-based containers are supported. This enables engineers with skills in managing Docker to quickly get up to speed managing Azure App Service.
Adherence to global compliance standards Compliance with ISO, SOC, and PCI standards is built in.
Easy to integrate with existing authentication solutions Various secure authentication solutions can be easily leveraged, enabling users to employ existing Azure Active Directory, Microsoft, Google, Facebook, and Twitter accounts.
Built-in support for mobile apps Mobile app features such as user authentication, notification services, offline data sync, social integration, and automated scaling are all built-in, making it easy to build and deploy apps.
Ability to run code and scripts in a serverless architecture On-demand scripts and code snippets can be executed without deploying back-end servers using serverless computing. This saves time, resources, and money, as compute costs are charged only for actual use.
Connectors for enterprise, SaaS, and internet-based services App Service has ready connectors for integration with enterprise applications, SaaS applications, and internet-based services, making it easy to integrate with the most commonly used platforms and applications.
Hybrid connectivity Support for hybrid connections is available to allow access to on-premises data sources.
Built-in application templates There are numerous application templates available in the Azure Marketplace, including templates for WordPress, Drupal, and Umbraco, to name a few. The list of templates available is quite extensive and is being updated constantly.
Visual Studio and Visual Studio Code integration Deep integration with Visual Studio and Visual Studio Code allows for streamlined app building, deployment, and troubleshooting.
Support for Linux languages and frameworks Linux containers can be run natively or using custom containers (known as Web App for Containers). This allows for the use of built-in Linux images for languages such as .NET Core, Python, Node.js, JRE, PHP, and others. Custom containers help address scenarios not covered by the built-in images.
App Service plans
App Service plans identify the hardware computing resources made available to the App Service to run the required web, API, and mobile apps. Depending on what plan you select, computing resources are dedicated solely to your organization or shared among customers. The App Service plan also defines the specifications of the back-end VM series that is allocated. This, in turn, affects the number of applications that can be hosted using those resources.
When you create an App Service plan, you must define certain parameters for that plan. These include the following:
The pricing tier (Free, Shared, Dedicated, Isolated, etc.)
The region in which the apps will run (Central US, West Europe, East Asia, etc.)
The size of the VM instances required (small, medium, large)
The total number of VM instances required
Once the preceding parameters are defined, the resources identified in the plan are created in the selected region. Thereafter, the resources are made available for the hosting of the required apps.
Choosing the right pricing tier is key. Table 3-1 reviews the four pricing tiers.
Table 3-1 Pricing tiers
Pricing tier |
Description |
Key features |
|---|---|---|
Free |
Allows you to host one or more web apps without having to pay any associated compute charges. |
The underlying hardware is shared between customers. You can run only 10 apps. You can have 10 free plans per region. There are time limits on CPU usage. These make this pricing tier ideal for test/dev workloads, and web APIs generally run quickly. There are limits on memory, storage, bandwidth, scalability, and security features. Uptime SLAs do not apply. |
Shared |
Similar to the Free tier in that the underlying hardware is shared, but offers more flexibility in terms of CPU usage and so on. |
The underlying hardware is shared between customers. You can run 100 apps. You can have 10 plans within a single resource group. You can have unlimited shared plans per region. There are limits on memory, storage, bandwidth, scalability, and security features. However, CPU usage limits apply 240 minutes per day. A per-app charge applies. Uptime SLAs do not apply. |
Dedicated |
Provides compute resources that are dedicated to that customer. There are different levels available in this plan—Basic, Standard, Premium, PremiumV2, and PremiumV3—and each defines the number of VM instances that the apps in the plan get access to. |
A per-instance charge applies, regardless of the number of apps running. You can scale out by increasing the number of VM instances available. You can scale up by moving from one dedicated tier to a higher one to increase the size of the VM instances. This tier supports several additional features, including features that relate to backups, security, auto-scaling, and integration with traffic management. An uptime SLA of 99.95% applies. |
Isolated |
Provides a dedicated set of VMs hosted in an Azure virtual network environment to support compute isolation. |
Plans in this tier are deployed into an App Service Environment (ASE), described in more detail later in this chapter. Fixed charges to run the environment apply, as well as variable charges based on the number of instances. This tier provides maximum scale-out capabilities. Fine-grained control over ingress and egress application network traffic is supported. All security and scaling features are available for apps running on this tier. An uptime SLA of 99.95% applies. |
Azure App Service Environments
Earlier, I mentioned that the Isolated pricing tier deploys apps in an App Service Environments (ASE). An ASE is a dedicated, fully isolated environment provisioned to run apps with high levels of security and scalability. An ASE can host Windows or Linux web apps, mobile apps, function apps, and Docker containers.
Although all application workloads can be hosted in an ASE, considering the cost implications, there are certain workload types that are more appropriate for ASEs than others. When deciding if an ASE is the best choice for an app, consider these factors:
Does the app require complete isolation and secure access to on-premises resources?
Does the app have high memory requirements that are not met by the Dedicated tier?
Does the app require a very high level of scalability?
If the answer to all or most of these questions is yes, then an ASE might be the appropriate choice.
Here is a list of some examples of functionality that is only possible when using an ASE:
Hosting apps in a single-tenant environment
Using private or internal Certificate Authority certificates
Publishing a dedicated outbound IP address for all the apps hosted in the ASE
Publishing and accessing apps only on a private internal IP address
Providing the highest level of scaling possible across all App Service plans
Securing outbound network traffic with additional network controls available with integrations that are not part of the app
An ASE is assigned exclusive access to a dedicated set of compute and network resources and is accessible only from a single subscription. Each subscription supports the deployment of 100 App Service plan instances. These can be deployed in one of three ways:
A single App Service plan with 100 instances
100 App Service plans with single instances in each plan
A combination of the two
An ASE is composed of two components:
Front ends Front ends provide HTTP and HTTPS endpoints for ingress termination and load-balancing. Front ends are added automatically as scaling operations take place to handle the additional load.
Workers Workers host the apps deployed by a customer. You specify the size of the workers when you select your App Service plan tier.
Both components are managed services and are deployed or removed automatically as the App Service plans are sized. Because of this design, the charges associated with an ASE are fixed every month based on the plan that is selected. Additionally, every vCPU in the plan has an associated cost, which will be levied when resources are consumed.
There are two different ways to provision network access for an ASE, depending on its public access requirements:
External ASE An internet-facing ASE is deployed with a public IP address so the apps hosted on the ASE can be accessed externally.
Internal ASE An internal ASE is deployed using an internal load balancer (ILB) IP address so it is accessible only on internal networks. This would include any networks connected over VPN or ExpressRoute.
The public virtual IP (VIP) or the ILB IP serve as the endpoints for the termination of the different protocols for client connectivity. Because there is no direct access to the VMs running in the ASE, you can create network security groups (NSGs) to manage the network traffic within the subnet where the ASE is housed. If a site-to-site VPN or ExpressRoute connection to the on-premises environment is in place, the apps hosted in the ASE can communicate with on-premises resources.
App Service walkthrough
The following sections step you through the process of creating a basic web app using the Azure Portal, Azure PowerShell, and Azure CLI. You will use sample GitHub code provided by Microsoft to create a static HTML website, which you will use later to create a Hello World web app.
Using the Azure Portal
To create a sample static HTML website for the Hello World web app using the Azure Portal, follow these steps:
Log in to the Azure Portal and type app services in the search bar.
Under Services, click App Services. (See Figure 3-1.)
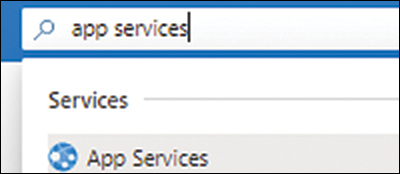
FIGURE 3-1 Selecting the App Services service in the Azure Portal.
Click either the Create button or the Create App Service button to launch the Create Web App wizard. (See Figure 3-2.)
FIGURE 3-2 Creating the first App Service.
In the Basics tab, enter the following information for the web app (see Figure 3-3):
Subscription Select the subscription that will host the web app.
Resource Group Select an existing resource group or create a new one to host the web app.
Name Enter a unique name for the web app. If the name you enter is already in use, the wizard will prompt you to select another name.
Publish Select the publishing model for the web app. Your options are Code and Docker Container. In this case, choose Code.
Runtime Stack Choose the runtime stack that corresponds to the app—here, .NET 5.
Operating System Choose an operating system for the app VM—in this case, Windows.
Region Select the Azure region you want to host the app.
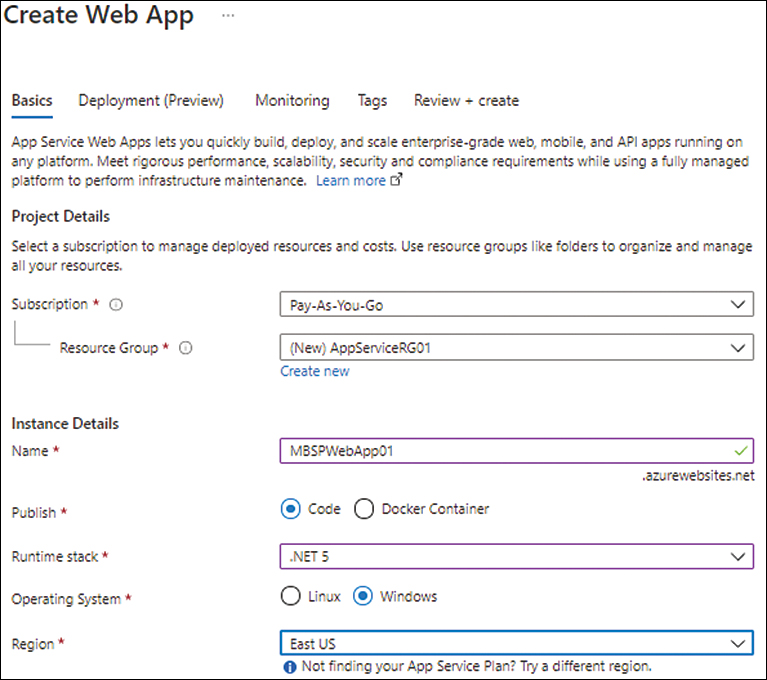
FIGURE 3-3 Setting up the basic configuration for the app.
Still in the Basics tab, under App Service Plan, select an existing App Service plan. Alternatively, to create a new plan, click Create New, type a name for the new plan, and click OK. (See Figure 3-4.)
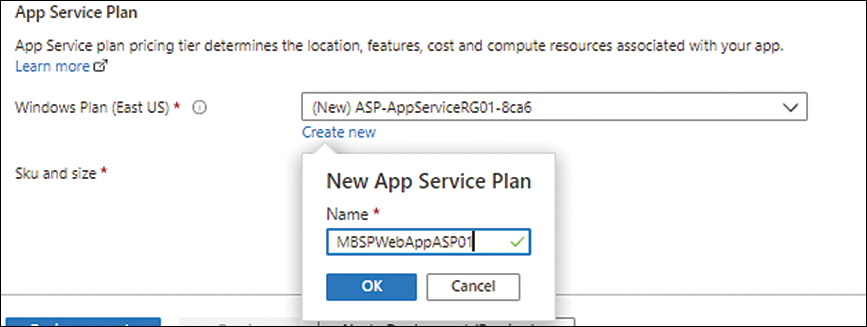
FIGURE 3-4 Defining a new App Service plan.
In the Sku and Size section, click the Change Size link. (See Figure 3-5.)
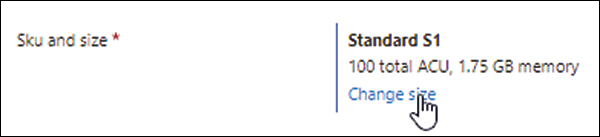
FIGURE 3-5 Setting the SKU and size for the App Service plan.
In the Spec Picker window, choose an appropriate pricing tier based on your resource and feature requirements. In this case, click Dev / Test. Then choose the F1 plan (the Free pricing tier) and click Apply. (See Figure 3-6.)
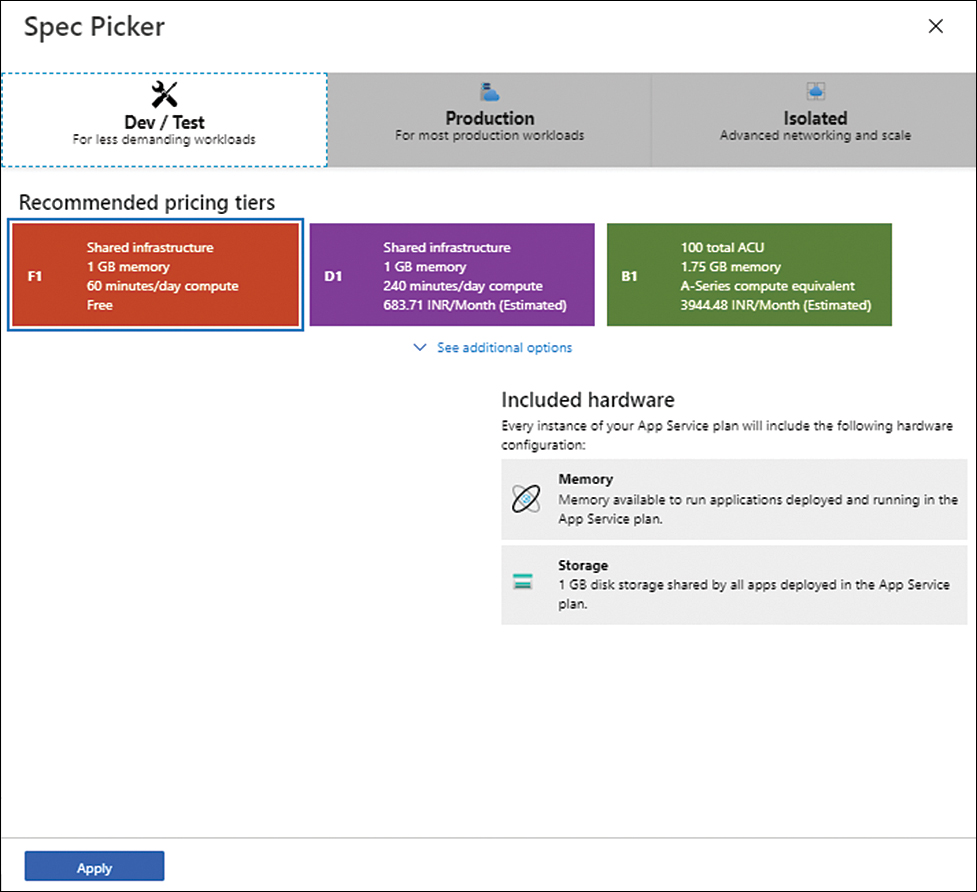
FIGURE 3-6 Set the SKU and size.
Choose a pricing tier
As you’ve learned, there are various pricing tiers available. Figure 3-7 shows additional Dev / Test pricing tiers, with the B1 tier selected; Figure 3-8 shows the recommended pricing tiers for production workloads; and Figure 3-9 shows recommended tiers for isolated workloads.

FIGURE 3-7 Options for the Shared and Basic tiers.
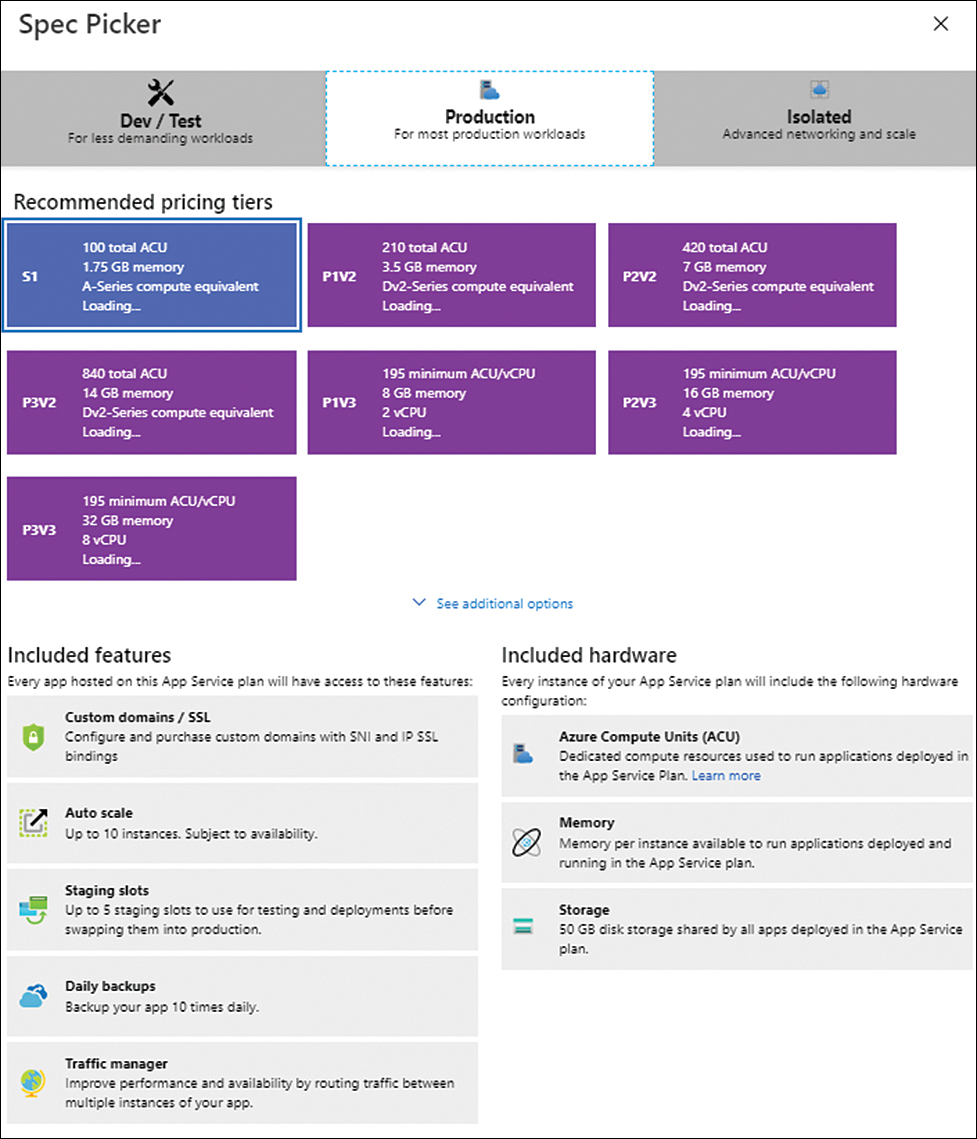
FIGURE 3-8 Tiers for production workloads.
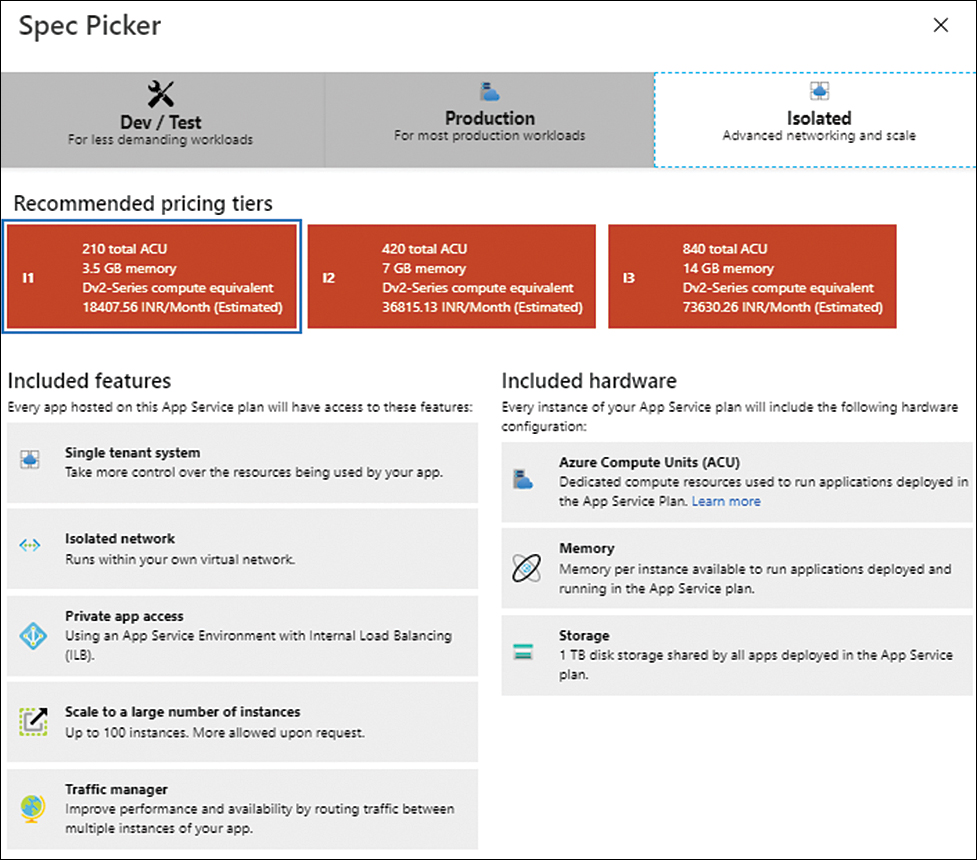
FIGURE 3-9 Tiers for isolated workloads.
Click Next twice. Then, in the Monitoring tab, next to Enable Application Insights, select the No option button and click Next. (See Figure 3-10.)
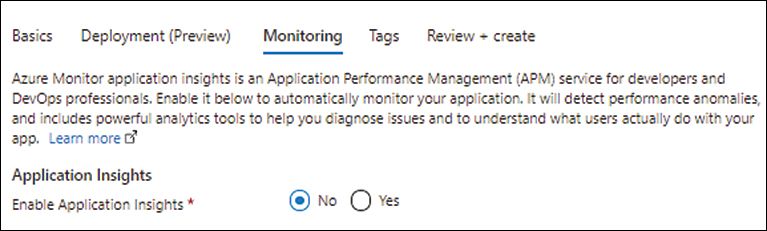
FIGURE 3-10 Choosing settings in the Monitoring tab.
In the Tags tab, enter any tags that you would like to apply to identify the resources for the App Service. For example, type ms-resource in the Name column and WebApp in the Value column. (See Figure 3-11.) Then click Next.

FIGURE 3-11 Setting up tags for the web app.
In the Review + Create tab, review your settings and click Create to create the web app. (See Figure 3-12.)
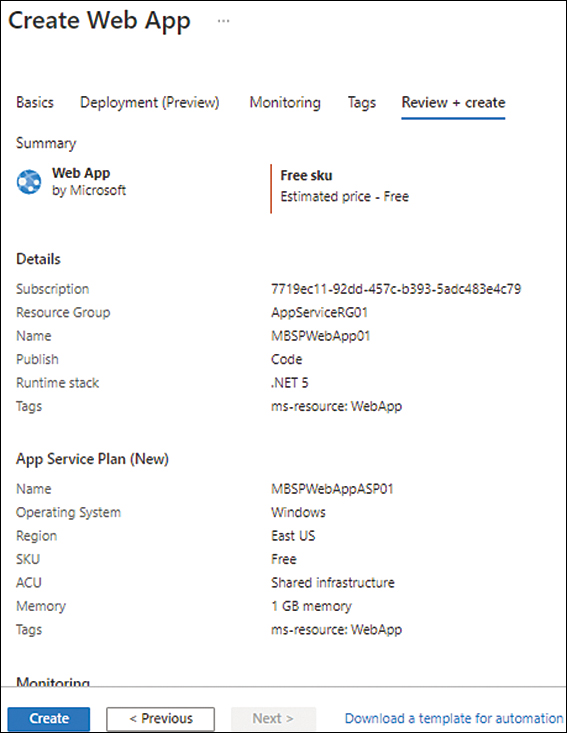
FIGURE 3-12 Reviewing the web app settings.
After the web app is created, click it. (In this example, it’s called MBSPWebApp01.) Then, in the Overview section of the web app’s page in the Azure Portal, copy the URL for the web app (located in the upper-right corner). (See Figure 3-13.)

FIGURE 3-13 Copying the web app URL.
Paste the URL in your web browser’s address bar to see the associated website. It will look like the one shown in Figure 3-14.

FIGURE 3-14 The default web app website.
Now you’ll build the web app.
In the Deployment section of the web app’s page in the Azure Portal, click Deployment Center.
In the Settings tab, click the Source drop-down list and select External Git. (See Figure 3-15.)
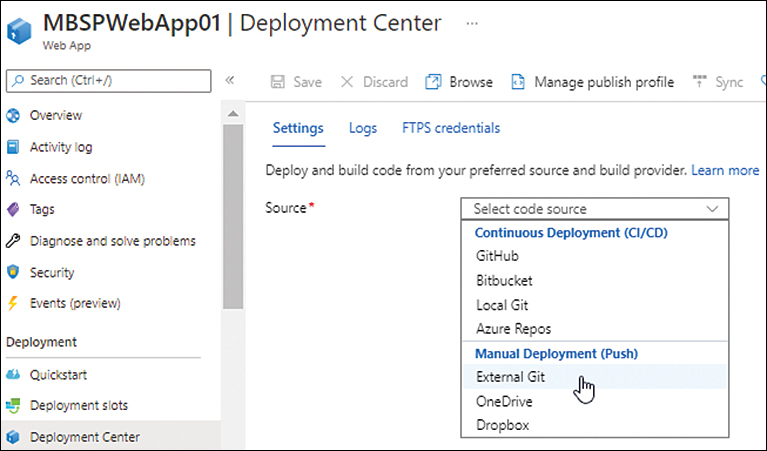
FIGURE 3-15 Setting the deployment source.
Under External Git, type https://github.com/Azure-Samples/html-docs-hello-world.git in the Repository box, type master in the Branch box, and select the Public option button next to Repository Type. (See Figure 3-16.)
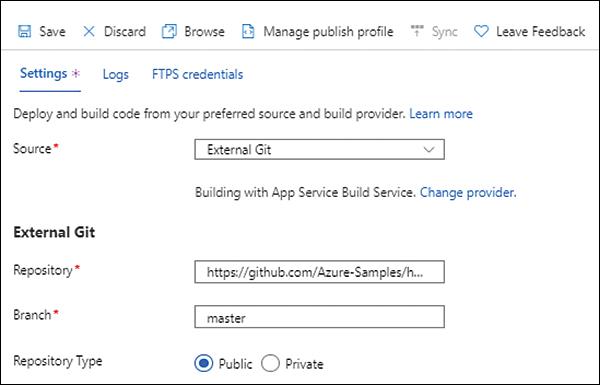
FIGURE 3-16 Setting the External Git configuration.
Click Save to apply the changes. This will reload the code from the repository and restart the web app.
Verify the app details. (See Figure 3-17.)
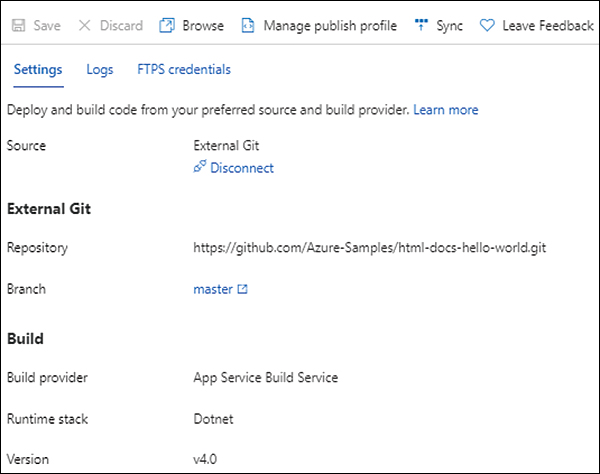
FIGURE 3-17 The external Git configuration.
Click Browse to return to the website.
The website has changed, as shown in Figure 3-18, indicating that the Git repository was successfully cloned to build your web app.
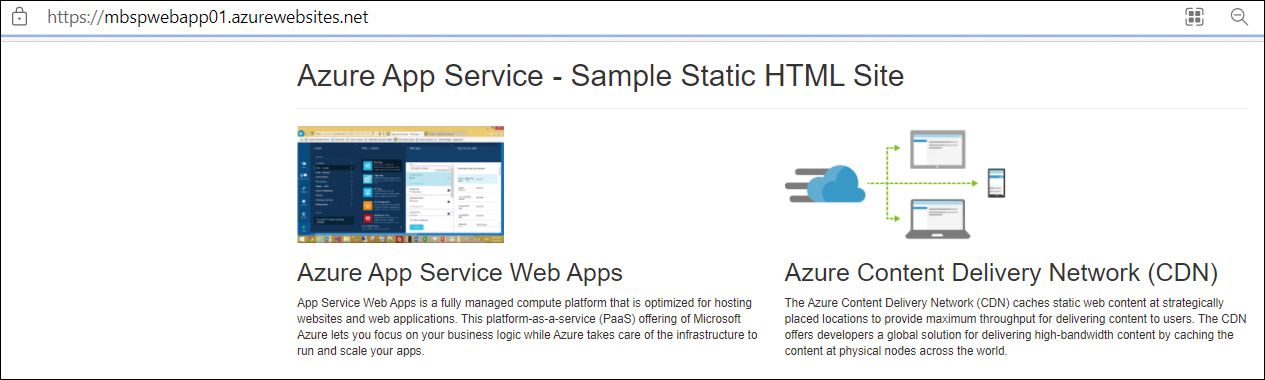
FIGURE 3-18 Sample Azure App Service static HTML site.
)
)
)
)
)
)
)
)
)
)
)
)
)
)
)
)
)
)
Using Azure PowerShell
You can create a sample static HTML website for the Hello World web app with Azure PowerShell using the New-AzAppServicePlan and New-AzWebApp commands. The following code shows you how. (Note that you need to connect to the Azure subscription using PowerShell first.)
Note that you need to make the following replacements in the code:
Replace the app name with a unique name or add (Get-Random) to the end of the name to randomize it.
Replace the Location variable with the desired Azure region.
Replace the resource group name with an existing resource group or a different name (optional).
After the script successfully completes, browse to the web app URL to verify the application has been created successfully:
# Set the public GitHub repository URL, AppName and Location variables.
$githubrepo="https://github.com/Azure-Samples/html-docs-hello-world.git"
$appname="MBSPWebApp01"
$location="East US"
$resourcegroup="AppServiceRG01"
# Create a resource group to host the App Service.
New-AzResourceGroup -Name $resourcegroup -Location $location
# Create an App Service plan in Free tier.
New-AzAppServicePlan -Name $appname -Location $location -ResourceGroupName $resourcegroup -Tier Free
# Create a web app using the App Service Plan.
New-AzWebApp -Name $appname -Location $location -AppServicePlan $appname -ResourceGroupName $resourcegroup
# Configure GitHub deployment from your GitHub repo and deploy once.
$PropertiesObject = @{
    repoUrl = "$githubrepo";
    branch = "master";
    isManualIntegration = "true";
}
Set-AzResource -Properties $PropertiesObject -ResourceGroupName $resourcegroup
-ResourceType Microsoft.Web/sites/sourcecontrols -ResourceName $appname/web
-ApiVersion 2015-08-01 -Force
Using the Azure CLI
You can create a sample static HTML website for the Hello World web app with the Azure CLI using the az appservice plan create and az webapp create commands. The following code shows you how. (Note that you need to connect to the Azure subscription using the Azure CLI first.)
Note that you need to make the following replacements in the code:
Replace the app name with a unique name or add ($RANDOM) to the end of the name to randomize it.
Replace the Location variable with the desired Azure region.
Replace the resource group name with an existing resource group or a different name (optional).
After the script successfully completes, browse to the web app URL to verify the application has been created successfully:
#!/bin/bash
# Set the public GitHub repository URL, AppName and Location variables.
githubrepo=https://github.com/Azure-Samples/html-docs-hello-world.git
appname=MBSPWebApp01
location=EastUS
resourcegroup=AppServiceRG01
# Create a resource group to host the App Service.
az group create --location $location --name $resourcegroup
# Create an App Service plan in Free tier.
az appservice plan create --name $appname --resource-group $resourcegroup --sku FREE
# Create a web app using the App Service Plan.
az webapp create --name $appname --resource-group $resourcegroup --plan $appname
# Configure GitHub deployment from your GitHub repo and deploy once.
az webapp deployment source config --name $appname --resource-group $resourcegroup
--repo-url $githubrepo --branch master --manual-integration