Implement Microsoft 365 security and threat management
- By Robert D. Clements, Charles Pluta, Brian Svidergol
- 9/24/2022
In this sample chapter from Exam Ref MS-101 Microsoft 365 Mobility and Security, 2nd Edition, you will explore cloud-based security services for Microsoft 365. This includes a deep dive into Cloud App Security, Advanced Threat Analytics, and Windows Defender Advanced Threat Protection.
In a traditional environment, applications and services are hosted and managed from an organization’s on-premises data center. Intellectual property, employee data, and other sensitive information are contained within the confines of that organization. In the modern workplace, applications and services are hosted in cloud environments, such as Office 365, reducing overhead for IT and providing greater flexibility to the end user. This transition requires IT administrators to address new challenges around information protection and application security.
In this chapter we cover cloud-based security services for Microsoft 365. This includes a deep dive into Cloud App Security, Advanced Threat Analytics, and Windows Defender Advanced Threat Protection. With these services we walk through the various reports and alerts provided in each solution.
Skills covered in this chapter:
2.1: Manage security reports and alerts
2.2: Plan and implement thread protection with Microsoft Defender
2.3: Plan Microsoft Cloud App Security
Skill 2.1: Manage security reports and alerts
Microsoft 365 includes several cloud services under its umbrella, each one enabled with security controls. As an Azure cloud administrator, it is important that you know what these controls are, how to configure alerts, and how to generate reports so that you can keep informed when an event occurs. In this chapter we are going to be working with a few different technologies dealing with Microsoft 365 security. This will include an introduction to service assurance and the various security assessment reports that Microsoft is making available to customers. We will also be onboarding Azure AD Identity Protection and exploring its capabilities. Finally, we will be exploring the event-based alerts available in the Office 365 Security & Compliance center.
Evaluate and manage Microsoft Office 365 tenant security by using Secure Score
In this skill section we review the Microsoft Secure Score. The Microsoft Secure Score is a numerical value based on the current configuration of the Microsoft 365 tenant. Every tenant has a different possible number of points, and the Secure Score is represented as a percentage of the possible points. By configuring or deploying the recommended best practices, an organization can increase their Secure Score points and percentage. A higher percentage then indicates an increased security posture based on the settings and policies defined by the organization.
Secure Score overview
The Microsoft Secure Score is segmented into different groups:
Identity Actions to take with Azure Active Directory accounts and roles
Device Actions to take with Microsoft Defender for Endpoint
App Actions to take with email and cloud apps, including Office 365 and Microsoft Cloud App Security
To view the Secure Score for your organization, follow these steps.
Sign in to the Microsoft 365 security center at https://security.microsoft.com.
From the Navigation bar on the left, click Secure score.
The Secure Score for the organization is displayed on the Overview tab, as shown in Figure 2-1. By default, the Secure Score only includes the currently settings that have already been configured in the tenant. You can change the display to include theoretical possabilities, including:
Planned score A projected score based on improvement actions that have been marked as ‘Planned’
Current license score The total possible score that can be achieved with the current licensed features
Achievable score The total score that can be achieved with both current licenses and risk acceptance

Figure 2-1 Microsoft Secure Score overview
Managing improvement actions
To increase the Secure Score in the tenant, you must take additional action for the various settings or features in identity, device, or apps. To see the list of improvement actions for your organization specifically, check the Improvement actions tab of Secure Score. Figure 2-2 shows the improvement actions that are available for the Contoso Electronics organization.

Figure 2-2 Microsoft Secure Score improvement actions
A variety of information is displayed for each improvement action that you can take in the organization. Some of the relevant columns for identifying how the improvement action changes the Secure Score are noted in these columns:
Score impact The percentage that the Secure Score will increase upon completing the action
Points achieved The numerical points that are added to your Secure Score by completing the action
Status The status of the action. Possible values are Alternate mitigation, Completed, Planned, Risk accepted, Third party, or To address
Regressed in last 90 days Whether the improvement action has been negatively impacted in the last 90 days by a configuration change
Have license? Displays if the organization already has the required license to make the recommended change
To manage an individual improvement action, click the action from the improvement actions tab. Each action has similar information that is displayed on the main tab. From the individual action, you can configure an Action plan, which changes the Status column on the previous page. The available settings for Action plan are To address, Planned, Risk accepted, Resolved through third party, and Resolved through alternate mitigation.
The Implementation section of the improvement action lists any prerequisites, such as licensing, as well as the general steps to customize and configure the desired state for that action. Figure 2-3 shows the management screen of an individual improvement action.

Figure 2-3 Microsoft Secure Score improvement action management
On the main Secure Score page, the History tab displays a line chart with the Secure Score history of the tenant. The History tab also shows a list of changes that have been made in the tenant with the resulting positive or negative point score change. You can also filter or search through the list of recent changes on the History tab. By default, the results show the past 90 days, but can be changed to 7 days, 30 days, or a custom date range. Other filter options include whether the change was an increase, regression, or no points change; the category of the change, the product the change was made in, the type of update that was made, and any tags that might have been associated with the change. Figure 2-4 shows the History tab with the default filtering options.
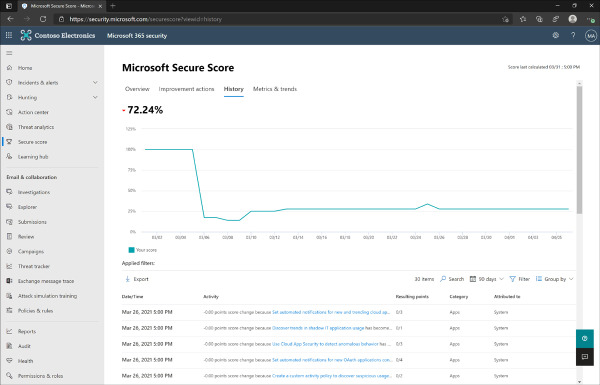
Figure 2-4 Microsoft Secure Score History
The final tab that is available with Secure Score is the Metrics & trends tab, which displays Secure Score changes, custom Secure Score zones, and trends in the environment for regression, risk acceptance, and a comparison to other organizations that are similar in size, industry, and the products that are licensed.
The Secure Score zones are a minimum and maximum percentage that you can set to display a chart that displays your score as bad, okay, or good relative to your current score. To create a custom zone, use the following steps.
Sign in to the Microsoft 365 security center at https://security.microsoft.com.
From the Navigation bar on the left, click Secure score.
On the Secure Score page, click Metrics & trends.
On the Metrics & trends tab, click Add score zones.
In the flyout window, customize the Score is bad if less than or equal to and Score is good if greater than or equal to fields, and then click Save and close.
Figure 2-5 shows the fields set to 40% and 70% respectively. This means that a bad score would be less than or equal to 40%, an okay score is in the 41% to 69% range, and a good score is greater than or equal to 70%.

Figure 2-5 Custom Secure Score zones
After you save the custom zone, the Metrics & trends page will update with a chart displaying where your tenant is on the scale that you created. Figure 2-6 shows the Metrics & trends page with a custom zone created, Secure Score changes, and the comparison and regression trends.
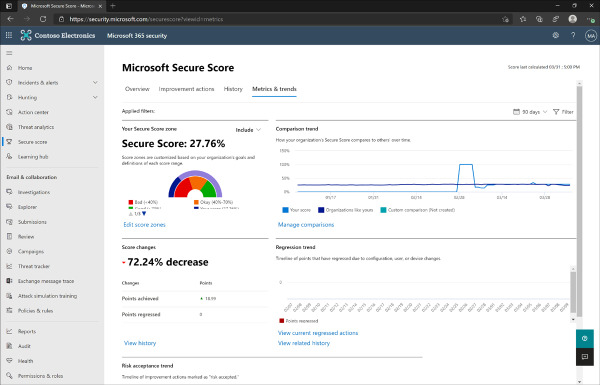
Figure 2-6 Secure Score Metrics & trends
To manage the comparison chart, click Manage comparisons on the Metrics & trends page. This will open another flyout window where you can set a custom comparison. The fields for a custom comparison are:
Industries The industries that you would like to compare with, for example, Manufacturing or Healthcare.
Organization size The size of the organization relative to the number of users being managed.
Licenses The licenses that are included in the organization.
Regions The geographic region of other organizations to compare with.
If you configure these options and click Save and close, the line chart on the Metrics & trends page will update with your custom settings. The line chart displays three lines, for Your score, organizations like yours, and your custom comparison.
The other charges that are displayed on the Metrics & trends for regression and risk acceptance are relative to the actions that have been taken in your specific environment. Actions that have resulted in a negative change to your Secure Score are displayed in the Regression trend chart. Improvement actions that have been marked as Risk accepted are displayed in the Risk Acceptance trend. You can also view the individual actions that were taken in either scenario if you need to review or report on when and why those actions were taken.
Required permissions
To have permissions to manage improvement actions, create custom score zones, or edit the custom comparisons, you must have a role that includes read and write access to Secure Score. The built-in roles that include read and write access are:
Global administrator
Security administrator
Exchange administrator
SharePoint administrator
Account administrator
For accounts that only need read access to the Secure Score and the customizations that an administrator has made, you can assign any of the following roles:
Helpdesk administrator
User administrator
Service administrator
Security reader
Security operator
Global reader
It is also important to note that the Secure Score is simply a numerical value that represents the security posture of the current configuration in the organization. It is not guaranteed measure of how secure the organization might be. No online service is completely protected from security breaches, and a high or even 100% completion of Secure Score should not be interpreted as such.
Manage incident investigation
Incidents are triggered by alerts that correspond to a suspicious or malicious event that has occurred in the organization. We can look at incident response with two categories: manual investigation and automated investigation. In a large organization, there could be thousands of alerts at any given time that might require additional investigation. Some might be handled automatically, and others might require additional administrative input. In this section, we’ll look at both investigation types.
Manual incident investigations
The Microsoft 365 security center includes an incidents queue, which displays any incidents that have occurred in the organization. The incidents queue can help you sort, filter, and prioritie the alerts and incidents that require additional actions to review and resolve the incident as either a False alert or a True alert. To open the incident queue, follow these steps.
Sign in to the Microsoft 365 security center at https://security.microsoft.com.
From the Navigation bar on the left, expand Incidents & alerts, and then click Incidents.
Figure 2-7 displays the incidents that have been identified in the Contoso Electronics organization.
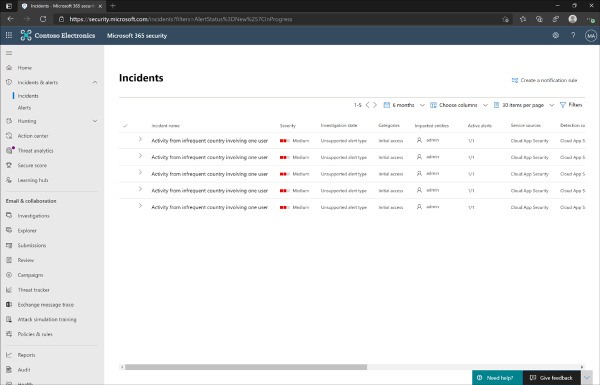
Figure 2-7 Microsoft 365 security center incident queue
The incident queue has a variety of columns that display relevant information for each incident that has outstanding actions. Some of these columns include:
Severity The severity of the incident, categorized as informational, low, medium, or high.
Investigation state Displays the alert type that the incident relates to.
Categories The category that the incident relates to.
Impacted entities The user accounts, devices, or other entity that the alert corresponds to.
Active alerts The number of alerts that are still active that correspond to the incident. One incident could have multiple alerts that correspond to the same event.
Service sources The Microsoft 365 service that the incident has potentially impacted.
To view more information about the incident, click the checkmark next to the name of the incident, without clicking the name itself. This will open a flyout window that displays more information about the incident, including the classification, activity times, and buttons to open the full incident page or assign the incident to your user account. Figure 2-8 displays a portion of the information from the flyout window.
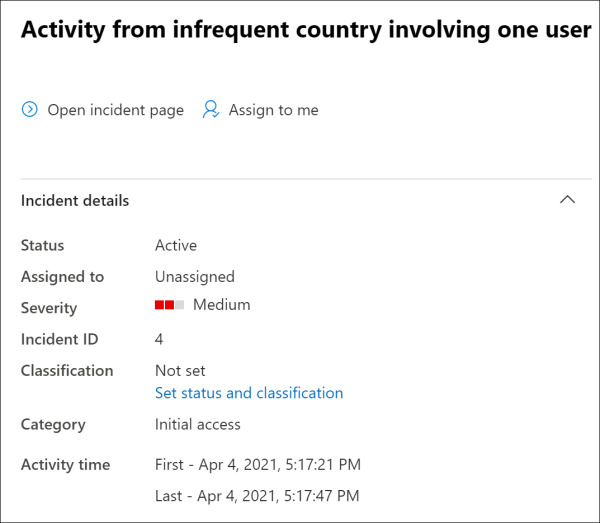
Figure 2-8 Incident information
To view even more information, or to begin managing the properties of the incident, click the name of the incident or the Open incident page link. Every incident can be managed individually, and has a variety of tabs that display more information around the incident and alert. These tabs include
Summary Displays the basic information about the incident and alert, including the MITRE ATT&CK tactics, impacted user accounts, and incident information.
Alerts The alert(s) that was generated from the services as they relate to the overall incident.
Devices Any impacted devices if the alert or incident occurred on a device that is being managed by the organization.
Users The impacted user accounts that have been associated with the incident.
Mailboxes Any Exchange Online mailboxes that might also be associated with the incident.
Investigations Any automated investigation that occurred with the incident.
Evidence and response. A summary of the evidence that relates to the alerts that were generated.
Depending on the incident and alert type, not all of these tabs might have information as it relates to the incident. Figure 2-9 shows the incident summary page for an alert related to user activity, but was not associated with a device or investigated automatically.
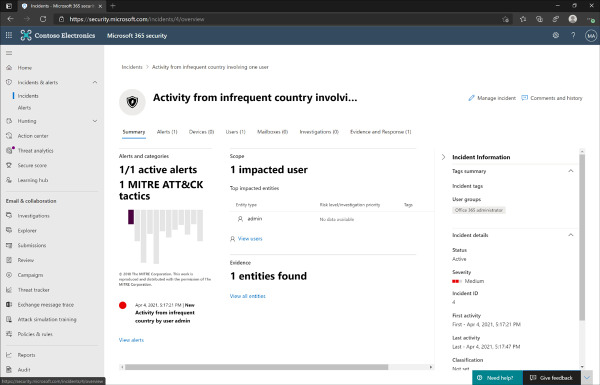
Figure 2-9 Incident summary
To manage the properties of the incident, click the Manage incident link from the summary tab. This will open a flyout window where you can change the properties of the incident, including:
Name You can change the display name of the incident from the default provided.
Incident tags Custom tags that can be assigned to the incident for reporting and tracking.
Assign to me A toggle to assign the incident to your user account for further investigation or management.
Resolve incident A toggle that marks whether the incident has been resolved and does not require further investigation.
Classification The classification value for the incident, which could be Not set, False alert, or True alert.
Comment A free text field that can be used to track investigation comments for later reporting or other administrators.
Automated incident investigations
If your organization is using Microsoft 365 Defender, you can take advantage of having a built-in analyst for the alerts and incidents that might occur in your environment. The automated investigation and remediation that is included with Microsoft 365 Defender provides some automated capabilities around for each alert, including:
Determining if an alert requires additional actions
Recommending or taking remeditation actions
Determining if additional investigation should occur
When an alert is generated and creates an incident, the automated investigation can come to a vedict about the alert. The three verdicts of an investigation are:
Malicious
Suspicious
No threats found
If an alert is found to be malicious or suspicious, some automatic remediation steps might be performed. Some of the more common actions include:
Sending a file to quarantine
Stopping a process on a managed device
Isolating a device from the network
Blocking a URL from being accessed
To configure automated investigation and response, there are a few prerequisites that the organization must meet to enable this configuration. Table 2-1 explains the various requirements for the tenant.
After you have verified that your organization meets the requirements, you can set the automation level for device groups. To configure the automation level, follow these steps.
Sign in to the Microsoft 365 Defender security center at https://securitycenter.windows.com.
Go to Settings.
Table 2-1 Automated investigation and response requirements
Requirement
Details
Subscription and license type
One of the following subscription and license types:
Microsoft 365 A5
Microsoft 365 E5
Microsoft 365 A5 Security
Microsoft 365 E5 Security
Office 365 E5 with Enterprise Mobility + Security E5, and Windows E5
Network requirements
Microsoft Defender for Identity enabled
Microsoft Cloud App Security configured
Microsoft Defender for Identity integration configured
Windows device requirements
Windows 10, version 1709 or later
Microsoft Defender for Endpoint
Micosoft Defender Antivirus
Protection for email content and Office files
Microsoft Defender for Office 365 configured
Permissions
Global Administrator
Security Administrator
Under Permissions, click Device groups.
For each device group, set the desired Remediation level. For example, the recommended setting is Full – remediate threads automatically. Figure 2-10 shows the setting configured for the Mobile Devices device group.
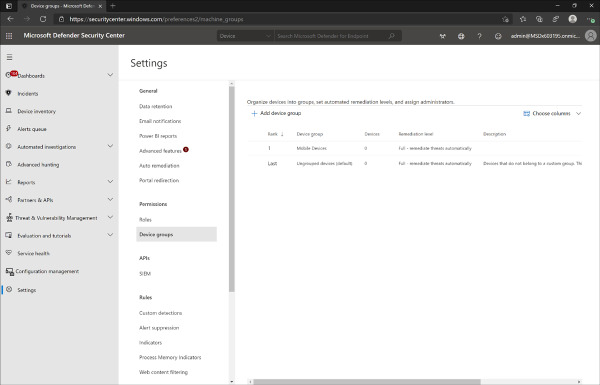
Figure 2-10 Microsoft Defender Security Center remediation level
Automated investigations appear in the Investigations tab of the incident. From this tab, you can view the conclusions and actions that the investigation resulted in.
Manage and review security alerts
In this section we work with alerts in the Office 365 Security & Compliance Center. The alerts available in this portal deal with user, administrator, and general Office 365 activity. These alerts are based on information contained in the Office 365 audit log. While you can review the audit logs to retrieve this information, creating an alert policy can ensure that you are notified about critical events. There are a handful of pre-defined alert policies that cover major events, such as a user account being elevated to Exchange administrator. New alert policies can also be created by an administrator to provide additional visibility around the Office 365 platform.
Plan for Office 365 alerts
Before you begin working with alerts in the Office 365 Security & Compliance Center, there are a few planning considerations that you need to be familiar with. These are the prerequisites for accessing managing Office 365 alerts.
Permissions The administrator that will be creating managing alerts must be granted the Organization Configuration role in the Office 365 Security & Compliance Center. This role is automatically granted to members of the Compliance Administrator and Organization Management role groups.
Audit logging Before you can start creating alerts, audit logging needs to be enabled for Office 365. Office 365 alerts are based on the information contained in the audit logs. To do this, navigate to the Office 365 Security & Compliance Center, select Alerts, then Alert policies. Select any one of the built-in alerts. On the alert policies settings you will be prompted to turn on auditing if it is not already enabled. Beyond these hard requirements, you should also create an action plan for implementation. This might include items such as who will be administering Office 365 alerts, who should be receiving notifications, and what items you need to create policies for.
Navigate Office 365 alerts
The alerts for Office 365 are visible in a few different formats, similar to the reports we saw with Azure AD Identity Protection. The first page we will look at is the Alerts dashboard. This can be accessed by signing in to the Office 365 Security & Compliance Center, clicking Alerts, and selecting Dashboard. Refer to Figure 2-11 for an example of what to expect when you access the dashboard. There are a few different resources available in this view.
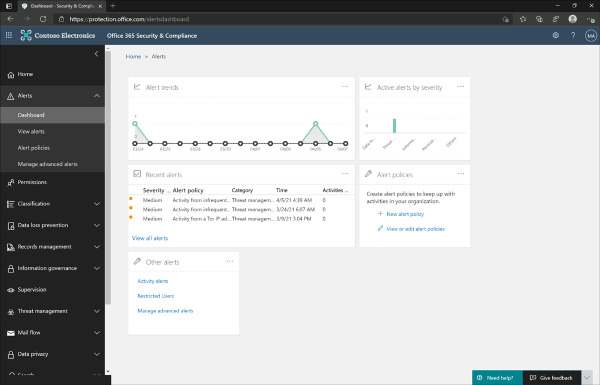
Figure 2-11 Office 365 Alerts Dashboard
Alert Trends The Alert Trends tile shows recent activity by count for each of the different alert categories. Hovering your mouse cursor over the report tile will summarize event accounts for each category. This tile does not have a drilldown view.
Active Alerts By Severity The Active Alerts By Severity tile provides summarizes active alerts by category and severity (low, medium, high). Hovering your mouse cursor over the report tile will summarize the event counts by severity. This tile does not have a drilldown view.
Recent Alerts The Recent Alerts tile provides a list of recent alerts, including Severity, Alert Policy, Category, Time, and Number Of Activities. Clicking any of the events on this tile will bring up a blade with additional details about the event. From there you can see additional information about that specific event. You also have controls to resolve, suppress, or notify users about the alert.
Alert Policies The Alert Policies tile provides helpful links to quickly create a new alert policy or manage the existing policies.
Other Alerts The Other Alerts tile provides helpful links to quickly create activity-based alerts, view restricted user accounts, and access advanced alert management.
It is worth noting that each of these tiles can also be pinned to the Office 365 Security & Compliance Center home page for quick reference. For situations where you need to browse all alerts, navigate to Alerts, then View Alerts. This page provides you with functionality to quickly filter all alerts, including those that have been resolved. Once you have isolated the alerts you need, you can also export them to CSV format from this page.
Configure Office 365 alert policies
The policy editor for Office 365 alerts enables you to create and manage additional custom alert policies. Through this interface you have access to all of the activities logged through auditing. In the following example we will walk through creating a policy that generates an alert when a user’s mailbox permissions are modified.
Sign in to the Office 365 Security & Compliance Center at https://protection.office.com.
From the Navigation bar on the left, click Alerts and select Alert Policies.
On the Alert policies page, click New Alert Policy.
On the Name Your Alert page, fill in the following information and click Next.
Name Change to mailbox permissions.
Description Generate an alert when mailbox permissions are modified.
Severity Medium.
Category Data loss prevention.
On the Create alert settings page, fill in the following information and click Next.
Activity Is Granted mailbox permission.
How Do You Want The Alert To Be Triggered? Every time an activity matches the rule.
On the Set your recipients page, fill in the following information and click Next.
Email Recipients Your email address.
Daily Notification Limit No limit.
On the Review your settings page, review the proposed policy as shown in Figure 2-12. Select the option Yes, Turn It On Right Away and click Finish.
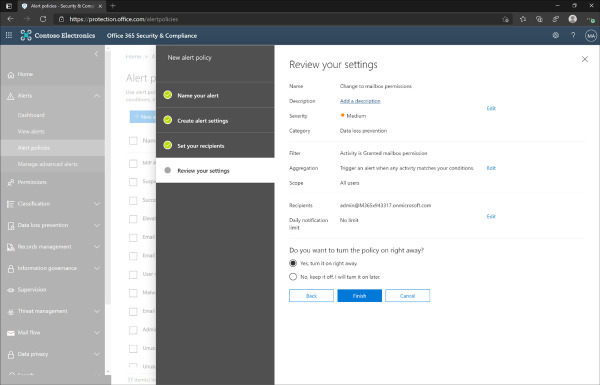
Figure 2-12 Office 365 Alerts - Alert Policy
Once the new alert policy has been applied you will start seeing associated events recorded in the Dashboard And Alerts page. The recipients that you configured in the policy will also begin receiving email notifications. These notifications will summarize each event and include a link that takes you back to the portal for further investigation.

 EXAM TIP