Mitigate threats using Azure Defender
- By Yuri Diogenes, Jake Mowrer, Sarah Young
- 9/24/2022
- Skill 2-1: Design and configure an Azure Defender implementation
- Skill 2-2: Plan and implement the use of data connectors for ingestion of data sources in Azure Defender
Skill 2-2: Plan and implement the use of data connectors for ingestion of data sources in Azure Defender
When you upgrade from Azure Security Center to Azure Defender, you can start monitoring the security posture of different cloud providers, including Amazon Web Service (AWS) and Google Cloud Platform (GCP). Ingesting data from these platforms is a mandatory step when you need to have visibility across different workloads located in multiple cloud providers. This section covers the skills necessary to plan and implement the use of data connectors for ingestion of data sources in Azure Defender according to the SC-200 exam outline.
Identify data sources to be ingested for Azure Defender
Azure Defender supports the integration of partner security solutions, such as vulnerability assessment by Qualys and Rapid7. It can also integrate with the Microsoft Azure Web Application Firewall on the Azure Application Gateway. The advantage of using this integration varies according to the solution. For vulnerability assessment, the agent can be provisioned using the license you already have for the product (Qualys or Rapid7). Follow these steps to access the Security Solutions dashboard:
Navigate to the Azure portal by opening https://portal.azure.com.
In the search bar, type security, and under Services, click Security Center.
In Security Center main dashboard, in the Management section, click Security Solutions. The Security Solutions page appears, as shown in Figure 2-7.
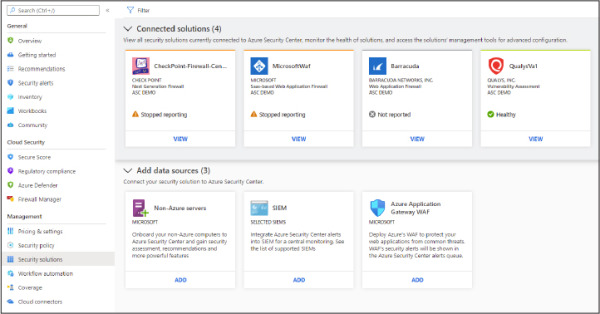
Figure 2-7 Security Solutions page with the connected solutions and available data sources
)
The Connected Solutions section is populated according to the solutions that were already deployed. The deployment of the solution will vary according to the vendor. For vulnerability assessment, you will deploy the agent based on the Azure Security Center recommendation indicating that your machine is missing a vulnerability assessment. The Add Data Source section of this page allows you to:
Onboard a non-Azure machine In this scenario, you will need to select the workspace in which the Log Analytics (LA) agent will report to, Then you will need to obtain the workspace ID and key, deploy the agent to the server, and configure it to use the workspace ID and key based on your workspace’s selection.
Connect to a SIEM platform In this scenario, you need to configure an Azure Event Hub, stream the data from Azure Defender to this Event Hub, and configure the SIEM to obtain the info from the Event Hub using a SIEM connector. The SIEM connector will vary according to the supported vendor (Splunk, ArcSight, QRadar, or Palo Alto). Keep in mind that you don’t need to use an Event Hub if you are connecting Azure Defender with Azure Sentinel. In this case, you just need to use the Azure Defender connector in Azure Sentinel.
Azure Web Application Firewall (WAF) In this scenario, the goal is to surface the Azure WAF logs in the Azure Defender Security Alerts Dashboard. Note that this integration only works for WAF v1.
Configure automated onboarding for Azure resources and data collection
PaaS-related resources in Azure don’t require an agent to work, which means that as long as you have the Azure Defender plan enabled on the subscription level, the subsequential resources will automatically have Azure Defender enabled on them. For example, if the technical requirement is to have Azure Defender for Storage enabled on all existing and new storage accounts, you just need to enable Azure Defender for Storage at the subscription level.
As mentioned earlier in this chapter, when dealing with Azure VMs (IaaS scenario), you will need to install the LA Agent. For Azure VMs, this agent can be auto-provisioned based on the auto-provisioning settings that were configured at the subscription level. To change these settings, follow these steps:
Open Azure portal and sign in with a user who has Security Admin privileges.
In the left navigation menu, click Security Center.
In the Security Center’s left navigation menu, under Management, click the Pricing & Settings option.
Click the subscription for which you want to review the auto-provisioning settings.
In the Settings section on the left, click Auto Provisioning. The Auto Provisioning settings appear, as shown in Figure 2-8.
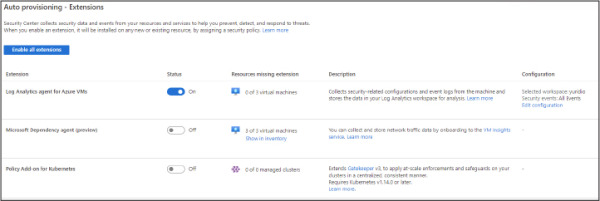
Figure 2-8 Auto Provisioning settings in Security Center
In the Configuration section for the Log Analytics Agent For Azure VMs, click Edit Configuration.
In the Extension Deployment Configuration blade shown in Figure 2-9, the default setting, Connect Azure VMs To The Default Workspace(s) Created By Security Center, allows Security Center to manage the workspace. Use this option if you can select another workspace to be used by Security Center. This is the preferred option when you have multiple subscriptions and want to centralize the workspace.
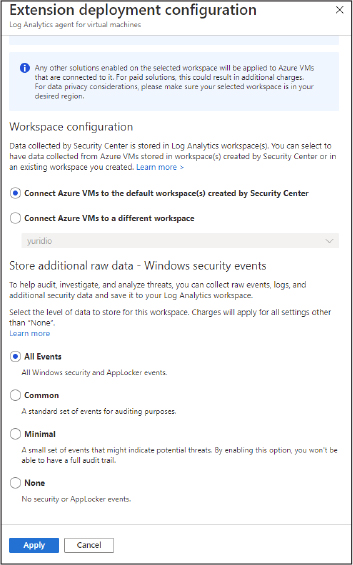
Figure 2-9 Options to control the workspace and data collection
)
In the Store Additional Raw Data section, you can configure the level of data collection granularity for Windows systems. Each setting will determine the type of events that will be collected. If you are using a Group Policy Object (GPO) to configure your servers where the agent will be installed, we recommended that you enable the Process Creation Event 4688 audit policy and the CommandLine field inside event 4688. Audit Process Creation determines whether the operating system generates audit events when a process is created (starts). Information includes the name of the program or the user who created the process. Following is a summary of what each option collects:
All Events If you select this option, all security events will be stored in your workspace.
Common When you select this option, only a subset of events will be stored in your workspace. Microsoft considers these events—including login and logout events—to provide sufficient detail to represent a reasonable audit trail. Other events, such as Kerberos operations, security group changes, and more, are included based on industry consensus as to what constitutes a full audit trail.
Minimal Choosing this setting results in the storage of fewer events than the Common setting, although we aren’t sure how many fewer events or what types of events are omitted. Microsoft worked with customers to ensure that this configuration surfaces enough events that successful breaches are detected and that important low-volume events are recorded. However, logout events aren’t recorded, so it doesn’t support a full user audit trail.
None This option disables security event storage.
To enable data collection for Adaptive Application Controls, Security Center configures a local AppLocker policy in Audit mode to allow all applications. This will cause AppLocker to generate events that are then collected and stored in your workspace. It is important to note that this policy will not be configured on any machines on which there is already a configured AppLocker policy. To collect Windows Filtering Platform Event ID 5156, you need to enable the Audit Filtering Platform Connection: Auditpol /set /subcategory:"Filtering Platform Connection" /Success:Enable.
Connect on-premises computers
As explained previously, VMs that are in Azure will be provisioned automatically, which means that the monitoring agent will be automatically installed. If you need to onboard on-premises computers, you will need to install the agent manually. Follow the steps below to onboard non-Azure computers or VMs:
Open Azure portal and sign in with a user who has Security Admin privileges.
In the left navigation menu, click Security Center.
In the Security Center’s left navigation menu, under General, click the Getting Started option and click the Get Started tab.
Under Add Non-Azure Computers, click the Configure button, as shown in Figure 2-10.
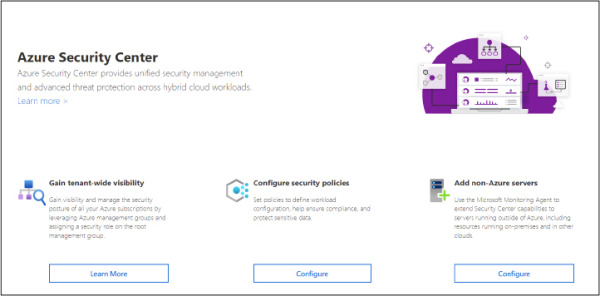
Figure 2-10 Option to onboard non-Azure computers
In the Add New Non-Azure Computers blade, select the workspace in which you want to store the data from these computers, and before onboarding any computer, make sure to click Upgrade to upgrade the Workspace to Azure Defender, as shown in Figure 2-11.
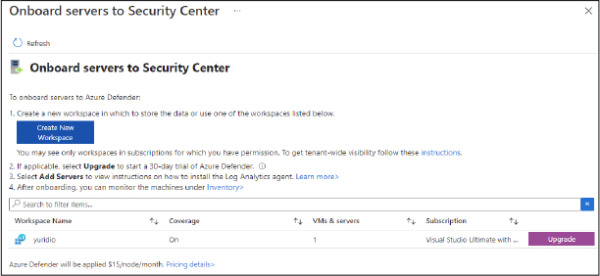
Figure 2-11 Upgrading the workspace to Azure Defender
If the Upgrade button did not change to + Add Servers, click the Refresh button, and you should see the + Add Servers button, as shown in Figure 2-12. Click Add Servers to proceed.

Figure 2-12 Adding servers to the workspace
Once you click the + Add Servers button, the Agents Management page appears, as shown in Figure 2-13.
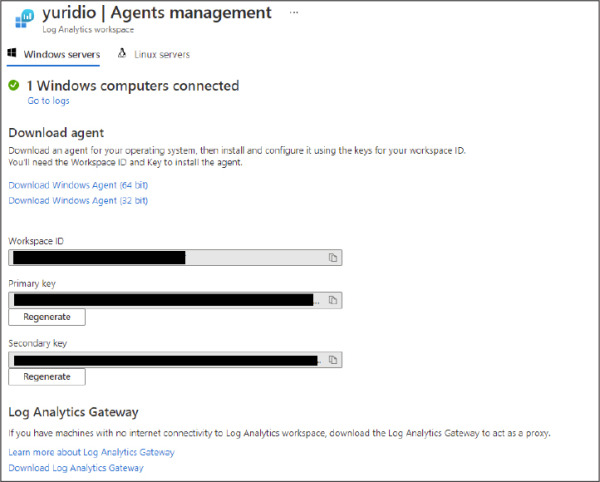
Figure 2-13 Agents Management
On this page, click the appropriate Windows agent (64-bit or 32-bit version). If you are installing the agent on a Linux operating system, click the Linux Servers tab and follow the instructions from there. Make sure to copy the Workspace ID and Primary Key values to the clipboard; you will need those values when installing the agent on the target system.
When you finish downloading it, you can close the Security Center dashboard (close your browser) and copy the agent installation file to a shared network location where the client can access it.
)
)
)
)
For this example, the agent installation will be done on an on-premises Windows Server 2016 computer, though the same set of procedures apply to a non-Azure VM located in a different cloud provider. Log in on the target system and follow the steps below to perform the installation:
Double-click in the MMASetup-AMD64.exe file, and if the Open File—Security Warning dialog appears, click Run.
If the User Access Control dialog appears, click Yes.
On the Welcome To The Microsoft Monitoring Agent Setup Wizard page, click Next.
Read the Microsoft License Terms and click I Agree.
In the Destination Folder page, leave the default selection and click Next. The Agent Setup Options page appears, as shown in Figure 2-14.
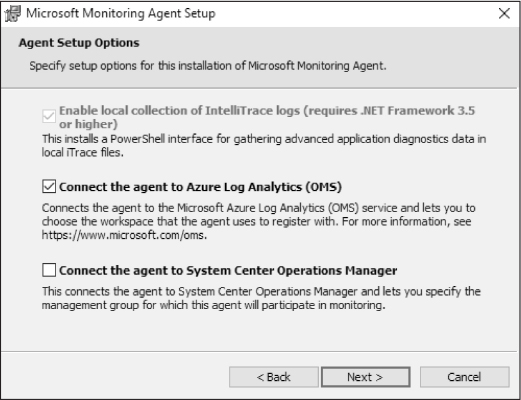
Figure 2-14 Selecting the target service
Select Connect The Agent To Azure Log Analytics (OMS), as shown in Figure 2-14, and click Next. The Azure Log Analytics page appears, as shown in Figure 2-15.
On this page, you need to enter the Workspace ID and Workspace Key that were obtained in step 8 of the previous procedure. Notice that the primary key should be entered in the Workspace Key field. If this computer is behind a proxy server, you need to click the Advanced button and provide the Proxy URL and authentication if needed. Once you finish filling in these options, click Next.

Figure 2-15 Providing the workspace ID and primary key
On the Microsoft Update page, select Use Microsoft Update For Updates (Recommended) and click Next.
On the Ready To Install page, review the summary field and click Install.
The Installing The Microsoft Monitoring Agent page appears, and the installation proceeds.
Once the installation is finished, the Microsoft Monitoring Agent Configuration Completed Successfully page appears. Click Finish.
)
You can also perform this installation using the command-line interface (CLI). Use the following code:
MMASetup-AMD64.exe /Q:A /R:N /C:"setup.exe /qn ADD_OPINSIGHTS_WORKSPACE=1 OPINSIGHTS_
WORKSPACE_AZURE_CLOUD_TYPE=0 OPINSIGHTS_WORKSPACE_ID=<yourworkspaceID> OPINSIGHTS_
WORKSPACE_KEY=<yourworkspaceprimarykey> AcceptEndUserLicenseAgreement=1"
Most of the parameters that you saw in the agent installation are self-explanatory. The only one that isn’t immediately obvious is the OPINSIGHTS_WORKSPACE_AZURE_CLOUD_TYPE parameter, which is the cloud environment specification. The default is 0, which represents the Azure commercial cloud. You should only use 1 if you are installing the agent in an Azure government cloud.
It can take some time for this new non-Azure computer to appear in Security Center. If you want to validate the connectivity between this computer and the workspace, you can use the TestCloudConnection tool. On the target computer, open the command prompt and navigate to the \Program Files\Microsoft Monitoring Agent\Agent folder. From there, execute the TestCloudConnection.exe command, and if the connectivity is working properly, you should see all tests followed by this message: Connectivity test passed for all hosts for workspace id <workspace id>.
Connect AWS cloud resources
For Azure Defender to connect with AWS, the target AWS account must have AWS Security Hub enabled on it. AWS Security Hub has a cost associated to it, which varies according to the number of accounts and regions where it is enabled.
Once the AWS connector is operational, you will start seeing security recommendations for AWS appearing in the Security Center Recommendations Dashboard. However, before configuring the AWS connector, you will need to: do the following:
Configure AWS Security Hub in the target account:
Enable AWS Config with the console.
Enable AWS Security Hub and confirm that there is data flowing to it.
Configure AWS authentication, which can be by creating these roles:
An IAM role for Security Center
An AWS user for Security Center
Regardless of the authentication method you selected previously, make sure that this role/user has the following permissions policies:
SecurityAudit
AmazonSSMAutomationRole
AWSSecurityHubReadOnlyAccess
When configuring the Account ID in AWS, make sure to use this Microsoft Account ID: 158177204117.
With those steps in place, you are ready to configure the Cloud Connector. If you also want to onboard servers that are in AWS, you will need to ensure that the following three tasks are done before configuring the cloud connector in Azure Defender:
Install the AWS Systems Manager on your Servers (EC2 instance) that reside in AWS. For instructions, see http://aka.ms/ascbookaws.
Configure this Server (EC2 Instance) to use Azure Arc. For instructions, see http://aka.ms/ascbookarc.
In Azure, make sure to create a service principal that will be used for Azure Arc. To configure that service principal, follow the steps from this article: http://aka.ms/ascbookspn.
Now that all prerequisites are fulfilled, you can follow the steps below to start the configuration of the AWS connector in Security Center:
Open Azure portal and sign in with a user who has ownership privileges in the subscription.
In the left navigation menu, click Security Center.
In the Security Center’s left navigation menu, under Management, click the Cloud Connectors option and click the Connect AWS Account button. The Connect AWS Account page appears, as shown in Figure 2-16.
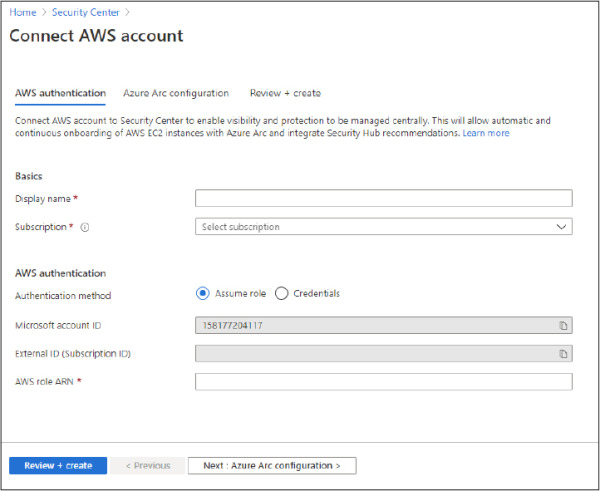
Figure 2-16 Connect AWS Account
In the Basics section, type a Display Name for the connector and select the appropriate Subscription from the drop-down menu.
In the AWS Authentication section, use the appropriate method (Assume Role if you created a role or Credentials if you created a user). Assuming that you created a role, the AWS Role ARN must be provided. This number is located in the summary of the role you created in AWS. Click the Next: Azure Arc Configuration button, and the Azure Arc Configuration tab appears, as shown in Figure 2-17.
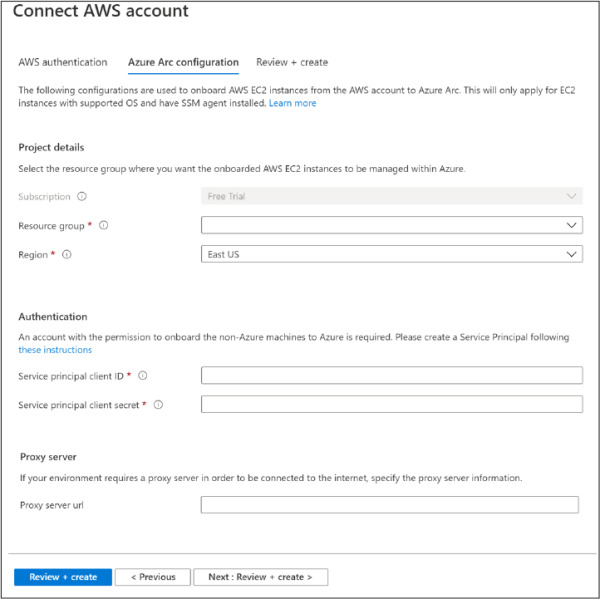
Figure 2-17 Configuring Azure Arc settings
Select the Resource Group and Region.
In the Authentication section, you need to provide the Service Principal Client ID and the Service Principal Client Secret.
Click the Review + Create button and complete this operation.
Once you finish, you will see the connector, as shown in Figure 2-18.
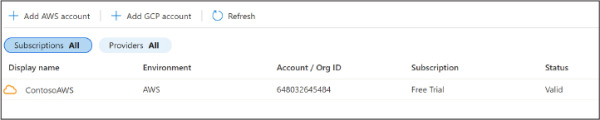
Figure 2-18 AWS connector configured
)
)
)
)
)
After some time, you will be able to see recommendations for your AWS account. In the search box, you can type AWS, and you will see all AWS-related recommendations, as shown in Figure 2-19.
)
Figure 2-19 AWS-related recommendations
At this point, your Azure Arc machines will be discovered, but you still need to install the Log Analytics agent on those machines. There is a specific recommendation for that, as shown in Figure 2-20.
)
Figure 2-20 Recommendation to install the Log Analytics agent on the Azure Arc machine
You can leverage the Quick Fix feature to deploy the agent to this Azure Arc machine quickly. You just need to select the server and click the Remediate button. As mentioned in the freshness interval description, it might take 24 hours for this remediation to take effect.