Managing and sharing 365 files
- By Joe Habraken
- 3/3/2022
- Understanding 365 file formats
- Configuring save file options
- Saving files as different file types
- Creating and managing files
- Searching for 365 files
- Protecting a 365 file
- . . . . .Preparing a file for sharing
Saving files as different file types
When you create a new Word document, Excel workbook, or PowerPoint presentation, you eventually need to save your work to a file. As already mentioned, each of these applications uses the open XML file format by default. So, if you save a new Word document and do not change the Save As Type setting, you get a file with the extension .docx (the open XML format for Word).
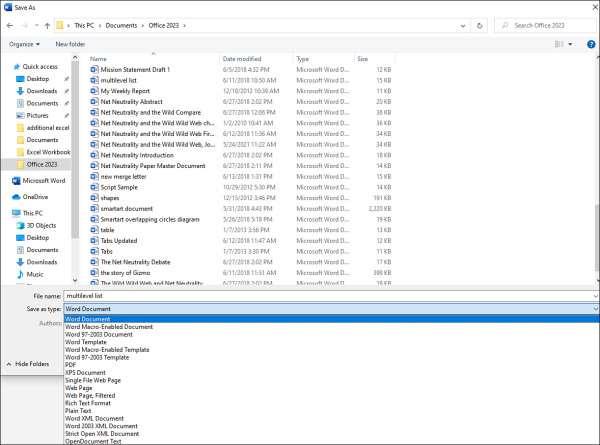
When you save a file for the first time, the Save As dialog box opens. At a minimum, you must provide a file name for the new file, and you have the option of specifying the location where the file will be saved. You also have control over the file type used when the file is saved. You can select the file type in the Save As Type drop-down menu. Figure 3-2 shows the Word Save As dialog box with the Save As Type drop-down menu selected.

Figure 3-2 Selecting the file type for a Word document
After selecting the file type, click Save. When you have saved the file for the first time, use the Save button on the application’s Quick Access Toolbar to save the changes that you make as you add to and edit the document.
You can also convert an existing file to another file type by using the Save As dialog box. After you save a file, the only route to the Save As dialog box is via the application’s Backstage. Follow these steps to open the Save As dialog box for a previously saved file:
Select File to access the Backstage.
Select Save As. The Backstage Save As page opens.
Select a place (location) to save the file on the left side of the Save As page. You can choose from This PC and cloud places such as your OneDrive or a network drive. You can also choose from existing Windows folders, such as Documents, Desktop, and Downloads.
Select Browse to choose your location and open the Save As dialog box.
In the Save As dialog box, use the Save As Type drop-down menu to specify the file type for the file.
You also have the option of changing the name and location for the newly created file.
Click Save. The Save As dialog box closes.
The file is saved using the new file format you selected. The file has a new name and save location if you changed these settings in the Save As dialog box.
Converting files to different file types
Save As gives you the capability to change a file’s current file type to another file type. Another avenue for converting a particular file to a different file type is the Export page in the Backstage. You can access this page by selecting File and then selecting Export.
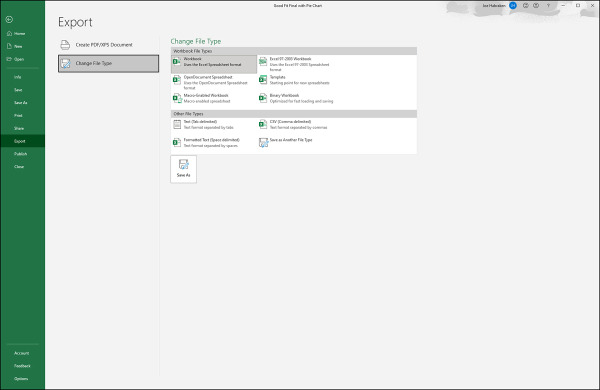
The Export page provides two possibilities: Create PDF/XPS Document and Change File Type. By default, the Create PDF/XPS Document is selected on the Export page, so to quickly create a PDF or XPS “copy” of the current file, click the Create PDF/XPS button. When the Publish As PDF Or XPS dialog box opens, it looks much like the Save As dialog box. By default, the file is saved as a PDF, but you can switch to XPS using the Save As Type drop-down menu. Specify a location file name, and then select Publish to save the PDF (or XPS) file.
The Export page also provides the Change File Type pane, which is accessed by selecting Change File Type on the left side of the Export page. The Change File Type pane makes changing the file type less confusing than just picking a file type from the Save As Type drop-down menu in the Save As dialog box. File types are visually represented in the Change File Type pane, and short descriptions of each file type are provided. Figure 3-3 shows the Excel Change File Type pane in the Backstage.

Figure 3-3 The Export page and the Excel Change File Type pane
To create a copy of the current file in a new file type, select one of the alternative file types provided in the Change File Type pane. For example, you might want to save an Excel workbook that is currently in the Excel .xlsx file format (the default) to the Excel 97–2003 workbook file type (.xls) so that you can share the file with a colleague who uses an earlier version of Excel.
Select the new file type in the Change File Type pane, and the Save As dialog box opens. The file type that you chose in the Change File Type pane is selected in the Save As Type drop-down menu. You can change the file name or the file location as needed and then click Save to save a copy of the original file in the file type.
Although going directly to the Save As dialog box via the Backstage Save As command might seem to be a faster option than getting to the Save As dialog box via the Change File Type pane, the latter option does a better job of laying out the possibilities. Until you have a good feel for which file type is which on the Save As Type drop-down menu in the Save As dialog box, use the Change File Type pane as an aid to select the appropriate file type for the file. Obviously, “appropriate” depends on what you are going to do with the file in its alternative file type.
