Manage policies and profiles
- By Andrew Bettany and Andrew Warren
- 11/29/2021
- Skill 2.1: Implement compliance policies for devices
- Skill 2.2: Configure device profiles
Skill 2.2: Configure device profiles
Administrators can implement mobile device management (MDM) functionality using Microsoft Intune or, to a more limited extent, with Basic Mobility and Security for Microsoft 365. In addition to managing settings on iOS and Android mobile devices, MDM allows you to configure policies that control settings on any Windows 10 device, such as desktop PCs and laptops.
Administrators can now manage devices from the cloud using an MDM solution such as Intune. By removing the traditional domain-based constraints that are often imposed on devices, MDM allows new management and device functionality to be used. You need to understand how devices enrolled into Azure Active Directory and Intune can be cloud-managed. Also, you need to understand how you can plan and use profiles and policies to configure devices, control user access, and set device settings to comply with company security and compliance policies.
Plan device profiles
When planning how your organization will use MDM to manage your devices, there are several areas that you should include in your scope.
Intune uses Azure Active Directory (Azure AD) for authentication, and if you already have a local Active Directory Domain Services (AD DS) environment, you can connect the two identity services using a tool called Azure AD Connect. If you use Configuration Manager and Intune, you can manage devices by implementing a co-management solution.
The two common elements to modern management are your users and the device or devices that they use. In a traditional environment, an administrator will retain full control of a user’s computing environment, including the user’s desktop, by using Configuration Manager or Group Policy. This can be restrictive for the user, but it provides the strictest level of control for the administrator. Using Intune, a similar level of control is possible. Also, the cloud-based nature of Intune can be especially useful for devices that are beyond the management scope of Group Policy, such as in the following scenarios:
Devices that are not domain members
Mobile phones
Windows 10 devices that are joined to Azure AD only
Devices that are used entirely remotely and without access to VPN solutions
Intune provides excellent features for managing devices that connect to your corporate data, allowing you to remain compliant with your corporate security and compliance requirements. All enrolled devices can be forced to comply with the device configuration policies you have defined.
MDM refers to the management of mobile devices and can be used to manage smartphones, laptops, and PCs. The Open Mobile Alliance (OMA) developed a set of platform-independent device management protocols to define the MDM specification. The MDM protocol is supported by modern devices.
Microsoft Intune allows you to manage your devices in an MDM solution that includes settings and features that you can enable or disable on a variety of mobile devices. Microsoft has built the MDM functionality into PCs running Windows 10, which allows Intune to fully manage Windows 10 as though it is a mobile device. The full list of platforms supported by Intune through device enrollment is as follows:
Apple
Apple iOS 12.0 and later
Apple iPadOS 13.0 and later
Mac OS X 10.13 and later
Android 5.0 and later, including Samsung KNOX Standard 2.4 and higher
Android Enterprise
Microsoft
Windows 10 (Home, S, Pro, Education, and Enterprise versions)
Windows 10 Enterprise 2019 LTSC
Surface Hub
Windows 10 1709 (RS3) and later, Windows 8.1 RT, PCs running Windows 8.1 (Sustaining mode)
Windows 10 Teams (Surface Hub)
Windows Holographic for Business
Windows 10 IoT Enterprise (x86, x64)
Because of the variety of platforms and devices, not all settings and features are available to be configured on every device platform. You should review the settings and features that you can add to a configuration profile for the different devices and different platforms that you use—or plan to use—in your organization.
You can view the most common device profiles in Table 2-5. Profile features are available on supported devices, indicated with an X.
The number and scope of the built-in device settings that are supported by Intune continues to grow as more organizations provide feedback to Microsoft requesting additional support for new scenarios. For each new Windows 10 version, there will be new MDM functionality added to the built-in MDM client to reflect new features that ship with that version of Windows 10.
In Table 2-5, the last item relates to creating custom Open Mobile Alliance Uniform Resource Identifier (OMA-URI) profiles. Custom profiles allow you to create and use device settings and features that aren’t natively built into Intune. If a setting or feature is supported on devices in your organization, you should be able to create a custom profile that sets the same feature for every device by using OMA-URI settings.
TABLE 2-5 Common Intune device configuration profiles
Profile |
Description |
Android |
Android enterprise |
iOS |
mac OS |
Windows 10 |
|---|---|---|---|---|---|---|
Manages Exchange ActiveSync settings on devices. |
X |
X |
X |
X |
||
Device restrictions |
Prevents device usage, such as disabling the built-in camera, connecting to Bluetooth devices, or using cellular data. |
X |
X |
X |
X |
X |
WiFi |
Allows you to manage wireless network settings for users and devices. In Windows 10, managing settings for users allows them to connect to corporate WiFi without having to configure the connection manually. Instead, users can import a configuration that was previously exported from another device. |
X |
X |
X |
X |
X |
Administrative Templates |
Allows you to manage hundreds of settings for Microsoft Edge, OneDrive, Remote Desktop, Word, Excel, and other Microsoft Office programs for Windows 10 devices. Administrative Templates provide a simplified view of settings similar to group policy. Windows 10 Version 1703 and later. |
X |
||||
Kiosk |
Allows you to configure a device to run one or multiple apps, such as a web browser. This feature supports Windows 10, and kiosk settings are also available as device restrictions for Android, Android Enterprise, and iOS devices. |
X |
X |
X |
X |
|
VPN |
Configures VPN settings for devices. This feature supports the following:
|
X |
X |
X |
X |
X |
Education |
Configures options for the Take a Test app in Windows 10. iOS uses the iOS Classroom app. |
X |
X |
|||
Certificates |
Allows you to configure trust and other certificates used for WiFi, VPN, and email profiles. |
X |
X |
X |
X |
|
Edition upgrade |
Allows you to permit users to upgrade some versions of Windows 10. |
X |
||||
Endpoint protection |
Configures settings for BitLocker and Windows Defender. |
X |
||||
Windows Information Protection |
Allows you to configure Windows Information Protection for data loss prevention. |
X |
||||
Custom profile |
Custom settings allow administrators to assign device settings that aren’t built into Intune. These use the Open Mobile Alliance Uniform Resource Identifier (OMA-URI) values for Android and Windows devices. For iOS devices, you can import a configuration file you created in the Apple Configurator or Apple Profile Manager. |
X |
X |
X |
X |
X |
Implement device profiles
A device profile allows you to add and configure settings that can then be deployed to devices enrolled in management within your organization. Once the device receives the device profile, the features and settings are applied automatically.
To create a device profile for Windows 10 devices that will configure BitLocker Drive Encryption for enrolled devices, follow these steps:
Sign into the Microsoft Endpoint Manager admin center at https://endpoint.microsoft.com as a global administrator.
Select Devices, and then under Policy, click Configuration profiles.
On the Configuration profiles blade, click Create profile.
On the Create a profile blade, under Platform, select Windows 10 and later; under Profile type, select Templates.
Under Template name, select Endpoint protection and click Create.
On the Endpoint protection page, enter the following properties:
Name Enter a descriptive name for the profile.
Description Enter a description for the profile.
Click Next.
Under Configuration settings, click Windows Encryption.
Under Windows Settings, to the right of Encrypt Devices, click Require, as shown in Figure 2-4.
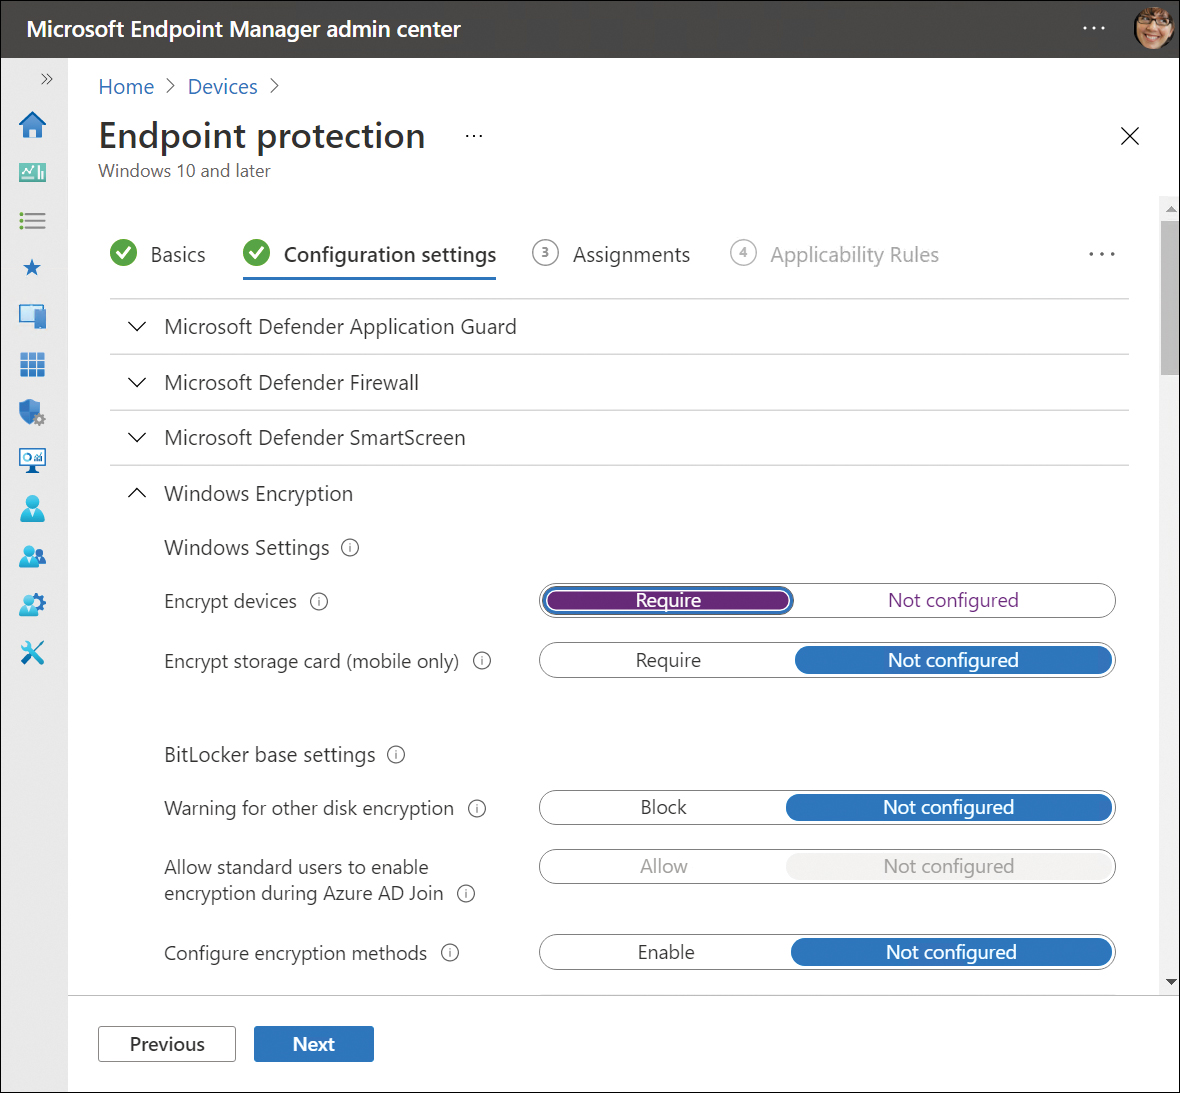
Figure 2-4 Configure device configuration policy
Review the other settings within this blade and then click Next.
On the Assignments blade, assign the policy to users, devices, or groups and then click Next.
On the Applicability Rules blade, review the settings and then click Next.
On the Review + create blade, review the summary and then click Create.
)
The device configuration profile policy is created and is shown in the configuration profiles list.
Deploy Administrative Template Profiles
In addition to using built-in configuration profiles and custom profiles, Windows 10 allows you to expand the current set of built-in policies by using Administrative Templates. The Administrative Templates use Group Policy ADMX-backed policies and allow administrators the ability to implement GPO settings via Intune for both user and device targets. The current functionality adds hundreds of popular settings to Intune.
To create a template for a Windows 10 device using Administrative Templates, follow these steps:
Sign into the Microsoft Endpoint Manager admin center at https://endpoint.microsoft.com as a global administrator.
Select Devices, and then under Policy, click Configuration profiles.
On the Configuration profiles blade, click Create profile.
On the Create a profile blade, under Platform, select Windows 10 and later; under Profile type, select Templates.
Under Template name, select Administrative Templates and click Create.
On the Create profile page, enter the following properties:
Name Enter a descriptive name for the profile.
Description Enter a description for the profile.
Click Next.
Under Configuration settings, use the search bar at the top to search for a setting or select a setting folder name to reveal the settings available.
Select a setting; for example, select Allow users to connect remotely by using Remote Desktop Services (see Figure 2-5). Choose Enabled, Disabled, or leave the setting as Not configured (default) and select OK.
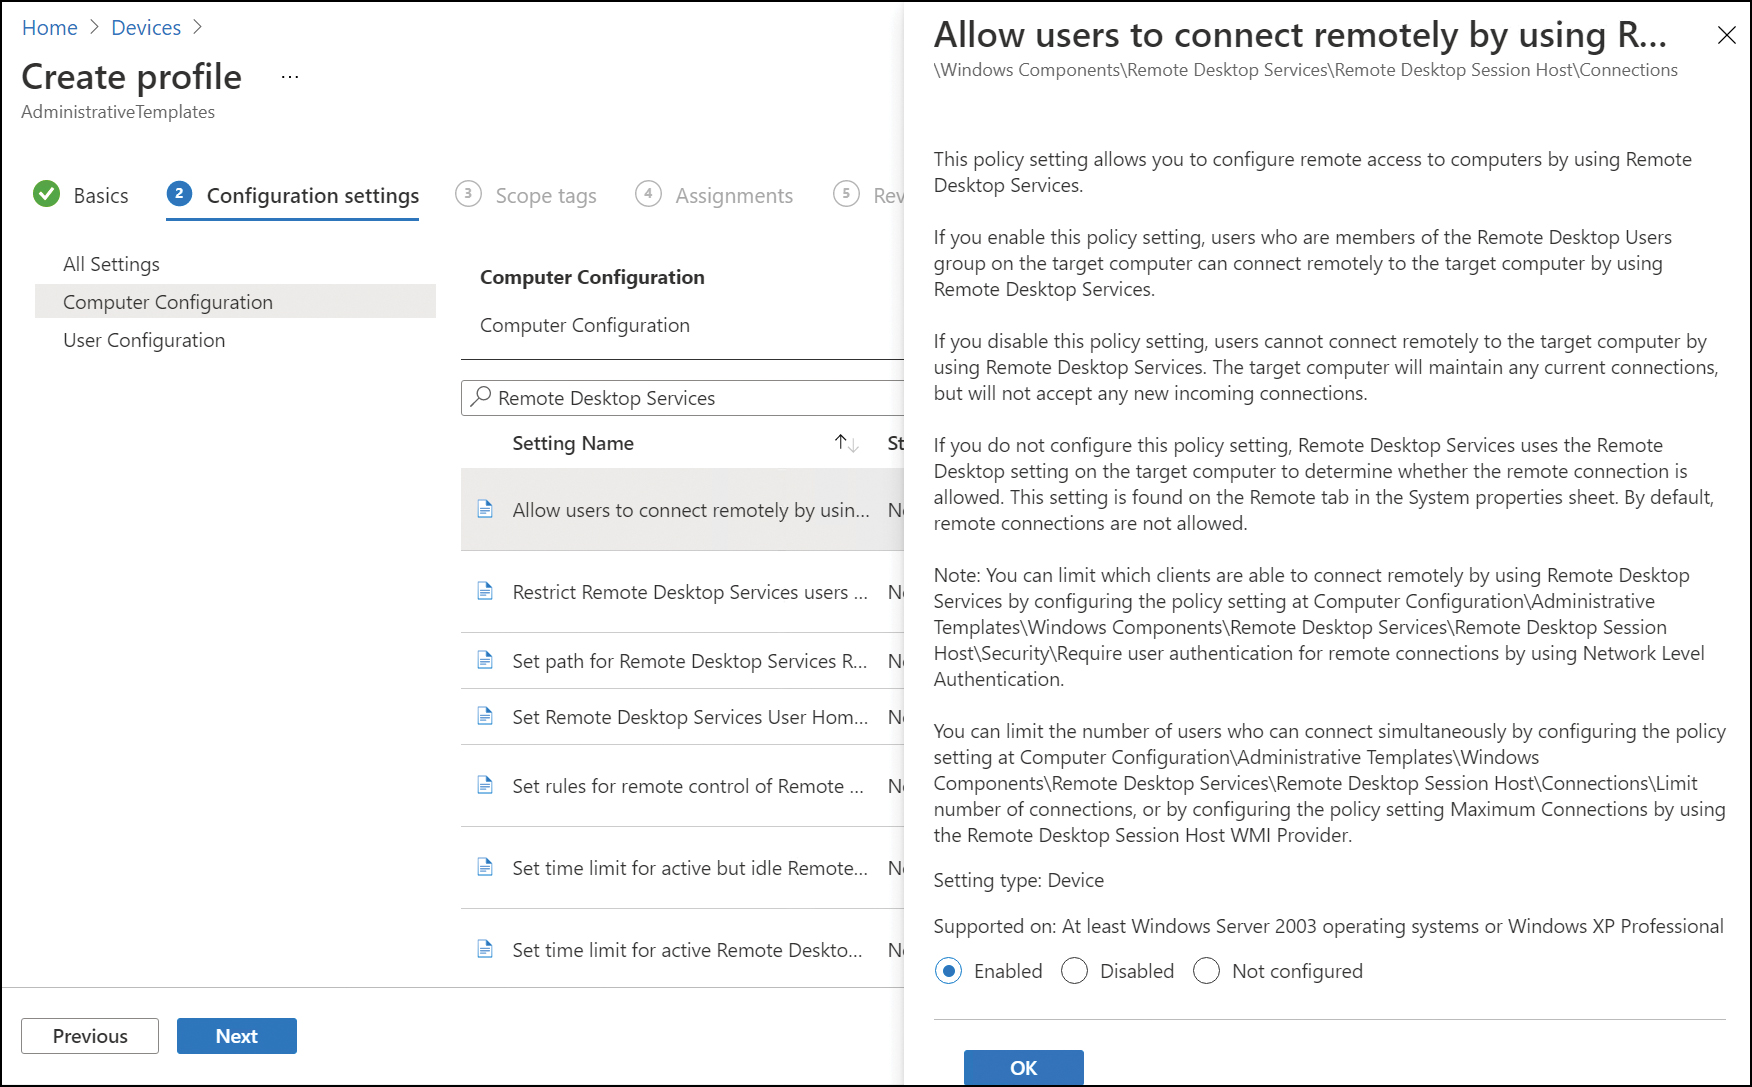
Figure 2-5 Configure Administrative Template profiles
Under Configuration settings, click Next.
On the Scope tags blade, allocate scope tags as required and then click Next.
On the Assignments blade, assign the policy to users, devices, or groups and then click Next.
On the Review + create blade, review the summary and then click Create.
)
The device configuration profile policy is saved and is shown in the configuration profiles list.
For the Administrative Template profile to be applied to an enrolled device, you need to assign the profile to users or devices using Azure AD groups. This is covered in the “Manage device profiles” section of this chapter.
Deploy PowerShell scripts in Intune
For Windows 10 devices (excluding Windows 10 Home), you can upload PowerShell scripts in Intune, which can then be run on Windows 10 devices. Intune includes a management extension, which facilitates adding PowerShell scripts. In addition to the Windows 10 version, you must also enable automatic MDM enrollment in Azure AD, and devices must be auto enrolled to Intune. Deployment of PowerShell scripts using Intune is supported for all enrolled Windows 10 devices that are Azure AD–joined, Hybrid Azure AD domain–joined, or co-managed.
The Intune management extension has the prerequisites outlined in Table 2-6.
TABLE 2-6 Intune management extension prerequisites
Requirement |
Prerequisite |
|---|---|
Windows 10 version |
Windows 10 version 1607 or later. If the device is enrolled using bulk auto-enrollment, then the device must use Windows 10 version 1709 or later. Not supported on Windows 10 in S mode. |
Directory joined devices |
Allows Hybrid Azure AD-joined and on-premises Active Directory joined. Azure AD registered/Workplace joined including Bring Your Own Device (BYOD) devices. |
Devices enrolled in Intune |
Devices enrolled in a group policy (GPO). Devices enrolled in Intune, via auto-enrollment. Users enrolled their device using their Azure AD account. Co-managed devices that use Configuration Manager and Intune. |
When you choose to run a PowerShell script using Intune, there are three script settings, as shown in Table 2-7.
TABLE 2-7 PowerShell script runtime settings
Setting |
Description |
|---|---|
Run This Script Using The Logged-On Credentials |
By default, the script will run in the system context. Optionally, this can be modified to run the script with the user’s credentials on the device. |
Enforce Script Signature Check |
By default, the signature check is not enforced. If there is a requirement for the script to be signed, you can choose to enforce the signature check, and the script must be signed by a trusted publisher. |
Run Script In 64-Bit PowerShell Host |
By default, the script is run in a 32-bit PowerShell host. Optionally, you can choose to run the script in a 64-bit PowerShell host on a 64-bit client. |
For example, you can create a PowerShell script that installs a Win32 app to your Windows 10 device. This scenario involves the following stages:
Write a PowerShell script to install the Win32 app.
Upload the script to Intune as a Device Configuration profile.
Configure the script runtime settings.
Assign the script to an Azure AD group of users or devices.
The script runs on the assigned group.
You can then use Intune to monitor the run status of the script.
To create a PowerShell script policy, follow these steps:
Sign into the Microsoft Endpoint Manager admin center at https://endpoint.microsoft.com as a global administrator.
Select Devices, and then under Policy, click Scripts.
On the Scripts blade, click Add and select Windows 10.
On the Add Powershell script blade, enter the following properties in the Basics tab:
Name Enter a descriptive name for the script.
Description Enter a description for the script.
Click Next.
Under Script settings, as shown in Figure 2-6, enter the following properties:
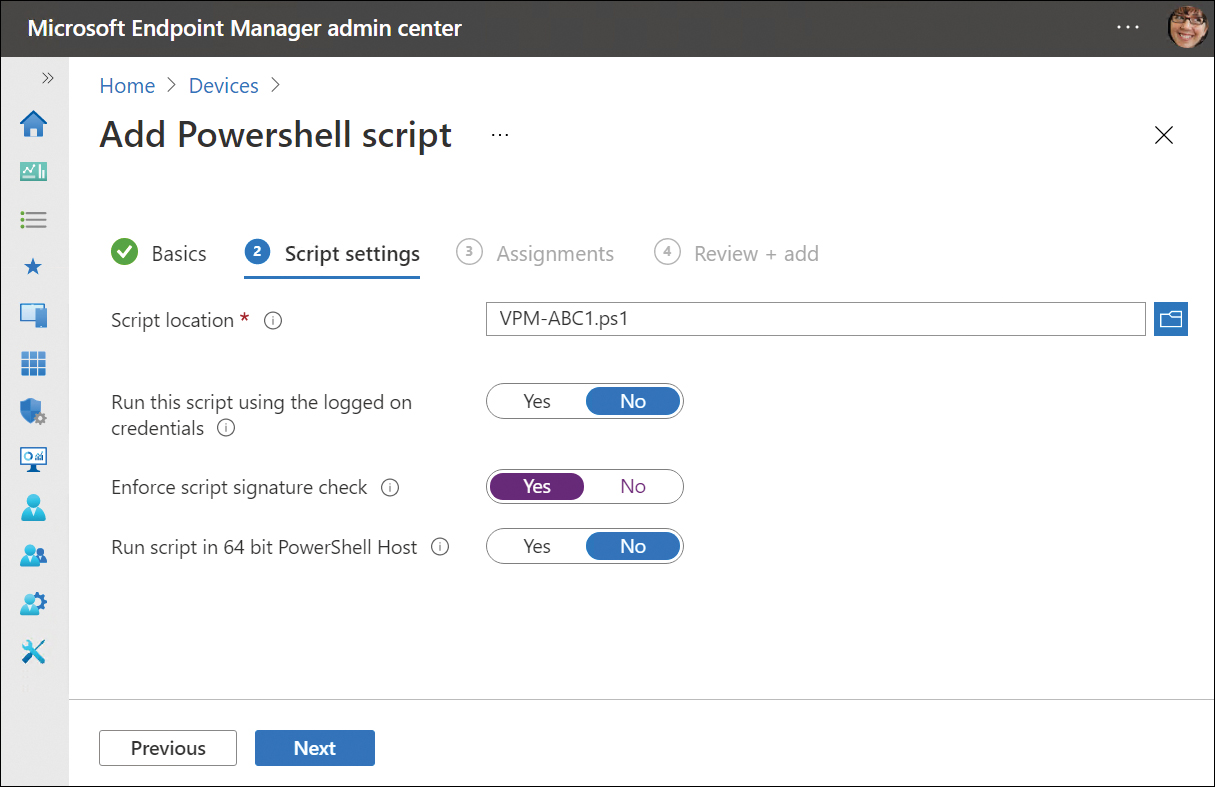
Figure 2-6 Add PowerShell script
Script location: Browse to the PowerShell script. The script must be less than 200 KB (ASCII).
Run this script using the logged-on credentials: Select Yes to run the script with the user’s credentials on the device, or choose No (default) to run the script in the system context.
Enforce script signature check: Select Yes or No (default).
Run script in 64-bit PowerShell host: Select Yes to run the script in a 64-bit PowerShell host or select No (default) to run the script in a 32-bit PowerShell host.
Click Next.
On the Assignments blade, assign the policy to users, devices, or groups and then click Next.
On the Review + add blade, review the summary and then click Create.
)
Once you have uploaded a PowerShell script to Intune, the management extension client checks with Intune for any new PowerShell scripts or changes; this check is done once every hour and after every reboot. After the PowerShell script has been executed on a targeted device, the PowerShell script is not executed again unless there’s a change in the script or policy.
Manage device profiles
For a device profile to be applied to an enrolled device, you need to assign the profile to users or devices using Azure (Azure AD) groups.
To assign a device profile using Azure (Azure AD) groups, follow these steps:
Sign into the Microsoft Endpoint Manager admin center at https://endpoint.microsoft.com as a global administrator.
Select Devices.
Under Policy, select Configuration profiles.
In the list of configuration profiles, if a profile has been assigned, there will be a Yes status under the Assigned column in the list of profiles.
Select the profile that you want to assign or modify the existing assignment.
On the Device configuration profile page for your profile, under Manage, select Properties.
On the Properties page, next to Assignments, select Edit.
You can now choose to modify the Included groups or the Excluded groups. To select Azure AD groups, you can select Add groups and then select the Azure AD groups, as shown in Figure 2-7. You can select multiple groups by selecting them one at a time, and they will be added to the list of Selected items. Alternatively, rather than selecting each individual group, you can also choose from two predefined groups:
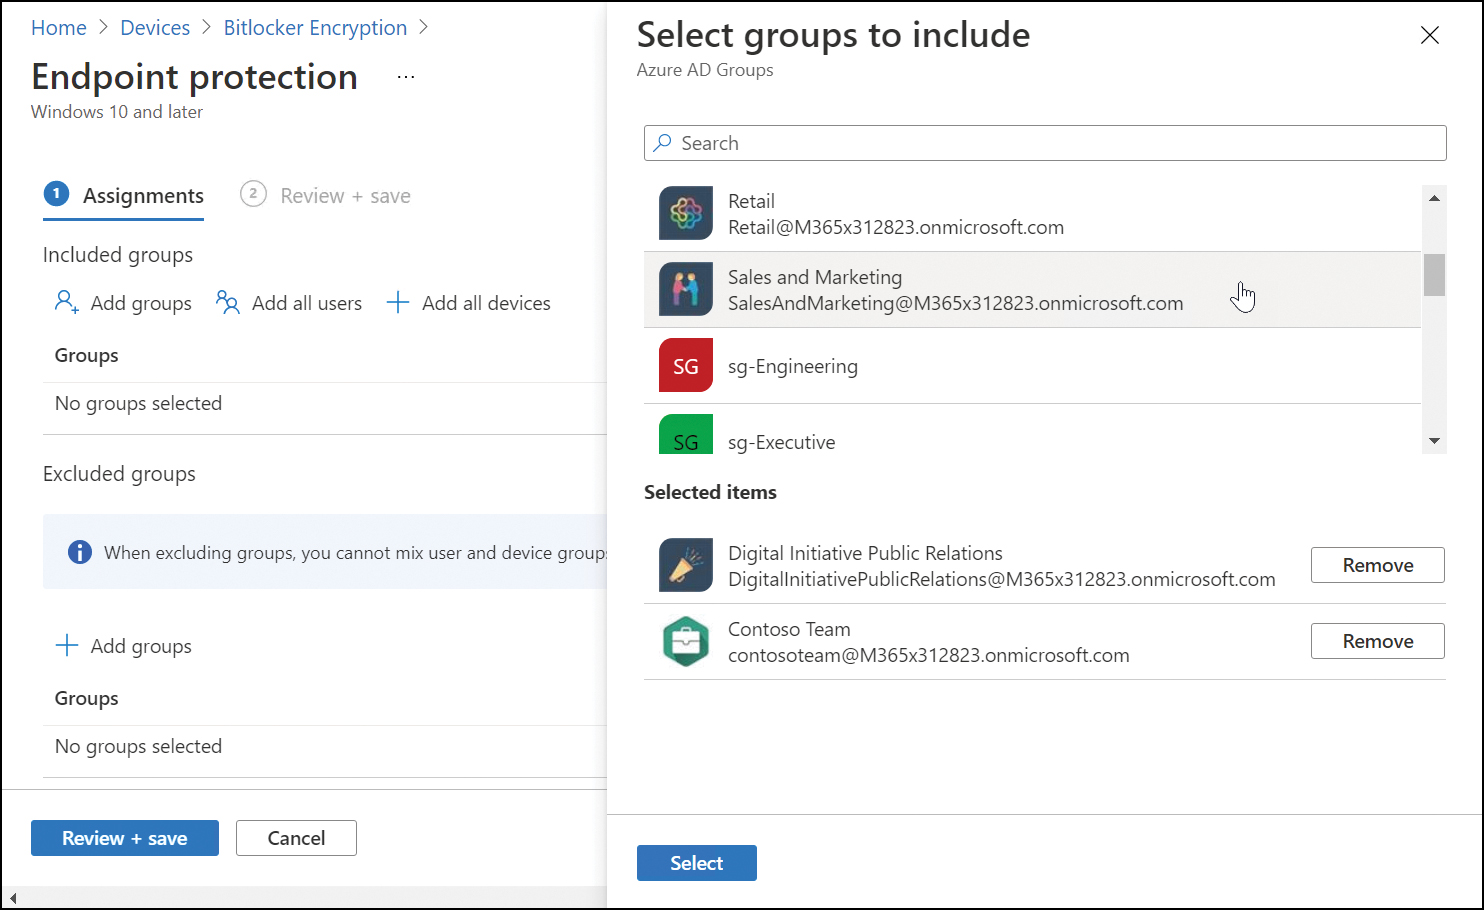
Figure 2-7 Assign a device configuration profile to Azure AD groups
All Devices
All Users
Click Select.
On the Assignments page, click Review + save, and then click Save.
)
You can also exclude groups from policy assignment by using the Exclude tab, as shown in Figure 2-7. Care should be taken to ensure that the assignment outcome is as desired.
Policy refresh cycle times
The refresh cycle for device configuration policies is the same as the compliance profiles, which can be found in Table 2-8.
TABLE 2-8 Compliance policy refresh cycle
Platform |
Initial Estimated Check-in Frequency |
Ongoing Refresh Cycle |
|---|---|---|
iOS |
Every 15 minutes for 6 hours, and then every 8 hours |
About every 8 hours |
macOS |
Every 15 minutes for 6 hours, and then every 8 hours |
About every 8 hours |
Android |
Every 3 minutes for 15 minutes, then every 15 minutes for 2 hours, and then every 8 hours |
About every 8 hours |
Windows 10 (enrolled as a device) |
Every 3 minutes for 15 minutes, then every 15 minutes for 2 hours, and then around every 8 hours |
About every 8 hours |
Windows 8.1 |
Every 5 minutes for 15 minutes, then every 15 minutes for 2 hours, and then around every 8 hours |
About every 8 hours |
Scope tags
When you create Intune policies, and after you add the settings, you can also add a scope tag to the profile. Scope tags are used to assign and filter policies to specific groups, such as your marketing team or sales employees.
You can also use scope tags to provide admins with the right level of access and visibility to objects in Intune. In this scenario, you would combine Azure AD role-based access control (RBAC) and scope tags. The role determines what access admins have to which objects, and the scope tags determine which objects admins can see.
To add a scope tag to a policy, you must have already created the tag. To add a scope tag, follow these steps:
Sign into the Microsoft Endpoint Manager admin center at https://endpoint.microsoft.com as a global administrator.
Select Tenant administration and then choose Roles.
On the Tenant admin blade, choose Roles.
On the All Roles blade, choose Scope (Tags) and then click Create.
On the Basics page, provide a Name and optional Description. Choose Next.
On the Assignments page, choose the groups containing the devices that you want to assign this scope tag. Choose Next.
On the Review + create page, review the settings and then choose Create.
The scope tag is created and appears in the list of Scope (Tags).
To add a Scope Tag to a Configuration Profile
Once you have created one or more scope tags, you can add them to your device configuration profile using these steps:
Sign into the Microsoft Endpoint Manager admin center at https://endpoint.microsoft.com as a global administrator.
Select Devices.
Under Policy, select Configuration profiles.
In the list of configuration profiles, if a profile has been created, select the profile to which you want to add a scope tag or modify the scope tags.
On the Device configuration profile page for your profile, under Manage, select Properties.
On the Properties page, next to Scope tags, select Edit.
You can now choose to remove the Scope tags or modify the tags by clicking Select scope tags.
On the Select tags blade, under Name, choose the scope tag(s) that you want to add to the profile, as shown in Figure 2-8.
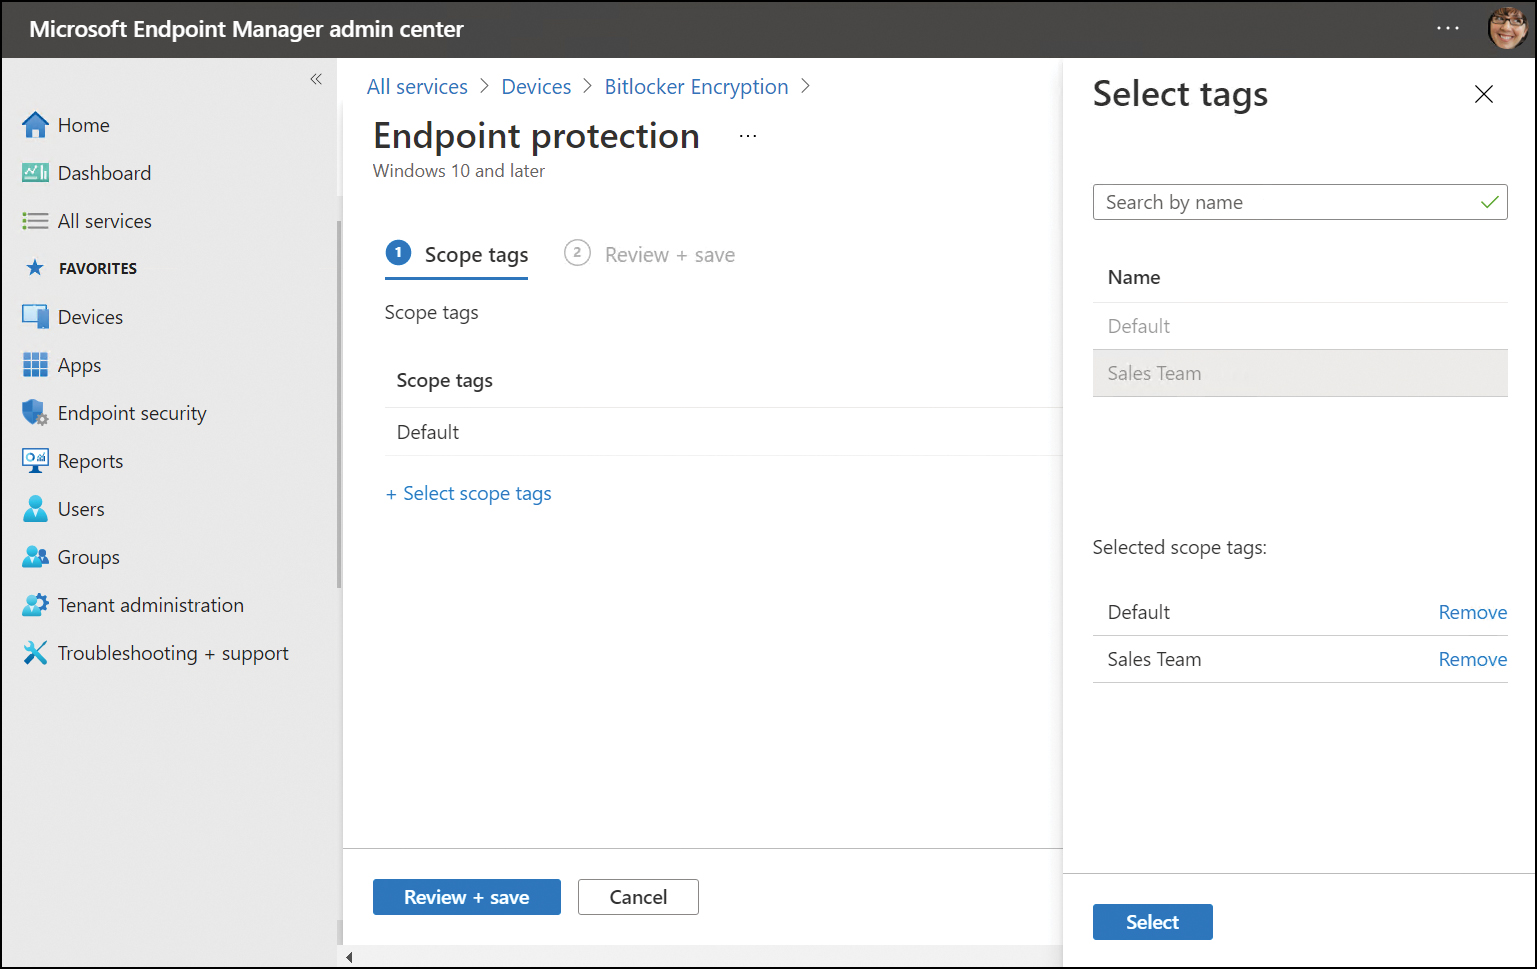
Figure 2-8 Add scope tags
Choose Select and then click OK.
On the Device configuration profile page for your profile, click Review + save.
)
The Intune Service Admins and Global Admins roles have full admin access to all the Intune features, regardless of what scope tags have been configured.
Common issues and troubleshooting
Some of the common issues and resolutions that you may encounter with policies and profiles with Intune relate to profile conflicts and Azure AD enrollment.
When two profile settings are applied to the same device, the most restrictive value will be applied. Any settings that are the same in each policy are applied as configured.
If a policy is deployed to a device and is active when a second policy is deployed, then the first policy takes precedence, and it will stay applied. Any conflicting settings are set to the most restrictive values.
You may also consider how different types of policy interact with each other:
Compliance policy settings have precedence over configuration profile settings.
If a compliance policy includes the same setting found in another compliance policy, then the most restrictive compliance policy setting will be applied.
If a configuration policy setting conflicts with a setting in another configuration policy, the conflict will be displayed in Intune. You will need to manually resolve the conflict.
If you configure custom policies, you should know that Intune doesn’t evaluate the payload of a custom Open Mobile Alliance Uniform Resource Identifier (OMA-URI) policy. Intune will deliver the policy without reference to other policies, and this can cause potential conflicts.
You should confirm that the configured settings within a custom policy don’t conflict with compliance, configuration, or other custom policies. For example, if iOS custom policy settings conflict, then the settings are applied randomly.
If Intune policies are not being applied to a specific device, or PowerShell scripts deployed by Intune are not being run, you may need to troubleshoot the client. You should first perform a full reboot of the device by holding down the Shift key and then selecting Shutdown from Start. After powering on the device, the Intune client built into Windows 10 should check whether any changes or new policies are available.
You should allow devices time after rebooting to sync to Intune and receive any changes. Sometimes, the sync can take several minutes to complete, so you may need to be patient. The refresh cycle for device configuration policies can be found in Table 2-8.
Devices won’t receive the policy if the device is not auto-enrolled in Azure AD. To confirm that a device is auto-enrolled, follow these steps:
On the client device, open the Settings app.
Click Accounts.
Under Accounts, click Access work or school.
Select the joined account and click Info.
Under Advanced Diagnostic Report, select Create report.
The MDMDiagReport will be exported to the following location: C:\Users\Public\Documents\MDMdiagnostics.
Open the MDMDiagReport in a web browser and locate the Enrolled configuration sources and target resources section.
If you cannot find the MDMDeviceWithAAD property, then the device is not auto-enrolled and will need to be enrolled to receive policies.
You can also use the troubleshooting portal of the Microsoft Endpoint Manager admin center to help users at your company to view user information and user enrollment issues, as shown in Figure 2-9.
)
Figure 2-9 Troubleshoot Intune user issues
Intune can report the following data:
User status
Assignments
Compliance issues
Device not responding
Device not getting VPN or WiFi settings
App installation failure
To access the portal to allow you to troubleshoot user issues in Intune, follow these steps:
9. Sign into the troubleshooting and support area for your tenant at https://aka.ms/intunetroubleshooting as a help desk operator.
10. Review the user information shown in the Troubleshooting + support pane, as described in Table 2-9.
TABLE 2-9 Troubleshoot user enrollment
Name |
Description |
|---|---|
Account status |
Shows the status of the current Intune tenant as Active or Inactive. A green tick indicates a valid active Intune status. |
User selection |
Select the user to review. Click Change user to choose a new user. |
User status |
Displays the status of the user’s Intune license, number of devices, and each device compliance. A green tick indicates a valid Intune license. Any compliance issues will be listed below the Intune status with a cross within a red circle. |
User-specific information |
Use the Assignments drop-down to select the details to review the status for each of the following areas:
|
Group membership |
Shows the current Azure AD groups of which the selected user is a member. |