Implement and manage storage
- By Scott Hoag, Harshul Patel, Jonathan Tuliani, Michael Washam
- 9/2/2021
In this sample chapter from Exam Ref AZ-104 Microsoft Azure Administrator, you will review how to implement and manage storage with an emphasis on Azure Storage.
Implementing and managing storage is one of the most important aspects of building or deploying a new solution using Azure. There are several services and features available for use, and each has its own place. Azure Storage is the underlying storage for most of the services in Azure. It provides service for the storage and retrieval of files, and it has services that are available for storing large volumes of data through tables. Also, Azure Storage includes a fast and reliable messaging service for application developers with queues. In this chapter, we review how to implement and manage storage with an emphasis on Azure Storage.
Also, we discuss related services such as Import/Export, Azure Files, and many of the tools that simplify the management of these services.
Skills covered in this chapter:
Skill 2.1: Secure Storage
Skill 2.2: Manage Storage
Skill 2.3: Configure Azure Files and Azure Blob Storage
Skill 2.1: Secure Storage
An Azure Storage account is an entity you create that is used to store Azure Storage data objects such as blobs, files, queues, tables, and disks. Data in an Azure Storage account is durable and highly available, secure, massively scalable, and accessible from anywhere in the world over HTTP or HTTPS.
Configure network access to the storage accounts
Storage accounts are managed through Azure Resource Manager. Management operations are authenticated and authorized using Azure Active Directory and RBAC. Each storage account service exposes its own endpoint used to manage the data in that storage service (blobs in Blob Storage, entities in tables, and so on). These service-specific endpoints are not exposed through Azure Resource Manager; instead, they are (by default) Internet-facing endpoints.
Access to these Internet-facing storage endpoints must be secured, and Azure Storage provides several ways to do so. In this section, we will review the network-level access controls: the storage firewall and service endpoints. We also discuss Blob Storage access levels. The following sections then describe the application-level controls: shared access signatures and access keys. In later sections, we also discuss Azure Storage replication and how to leverage Azure AD authentication for a storage account.
Storage firewall
The storage firewall allows you to limit access to specific IP addresses or an IP address range. It applies to all storage account services (blobs, tables, queues, and files). For example, by limiting access to the IP address range of your company, access from other locations will be blocked. Service endpoints are used to restrict access to specific subnets within an Azure VNet.
To configure the storage firewall using the Azure portal, open the storage account blade and click Firewalls And Virtual Networks. Under All Access From, click Selected Networks to reveal the Firewall and Virtual Network settings, as shown in Figure 2-1.

FIGURE 2-1 Configuring a storage account firewall and virtual network service endpoint access
When accessing the storage account via the Internet, use the storage firewall to specify the Internet-facing source IP addresses (for example, 32.54.231.0/24, as shown in Figure 2-1) that will make the storage requests. All Internet traffic is denied, except the defined IP addresses in the storage firewall. You can specify a list of either individual IPv4 addresses or IPv4 CIDR address ranges. (CIDR notation is explained in the chapter on Azure Networking.)
The storage firewall includes an option to allow access from trusted Microsoft services. These services include Azure Backup, Azure Site Recovery, and Azure Networking. For example, it will allow access to storage for NSG flow logs if the Allow Trusted Microsoft Services To Access This Account exceptions checkbox is selected (see Figure 2-1). It will also allow read-only access to storage metrics and logs.
Virtual network service endpoints
In some scenarios, a storage account is only accessed from within an Azure virtual network. In this case, it is desirable from a security standpoint to block all Internet access. Configuring virtual network service endpoints for your Azure Storage accounts allows you to remove access from the public Internet and only allow traffic from a virtual network for improved security.
Another benefit of using service endpoints is optimized routing. Service endpoints create a direct network route from the virtual network to the storage service. If forced tunneling is being used to force Internet traffic to your on-premises network or to another network appliance, requests to Azure Storage will follow that same route. By using service endpoints, you can use direct route to the storage account instead of the on-premises route, so no additional latency is incurred.
Configuring service endpoints requires two steps. First, from the virtual network subnet, choose Microsoft.Storage from the Service Endpoints drop-down menu. This creates the route from the subnet to the storage service but does not restrict which storage account the virtual network can use. To update the subnet settings, you should choose virtualNetwork1 from the Virtual Networks blade. Then go to Subnets in the left pane under Settings. Click Subnet1 to access the subnet settings. Figure 2-2
The second step is to configure which virtual networks can access a particular storage account. From the storage account blade, click Firewalls And Virtual Networks. Under All Access From, click Selected Networks to reveal the Firewall and Virtual Network settings, as shown previously in Figure 2-1. Under Virtual Networks, select the virtual networks and subnets that should have access to this storage account. FIGURE 2-2 Configuring a subnet with a service endpoint for Azure Storage Storage accounts support an additional access control mechanism that is limited only to Blob Storage. By default, no public read access is enabled for anonymous users, and only users with rights granted through RBAC or with the storage account name and key will have access to the stored blobs. To enable anonymous user access, you must change the container access level (see Figure 2-3). The supported levels are as follows: Private. With this option, only the storage account owner can access the container and its blobs. No one else would have access to them. Blob. With this option, only blobs within the container can be accessed anonymously. Container. With this option, blobs and their containers can be accessed anonymously. FIGURE 2-3 Blob Storage access levels You can change the access level through the Azure portal, Azure PowerShell, Azure CLI, programmatically using the REST API, or by using Azure Storage Explorer. The access level is configured separately on each blob container. A shared access signature token (SAS token) is a URI query string parameter that grants access to specific containers, blobs, queues, and tables. Use an SAS token to grant access to a client that should not have access to the entire contents of the storage account (and therefore, should not have access to the storage account keys) but still requires secure authentication. By distributing an SAS URI to these clients, you can grant them access to a specific resource, for a specified period of time, and with a specified set of permissions. Frequently, SAS tokens are used to read and write the data to users’ storage accounts. Also, SAS tokens are widely used to copy blobs or files to another storage account. Azure Storage accounts provide a cloud-based storage service that is highly scalable, available, performant, and durable. Within each storage account, a number of separate storage services are provided: Blobs. Provides a highly scalable service for storing arbitrary data objects such as text or binary data. Tables. Provides a NoSQL-style store for storing structured data. Unlike a relational database, tables in Azure storage do not require a fixed schema, so different entries in the same table can have different fields. Queues. Provides reliable message queueing between application components. Files. Provides managed file shares that can be used by Azure VMs or on-premises servers. Disks. Provides a persistent storage volume for Azure VM which can be attached as a virtual hard disk. There are three types of storage blobs: Block Blobs, Append Blobs, and Page Blobs. Page Blobs are generally used to store VHD files when deploying unmanaged disks. (Unmanaged disks are an older disk storage technology for Azure virtual machines. Managed disks are recommended for new deployments.) When creating a storage account, there are several options that must be set: Performance Tier, Account Kind, Replication Option, and Access Tier. There are some interactions between these settings. For example, only the Standard performance tier allows you to choose the access tier. The following sections describe each of these settings. We then describe how to create storage accounts using the Azure portal, PowerShell, and Azure CLI. While naming an Azure Storage Account, you need to remember these points: The storage account name must be unique across all existing storage account names in Azure. The name must be between 3 to 24 characters and can contain only lowercase letters and numbers. When creating a storage account, you must choose between the Standard and Premium performance tiers. This setting cannot be changed later. Standard. This tier supports all storage services: blobs, tables, files, queues, and unmanaged Azure virtual machine disks. It uses magnetic disks to provide cost-efficient and reliable storage. Premium. This tier is designed to support workloads with greater demands on I/O and is backed by high-performance SSD disks. It only supports General-Purpose accounts with Disk Blobs and Page Blobs. It also supports Block Blobs or Append Blobs with BlockBlobStorage accounts and files with FileStorage accounts. There are three possible values for the Standard tier: StorageV2 (General-Purpose V2), Storage (General-Purpose V1), and BlobStorage. There are four possible values for the Premium tier: StorageV2 (General-Purpose V2), Storage (General-Purpose V1), BlockBlobStorage, and FileStorage. Table 2-1 shows the features for each kind of account. Key points to remember are as follows: The Blob Storage account is a specialized storage account used to store Block Blobs and Append Blobs. You can’t store Page Blobs in these accounts; therefore, you can’t use them for unmanaged disks. Only General-Purpose V2 and Blob Storage accounts support the Hot, Cool, and Archive access tiers. General-Purpose V1 and Blob Storage accounts can both be upgraded to a General-Purpose V2 account. This operation is irreversible. No other changes to the account kind are supported.
Blob Storage access levels

Create and configure storage accounts
Naming storage accounts
Performance tiers
Account kind
TABLE 2-1 Storage account types and their supported features
General-Purpose V2 |
General-Purpose V1 |
Blob Storage |
Block Blob Storage |
File Storage |
|
|---|---|---|---|---|---|
Services supported |
Blob, File, Queue, Table |
Blob, File, Queue, Table |
Blob (Block Blobs and Append Blobs only) |
Blob (Block Blobs and Append Blobs only) |
File only |
Unmanaged DIsk (Page Blob) support |
Yes |
Yes |
No |
No |
No |
Supported Performance Tiers |
Standard, Premium |
Standard, Premium |
Standard |
Premium |
Premium |
Supported Access Tiers |
Hot, Cool, Archive |
N/A |
Hot, Cool, Archive |
N/A |
N/A |
Replication Options |
LRS, ZRS, GRS, RA-GRS, GZRS, RA-GZRS |
LRS, GRS, RA-GRS |
LRS, GRS, RA-GRS |
LRS, ZRS |
LRS, ZRS |
Replication options
When you create a storage account, you can also specify how your data will be replicated for redundancy and resistance to failure. There are four options, as described in Table 2-2.
TABLE 2-2 Storage account replication options
Replication Type |
Description |
|---|---|
Locally redundant storage (LRS) |
Makes three synchronous copies of your data within a single datacenter. Available for General-Purpose or Blob Storage accounts at both the Standard and Premium Performance tiers. |
Zone redundant storage (ZRS) |
Makes three synchronous copies to three separate availability zones within a single region. Available for General-Purpose V2 storage accounts only, at the Standard Performance tier only. Also available for BlockBlobStorage and FileStorage. |
Geographically redundant storage (GRS) |
This is the same as LRS (three local copies), plus three additional asynchronous copies to a second datacenter hundreds of miles away from the primary region. Data replication typically occurs within 15 minutes, although no SLA is provided. Available for General-Purpose or Blob Storage accounts, at the Standard Performance tier only. |
Read access geographically redundant storage (RA-GRS) |
This has the same capabilities as GRS, plus you have read-only access to the data in the secondary datacenter. Available for General-Purpose or Blob Storage accounts, at the Standard Performance tier only. |
Geographically zone redundant storage (GZRS) |
This is the same as ZRS (three synchronous copies across multiple availability zones), plus three additional asynchronous copies to a second datacenter hundreds of miles away from the primary region. Data replication typically occurs within 15 minutes, although no SLA is provided. Available for General-Purpose v2 storage accounts only, at the Standard Performance tier only. |
Read access geographically zone redundant storage (RA-GZRS) |
This has the same capabilities as GZRS, plus you have read-only access to the data in the secondary datacenter. Available for General-Purpose V2 storage accounts only at the Standard Performance tier only. |
Access tiers
Azure Blob Storage supports three access tiers: Hot, Cool, and Archive. Each represents a trade-off of performance, availability, and cost. There is no trade-off on the durability (probability of data loss), which is extremely high across all tiers.
The tiers are as follows:
Hot. This access tier is used to store frequently accessed objects. Relative to other tiers, data access costs are low while storage costs are higher.
Cool. This access tier is used to store large amounts of data that is not accessed frequently and that is stored for at least 30 days. The availability SLA is lower than for the Hot tier. Relative to the Hot tier, data access costs are higher and storage costs are lower.
Archive. This access tier is used to archive data for long-term storage, that is accessed rarely, can tolerate several hours of retrieval latency, and will remain in the Archive tier for at least 180 days. This tier is the most cost-effective option for storing data, but accessing that data is more expensive than accessing data in the Hot or Cool tiers.
New blobs will default to the access tier that is set at the storage account level, though you can override that at the blob level by setting a different access tier, including the archive tier.
Creating an Azure Storage account
To create a storage account by using the Azure portal, first click Create A Resource and then select Storage. Next, click Storage Account, which will open the Create Storage Account blade (see Figure 2-4). You must choose a unique name for the storage account name. Storage account names must be globally unique and may only contain lowercase characters and digits. Select the Azure region (Location), the performance tier, the kind of storage account, the replication mode, and the access tier. The blade adjusts based on the settings you choose so that you cannot select an unsupported feature combination.
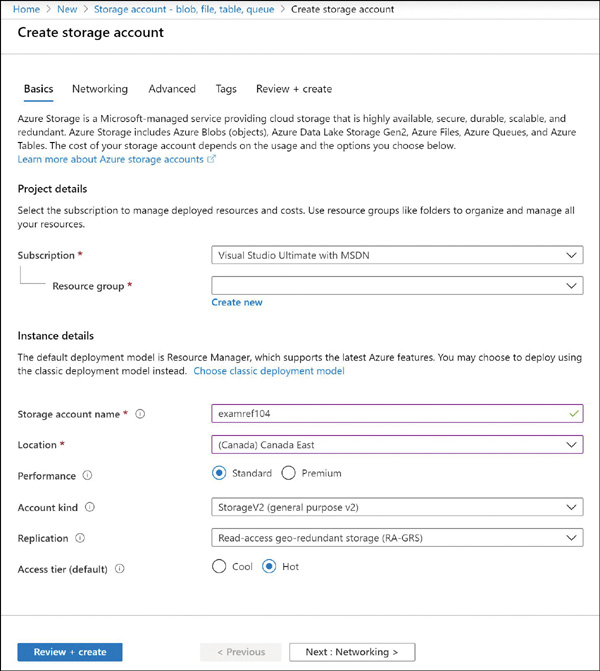
FIGURE 2-4 Creating an Azure storage account using the Azure portal
The Networking tab of the Create Storage Account blade is shown in Figure 2-5. This tab allows us to maintain storage account access either publicly by choosing Public Endpoint (Selected Networks) or privately by choosing Private Endpoint.
The Advanced tab of the Create Storage Account blade is shown in Figure 2-6. This tab allows you to specify whether SSL is required for accessing objects in storage; disabling or enabling Azure Files support; choosing data protection options such as blob Soft Delete or Versioning; and for enabling Data Lake Storage integration. Additionally, clicking the Tags tab allows you to specify tags on the storage account resource.

FIGURE 2-5 The networking properties that can be set when creating an Azure Storage account using the portal
Generate shared access signatures
There are few different ways you can create an SAS token. An SAS token is a way to granularly control how a client can access data in Azure storage account. You can also use an account-level SAS to access the account itself. You can control many things, such as what services and resources the client can access, what permission the client has, how long the token is valid for, and more.
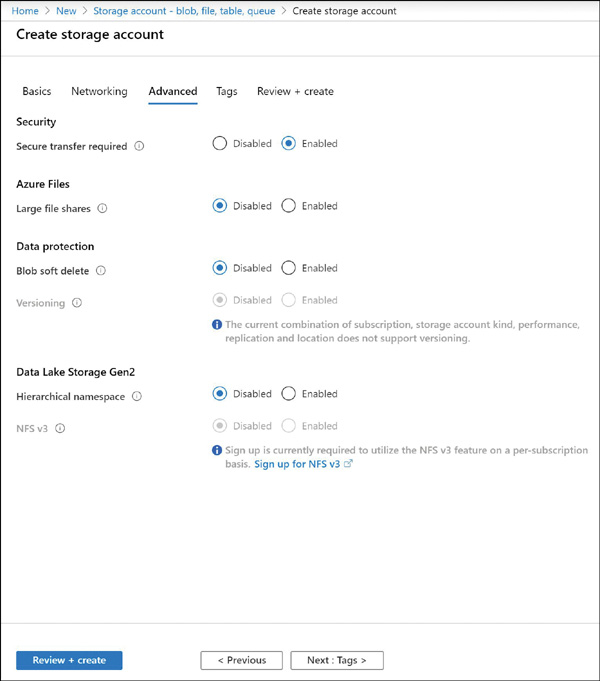
FIGURE 2-6 The advanced properties that can be set when creating an Azure Storage account using the Azure portal
In this section, we examine how to create SAS tokens using various methods. The simplest way to create one is by using the Azure portal. Browse to an Azure storage account and open the Shared Access Signature blade (see Figure 2-7). You can check the services, resource types, and permissions based on specific requirements, along with the duration for the SAS token validity and the IP addresses that are providing access. Lastly, you have an option to choose which key you want to use as the signing key for this token.
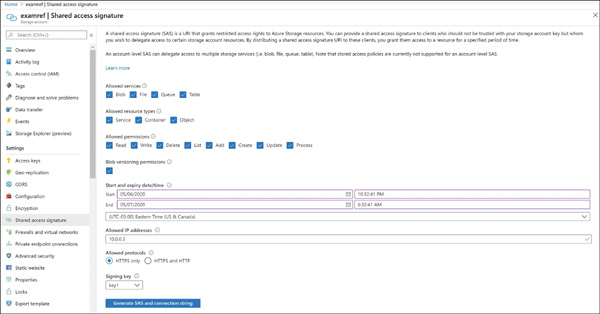
FIGURE 2-7 Creating a shared access signature using the Azure portal
Once the token is generated, it will be listed along with connection string and SAS URLs, as shown in Figure 2-8.

FIGURE 2-8 Generated SAS token with connection string and SAS URLs
Also, you can create SAS tokens using Storage Explorer or the command-line tools (or programmatically using the REST APIs/SDK). To create an SAS token using Storage Explorer, you need to first select the resource (storage account, container, blob, and so on) for which the SAS token needs to be created. Then right-click the resource and select Get Shared Access Signature. Figure 2-9
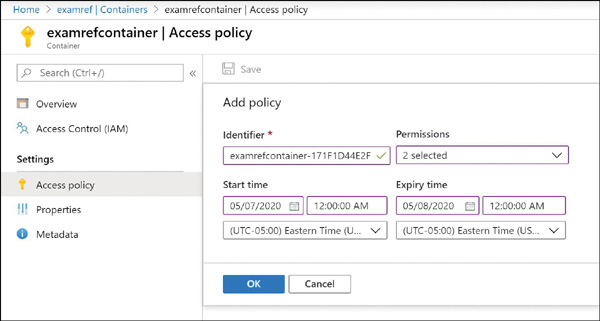
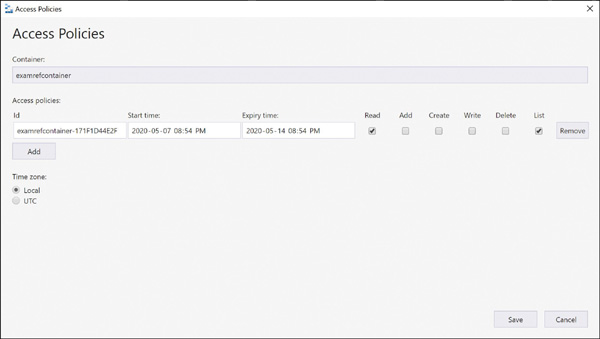
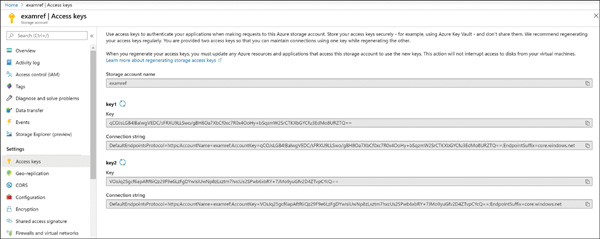
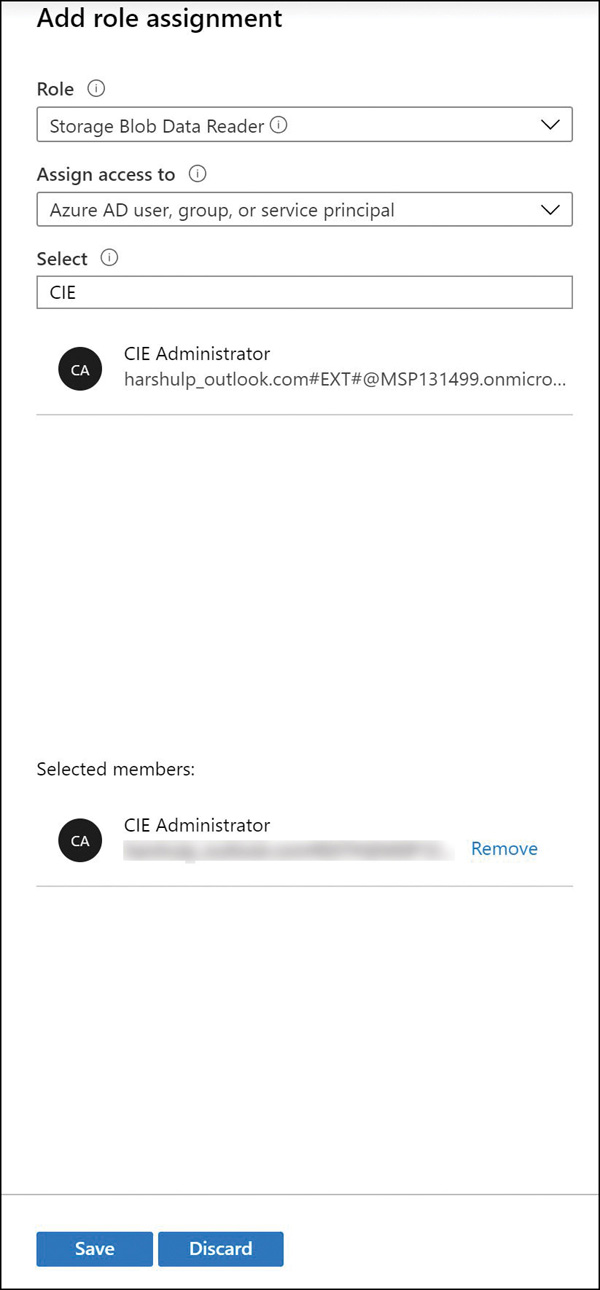
FIGURE 2-9 Creating a shared access signature using Azure Storage Explorer Each SAS token is a query string parameter that can be appended to the full URI of the blob or other storage resource for which the SAS token was created. Create the SAS URI by appending the SAS token to the full URI of the blob or other storage resource. The following example shows the combination in more detail. Suppose the storage account name is examref, the blob container name is examrefcontainer, and the blob path is sample-file.png. The full URI to the blob in storage is The combined URI with the generated SAS token is You can create the SAS at the storage account–level, too. With this SAS, you can manage all the resources belonging to the storage account. You can also perform write and delete operations for all the resources (blobs, tables, and so on) of the storage account. Currently, stored access policy is not supported for account-level SAS. You can also create user delegation SAS using Azure AD credentials. The user delegation SAS is only supported by the Blob Storage, and it can grant access to containers and blobs. Currently, SAS is not supported for user delegation SAS. An SAS token incorporates the access parameters (start and end time, permissions, and so on) as part of the token. The parameters cannot be changed without generating a new token, and the only way to revoke an existing token before its expiry time is to roll over the storage account key used to generate the token or delete the blob. In practice, these limitations can make standard SAS tokens difficult to manage. Stored access policies allow the parameters for an SAS token to be decoupled from the token itself. The access policy specifies the start time, end time, and access permissions, and the access policy is created independently of the SAS tokens. SAS tokens are generated that reference the stored access policy instead of embedding the access parameters explicitly. With this arrangement, the parameters of existing tokens can be modified by simply editing the stored access policy. Existing SAS tokens remain valid and use the updated parameters. You can revoke the SAS token by deleting the access policy, renaming it (changing the identifier), or changing the expiry time. Figure 2-10
FIGURE 2-10 Creating stored access policies using Azure portal Figure 2-11
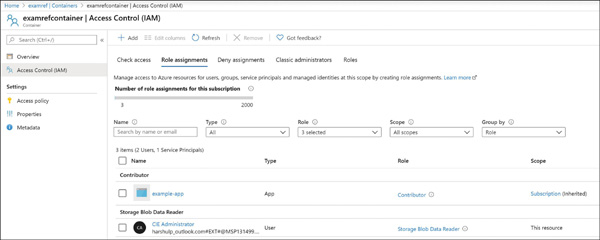
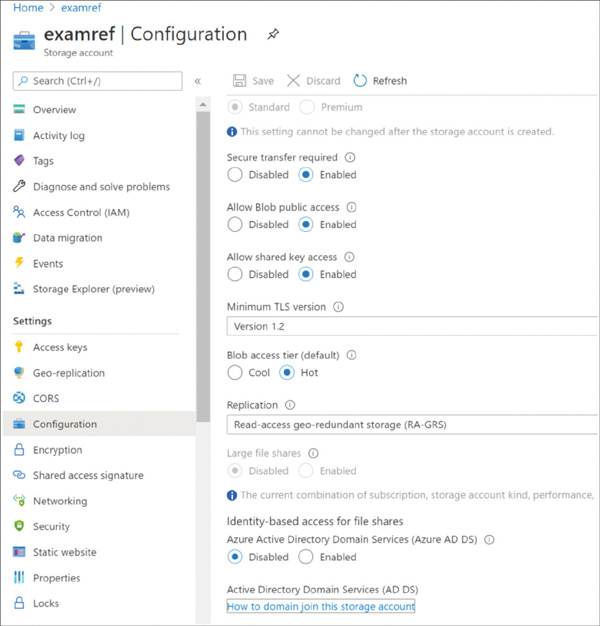
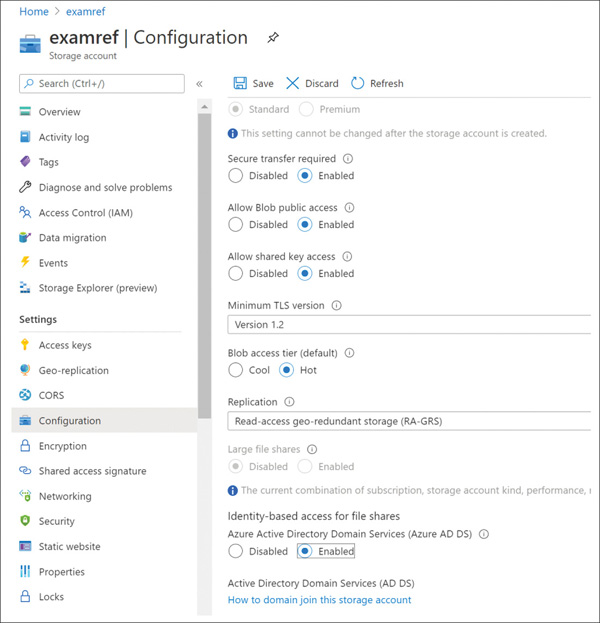
FIGURE 2-11 Creating stored access policies using Azure Storage Explorer To use the created policies, reference them by name when creating an SAS token using Storage Explorer or when creating an SAS token using PowerShell or the CLI tools. The simplest way to manage access to a storage account is to use access keys. With the storage account name and an access key of the Azure storage account, you have full access to all data in all services within the storage account. You can create, read, update, and delete containers, blobs, tables, queues, and file shares. In addition, you have full administrative access to everything other than the storage account itself. (You cannot delete the storage account or change settings on the storage account, such as its type.) Applications will use the storage account name and key for access to Azure Storage. Sometimes, this is to grant access by generating an SAS token, and sometimes, it is for direct access with the name and key. To access the storage account name and key, open the storage account from within the Azure portal and click Access Keys. Figure 2-12examref storage account. FIGURE 2-12 Access keys for an Azure storage account Each storage account has two access keys. This allows you to modify applications to use the second key instead of the first and then regenerate the first key. This technique is known as “key rolling,” and it allows you to reset the primary key with no downtime for applications that directly access storage using an access key. Storage account access keys can be regenerated using the Azure portal or the command-line tools. In PowerShell, this is accomplished with the New-AzStorageAccountKey cmdlet; with Azure CLI, you will use the az storage account keys renew command. It is important to protect the storage account access keys because they provide full access to the storage account. Azure Key Vault helps safeguard cryptographic keys and secrets used by cloud applications and services, such as authentication keys, storage account keys, data encryption keys, and certificate private keys. Keys in Azure Key Vault can be protected in software or by using hardware security modules (HSMs). HSM keys can be generated in place or imported. Importing keys is often referred to as bring your own key, or BYOK. Accessing and unencrypting the stored keys is typically done by a developer, although keys from Key Vault can also be accessed from ARM templates during deployment. Azure AD authentication is beneficial for large customers who want to control the data access at an enterprise level based on their security and compliance standards. AAD authentication was recently added to the list in addition to existing shared-key and SAS token authorization mechanisms for Azure Storage (Blob and Queue). Azure blobs and queues are supported by Azure AD authentication. Azure Table storage is not supported with Azure AD authorization as of now. AAD authentication enables customers to leverage Azure’s RBAC for granting the required permissions to a security principal (users, groups, and applications) down to the scope of an individual blob container or queue. While authenticating a request, Azure AD returns an OAuth 2.0 token to security principal, which can be used for authorization against Azure Storage (blob or queue). Azure AD authorization can be implemented in many ways, such as assigning a RBAC roles to a security principal (users, groups, and applications), using a managed service identity (MSI), or creating shared access signatures signed by Azure AD credentials and so on. If an application is running from within an Azure entity such as an Azure VM, a virtual machine scale set, or an Azure Functions app, it can use a managed service identity (MSI) to access blobs or queues. There are few built-in RBAC roles available in Azure for authorizing access to Blob and Queue Storage. Storage Blob Data Owner: Sets ownership and manages POSIX access control for Azure Data Lake Storage Gen2. Storage Blob Data Contributor: Grants read/write/delete permissions for Blob Storage. Storage Blob Data Reader: Grants read-only permissions for Blob Storage. Storage Queue Data Contributor: Grants read/write/delete permissions for Queue Storage. Storage Queue Data Reader: Grants read-only permissions for Queue Storage. Storage Queue Data Message Processor: Grants peek, retrieve, and delete permissions to messages in queues. Storage Queue Data Message Sender: Grants add permissions to messages in queues. It is also important to determine the scope of the access for security principal before you assign an RBAC role. You can narrow down the scope to the container or queue level. Below are the valid scopes: Container. Under this scope, the role assignment will be applicable at the container level. All the blobs inside the container, the container properties, and the metadata will inherit the role assignment when this scope is selected. Queue. Under this scope, the role assignment will be applicable at the queue level. All the messages inside the queue, as well as queue properties and metadata will inherit the role assignment when this scope is selected. Storage account. Under this scope, the role assignment will be applicable at the storage account level. All the containers, blobs, queues, and messages within the storage account will inherit the role assignment when this scope is selected. Resource group. Under this scope, the role assignment will be applicable at the resource group level. All the containers or queues in all the storage accounts in the resource group will inherit the role assignment when this scope is selected. Subscription. Under this scope, the role assignment will be applicable at the subscription level. All the containers or queues in all the storage accounts in all the resource groups in the subscription will inherit the role assignment when this scope is selected. In the following example, you will learn how to configure the AAD authentication method in order to allow users to access the blob data. In Figure 2-13, you can see the examrefcontainer container has one blob named UserCreateTemplate.csv. Also, notice that the authentication method is currently set as Access Key. FIGURE 2-13 The overview blade of examrefcontainer Switch the authentication method to Azure AD User Account by clicking Switch To Azure AD Account. You will see a warning message indicating that you do not have permission to list the data (see Figure 2-14). FIGURE 2-14 The overview blade of examrefcontainer Now let’s assign Storage Blob Data Reader role to the logged in user at container level. Go to the Access Control (IAM) blade on the container and select Role from the Storage Blob Data Reader drop-down menu. Then search for and select CIE Administrator. Click Save to apply the role assignment (see Figure 2-15). FIGURE 2-15 Storage Blob Data Reader Role assignment You should now see the current user with the role Storage Blob Data Reader, which appears under Role Assignments (see Figure 2-16). FIGURE 2-16 Role assignments for examrefcontainer If you navigate to Overview blade of examrefcontainer now, you will see the UserCreateTemplate.csv blob with authentication method shown as Azure AD User Account (see Figure 2-17). FIGURE 2-17 The overview blade of examrefcontainer Azure Files provides managed file shares that are accessible over the SMB protocol. SMB is a network file-sharing protocol, and Azure Files provides flexibility to use the following two types of identity-based authentication to access the shares. On-premises Active Directory Domain Services (AD DS) Azure Active Directory Domain Services (Azure AD DS) In this section, you will learn how to use either of these domain services to access file shares over SMB. Azure file shares leverage Kerberos tokens to authenticate a user or application to access the file shares. You can configure authorization either at the share or directory/file levels. Share-level permission can be assigned using Azure built-in roles such as Storage File Data SMB Share Reader, which allows Azure AD users or groups to grant read access to an Azure file share. You can enable AD DS authentication for your Azure file shares to authenticate using your on-premises AD DS credentials. You can also manage granular access control by syncing identities from on-premises AD DS to Azure AD with AD Connect. The share-level access can be availed with identities that are synced to Azure AD, and file/share-level access can be availed using on-premises AD DS credentials. To configure identity-based authentication using AD DS, there is a five-step process you need to follow for your Azure file shares. You can get the documentation link using the Azure portal as shown in Figure 2-18. Click the How To Domain Join The Storage Account hyperlink to access the latest official documentation. FIGURE 2-18 Configuring identity-based access for file shares using AD DS Follow these steps for AD DS authentication: Enable AD DS authentication on your storage account. Assign share-level access permissions to an Azure AD identity. Assign directory/file-level permissions using Windows ACLs. Mount the Azure file share. Update the password of your storage account identity in AD DS. You can enable Azure AD DS authentication for your Azure file shares to authenticate with Azure AD credentials. Azure AD DS–joined Windows machines can access Azure file shares with Azure AD credentials over SMB. To configure identity-based authentication using Azure AD DS, there is a set of steps you need to follow for your Azure file shares. First, you must enable Azure AD DS for your storage account. You can enable AD DS using the Azure portal by accessing the storage account Configuration option, and then setting Azure AD DS Identity-Based Access For File Shares setting to Enabled, as shown in Figure 2-19. Once Enabled, click the Save option at the top. FIGURE 2-19 Configuring Identity-Based Access For File Shares using Azure AD DS You also need to register your storage account with AD DS and enable AD DS authentication for your Azure file shares. There are two ways to accomplish this: Use the AzFilesHybrid PowerShell module This PowerShell module makes the required modifications and enables the feature for you. Note the following: You can download and extract the AzFilesHybrid module here: https://github.com/Azure-Samples/azure-files-samples/releases. Note that v0.2.0 and above are GA versions. Install the module on a device that is domain joined to an on-premises AD DS with AD DS credentials that have permissions to create a Service Logon Account or a computer account in the target AD. You must execute the commands using an on-premises AD DS credential that is synced to your Azure AD. The on-premises AD DS credential must have either the storage account owner or the contributor Azure role permissions. Join-AzStorageAccountForAuth is a module command that registers the target storage account with your active directory environment under the target OU. You can also choose to create the identity that represents the storage account as either a Service Logon Account or Computer Account depends on the AD permission you have, as well as your preference. Moreover, you can run Get-Help Join-AzStorageAccountForAuth for more details on this cmdlet. Manually perform the enablement actions To enable the feature manually, you will need have the Active Directory PowerShell and Az.Storage 2.0 modules installed. You also need to check your AD DS to see if either a computer account or Service Logon Account has already been created. If not, then you must create one. Now you can use the following command to enable the feature on your storage account. You can provide the target storage account and the required AD domain information. Next, you need to configure share-level permissions in order to get access to your file shares. First, you need to set up a hybrid identity that is in AD DS and that is synced to your Azure AD. Authentication and authorization against identities that only exist in Azure AD, such as Azure Managed Identities (MSIs), are not supported with AD DS authentication. You can assign share-level permissions to the identity using Azure portal by accessing the Access Control (IAM) blade on an Azure file share. Select Add A Role Assignment and select one of the following roles and select the identity. Save the changes by clicking Save on the top of the blade. Storage File Data SMB Share Reader—Allows read access in Azure Storage file shares over SMB. Storage File Data SMB Share Contributor Allows read, write, and delete access in Azure Storage file shares over SMB. Storage File Data SMB Share Elevated Contributor Allows read, write, delete, and modify NTFS permissions in Azure Storage file shares over SMB. Once you assign share-level permissions, you must assign granular-level permissions at the root, directory, or file level using basic and advanced Windows ACLs. The following permissions are supported on the root directory of a file share: BUILTIN\Administrators:(OI)(CI)(F) NT AUTHORITY\SYSTEM:(OI)(CI)(F) BUILTIN\Users:(RX) BUILTIN\Users:(OI)(CI)(IO)(GR,GE) NT AUTHORITY\Authenticated Users:(OI)(CI)(M) NT AUTHORITY\SYSTEM:(F) CREATOR OWNER:(OI)(CI)(IO)(F) You should mount an Azure file share from a domain-joined VM Log in to the domain-joined VM using an Azure AD identity such as user with the granted permissions mentioned in pervious steps. Note that if the client machine is not in the AD DS network, you must use VPN in order to successfully authenticate. You can use the net use command to mount the file share. Following is a sample command: If you want to grant permission to additional users, you can follow the steps again with the target Azure AD identity to provide access to Azure file shares. To configure ACLs with superuser permissions, you must mount the share by using your storage account key from your domain-joined VM: You can configure the Windows ACLs using either Windows File Explorer or icacls. You can use following command to grant full permissions to all directories and files under the file share, including the root directory: Alternatively, you can also use Windows File Explorer to grant the necessary permissions. Please note, both share-level and file/directory level permissions are enforced when a user attempts to access a file/directory. If there is a conflict in any of these permissions, the most restrictive permission will be applied. For example, if the user has read/write access at the share level but has only read access at the file level, then the user can only read the file. The same is true in reverse. The final step is to update the password of AD DS identity/account that represents your storage account in an organizational unit or domain that enforces password expiration time. You can use the AzStorageAccountADObjectPassword command from the AzFilesHybrid module to update the password. This command performs actions similar to storage account key rotation and must be performed by a hybrid user with owner permission to the storage account and AD DS permissions to change the password of the identity representing the storage account. You must run the following command in an on-premises, AD DS-joined environment: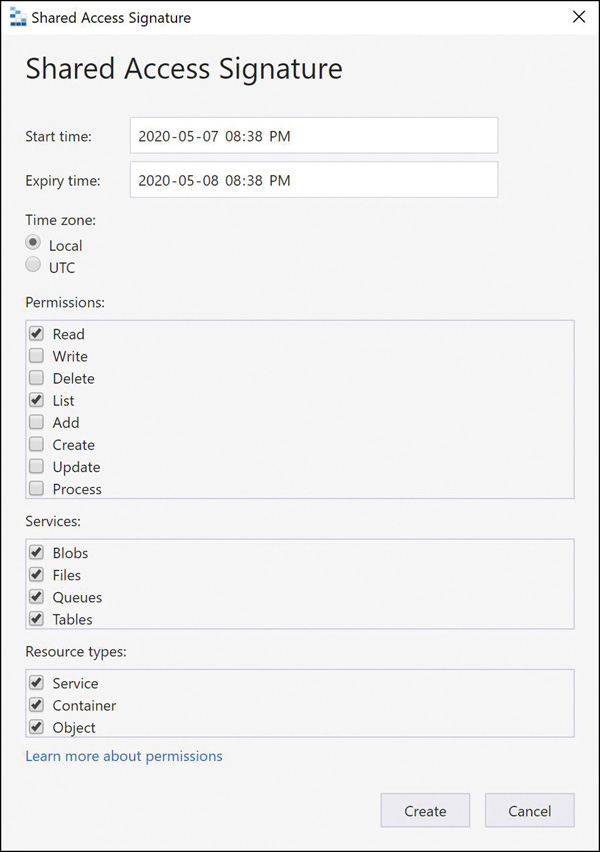
Using shared access signatures
https://examrefstorage.blob.core.windows.net/examrefcontainer/sample-file.png
https://examrefstorage.blob.core.windows.net/examrefcontainer/sample-file.png?
sv=2019-10-10&ss=bfqt&srt=sco&sp=rwdlacupx&se=2020-05-08T08:50:14Z&st=2020-05-08T00:
50:14Z&spr=https&sig=65tNhZtj2lu0tih8HQtK7aEL9YCIpGGprZocXjiQ%2Fko%3D
Using account-level SAS
Using user delegation SAS
Using a stored access policy
Manage access keys
Managing access keys in Azure Key Vault
Configure Azure AD Authentication for a storage account
RBAC roles for blobs and queues
Resource scope for blobs and queues
AAD authentication and authorization in Azure portal



Configure access to Azure Files
On-premises Active Directory Domain Services (AD DS) authentication and authorization
Azure Active Directory Domain Services (Azure AD DS) authentication and authorization
Set-AzStorageAccount `
        -ResourceGroupName "<your-resource-group-name-here>" `
        -Name "<your-storage-account-name-here>" `
        -EnableActiveDirectoryDomainServicesForFile $true `
        -ActiveDirectoryDomainName "<your-domain-name-here>" `
        -ActiveDirectoryNetBiosDomainName "<your-netbios-domain-name-here>" `
        -ActiveDirectoryForestName "<your-forest-name-here>" `
        -ActiveDirectoryDomainGuid "<your-guid-here>" `
        -ActiveDirectoryDomainsid "<your-domain-sid-here>" `
        -ActiveDirectoryAzureStorageSid "<your-storage-account-sid>"
net use <drive-letter>: \\<storage-account>.file.core.windows.net\<fileshare>
net use <drive-letter>: \\<storage-account>.file.core.windows.net\<fileshare> /
user:Azure\<storage-account-name> <storage-account-key>
icacls <mounted-drive-letter>: /grant <user-email>:(f)
Update-AzStorageAccountADObjectPassword -RotateToKerbKey kerb2 -ResourceGroupName
"<resource-group-name>" -StorageAccountName "<storage-account-name>"
