Objective group 2. Manage slides
- By Joan Lambert
- 10/1/2020
- Objective 2.1: Insert slides
- Objective 2.2: Modify slides
Objective 2.2: Modify slides
It is generally best practice within a presentation to display information using a consistent appearance and following a consistent flow. At times you might find it necessary to remove a slide from a presentation, to emphasize a slide by using a different background, or to include identifying information in the header or footer area of one or more slides, handouts, or notes pages.
Hide and unhide slides
If you decide not to include a slide when you deliver a presentation but you don’t want to delete the slide entirely, you can hide the slide. Then PowerPoint will skip over that slide during delivery. Hidden slides are still visible in Normal view and Slide Sorter view, but they appear shaded and have a slash through the slide number.
)
To hide or unhide slides
 Right-click a slide or selected slides, and then click Hide Slide.
Modify individual slide backgrounds
You can customize the background of an individual slide by adding a solid color, a color gradient, a texture, or even a picture.
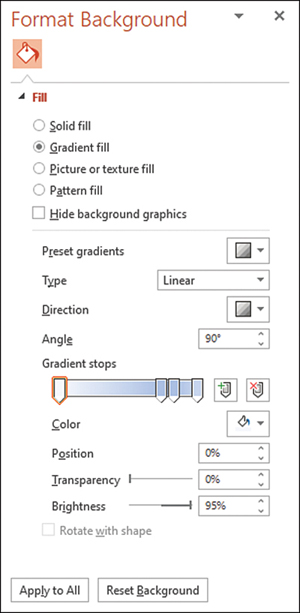
In the Format Background pane, you can specify the colors, texture, pattern, or picture that appear on the background of the current slide or slide master.
A solid or gradient color corresponding to the color scheme applied to the presentation can provide a simple yet elegant slide background.
You can configure a more complex slide background by selecting one of the 15 built-in textures or 48 patterns that can be customized with any two colors. Each texture is a small graphic that is tiled on the slide and designed to repeat gracefully, both horizontally and vertically.
)
If none of the textures meets your requirements, you can tile a picture of your own. You can customize a slide background even further by using a picture as the background. Because most pictures are too busy to support the inclusion of other content on the slide, these are often best used for title slides or other slides that do not have to support a lot of content.
)
To display the Format Background pane
- On the Design tab, in the Customize group, click the Format Background button.
- Right-click the slide, and then click Format Background.
To modify individual slide backgrounds
In Normal view or Slide Sorter view, select the slide or slides you want to modify.
Display the Format Background pane.
Slide backgrounds can be simple or complex
In the Format Background pane, do one of the following:
Click Solid fill, and then select the color and set the transparency.
Click Gradient fill, and then select the type, direction, angle, and gradient stop locations and colors. For each color, set the position, transparency, and brightness.
Click Picture or texture fill, and then select a local or online picture, or select a texture. Then set the transparency and, if appropriate, select the Tile picture as texture check box or set the offset, scale, alignment, or mirror type.
Click Pattern fill, and then select a pattern, foreground color, and background color.
If you want to remove the background graphics applied by the slide master, select the Hide background graphics check box.
If you want to apply the background settings to the slide master, click Apply to All.
Insert slide headers, footers, and page numbers
To ensure consistency across slides in a presentation, slide header and footer elements are usually managed on slide masters, notes masters, and handout masters. However, you can configure the display of information in slide footers, and in the headers and footers of speaker notes pages and handouts, without modifying the slide master.
The following table describes the information you can display in the slide footer. You have the option of configuring the footer for one slide, for all slides, or for all slides other than the title slide. The footer configuration applies to on-screen and printed slides.
Location |
Information |
|---|---|
Left side |
Static or dynamically updating date and/or time |
Center |
Text of your choice (approximately 50 characters per line up to 200 characters in the default space) |
Right side |
Slide number |
The following table describes the information you can display on speaker notes pages and handouts. The header and footer configuration applies to the speaker notes pages and handouts for all slides in the presentation.
Area |
Location |
Information |
|---|---|---|
Header |
Left side |
Text of your choice (approximately 35 characters per line up to 175 characters in the default space above the slide) |
Header |
Right side |
Static or dynamically updating date and/or time |
Footer |
Left side |
Text of your choice (approximately 35 characters per line extending up from the lower-left corner of the page) |
Footer |
Right side |
Page number |
To configure slide footer content
On the Insert tab, in the Text group, click Header & Footer.
On the Slide tab of the Header and Footer dialog box, select the check boxes for the elements you want to display. Options include Date and time, Slide number, and Footer.
If you select the Date and time check box, do either of the following:
Select the Update automatically option, and then select the date and time format you want from the list.
Select the Fixed option, and then enter the date and time you want to display.
If you select the Footer check box, enter the text that you want to display in the center footer section.
To suppress the footer elements on the title slide of the presentations, select the Don’t show on title slide check box.
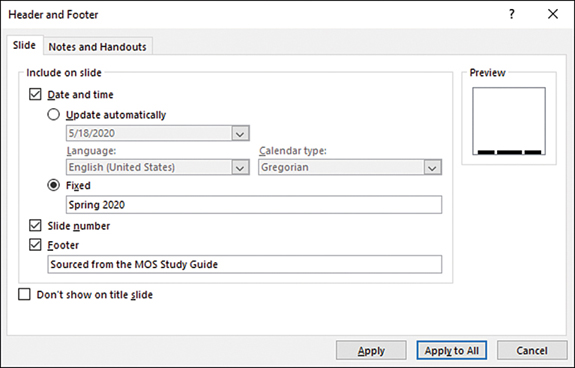
Selecting an element outlines the corresponding location in the preview area
To save your changes, do either of the following:
To display the footer only on the current slide, click Apply.
To display the footer on all slides in the presentation, click Apply to All.
To configure notes page and handout header and footer content
On the Insert tab, in the Text group, click the Header & Footer button.
Click the Notes and Handouts tab.
Select the check boxes for the elements you want to display. Options include Date and time, Page number, Header, and Footer.
If you select the Date and time check box, do either of the following:
Select the Update automatically option, and then select the date and time format you want from the list.
Select the Fixed option, and then enter the date and time you want to display.
If you select the Header check box, enter the text that you want to display on the left side of the header.
If you select the Footer check box, enter the text that you want to display on the left side of the footer.
To save your changes, click Apply to All.
OBJECTIVE 2.2 PRACTICE TASKS
The practice file for these tasks is in the MOSPowerPoint2019\Objective2 practice file folder. The folder also contains a result file that you can use to check your work.
 Open the PowerPoint_2-2 presentation and do the following:
 Hide the Falling Rates section opener (slide 6) and the blank slide that follows it (slide 7).
- Format the background of only the title slide to display the Water droplets texture.
- Configure the slide footer settings to display the footer text My Presentation and the slide number on all slides other than title slides. Then verify that the title slide and section openers don’t display the footer content and the other slides do.
- Save the PowerPoint_2-2 presentation. Open the PowerPoint_2-2_results presentation. Compare the two presentations to check your work. Then close the open presentations.