Objective group 2. Manage slides
- By Joan Lambert
- 10/1/2020
- Objective 2.1: Insert slides
- Objective 2.2: Modify slides
In this sample chapter from MOS Study Guide for Microsoft PowerPoint Exam MO-300, author Joan Lambert covers the skills relating to creating and managing slides (rather than slide content).
The skills tested in this section of the Microsoft Office Specialist exam for Microsoft PowerPoint 2019 relate to creating and managing slides (rather than slide content). Specifically, the following objectives are associated with this set of skills:
2.1 Insert slides
2.2 Modify slides
2.3 Order and group slides
As you build your presentation by inserting slides, each slide has a specific slide layout that governs the layout of the content on the slide. You can modify the slide layout and automatically rearrange the slide content at any time.
If the information you want to share with your audience already exists in another presentation, you can merge the content of the existing slides into your presentation so that the slides take on the theme colors and fonts of the presentation. You can hide slides that you don’t want to show in a slideshow (and don’t want to delete) or apply specific background colors, patterns, or textures to individual slides to make them stand out from the themed content of the presentation. You can easily display identifying information in the header and footer areas of slides.
By organizing related slides into sections, you can identify and more easily manage groups of slides.
This chapter guides you in studying methods of inserting, modifying, ordering, and grouping slides.
Objective 2.1: Insert slides
It can often be simpler to organize the content, or at least an outline, of a presentation in a document rather than directly in PowerPoint. Creating a presentation outline within a document allows you to see more of the content at one time and consider the presentation content at a higher level. After transferring the content to PowerPoint, you can concentrate on the individual slides without worrying about the presentation flow.
Import Word document outlines
It isn’t necessary to manually transfer a presentation outline from a document to individual slides. To create an unformatted presentation that includes slides, you can import a text file or Word document that contains the slide information. PowerPoint creates unformatted Title And Content slides corresponding to the slide titles specified in the source file. When creating a presentation from text file content, you can create only slide titles, because text files don’t support formatting options that would inform PowerPoint of how you want to use the content. When creating a presentation from Word file content, however, you can format the content by applying multiple heading levels.
)
PowerPoint creates slides, slide titles, and multiple levels of bulleted content based on the heading levels assigned within the Word document. PowerPoint uses only the headings and no other document content. Paragraphs styled as Title or Heading1 become slide titles, and paragraphs styled as Heading2 through Heading9 become bullet points.
)
If you save an outline containing styled headings as a Word document (with the .doc or .docx extension) or a Rich Text Format (.rtf) file, you can create a new presentation by opening the outline from PowerPoint, or you can add the outline slides to the existing presentation by importing the outline.
To prepare a Word document as a presentation outline
Create a Word document that contains the slide titles and bulleted list content for the slides you want. The document can also contain other content.
In the Word document, apply the Title or Heading1 style to text that equates to new slide titles, the Heading2 style to text that equates to first-level bullet points on the slide, and the Heading3 style to text that equates to second-level bullet points. Then save the file.
To create a presentation based on a Word outline
Identify a document that contains the correctly styled outline content.
In PowerPoint, do the following:
From the Open page of the Backstage view, browse to the folder that contains the Word document.
Click Browse to display the Open dialog box.
In the Open dialog box, in the File Type list, click All Files or All Outlines.
Locate the document that contains the outline, and then do either of the following to create a presentation populated with slides corresponding to the slide titles in the document:
Double-click the document.
Click the document to select it, and then click Open.
To insert slides based on a Word outline into an existing presentation
Identify a document that contains the correctly styled outline content.
Open the presentation you want to insert slides into.
In the Slides pane, click to position the insertion bar in the location where you want to insert the new slides.
On the Insert tab, in the Slides group, click the New Slide arrow, and then click Slides from Outline.
In the Insert Outline dialog box, browse to the folder that contains the Word document, and then double-click the document to insert slides corresponding to the slide titles in the document.
Insert slides from another presentation
If the slides you want to use already exist in another presentation, you can easily incorporate them into a new presentation.
PowerPoint offers multiple ways to reuse slides from one presentation in another:
 You can move or copy slides directly between open presentations.
- You can import slides from one presentation into another by using the Reuse Slides tool. It isn’t necessary to open the source presentation.
- If you know in advance that you’ll want to use a slide in multiple presentations, you can publish it to the slide library on your computer and then reuse it from there, without having to track down the presentation or undo any presentation-specific modifications that you might have made to the slide.
You can reuse slides from any presentation that you can browse to from File Explorer
To copy slides from an open presentation
Open the source and target presentations.
Display the presentation content in Normal view or Slide Sorter view. (The source and target presentations don’t have to be in the same view.)
Drag the slides you want to reuse from the source presentation to the target presentation and drop them among the slide thumbnails in the location you want them.
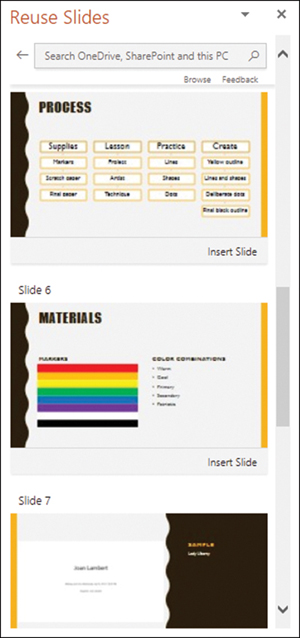
To reuse slides from an existing presentation
In the Thumbnails pane or Slide Sorter pane, click where you want to insert the reused slide or slides.
On the Home tab or Insert tab, in the Slides group, click Reuse Slides. The Reuse Slides pane opens, displaying thumbnail representations of presentations saved on your computer or to which you have access on OneDrive or SharePoint.
Do either of the following:
Scroll the Reuse Slides pane to locate a presentation from which you want to reuse slides. On the presentation thumbnail, click Choose Content.
In the Reuse Slides pane, click Browse. In the Choose Content dialog box, locate and double-click the presentation containing the slides you want to reuse.
In the Reuse Slides pane displaying the presentation content, click Insert Slide on the thumbnail of each slide you want to insert in your presentation.
Insert slides and select slide layouts
When you insert a slide into a presentation, PowerPoint inserts it with the default layout immediately after the current slide. If you want to add a slide with a different layout, select the layout you want from the New Slide gallery. The available layouts and their design depend on the template used to create the presentation.
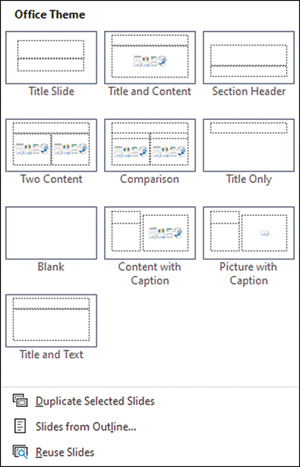
Thumbnails depict the content of each slide layout
After you insert a slide, you can apply a different layout at any time, or if you make changes to the slide structure, you can reset the layout.
If you want to insert a slide that is similar to an existing slide, you can duplicate the existing slide and then change it instead of having to create the slide from scratch.
To add slides
 In Normal view or Slide Sorter view, click the slide that you want the new slide to follow, and then on the Home tab, in the Slides group, do one of the following:
To add a slide of a specific layout, click the New Slide arrow, and then click the slide layout you want to add.
To add a slide of the currently selected layout, click the New Slide button or press Ctrl+M.
To add a slide that is identical to the currently selected slide, click the New Slide arrow, and then click Duplicate Selected Slides.
- Right-click a slide, and then do one of the following:
To add a slide of the currently selected layout, click New Slide.
To add a slide that is identical to the currently selected slide, click Duplicate Slide.
To apply a slide layout
Do either of the following:
To apply the layout to only one slide, display the slide in Normal view or select it in Slide Sorter view.
To apply the layout to multiple slides, display the presentation in Slide Sorter view, and then select the slides you want to modify.
On the Home tab, in the Slides group, click the Slide Layout button, and then click the layout you want to apply.
To reset slide content to the layout defaults
- Select the slide or slides you want to reset. Then on the Home tab, in the Slides group, click the Reset button.
To delete slides
- Right-click a slide or selected slides, and then click Delete Slide.
OBJECTIVE 2.1 PRACTICE TASKS
The practice files for these tasks are in the MOSPowerPoint2019\ Objective2 practice file folder. The folder also contains a result file that you can use to check your work.
 Open the PowerPoint_2-1 presentation and do the following:
 From within PowerPoint, open the PowerPoint_2-1a document from the practice file folder to create a presentation based on the outline in the document. (If you encounter an error opening the file, use the Insert Slides from Outline method to import the outline content.)
- Delete the original blank slide from the presentation, leaving only the slides created from the outline.
- Save the presentation as PowerPoint_2-1a.pptx.
- Start or switch to File Explorer and do the following:
- Display the contents of the practice file folder.
- Open the PowerPoint 2-1a document and compare it to the PowerPoint_2-1a presentation to identify the relationship between the outline levels and the slide content.
- Close the PowerPoint 2-1a document and File Explorer.
- Save the PowerPoint_2-1a presentation. Open the PowerPoint_2-1a_results presentation. Compare the two presentations to check your work. Then close the open presentations.
- Open the PowerPoint_2-1b presentation and do the following:
- Immediately following the title slide (slide 1), insert a new slide with the default Title and Content layout.
- Delete the blank slide from the end of the presentation.
- After slide 7 (Falling Rates), insert a new slide with the Winter Section Header slide layout. In the title placeholder, enter Winter Wonders.
- Duplicate slide 6 (Water Conservation) and then move the duplicate to follow the Winter Wonders section opener slide.
- Display slide 4 (Grow Your Own Gardener). Change the slide layout from Picture with Caption to Comparison. Note the effect on the existing slide content.
- Save the PowerPoint_2-1b presentation. Open the PowerPoint_2-1b_results presentation. Compare the two presentations to check your work. Then close the open presentations.