Objective group 2. Use advanced editing and formatting features
- By Paul McFedries
- 5/5/2020
- Objective 2.1: Perform advanced editing and formatting
- Objective 2.2: Configure paragraph layout options
Objective 2.2: Configure paragraph layout options
This topic describes Word’s advanced paragraph layout options, including how to control hyphenation and add line numbers. Later in this section you also learn how to set paragraph pagination options.
Configure hyphenation and line numbers
A raging debate among desktop publishers is going on even as you read this: should you justify text—that is, align the text on both the left and right margins—or should you justify only the left margin and leave the right margin ragged? The answer is, “It depends.” Many people perceive justified text as a formal look and, therefore, more desirable for formal documents. Others insist that the drawbacks of right justification outweigh the perhaps more casual approach of a ragged-right margin. White space comes into play here, both as a positive and a negative.
When you justify text (that is, align the text on both the left and right margins), Word forces extra spaces between words to make the right margin even. These extra spaces can cause “rivers” of unwanted white space to run through your text. When you justify text in columns, Word has fewer words to work with and might insert whole blocks of spaces to even out the margin. Readers find these blocks extremely distracting. On the other hand, ragged-right margins created by aligning text on the left don’t force extra spaces into text and therefore don’t cause white space rivers and blank areas. Extra white space at the right margin also helps open up your text, but sometimes your right edges can look too ragged, particularly if you use many long words.
You can solve both problems using Word’s hyphenation feature, which hyphenates longer words rather than wrapping them onto the next line:
In justified text, this means you get more text on each line, so you are less likely to have rivers of white space and blank areas are filled in with partial words.
In right-ragged text, Word fills in the right edge of each line with either entire words, if they fit, or with partial words as part of the hyphenation process, so the raggedness of the right margin is greatly reduced.

Set your hyphenation options.
Unfortunately, if you hyphenate to reduce raggedness, you run the risk of having hyphens ending too many lines, which is another visual distraction for the reader. If you choose to have Word hyphenate a document automatically, you can set an option to limit the number of consecutive hyphens. If you hyphenate a document manually, Word displays a dialog box in which you can confirm the hyphenation Word suggests or reposition a hyphen within a word.
)
Some documents require the lines to be numbered so that the reader (or writer) can more easily reference a particular line. Legal documents most often require line numbers, but they are also useful for programming code and literary analysis. You can also apply line numbers by section, so you can add them to some or all of a document. Word’s Line Numbers command inserts line numbers along the left margin of a document. You can also set line-numbering options such as the distance between line numbers and text.
You can display line numbers that use a specific interval by changing the value in the Count By list.
To automatically hyphenate a document
On the Layout tab, in the Page Setup group, click Hyphenation, then click Hyphenation Options.
In the Hyphenation dialog box, select the Automatically hyphenate document check box.
In the Limit consecutive hyphens to box, enter or select the maximum number of consecutive hyphenated lines that a paragraph can contain.
Click OK.
To manually hyphenate a word
In the document, select the word you want to hyphenate.
On the Layout tab, in the Page Setup group, click Hyphenation, then click Manual.
In the Manual Hyphenation dialog box, accept the hyphenation suggested by Word or insert a hyphen where you want to break the word.
To assign line numbers
 Select the paragraph or paragraphs you want to work with. On the Layout tab, in the Page Setup group, click Line Numbers, then click a preset option: None, Continuous, Restart Each Page, Restart Each Section, or Suppress for Current Paragraph.
Or
Select the paragraph or paragraphs you want to work with.
On the Layout tab, in the Page Setup group, click Line Numbers, then click Line Numbering Options.
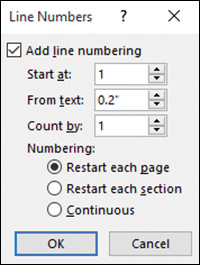
On the Layout tab of the Page Setup dialog box, click the Line Numbers button.
In the Line Numbers dialog box, select the Add line numbering check box.
In the Start at list, click the beginning line number.
In the From text list, specify the distance the line number will appear from the left margin of the text, or keep the default setting of Auto.
In the Count by list, specify the increment by which line numbers are displayed.
In the Numbering area, select the option for how line numbers should be displayed: Restart each page, Restart each section, or Continuous.
Click OK in the Line Numbers dialog box, then click OK in the Page Setup dialog box.
Set paragraph pagination options
The Line And Page Breaks tab of the Paragraph dialog box provides options that you can use to control various aspects of page layout.
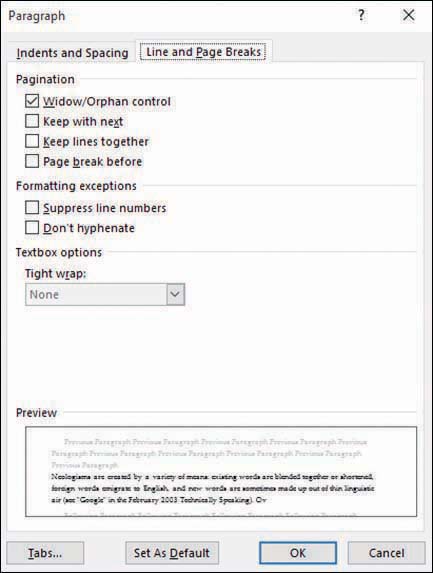
Select one or more of the Pagination options to control how text breaks across a page.
In the Pagination group, use the following settings to manage pagination:
Widow/Orphan control A widow is a single line of text that appears at the bottom of a page, and an orphan is a single line that appears at the top of a page. Selecting this option controls widows and orphans by preventing single lines of text at either the start or the end of a page.
Keep with next This option keeps the lines of text you select together with the paragraph that follows them. You might apply this setting to a heading and the paragraph that follows it so that the heading does not stand alone on the page.
Keep lines together When you want to keep lines of text together on a page (the stanza of a poem or a quotation, for example), select that text, then set this option.
Page break before Select this option to insert a page break before selected text.
In the Formatting Exceptions area of the Line And Page Breaks tab, there are two options:
Suppress line numbers Use this option to turn off the display of line numbers for the active paragraph.
Don’t hyphenate Use this option to turn off hyphenation in the active paragraph.
The Textbox Options area of the dialog box provides settings for controlling whether the text that wraps a text box is tightly wrapped. You can apply one of the following settings to the active paragraph: None, All, First And Last Lines, First Line Only, and Last Line Only.
To set paragraph pagination options
Select the paragraph or paragraphs you want to work with.
Either right-click the selection and then click Paragraph or, on the Layout tab, in the Paragraph group, click the dialog box launcher.
On the Line and Page Breaks tab of the Paragraph dialog box, do any of the following:
In the Pagination area, select any of the Widow/Orphan control, Keep with next, Keep lines together, and Page break before check boxes.
In the Formatting exceptions area, select either or both of the Suppress line numbers and Don’t hyphenate check boxes.
In the Textbox options area, if the Tight wrap list is active, select an option for how to wrap text around the selected text box.
Click OK to apply the settings.
OBJECTIVE 2.2 PRACTICE TASKS
The practice file for these tasks is located in the MOSWordExpert2019\Objective2 practice file folder. The folder also contains a result file that you can use to check your work.
- Open the WordExpert_2-2 document, and do the following:
 Configure the VBA code listing so that it does not get hyphenated.
- Configure the rest of the document (that is, the non-code text) to suppress line numbers.
- Manually hyphenate the entire document, accepting Word’s default hyphen placements (for example, in the first paragraph, the words sentence and sentences should be hyphenated as sen-tence and sen-tences, respectively). However, if Word tries to insert a hyphen into a code word (that is, any text in a monospace font), decline the hyphen.
- Add continuous line numbers to the VBA code listing.
- Open the WordExpert_2-2_results document. Compare the two documents to check your work. Then close the open documents.