Objective group 2. Use advanced editing and formatting features
- By Paul McFedries
- 5/5/2020
- Objective 2.1: Perform advanced editing and formatting
- Objective 2.2: Configure paragraph layout options
In this sample chapter from the MOS Study Guide for Microsoft Word Expert Exam MO-101, author Paul McFedries covers the skills tested in the Microsoft Office Specialist Expert exam for Microsoft Word 365 and Microsoft Word 2019 relating to using Word’s advanced editing and formatting features.
Objective 2.1: Perform advanced editing and formatting
This topic explains how to work with advanced editing and formatting features. It describes how to extend find-and-replace operations by using wildcard characters and how to use special characters when you search for and replace text. It next describes how you can carry out find-and-replace operations by using styles or specific formatting. Finally, this topic also covers Word’s options for pasting cut or copied content.
Find and replace text by using wildcards and special characters
Simple find-and-replace operations in Word can be extended in several ways. For example, in the Find And Replace dialog box, you can select an option to search only for whole words, use a case-specific search (they’re instead of They’re), or search by using how words sound (they’re, their, and there). This section describes another way to extend find-and-replace operations—by using wildcard characters and special characters.
Use wildcard characters to find and replace text
You can extend your use of the Find And Replace dialog box by using wildcards. For example, as a wildcard character, the asterisk (*) represents a sequence of one or more characters. The question mark (?) is used to represent a single character within a sequence. When you combine wildcard characters with literal characters, you can find patterns of text.
The following table lists wildcard characters and examples of how to use them.
Wildcard character |
Syntax and examples |
|---|---|
? |
Locates any single character. For example, l?w locates the words law and low and this sequence of characters in words such as below or lawful. |
* |
Locates a string of characters. For example, J*n finds John, Jocelyn, and Johnson. Wildcard character sequences are case-sensitive. To find joinery and journey, you would use j*n. |
< |
Finds characters at the start of a word. For example, <plen finds plenty, plentiful, and plentitude. It does not find the word splendid. |
> |
Finds characters at the end of a word. For example, ful> finds fanciful, useful, and plentiful. It does not find fulfill or wonderfully. |
[ ] |
Finds one of the characters within a sequence you specify. For example, h[eor]s finds words such as ghosts, these, hose, those, and searches, or the abbreviation hrs (hours). It does not find horse. |
[n-n] |
Finds any single character within the range you specify. You must specify the range in ascending order (d-l, for example). For instance, [c-h]ave finds gave, have, and leave. |
[!n-n] |
Finds any single character except the characters in the range you specify. For example, st[!n-z]ck finds stack and stick but not stock or stuck. |
{n} |
Finds the specified number of instances of the previous character or expression. For example, cre{2}d finds creed (two instances of e) but does not find credential. |
{n,} |
Finds at least the specified number of instances of the preceding character or expression. For example, cre{1,}d finds both creed and credential. |
{n,m} |
Finds the number of instances of the preceding character or expression in a range. For example, 50{1,3} finds 50, 500, and 5000. |
@ |
Finds one or more instances of the preceding character or expression. For example, bal@* finds balloon and balcony. |
[\wildcard character] |
Finds instances of the specified wildcard character. For example, [\*] finds all asterisk wildcard characters. |
As shown in the example for the @ symbol, you can combine wildcard characters to create expressions. For example, the expression s[a-n]{2}d finds words such as send, sending, dashed, and slide, but it does not find the word sad. In this expression, Word searches for a string of characters that starts with s, contains two characters within the range a-n, and ends with d. You can also use parentheses to group wildcard characters and text to indicate the order of evaluation. For example, the expression <(det)*(ing)> finds determining and deterring, with the character sequence det at the start of the word (indicated by the < symbol) and the sequence ing at the end (indicated by the > symbol). Keep in mind that all searches in which you use wildcards are case-sensitive. As an example, the expression [c-h]ave finds have and cave but not the name Dave.
You can also use wildcards to replace patterns of text. For example, you can use the \n wildcard character to invert first and last names by entering (First Name) (Last Name) (that is, a person’s actual first and last names, each enclosed in parentheses) in the Find What box and \2 \1 in the Replace With box. Word finds occurrences of the name and inverts the order so that the last name (item 2) comes first.
To display the Replace tab of the Find And Replace dialog box
 On the Home tab, in the Editing group, click Replace.
- Press Ctrl+H.
To search and replace by using wildcard characters
Display the Replace tab of the Find and Replace dialog box.
If the Search Options area isn’t displayed, click More.
Select the Use wildcards check box.
In the Find what box, enter the wildcard expression for the text you want to find. Select wildcard characters from the Special menu or enter the wildcard character sequence yourself.
In the Replace with box, enter any replacement text or select an option from the Special menu.
Click Find Next to locate the first instance of the search term.
Click Replace or Replace All as appropriate to replace the search term.
Use special characters to find and replace text
To find and replace formatting marks, a character such as an em dash, or a field, you make selections from the Special menu in the Find And Replace dialog box. Special characters are represented by a character combination that begins with the caret symbol (^).

Insert character codes from the Special menu to find and replace special characters such as paragraph marks, notes, and dashes.
In a document with extra paragraph characters, for example, you could search for two paragraph characters (^p^p) and replace the pair with one. If you wanted to search for any year between 2000 and 2009 and replace each year with 2019, you could enter 2^#^#^# (a 2 and three instances of the Any Digit option) in the Find What box and 2019 in the Replace With box.
Items on the Special menu vary depending on whether you are specifying values in the Find What box or the Replace With box. For example, you can choose Clipboard Contents as the value in the Replace With box to replace what you are searching for with the content saved on the Clipboard.
To search and replace by using special characters
Display the Replace tab of the Find and Replace dialog box. If necessary, click More to display the Search Options area.
In the Find what box, enter any text that you want to include in the search term.
Click the Special button, then on the menu, click the special character you want to enter in the box. Repeat as necessary to enter multiple special characters.
In the Replace with box, enter any replacement text or special characters.
Click Find Next to locate the first instance of the search term.
Click Replace or Replace All as appropriate to replace the search term.
Find and replace formatting and styles
In the Find And Replace dialog box, you can use the Format menu to locate text formatted with a specific font, for example, and then replace that font with another. You can also search for formatting attributes such as font size or color, paragraph settings such as line spacing, specific tab settings, text in a specific language, or text or other document elements to which a specific style is applied.
The options on the Format menu open dialog boxes like those that you open from the Home tab to apply or modify formatting. In those dialog boxes, you select or enter settings for the format you want to search for (for example, 12-point Arial font with italic applied), and then specify settings for the new formatting you want to apply (such as 14-point Calibri with a red font color).
When you select Style on the Format menu, you can use options in the Find Style dialog box to specify a style you want to locate and a style with which you want to replace that style.
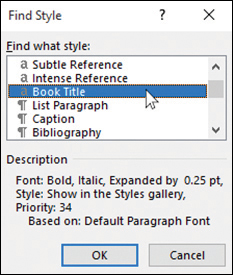
In the Description area, you can verify the attributes of the style you’re searching for.
When you use these find-and-replace operations to find and replace only formatting or styles (leaving the related text unchanged), you don’t enter any text or other values in the Find What and Replace With boxes. However, you can search for and replace text by using the formatting or style applied to that text. For example, you could search for instances of the text Office 2013 that have the Version Number style applied and replace those instances with the text Office 2019.
To find and replace formatting
Display the Replace tab of the Find and Replace dialog box. If necessary, click More to display the Search Options area.
Click in the Find what box, then click Format. On the Format menu, click the type of formatting you want to find. In the dialog box that opens, specify the formatting, then click OK.
Click in the Replace with box. On the Format menu, click the command for the type of formatting you need. In the dialog box that opens, specify the formatting you want to substitute, then click OK.
Click Find Next to locate the first instance of the formatting.
Click Replace or Replace All as appropriate to substitute the new formatting.
To find and replace styles
Display the Replace tab of the Find and Replace dialog box. If necessary, click More to display the Search Options area.
Click in the Find what box, then click Format.
On the Format menu, click Style.
In the Find Style dialog box, click the style you want to find, then click OK.
Click in the Replace with box.
On the Format menu, click Style.
In the Replace Style dialog box, click the style you want to substitute, then click OK.
Click Find Next to locate the first instance of the style.
Click Replace or Replace All as appropriate to substitute the new style.
To find and replace text by using formatting or styles
Display the Replace tab of the Find and Replace dialog box. If necessary, click More to display the Search Options area.
Click in the Find what box, enter the text you want to find, then click Format.
On the Format menu, click the command for the type of formatting applied to the text or click Style to search for text with a specific style applied.
In the dialog box that opens, specify the formatting or style, then click OK.
In the Replace with box, enter the text you want to substitute.
Click Find Next to locate the first instance of the text.
Click Replace or Replace All as appropriate to substitute the new style.
Apply paste options
Pasting cut or copied text and other content is a common editing task that applies when you’re working with a single Word document, multiple Word documents, or content from another program. The document (or document location) where the content was cut or copied is called the source, and the document where the content is to be pasted is called the destination. As a general rule, if the styles in the documents you are working with have the same definitions, the text and other content will retain the formatting from the source. If the same styles in the source and destination have conflicting definitions, Word uses the style definition in the destination by default.
To control how styles get applied during a paste, or to resolve a conflict in styles between the source and destination, you can use the Paste Options button, which Word displays whenever you paste content. You click the button (or press Ctrl) to open a gallery of icons that provides options for how the content you are pasting should be formatted. You can use the destination formatting, use the source formatting, merge formatting, or keep only the text (so that the content is pasted using the default Normal style). If Live Preview is enabled, Word displays how each option affects the display of the pasted content when you point to the option’s icon.
)
Depending on the content you paste, the Paste Options gallery includes some or all of the following icons:
Use Destination Styles Click this icon (or press S while the gallery is displayed) to paste the content using the styles as defined in the destination document.
Picture (Word 365 only) Click this icon (or press U while the gallery is displayed) to paste the content as a picture object (that is, you end up with a noneditable image of the original text, not the text itself).
Keep Source Formatting Click this icon (or press K while the gallery is displayed) to paste the content using the styles as defined in the source document.
Merge Formatting Click this icon (or press M while the gallery is displayed) to paste the content without any formatting that was applied directly to the content, except for emphasis formatting (such as bold and italic) that has been applied to only portions of the content. The pasted content assumes the styles and formatting that are in effect at the insertion point.
Keep Text Only Click this icon (or press T while the gallery is displayed) to discard all the source formatting (as well as any nontext elements such as images) and paste the content so that it assumes the styles and formatting that are in effect at the insertion point.
By selecting settings on the Advanced page of the Word Options dialog box (or clicking Set Default Paste in the Paste Options gallery), you can control Word’s default paste option in four pasting scenarios: Pasting Within the Same Document, Pasting Between Documents, Pasting Between Documents When Style Definitions Conflict, and Pasting From Other Programs. You can also specify a default paste behavior for images.
)
In the rest of the Cut, Copy, And Paste section, you can set other default pasting behaviors. For example, by default Word preserves bullets and numbers when you use the Keep Text Only paste option, but you can turn this off by clearing the Keep Bullets And Numbers When Pasting Text With Keep Text Only Option check box. Rather than using the Ctrl+V key combination to paste content, you can press the Insert key if you select the Use The Insert Key For Paste check box. In the unlikely event that you never use the Paste Options button and therefore find it just gets in the way, you can prevent it from appearing by clearing the Show Paste Options button When Content Is Pasted check box. Finally, you can click the Settings button next to the Use Smart Cut And Paste option to open the Settings dialog box. The Smart Style Behavior option in this dialog box also affects how Word manages style conflicts. When this option is selected, styles are handled consistently when the style in the document you are pasting from has the same name as a style in the document you are pasting to. The paste options allow you to choose between keeping the formatting and matching the formatting of the destination document.
To apply a paste option
Paste some content where you want it to appear in a Word document.
Click the Paste Options button (or press Ctrl).
Point to the paste option icons, refer to the live preview to view how each option affects the content you are pasting, and then click the option you want to apply.
To set paste options
Display the Advanced page of the Word Options dialog box:
Click File, click Options, and then click Advanced.
After you paste content, click Paste Options, then click Set Default Paste.
In the Cut, Copy, and Paste section, use the four Pasting X lists to select the default paste options you want to use.
Use the Insert/Paste Pictures As list to set the default paste behavior for images.
Use the check boxes in the rest of the Cut, Copy, and Paste section to set Word’s other paste options.
To customize Word’s Smart Cut and Paste feature, click Settings.
OBJECTIVE 2.1 PRACTICE TASKS
The practice file for these tasks is located in the MOSWordExpert2019\Objective2 practice file folder. The folder also contains a result file that you can use to check your work.
 Open the WordExpert_2-1 document, and do the following:
 Use wildcards in the Find And Replace dialog box to locate words that start with calor.
- Use the \n wildcard character to replace the phrase aisle cookie with cookie aisle.
- Find instances of two consecutive paragraph marks and replace them with a single paragraph mark.
- Find the instance of the Subtitle style and replace it with the Quote style.
- Find all the bold text and change the font color to Dark Blue.
- Open the WordExpert_2-1_results document. Compare the two documents to check your work. Then close the open documents.