Describe core Azure services
- By Jim Cheshire
- 8/14/2020
- Skill 2.1: Describe the core Azure architectural components
- Skill 2.2: Describe core workload products available in Azure
Skill 2.2: Describe core workload products available in Azure
As we went over the core Azure architectural components, you noticed some references to some of the products available in Azure. In this skill section, we’ll talk about some of the core workload products available in Azure.
Azure virtual machines
A virtual machine (VM) is a software-based computer that runs on a physical computer. The physical computer is considered the host, and it provides the underlying physical components such as disk space, memory, CPU power, and so on. The host computer runs software called a hypervisor that can create and manage one or more VMs, and those VMs are commonly referred to as guests.
The operating system on a guest doesn’t have to be the same operating system that the host is running. If your host is running Windows 10, you can run a guest that uses Windows Server 2016, Linux, or many other operating systems. This flexibility makes VMs extremely popular. However, because the VMs running on a host use the physical systems on that host, if you have a need for a powerful VM, you’ll need a powerful physical computer to host it.
By using Azure virtual machines, you can take advantage of powerful host computers that Microsoft makes available when you need computing power, and when you no longer need that power, you no longer have to pay for it.
To create an Azure virtual machine, log in to the Azure portal using your Azure account and then follow these steps, as shown in Figures 2-11 through 2-13.
)
)
Figure 2-11 Creating a virtual machine

Figure 2-12 Virtual machine settings
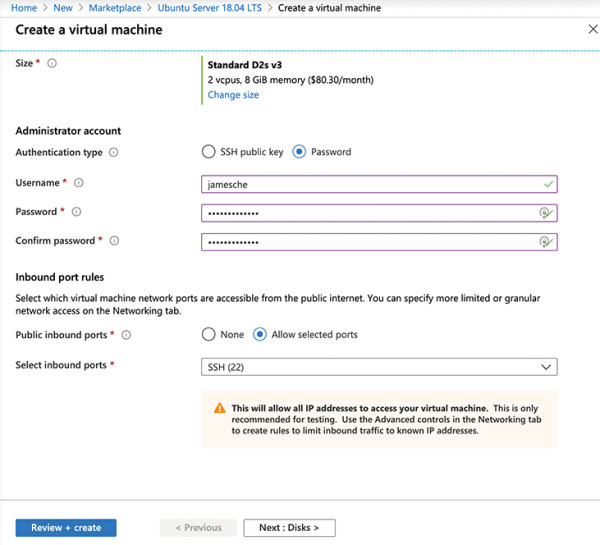
Figure 2-13 Virtual machine settings
Click Create A Resource.
Click Compute.
Click the See All link.
Click Ubuntu Server.
Click the Create button.
Next to Resource Group, click Create New to create a new resource group.
Enter TestRG as the resource group name and click OK.
Enter TestVM as your VM name.
Scroll down and select Password for the authentication type.
Enter a username for your administrator account.
Enter a password you’d like to use for your administrator account.
Confirm the password.
Leave all the other settings as they are and click the Next button three times to move to the Management screen.
In the Monitoring section, set Boot Diagnostics to Off.
Click Review + Create to create your VM.
After you click Review + Create, Azure will validate your settings to make sure you haven’t left anything out. Once your validation has passed, you will see a Create button. Click the Create button to start the deployment of your new VM.
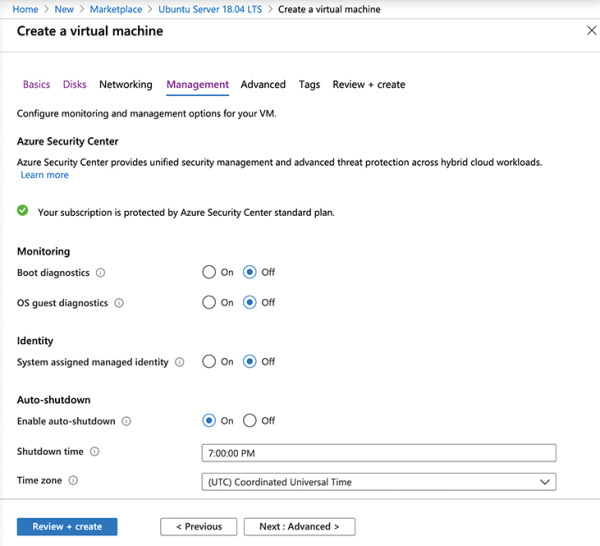
Figure 2-14 Virtual machine management settings
As your VM is being deployed, you’ll see the status displayed in the Azure portal as shown in Figure 2-15. You can see the Azure resources that are created to support your VM. You can see the resource name, the resource type (which starts with the resource provider), and the status of each resource.
)
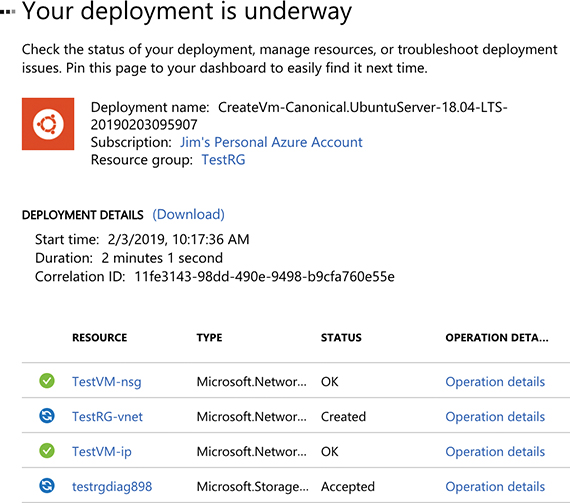
Figure 2-15 Virtual machine deployment
Once all the resources required for your VM are created, your VM will be considered fully deployed. You’ll then be able to click the Go To Resource button to see the management interface for your VM in the Azure portal, as shown in Figure 2-16.
)
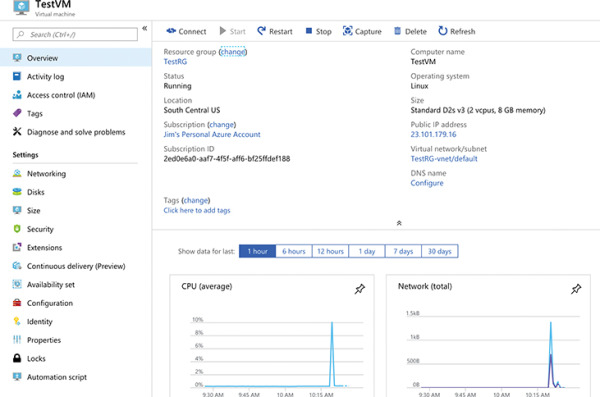
Figure 2-16 Viewing a virtual machine
Our new VM is a guest on a physical computer in an Azure datacenter. In that datacenter is a physical rack of computer servers, and our VM is hosted on one of those servers. The host computer is managed by Microsoft, but the VM is managed by you because this is an IaaS offering in Azure.
As of right now, this VM is susceptible to downtime due to three types of events: planned maintenance, unplanned maintenance, and unexpected downtime.
Planned maintenance refers to planned updates that Microsoft makes to the host computer. This includes things like operating system updates, driver updates, and so on. In many cases, updates won’t affect your VM, but if Microsoft installs an update that requires a reboot of the host computer, your VM will be down during that reboot.
Azure has underlying systems that constantly monitor the health of computer components. If one of these underlying systems detects that a component within the host computer might fail soon, Azure will flag the computer for unplanned maintenance. In an unplanned maintenance event, Azure will attempt to move your VM to a healthy host computer. When it does this, it preserves the state of the VM, including what’s in memory and any files that are open. It only takes Azure a short time to move the VM, during which time it’s in a paused state. In a case where the move operation fails, the VM will experience unexpected downtime.
In order to ensure reliability when a failure occurs in a rack within the Azure datacenter, you can (and you should) take advantage of a feature called availability sets. Availability sets protect you from maintenance events and downtime caused by hardware failures. To do that, Azure creates some underlying entities in an availability set called update domains and fault domains. (In order to protect yourself in the event of maintenance events or downtime, you must deploy at least two VMs into your availability set.)
Fault domains are a logical representation of the physical rack in which a host computer is installed. By default, Azure assigns two fault domains to an availability set. If a problem occurs in one fault domain (one computer rack), the VMs in that fault domain will be affected, but VMs in the second fault domain will not. This protects you from unplanned maintenance events and unexpected downtime.
Update domains are designed to protect you from a situation where the host computer is being rebooted. When you create an availability set, Azure creates five update domains by default. These update domains are spread across the fault domains in the availability set. If a reboot is required on computers in the availability set (whether host computers or VMs within the availability set), Azure will only reboot computers in one update domain at a time and it will wait 30 minutes for computers to recover from the reboot before it moves on to the next update domain. Update domains protect you from planned maintenance events.
Figure 2-17 shows the diagram that Microsoft uses to represent an availability set. In this diagram, the fault domains FD0, FD1, and FD2 encompass three physical racks of computers. UD0, UD1, and UD2 are update domains within the fault domains. You will see this same representation of an availability set within other Azure training as well, but it’s a bit misleading because update domains are not tied to a particular fault domain.
)
Figure 2-17 Microsoft documentation representation of an availability set
Figure 2-18 shows a better representation of an availability set, with five VMs in the availability set. There are two fault domains and three update domains. When VMs were created in this availability set, they were assigned as follows:
)
The first VM is assigned Fault Domain 0 and Update Domain 0.
The second VM is assigned Fault Domain 1 and Update Domain 1.
The third VM is assigned Fault Domain 0 and Update Domain 2.
The fourth VM is assigned Fault Domain 1 and Update Domain 0.
The fifth VM is assigned Fault Domain 0 and Update Domain 1.
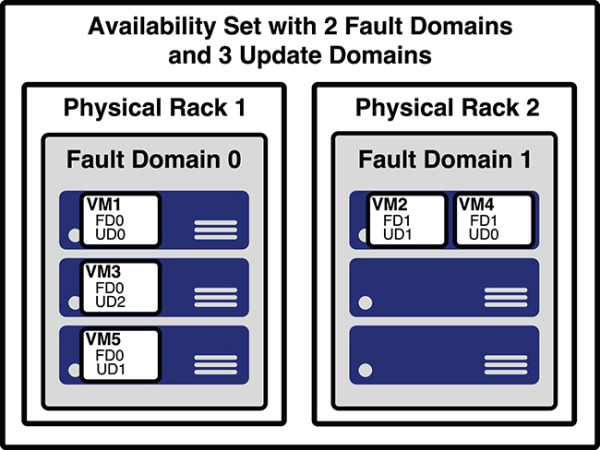
Figure 2-18 A better representation of an availability set
You can verify the placement of fault domains and update domains by creating five VMs in an availability set with two fault domains and three update domains. If you then look at the availability set created in the Azure portal, as shown in Figure 2-19, you can see the same configuration depicted in Figure 2-18.
)
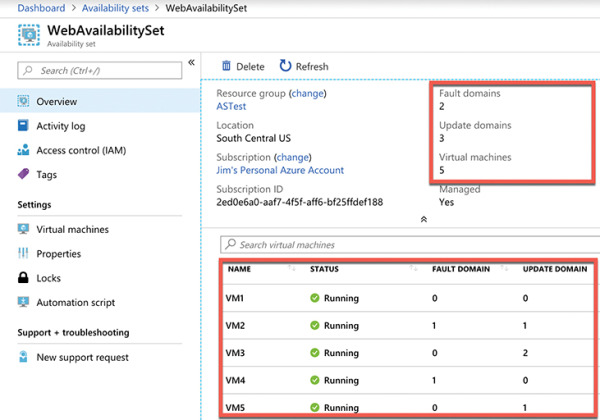
Figure 2-19 An availability set in the Azure portal showing fault domains and update domains
Notice in Figure 2-19 that the availability set is named WebAvailabilitySet. In this availability set, we run five VMs that are all running a web server and host the website for an application. Suppose you need a database for this application, and you want to host that database on VMs as well. In that situation, you would want to separate the database VMs into their own availability set. As a best practice, you should always separate your workloads into separate availability sets.
Availability sets certainly provide a benefit in protecting from downtime in certain situations, but they also have some disadvantages. First of all, every machine in an availability set has to be explicitly created. While you can use an ARM template to deploy multiple virtual machines in one deployment, you still have to configure those machines with the software and configuration necessary to support your application.
An availability set also requires that you configure something in front of your VMs that will handle the distribution of traffic to those VMs. For example, if your availability set is servicing a website hosted on the VMs, you’ll need to configure a load balancer that will handle the job of routing users of your website to the VMs that are running it.
Another disadvantage to availability sets relates to cost. In a situation where your VM needs to be changed often based on things like load on the application, you might find yourself paying for many more VMs than you need.
Azure offers another feature for VMs called scale sets that solves these problems nicely. When you create a scale set, you tell Azure what operating system you want to run and then you tell Azure how many VMs you want in your scale set. You have many other options such as creating a load balancer or gateway and so forth. Azure will create as many VMs as you specify (up to 1,000) in one easy step.
Scale sets are deployed in availability sets automatically, so you automatically benefit from multiple fault domains and update domains. Unlike VMs in an availability set, however, VMs in a scale set are also compatible with availability zones, so you are protected from problems in an Azure datacenter.
As you might imagine, you can also scale a scale set in a situation where you need more or fewer VMs. You might start with only one VM in a scale set, but as load on that VM increases, you might want to automatically add additional VMs. Scale sets provide that functionality by using Azure’s auto-scale feature. You define scaling rules that use metrics like CPU, disk usage, network usage, and so forth. You can configure when Azure should add additional instances and when it should scale back and deallocate instances. This is a great way to ensure availability while reducing costs by taking advantage of the elasticity that auto-scale provides.
Microsoft guarantees an SLA of 99.95 percent when you use a multi-VM deployment scenario, and for most production scenarios, a multi-VM deployment is preferred. However, if you use a single-instance VM, and you use premium storage, Microsoft guarantees a 99.9 percent SLA. Premium storage uses solid-state drives (SSDs) that are located on the same physical server that is hosting the VM for enhanced performance and uptime.
Azure App Service
As mentioned in Chapter 1, Azure App Service is a PaaS offering in Azure for hosting websites. In addition to basic web hosting services, App Service also offers many additional features that you can easily add to your web app, often with the flip of a switch within the Azure portal.
When you create a web app in Azure App Service, your app runs on an Azure virtual machine that is preconfigured specifically for App Service. Depending on the tier of service you use when you create your app, it will either run on a VM that is shared among many users or a VM that is dedicated to you.
Figure 2-20 shows a diagram of the basic App Service architecture. This diagram is simplified, but it illustrates the basics of how App Service works. Azure Load Balancer distributes traffic to a special VM within App Service called a front end. The front end is running special software that allows it to effectively distribute traffic to the VMs that are actually running your web app. These VMs run inside of an App Service plan, a logical container for one or more VMs that are running your web app.
)
Figure 2-20 A high-level representation of Azure App Service
App Service plans
Every web app you create in App Service runs inside of an App Service plan. An App Service plan is created within a specific Azure region, and it specifies how many VMs your app runs on and the properties of those VMs.
In Figure 2-21, an App Service plan named AZ900-Plan is being created in the Central US region. The VMs in this App Service plan will run Windows and will be created in the Standard S1 App Service pricing tier. You can click Change Size to change the pricing tier before the App Service plan is created, and you can also scale the App Service plan at any point to change the size.
)
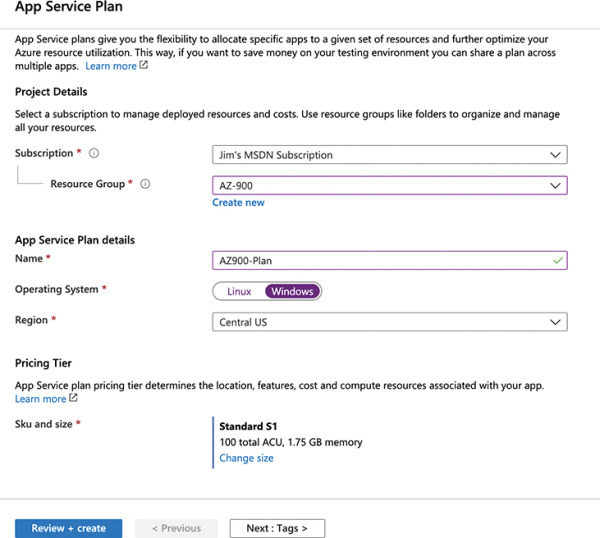
Figure 2-21 Creating an App Service plan in the Central US region
The following pricing tiers are available in App Service:
Free A no-cost tier for testing only that runs on VMs shared with other App Service customers.
Shared A low-cost tier for testing only with some additional features not offered in the Free tier. Runs on VMs shared with other App Service customers.
Basic, Standard, Premium, and PremiumV2 Higher-cost tiers that offer many additional features. Runs on dedicated VMs that are not shared with other customers.
 EXAM TIP
You are charged for App Service plans even when no web apps are running in them. If you do have web apps in your App Service plan, you are still charged if you stop the web apps. The only way to avoid being billed for an App Service plan is to delete it.
When you move from a lower pricing tier to a higher pricing tier, you are scaling up. You can also scale down at any time by moving to a lower pricing tier. If you are running in the Basic, Standard, Premium, or PremiumV2 tier, you can also scale out to multiple VMs. The Basic tier allows you to scale to a maximum of 3 VMs (or instances), the Standard tier allows for 10 instances, and the Premium and PremiumV2 tiers allow for up to 20 instances.
Web apps
When you create a new web app, you can create it in an existing App Service plan, or you can create a new App Service plan for the app. All apps in an App Service plan run on the same VMs, so if you are already stressing the resources of an existing App Service plan, your best choice might be to create a new App Service plan for your new web app.
App Service allows you to choose between a VM preconfigured with a runtime stack (such as Java, .NET, PHP, and so forth) to run your app or a Docker container. If you choose to run a preconfigured runtime stack, you can choose between multiple versions that App Service provides.
Figure 2-22 shows a web app being created in the AZ900-Plan App Service plan. This new web app will run on a VM that is configured to run .NET Core 3.0 apps on a Windows VM.
)
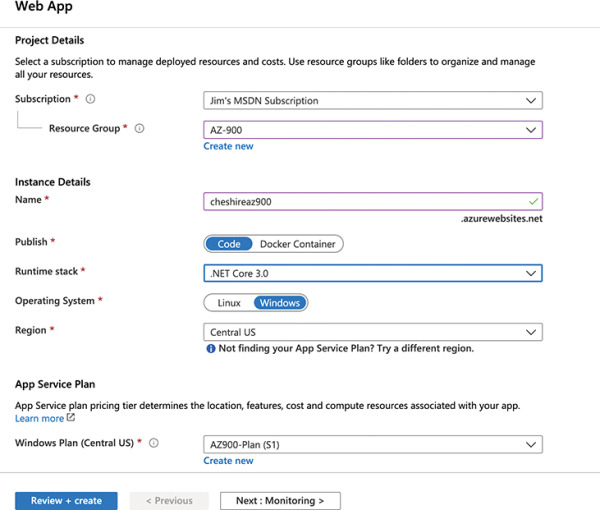
Figure 2-22 Creating a web app to run a .NET Core 3.0 website
Configuring and managing your web app is extremely easy. Because App Service is a PaaS service, you are only responsible for your code. Microsoft manages the features available to you. In Figure 2-23, you can see many of the features available in App Service, including the ability to quickly and easily scale out when needed.
)
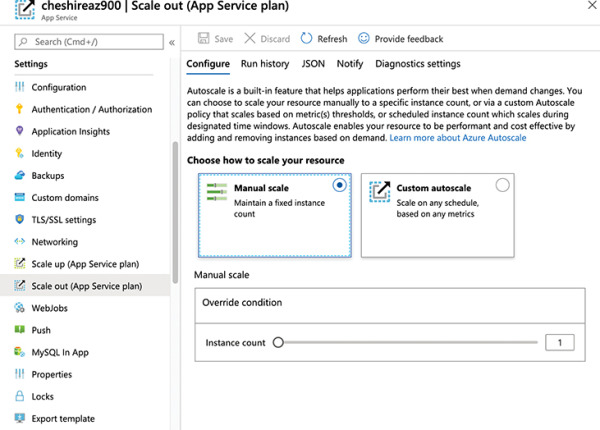
Figure 2-23 Settings for a web app make it easy to add features and scale your app
Azure Container Instances (ACI)
Azure Container Instances (ACI) is a PaaS service that offers the ability to run a containerized application easily. In order to understand how ACI works, it’s necessary to have a basic understanding of containers.
Containers
It’s becoming pretty commonplace for companies to move applications between “environments,” and this type of thing is even more prevalent when it comes to the cloud. In fact, one of the most complicated aspects of moving to the cloud is dealing with the complexities of moving to a new environment. To help with this problem and to make it easier to shift applications into new environments, the concept of containers was invented.
A container is created using a zipped version of an application called an image, and it includes everything the application needs to run. That might include a database engine, a web server, and so on. The image can be deployed to any environment that supports the use of containers. Once there, the image is used to start a container the application runs in.
In order to run an application in a container, a computer needs to have a container runtime installed on it. The most popular container runtime is Docker, a runtime developed and maintained by Docker Inc. Docker not only knows how to run applications in containers, but it also enforces certain conditions to ensure a secure environment.
Each container typically operates within an isolated environment. It has its own network, its own storage, and so on. Other containers running on the same machine cannot access the data and systems used by another container unless the developer of the image takes explicit steps to allow it. This makes containerized applications an ideal solution when security is a concern.