Describe core Azure services
- By Jim Cheshire
- 8/14/2020
- Skill 2.1: Describe the core Azure architectural components
- Skill 2.2: Describe core workload products available in Azure
In this sample chapter from Exam Ref AZ-900 Microsoft Azure Fundamentals, 2nd Edition, author Jim Cheshire reviews core Azure services and solutions.
In Chapter 1, “Describe cloud concepts,” you learned about the cloud and how you can benefit from using cloud services. Microsoft Azure was mentioned, but not in much detail.
In this chapter, we dive into the many services and solutions that Azure offers. You’ll gain an understanding of the key concepts in Azure’s architecture, which apply to all Azure services. We cover Azure datacenters and ways that Microsoft implements fault tolerance and disaster recovery by spreading Azure infrastructure across the globe. You’ll also learn about availability zones, which are Microsoft’s solution for ensuring your services aren’t affected when a particular Azure datacenter experiences a problem.
You’ll also discover how to manage and track your Azure resources, and how you can work with resources as a group using Azure resource groups. You’ll learn how to use resource groups to plan and manage Azure resources, and you’ll learn how resource groups can help you categorize your operational expenses in Azure.
In order to really understand resource groups and how Azure works under the hood, it’s important to understand Azure Resource Manager (ARM), the underlying system that Azure uses to manage your resources. You’ll learn about the benefits that ARM provides, and you’ll see how ARM opens up some powerful possibilities for quickly and easily deploying real-world solutions to Azure.
Once you have the foundational understanding of Azure, you’ll dig into some of the core workload products that Microsoft provides, such as Azure virtual machines, Azure App Service, services that make it easy to work with containers and networking, and storage and database services. You’ll also learn about the Azure Marketplace and how it enables the creation and deployment of complex solutions with minimal work on your part, and because of the “under the hood” knowledge you’ll have from earlier in the chapter, the Azure Marketplace won’t seem like black magic.
If you think that’s a lot to cover, you’re right! It’s important for you to have an understanding of all these topics in order to pass the AZ-900 exam. With the foundational knowledge of the cloud from Chapter 1, “Describe cloud concepts,” you’ll find that understanding Azure-specific concepts will be easier than you think.
Skills covered in this chapter:
Describe the core Azure architectural components
Describe core workload products available in Azure
Skill 2.1: Describe the core Azure architectural components
If you were to ask any CEO to list the five most important assets of their company, it is likely that the company’s data would be near the top of the list. The world we live in revolves around data. Just look at companies like Facebook and Google. These companies offer services to us that we like. Everyone likes looking at pictures from friends and family on Facebook (mixed in with things we don’t like so much), and who doesn’t use Google to look for things on the Internet? Facebook and Google don’t offer those services because they want to be nice to us. They offer those services because it’s a way for them to collect a large amount of data on their customers, and that data is their most valuable asset.
Facebook and Google aren’t alone. Most companies have vast amounts of data that is key to their business and keeping that data safe is at the cornerstone of business decisions. That’s why many companies are hesitant to move to the cloud. They’re afraid of losing control of their data. Not only are they afraid that someone else might gain access to sensitive data, but they’re also concerned about losing data that would be difficult (or even impossible) to re-create.
Microsoft is keenly aware of those fears, and Azure has been designed from the ground up to instill confidence in this area. Let’s look at some core architectural components that help Microsoft deliver on the cloud promise.
Azure regions
The term “cloud” tends to make people think of Azure as a nebulous entity that you can’t clearly see, but that would be a mistake. While there certainly are logical constructs to Azure, there are also physical components to it. After all, at the end of the day, we’re talking about computers!
In order to provide Azure services to people around the world, Microsoft has created boundaries called geographies. A geography boundary is oftentimes the border of a country, and there’s good reason for that. There are often regulations for data handling that apply to an entire country, and having a geography defined for a country allows Microsoft to ensure that data-handling regulations are in place. Many companies (especially ones that deal with sensitive data) are also much more comfortable if their data is contained within the confines of the country in which they operate.
There are numerous geographies in Azure. For example, there’s a United States geography, a Canada geography, a UK geography, and so on. Each geography is broken out into two or more regions, each of which is typically hundreds of miles apart. As an example, within the United States geography, there are many regions, including the Central US region in Iowa, the East US region in Virginia, the West US region in California, and the South Central US region in Texas. Microsoft also operates isolated regions that are completely dedicated to government data because of the additional regulations that governmental data requires.
Within each geography, Microsoft has created another logical boundary called a regional pair. Each regional pair contains two regions within the geography. When Microsoft has to perform updates to the Azure platform, they perform those updates on one region in the regional pair. Once those updates are complete, they move to the next region in the regional pair. This ensures that your services operating within a regional pair aren’t impacted by updates.
 EXAM TIP
The fact that each geography contains at least two regions separated by a large physical distance is important. That’s how Azure maintains disaster recovery, and it’s likely this concept will be included on the exam. We’ll cover more about this later in this chapter.
At each region, Microsoft has built datacenters (physical buildings) that contain the physical hardware that Azure uses. These datacenters contain climate-controlled buildings that house the server racks containing physical computer hardware. Each region also operates on its own network infrastructure, and Microsoft has designed the networks for low latency. Therefore, any Azure services you have in a particular region will have reliable and fast network connectivity with each other.
Each datacenter has an isolated power supply and power generators in case of a power outage. All the network traffic entering and exiting the datacenter goes over Microsoft’s own fiber-optic network on fiber owned or leased by Microsoft. Even data that flows between regions across oceans travels over Microsoft’s fiber-optic cables that traverse the oceans.
To ensure that data in Azure is safe from disasters and failures caused by possible problems in a particular region, customers are encouraged to replicate data in multiple regions. For example, if the South Central US region is hit by a devastating tornado (not out of the question in Texas), data that is also replicated to the North Central US region in Illinois is still safe and available. In order to ensure that applications are still performing as quickly as possible, Microsoft guarantees round-trip network performance of 2 milliseconds or less between regions.
Availability zones
The fact that regions are physically separated by hundreds of miles protects Azure users from data loss and application outages caused by disasters at a particular region. However, it’s also important that data and applications maintain availability when a problem occurs at a particular datacenter within a region. For that reason, Microsoft developed availability zones.
There are at least three availability zones within each enabled region, and because each availability zone exists within its own datacenter in that region, each has a water supply, cooling system, network, and power supply that is isolated from other zones. By deploying an Azure service in two or more availability zones, you can achieve high availability in a situation where there is a problem in one zone.
EXAM TIP
Availability zones provide high-availability and fault tolerance, but they might not help you with disaster recovery. If there is a localized disaster, such as a fire in a datacenter housing one zone, you will benefit from availability zones. Because availability zones are located in the same Azure region, if there is a large-scale natural disaster such as a tornado, you might not be protected. In other words, availability zones are just one facet to an overall disaster recovery and fault-tolerant design.
Because Availability zones are designed to offer enhanced availability for infrastructure, not all services support availability zones. For example, Azure has a service called App Service Certificates that allows you to purchase and manage an SSL certificate through Azure. It wouldn’t make any sense to host a certificate in App Service Certificates within an availability zone because it’s not an infrastructure component.
Currently, availability zones are supported with the following Azure services.
Windows virtual machines
Linux virtual machines
Virtual Machine Scale Sets
Azure Kubernetes Service
Managed disks
Zone-redundant storage
Standard Load Balancer
Standard IP address
VPN Gateway
ExpressRoute Gateway
Application Gateway V2
Azure Firewall
Azure Data Explorer
Azure SQL Database
Azure Cache for Redis
Azure Cosmos DB
Event Hubs
Service Bus (Premium tier)
Event Grid
Azure AD Domain Services
App Service Environments ILB
By deploying your service to two or more availability zones, you ensure the maximum availability for that resource. In fact, Microsoft guarantees an SLA of 99.99 percent uptime for Azure virtual machines only if two or more VMs are deployed into two or more zones. Figure 2-1 illustrates the benefit of running in multiple zones. As you can see, even though availability zone 3 has gone offline for some reason, zones 1 and 2 are still operational.
)
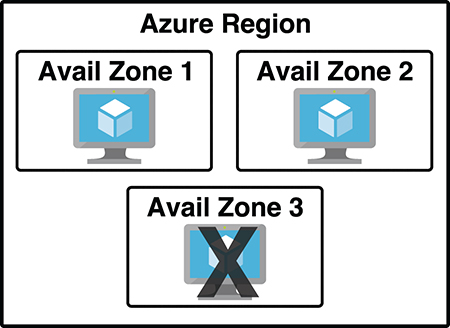
Figure 2-1 Azure virtual machine inside of three availability zones
EXAM TIP
Don’t confuse availability zones with availability sets. Availability sets allow you to create two or more virtual machines in different physical server racks in an Azure datacenter. Microsoft guarantees a 99.95 percent SLA with an availability set.
An availability zone allows you to deploy two or more Azure services into two distinct datacenters within a region. Microsoft guarantees a 99.99 percent SLA with availability zones.
There are two categories of services that support availability zones: zonal services and zone redundant services. Zonal services are services such as virtual machines, managed disks used in a virtual machine, and public IP addresses used in virtual machines. In order to achieve high availability, you must explicitly deploy zonal services into two or more zones.
Zone redundant services are services such as zone redundant storage and SQL Databases. To use availability zones with these services, you specify the option to make them zone redundant when you create them. (For storage, the feature is called ZRS or zone redundant storage. For SQL Database, there is an option to make the database zone redundant.) Azure takes care of the rest for you by replicating data automatically to multiple availability zones.
Resource groups
You should now be realizing that moving to the cloud might not be as simple as it first seemed. Creating a single resource in Azure is pretty simple, but when you’re dealing with enterprise-level applications, you’re usually dealing with a complex array of services. Not only that, but you might be dealing with multiple applications that use multiple services, and they might be spread across multiple Azure regions. Things can certainly get chaotic quickly.
Fortunately, Azure provides a feature that helps you deal with this kind of problem: the resource group. A resource group is a logical container for Azure services. By creating all Azure services associated with a particular application in a single resource group, you can then deploy and manage all of those services as a single entity.
Organizing Azure resources in a resource group has many advantages. You can easily set up deployments using a feature known as an ARM template. ARM template deployments are typically for a single resource group. You can deploy to multiple resource groups but doing so requires you to set up a complicated chain of ARM templates.
Another advantage to resource groups is that you can name a resource group with an easily recognizable name so that you can see all Azure resources used in a particular application at a glance. This might not seem so important until you actually start deploying Azure resources and realize that you have many more resources than you first thought. For example, when you create an Azure virtual machine, Azure creates not only a virtual machine, but it also creates a disk resource, network interface, public IP resource, and network security group. If you’re looking at all your Azure resources, it can be hard to differentiate which resources go with which app. Resource groups solve that problem.
In Figure 2-2, you can see a lot of Azure services. Some of these were automatically created by Azure in order to support other services, and in many cases, Azure gives the resource an unrecognizable name.
)
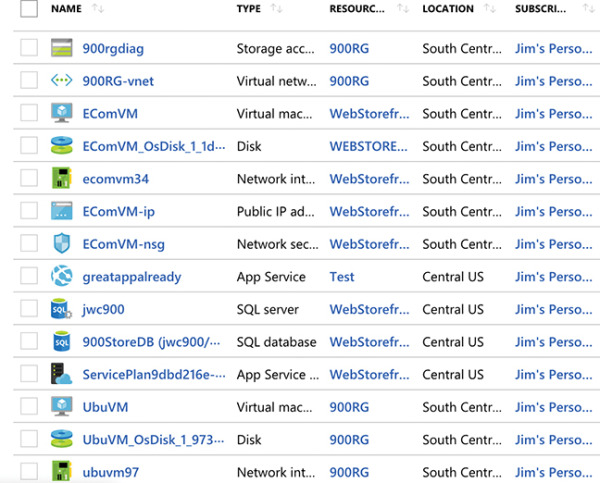
Figure 2-2 All my Azure resources
In Figure 2-3, you can see resources that are in the WebStorefront resource group. These are the Azure resources used in the e-commerce storefront.
)
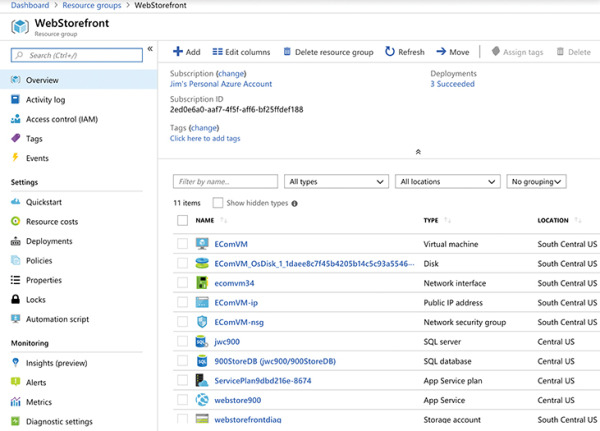
Figure 2-3 An Azure resource group
It’s convenient to see all the resources associated with a particular app, but you aren’t locked into that paradigm. This is a useful example, because it’s a common use of resource groups; however, you can organize your resource groups any way you choose. Notice in Figure 2-3 that you see resources in several different Azure regions (Regions are in the Location column). If you have access to multiple Azure subscriptions, you can also have resources from multiple subscriptions in a single resource group.
If you look at the left side of Figure 2-3, you’ll see a menu of operations that you can perform on your resource group. We won’t go into all of these because it’s out of scope for the AZ-900 exam, but there are a few that clarify the benefit of resource groups.
If you click Resource Costs, you can see the cost of all the resources in this resource group. Having that information at your fingertips is especially helpful in situations where you want to make sure certain departments in your company are charged correctly for their used resources. In fact, some companies will create resource groups for each department rather than creating resource groups scoped to applications. Having a Sales and Marketing resource group or an IT Support resource group, for instance, can help you immensely when reporting and controlling costs.
EXAM TIP
An Azure resource can only exist in one resource group. In other words, you can’t have a virtual machine in a resource group called WebStorefront and also in a resource group called SalesMarketing, because it must be in one group or the other. You can move Azure resources from one resource group to another.
You can also click Automation Script and Azure will generate an ARM template that you can use to deploy all these Azure resources. This is useful in a situation where you want to deploy these resources later or when you want to deploy them to another Azure subscription.
When you delete a resource group, all the resources in that resource group are automatically deleted. This makes it easy to delete multiple Azure resources in one easy step. Suppose you are testing a scenario and you need to create a couple of virtual machines, a database, a web app, and more. By placing all these resources in one resource group, you can easily delete that resource group after your testing and Azure will automatically delete all the resources in it for you. This is a great way to avoid unexpected costs associated with resources you are no longer using.
Azure subscriptions
You get an Azure subscription automatically when you sign up for Azure and all the resources you create are created inside that subscription. You can, however, create additional subscriptions that are tied to your Azure account. Additional subscriptions are useful in cases where you want to have some logical groupings for Azure resources or if you want to be able to report on resources used by specific groups of people.
Each Azure subscription has limits (sometimes called quotas) assigned to it. For example, you can have up to 250 Azure Storage accounts per region in a subscription, up to 25,000 virtual machines per region, and up to 980 resource groups per subscription across all regions.
EXAM TIP
Microsoft support can increase limits in some scenarios if you have a good business justification. Some limits, however, cannot be increased.
Figure 2-4 shows an Azure subscription in the Azure portal.
)
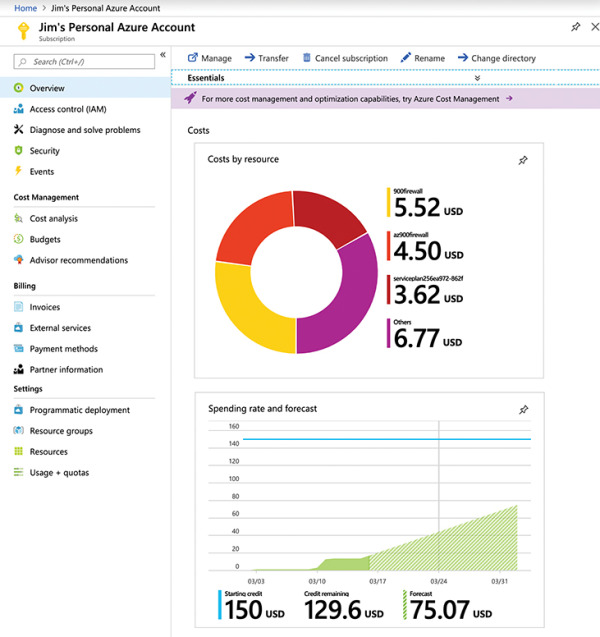
Figure 2-4 Azure subscription in the Azure portal
On the Overview blade, you can see a cost breakdown for each of the resources. You can also see the spending rate for the subscription, along with a forecasted cost by the end of the current month. If you click the Costs By Resource tile, you can see a further breakdown of the Azure expenses, as shown in Figure 2-5. In this view, you see costs by Service Name, Location (Azure region), and Resource Group, along with a graph of the costs for the month.
)
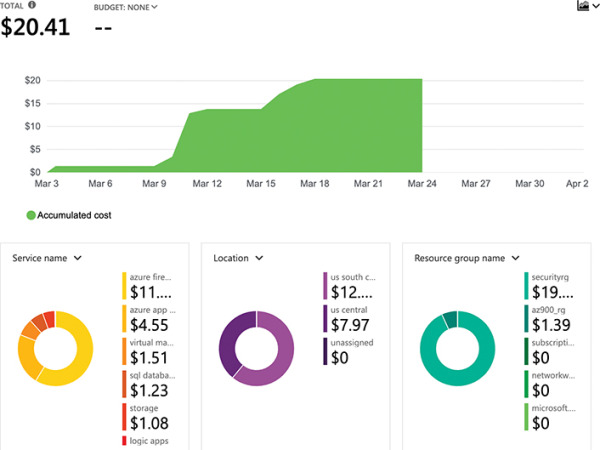
Figure 2-5 Azure subscription cost analysis
Azure invoices are also available for the subscription from within the Azure portal. You can see all the past invoices by clicking Invoices in the menu for the subscription, as shown in Figure 2-6.
)
Figure 2-6 Azure invoices
You can create additional Azure subscriptions in your Azure account. This is useful in cases where you want to separate costs or if you are approaching a subscription limit on a resource. To create a new Azure subscription, type subscription in the search box and click Subscriptions as shown in Figure 2-7.
)
Figure 2-7 Azure subscriptions
To create a new subscription, click Add in the Subscriptions blade, as shown in Figure 2-8.
)
Figure 2-8 Creating a new subscription
After you click Add, you need to choose which type of subscription you want to create. There are several types of Azure subscriptions.
Free Trial Provides free access to Azure resources for a limited time. Only one free trial subscription is available per account, and you cannot create a new free trial if a previous one has expired.
Pay-As-You-Go You pay only for those resources you use in Azure. There’s no up-front cost, and you can cancel the subscription at any time.
Pay-As-You-Go Dev/Test A special subscription for subscribers to Visual Studio that can be used for development and testing. This subscription offers discounted rates on VMs, but you cannot use this for production applications.
EXAM TIP
Each subscription is associated with a unique identifier called a subscription ID. You can give each subscription a descriptive name to help you identify it, but Azure will always use the subscription ID to identify your subscription. When you talk to Microsoft about your Azure account, they’ll also often ask for your subscription ID.
You now have an understanding of Azure subscriptions and how you can create additional subscriptions if needed. Once you’ve created additional subscriptions and resources in those subscriptions, you might find that managing all your resources becomes more cumbersome. To help with that, Microsoft has developed a feature called management groups.
Management groups
Management groups are a convenient way to apply policies and access control to your Azure resources. Much like a resource group, a management group is a container for organizing your resources. However, management groups can contain only Azure subscriptions or other management groups.
In Figure 2-9, three management groups have been created for a company. The Sales Dept. management group contains subscriptions for the sales department. The IT Dept. management group contains a subscription and another management group, and two additional subscriptions are within that management group. The Training Dept. management group contains two subscriptions for the training department.
)
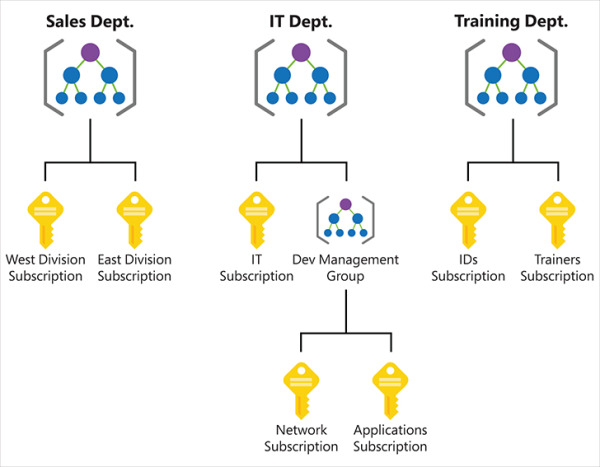
Figure 2-9 Management groups organizing subscriptions and other management groups
By organizing the subscriptions using management groups, you can have more precise control over who has access to which resources. You can also control the configuration of resources created within those subscriptions.
After you create a management group, you can move any of your subscriptions into that management group. You can also move a management group into another management group. There are, however, a few limitations:
You’re limited to a total of 10,000 management groups.
A management group hierarchy can only support up to six levels.
You cannot have multiple parents for a single management group or subscription.
Azure Resource Manager (ARM)
Almost all systems that are moved to the cloud consist of more than one Azure service. For example, you might have an Azure virtual machine for one part of your app; your data might be in an Azure SQL Database; you might have some sensitive data stored in Azure Key Vault; and you might have a web-based portion of your app hosted in Azure App Service.
If you must manage all these different Azure services separately, it can be quite a headache, and if you have multiple applications in the cloud, it can be even worse. Not only would it be confusing to keep track of which services are related to which applications, but when you add in the complexity of deploying updates to your application, things can really become disorganized.
In order to make it easier to deploy and manage Azure services, Microsoft developed Azure Resource Manager, or ARM. ARM is a service that runs in Azure, and it’s responsible for all interaction with Azure services. When you create a new Azure service, ARM authenticates you to make sure you have the right access to create that resource, and then it talks to a resource provider for the service you’re creating. For example, if you’re creating a new web app in Azure App Service, ARM will pass your request on to the Microsoft.Web resource provider because it knows all about web apps and how to create them.
EXAM TIP
There are resource providers for every Azure service, but the names might not always make sense. For example, the Microsoft.Compute resource provider is responsible for creating virtual machine resources.
You don’t have to know details on resource providers for the AZ-900 exam, but you should understand the general concept because you are expected to know about Azure Resource Manager.
In Chapter 3, you’ll learn about using the Azure portal to create and manage Azure services. You’ll also learn about how you can use command-line tools to do the same thing. Both the portal and the command-line tools work by using ARM, and they interact with ARM using the ARM application programming interface, or API. The ARM API is the same whether you’re using the portal or command-line tools, and that means you get a consistent result. It also means that you can create an Azure resource with the portal and then make changes to it using command-line tools, allowing you the flexibility that cloud consumers need.
The flow of a typical ARM request to create or manage a resource is straightforward. Tools such as the Azure portal, command-line tools, or Visual Studio make a request to the ARM API. The API passes that request to ARM where the user is authenticated and authorized to perform the action. ARM then passes the request to a resource provider, and the resource provider creates the new resource or modifies an existing resource. Figure 2-10 illustrates this flow and features a small sampling of the many Azure services that are available.
)
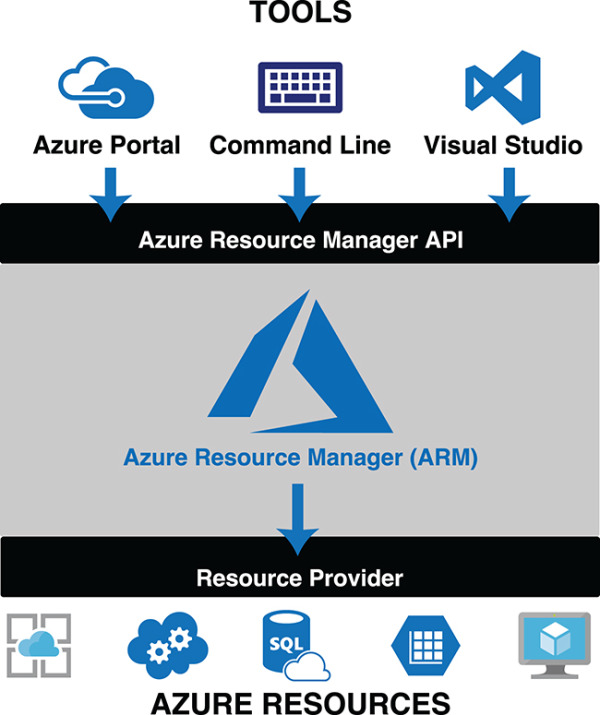
Figure 2-10 Azure Resource Manager
The request that is made to ARM isn’t a complicated, code-based request. Instead, ARM uses declarative syntax. That means that, as a consumer of Azure, you tell ARM what you want to do, and ARM does it for you. You don’t have to tell ARM how to do what you want. You simply have to tell it what you want. To do that, ARM uses files that are encoded in JavaScript Object Notation (or JSON) called ARM templates.
In the most basic sense, an ARM template contains a list of resources that you want to either create or modify. Each resource is accompanied by properties such as the name of the resource and properties that are specific to that resource. For example, if you were using an ARM template to deploy a web app in App Service, your ARM template would specify the region you want your app to be created in, the name of the app, the pricing plan for your app, any domain names you want your app to use, and so forth. You don’t have to know how to set all those properties. You simply tell ARM to do it (you declare your intent to ARM), and ARM takes care of it for you.
There’s one more important aspect to ARM template deployment. When you’re deploying multiple resources (which, as pointed out, is a typical real-world scenario), you often have service dependencies. In other words, you are deploying one or more services that rely on other services already being created.
For example, think of a situation where you’re deploying a certificate to be used with a web app. One of the properties you need to set on the web app is the certificate that you want to use, but if that certificate hasn’t been deployed yet, your deployment will fail. ARM allows you to specify dependencies so you can avoid issues like this. You simply tell ARM that the web app depends on the certificate and ARM will ensure the certificate’s deployment is completed before it deploys the web app.
As you can see, ARM has many benefits, and you should be aware of these for your exam:
ARM allows you to easily deploy multiple Azure resources at once.
ARM makes it possible to reproduce any deployment with consistent results at any point in the future.
ARM allows you to create declarative templates for deployment instead of requiring you to write and maintain complex deployment scripts.
ARM makes it possible to set up dependencies so that your resources are deployed in the right order every time.
Throughout this skill section, you’ve learned about some of the benefits of using Azure. Because Azure regions are spread out across the world in different geographies, you can be assured that your data and apps are hosted where you need them to be and that any regulations or data requirements are complied with. You learned that there are multiple datacenters in each region, and by deploying your applications in availability zones, you can avoid effects from a failure in a particular datacenter.
You also learned about using resource groups to organize your Azure resources and how to use Azure subscriptions. Finally, you learned about management groups and Azure Resource Manager, or ARM. In the next skill section, you’ll learn details about some of the core workload products in Azure.