Objective group 2. Manage data cells and ranges
- By Joan Lambert
- 4/16/2020
- Objective 2.1: Manipulate data in worksheets
- Objective 2.2: Format cells and ranges
In this sample chapter from the MOS Study Guide for Microsoft Excel Exam MO-200, author Joan Lambert explains the skills tested in the section of the Microsoft Office Specialist exam for Microsoft Excel 2019 related to managing cells and cell content in worksheets. This includes manipulating data in worksheets, formatting cells and ranges, defining and referencing named ranges, and summarizing data visually.
Objective 2.1: Manipulate data in worksheets
The most basic method of inserting data in cells is by entering it manually, which is a prerequisite skill for this exam. This section discusses methods of creating and reusing data to fill a worksheet.
Create data
When you create the structure of a data range, or a series of formulas, you can automate the process of completing data patterns (such as January, February, March) or copying calculations from one row or column to those adjacent. Automation saves time and can help prevent human errors.
You can quickly fill adjacent cells with data that continues a formula or a series of numbers, days, or dates, either manually from the Fill menu, or automatically by dragging the fill handle. When copying or filling data by using the Fill menu commands, you can set specific options in the Series dialog box for the pattern of the data sequence you want to create.
)
You can use the fill functionality to copy text data, numeric data, or cell formatting (such as text color, background color, and alignment) to adjacent cells.
When creating a series based on one or more selected cells (called filling a series), you can select from the following series types:
Linear Excel calculates the series values by adding the value you enter in the Step Value box to each cell in the series.
Growth Excel calculates the series values by multiplying each cell in the series by the step value.
Date Excel calculates the series values by incrementing each cell in the series of dates, designated by the Date Unit you select, by the step value.
Auto Fill This option creates a series that produces the same results as dragging the fill handle.
When you use the Auto Fill feature, either from the Fill menu or by dragging the fill handle, the Auto Fill Options button appears in the lower-right corner of the fill range. Clicking the button displays a menu of fill options. The fill options vary based on the type of content being filled.
)
You can use the Auto Fill feature to create sequences of numbers, days, and dates; to apply formatting from one cell to adjacent cells; or, if you use Excel for more sophisticated purposes, to create sequences of data generated by formulas, or custom sequences based on information you specify. You can also use the fill functionality to copy text or numeric data within the column or row.
To fill a simple numeric, day, or date series
Do either of the following:
In the upper-left cell of the range you want to fill, enter the first number, day, or date of the series you want to create.
To create a series in which numbers or dates increment by more than one, enter the first two or more values of the series in the first cells of the range you want to fill.
If creating a numeric series that has a specific number format (such as currency, percentage, or fraction), apply the number format you want from the Number group on the Home tab.
Select the cell or cells that define the series.
Do either of the following:
Drag the fill handle down or to the right to create an increasing series.
Drag the fill handle up or to the left to create a decreasing series.
If the series doesn’t automatically fill correctly, click the Auto Fill Options button and then, on the Auto Fill Options menu, click Fill Series.
To fill a specific day or date series
Fill the series. Immediately after you release the mouse button, click the Auto Fill Options button that appears in the lower-right corner of the cell range.
On the Auto Fill Options menu, click Fill Days, Fill Weekdays, Fill Months, or Fill Years.
To set advanced options for a numeric, day, or date series
Enter the number or date beginning the series, and then select the cell range you want to fill.
On the Home tab, in the Editing group, in the Fill list, click Series.
In the Series dialog box, select the options you want, and then click OK.
To exclude formatting when filling or copying data
Drag the fill handle to fill the series or copy the data, and then click the Auto Fill Options button.
On the Auto Fill Options menu, click Fill Without Formatting.
Reuse data
If the content you want to work with in Excel already exists elsewhere—such as in another worksheet or workbook or in a document—you can cut or copy the data from the source location to the Microsoft Office Clipboard and then paste it into the worksheet. If the content exists but not in the format that you need it, you might be able to reform the content to fit your needs by using the CONCATENATE function or the Flash Fill feature.
Paste data by using special paste options
You can insert cut or copied cell contents into empty cells or directly into an existing table or data range. Cutting, copying, and pasting content (including columns and rows) in a worksheet are basic tasks that, as a certification candidate, you should have extensive experience with. If you need a refresher on these subjects, see the “Prerequisites” section of the Exam Overview. This section contains information about Excel-specific pasting operations that you may be required to demonstrate to pass Exam MO-200 and become certified as a Microsoft Office Specialist for Excel 2019.
When pasting data, you have several options for inserting values, formulas, formatting, or links to the original source data into the new location. Paste options are available from the Paste menu, from the shortcut menu, and from the Paste Options menu that becomes temporarily available when you paste content.
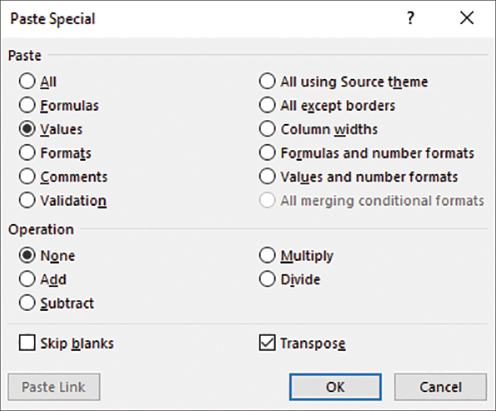
Excel also offers some advanced pasting techniques you can use to modify data while pasting it into a worksheet. Using the Paste Special feature, you can perform mathematical operations when you paste data over existing data, you can transpose columns to rows and rows to columns, and you can be selective about what you want to paste from the source cells.
)
Paste specific aspects of copied content, or modify content while pasting it
You have the option to paste only values without formatting, formatting without values, formulas, comments, and other specific aspects of copied content. You can also link to data rather than inserting it, so that if the source data changes, the copied data will also change.
Paste options that are commonly used in business, and that you should be comfortable with when taking Exam MO-200, include the following:
Pasting values When you reuse a value that is the result of a formula, it is often necessary to paste only the value—the result of the formula—rather than the actual cell content.
Pasting formats This is somewhat like using the Format Painter and can be useful when you want to build a structure on a worksheet that already exists elsewhere.
Transposing cells Transposing content switches it from columns to rows or from rows to columns. This can be very useful when reusing content from one worksheet in another.
)
To insert data into an existing data range
Select and copy the source content.
Select the upper-left cell of the range in which you want to insert the copied content.
On the Home tab, in the Cells group, click Insert, and then click Insert Copied Cells.
In the Insert Paste dialog box, click Shift cells right or Shift cells down to indicate the direction you want Excel to move the existing content.

Specify the direction to shift existing data when inserting cells into a data range
In the Insert Paste dialog box, click OK.
To paste cell values (without formulas)
Select and copy the source content.
Do either of the following in the upper-left cell of the range to which you want to copy the values:
Select the cell. On the Home tab, in the Clipboard group, display the Paste list and then, in the Paste Values section, click the Values button.
Right-click the cell, and then in the Paste Options section of the shortcut menu, click the Values button.
To paste cell formatting (without content)
Select and copy the formatted source content.
Do either of the following in the upper-left cell of the range to which you want to copy the values:
Select the cell. On the Home tab, in the Clipboard group, display the Paste list and then, in the Other Paste Options section, click the Formatting button.
Right-click the cell, and then in the Paste Options section of the shortcut menu, click the Formatting button.
To transpose rows and columns
Select and copy the source content.
Do either of the following in the upper-left cell of the range to which you want to copy the transposed values:
Select the cell. On the Home tab, in the Clipboard group, display the Paste list and then, in the Paste section, click the Transpose button.
Right-click the cell, and then in the Paste Options section of the shortcut menu, click the Transpose button.
Fill data based on an adjacent column
The Flash Fill feature looks for correlation between data that you enter in a column and the adjacent data. If it identifies a pattern of data entry based on the adjacent column, it fills the rest of the column to match the pattern. A common example of using Flash Fill is to divide full names in one column into separate columns of first and last names so you can reference them individually (for example, when creating form letters).
)
To fill cells by using Flash Fill
In columns adjacent to the source content column, enter content in one or more cells to establish the pattern of content reuse.
Select the next cell below the cells that establish the pattern. (Do not select a range of cells.)
Do either of the following:
On the Home tab, in the Editing group, click Fill, and then click Flash Fill.
Press Ctrl+E.
Modify worksheet structure
Insert and delete multiple columns or rows
To insert rows or columns
Select the number of rows you want to insert, starting with the row above which you want the inserted rows to appear, or select the number of columns you want to insert, starting with the column to the left of which you want the inserted columns to appear.
Do either of the following:
On the Home tab, in the Cells group, click the Insert button.
Right-click the selection, and then click Insert.
To delete selected rows or columns
➜ On the Home tab, in the Cells group, click the Delete button.
➜ Right-click the selection, and then click Delete.
Insert and delete cells
To insert cells in an existing data range
Select the number of cells you want to insert, in the location in which you want to insert them.
On the Home tab, in the Cells group, click Insert and then Insert Cells.
In the Insert dialog box, select Shift cells right or Shift cells down to indicate the direction in which you want to move the existing data to make room for the new cells. Then click OK.