Mapping Problems and Algorithms with Machine Learning
- By Dino Esposito and Francesco Esposito
- 2/2/2020
- Fundamental Problems
- More Complex Problems
- Automated Machine Learning
- Summary
Automated Machine Learning
Machine learning is a large field and is growing larger every day. As you’ll see in much more detail in the next chapter, building an intelligent solution for a real-life business problem requires a workflow that essentially consists of a combination of different steps: data transformations, training algorithms, evaluation metrics, and, last but not least, domain knowledge, knowledge base, trial-and-error attitude, and imagination.
In this context, while the human ability to sort things out probably remains unparalleled, the community is seriously investigating the possibility of using automated, wizard-style tools to prepare a sketchy plan that could possibly represent the foundation of a true solution in a matter of minutes instead of days.
This is just the essence of the automated machine learning (AutoML) approach and consists of a framework that looks at your data and declared intent and intelligently suggests the steps to take that it determines most appropriate.
Aspects of an AutoML Platform
The typical end-to-end pipeline of any machine learning solution applied to a real-world problem most likely includes a number of steps, as outlined here:
Preliminary analysis and cleaning of available data
Identification of the properties (features) of the data that look most promising and relevant to solve the actual problem
Selection of the algorithm
Configuration of the parameters of the algorithm
Definition of an appropriate validation model to measure the performance of the algorithm and indirectly the quality of the data it is set to use
Machine learning may not be for the faint-hearted, and even when one has a strong domain knowledge, the risk of feeling like a nonexpert newbie is fairly high.
Hence, AutoML is emerging as a solution to get people started quickly on machine learning projects and sometimes even effectively. AutoML offers the clear advantage of being fast and producing working solutions. The debatable point is not how objectively good the solution is that you can get out of an AutoML wizard, but the trade-off between what you get from AutoML and what you might be able to design by hand, especially if your team is not made up of domain and machine learning super-experts.

Common Features
An AutoML framework is made of two distinct parts: a public list of supported learning scenarios and an invisible runtime service that returns a deliverable model based on some input parameters. A learning scenario is essentially an expert subsystem designed to solve specific classes of problems using data in one of a few predefined formats. The runtime is a learning pipeline in which a set of predefined data transformations are performed on selected input given the learning objective; target features are selected; and the trainer is selected, configured, trained, and tested.
An AutoML framework will perform any of the following tasks in an automated way after the user has indicated the physical source of data (tabular files, relational databases, cloud-based data warehouses) and the learning objective:
Preprocessing and loading of data from different formats including detection of missing and skewed values
Understanding of the type of each dataset column to figure out whether the column is, say, a Boolean, a discrete number, a categorical value, or free text
Application of built-in forms of feature engineering and selection, namely the addition or transformation of data columns in a way that makes particular sense for the learning objective
Detection of the type of work required by the learning objective (binary classification, regression, anomaly detection) and selection of a range of most appropriate training algorithms
Configuration of the hyperparameters of the selected training algorithms
Training of the model, application of appropriate evaluation metrics, and testing of the model
In addition, an AutoML framework is also often capable of visualizing data and results in a fancy way that is also helpful to better understand the underpinnings of the problem at hand.
There are a couple of popular AutoML frameworks: one is from Google and one, the newest, from Microsoft. Let’s first briefly examine the Google Cloud AutoML platform, and then we’ll go for a deeper live demonstration of the Microsoft AutoML framework as integrated in Visual Studio 2019.
Google Cloud AutoML
The Google Cloud AutoML platform is located at https://cloud.google.com/automl. It comes as a suite of machine learning systems specifically designed to simplify as much as possible the building of models tailor-made for specific needs. The platform works much like a UI wizard and guides the user through the steps of selecting the scenario, data, and parameters and then does the apparent magic of returning a deployable artifact out of nowhere. Internally, the Google Cloud AutoML platform relies on Google’s transfer learning technology, which allows the building of neural networks as the composition of predefined existing networks.
Google Cloud AutoML supports a few learning scenarios such as computer vision, object detection in videos and still images, and natural language processing and translation. As you can see, it’s a group of pretty advanced and sophisticated scenarios. It also supports a simpler one, called AutoML Tables, that works on tabular datasets and tests multiple model types at the same time (regression, feedforward neural network, decision tree, ensemble methods).
Microsoft AutoML Model Builder
An AutoML framework is also integrated in Visual Studio 2019 and comes packaged with ML.NET—the newest Microsoft .NET-based library for machine learning. The AutoML Model Builder framework has both a visual, wizard-style interface in Visual Studio (more on this in a moment) and a command-line interface (CLI) for use from within command-based environments such as PowerShell. A quick but effective summary of AutoML CLI can be found at https://bit.ly/2FaK7SP.
In Microsoft’s AutoML framework, developers choose a task, provide the data source, and indicate a maximum training duration. Needless to say, the selected maximum duration is a discriminant for the quality of the final model. The shorter time you choose, the less reliable the final model can be.
The AutoML Model Builder in Action
In Visual Studio 2019, after you install the latest version of the ML.NET Model Builder extension, you gain the ability to add a machine learning item to an existing project. When you do that, you’re sent to a wizard like the one shown in Figure 3-3.
)
Figure 3-3 The main page of the Model Builder Visual Studio extension
As you can see, the wizard is articulated in five steps that broadly match the main steps of any machine learning pipeline. The first step of the builder is choosing the learning scenario—namely, the broad category of the problem for which you’d like to build a machine learning solution. In the version of the builder used for the test, the choice is not very large: Sentiment Analysis, Issue Classification, Price Prediction, and Custom Scenario. As an example, let’s go for Price Prediction.
Exploring the Price Prediction Scenario
After you pick the scenario, the wizard asks you to load some data into the system. For the price prediction scenario, you can choose from a plain file or a SQL Server table. In the example shown in Figure 3-4, the loaded file is a CSV file. One key input to provide is the name of the column you want the final model to predict. In this case, the CSV file contains about one million rows, representing a taxi ride that really took place. The column to predict is the fare amount.
)
Figure 3-4 Loading data into the model
Training the Model
The third step is about the selection of the ideal trainer—the algorithm that is the most appropriate for the learning scenario and the data. This is where the power (and from a certain angle also the weakness) of the automated machine learning framework emerges. Some hard-coded logic, specific to the chosen scenario, tries a few training algorithms based on the allotted training time. Figure 3-5 shows an estimation of the training time necessary for a certain amount of data.
)
Figure 3-5 Estimating the training time
During the training phase, the system tries several different algorithms and uses an apt metric to evaluate its performance. (See Figure 3-6.)
)
Figure 3-6 AutoML tries different algorithms and uses some metrics to evaluate the quality.
Evaluating the Results
At the end of the training, the AutoML system has data about a few algorithms it has tried with different hyperparameters. The metrics for evaluating the performance depend on the tasks and the algorithm. Price prediction is essentially a regression task for which the R-squared measure is the most commonly used. (We’ll cover the math behind regression and R-squared in Chapter 11, “How to Make Simple Predictions: Linear Regression.”) The theoretic ideal value of the R-squared metrics is 1; therefore, any value close enough to 1 is more than acceptable. Consider that in training, a resulting metric with a value of 1 (or very close to 1) is often the sign of overfitting—the model fits too much to the training data and potentially might not work effectively on live data once in production.
The AutoML process then suggests the use of the LightGbmRegression algorithm. If you want, you can just take the ZIP file with the final model ready for deployment. But what about looking into the actual set of data transformation and the actual code to possibly modify for further improvements?
The AutoML also offers the option to add the C# files to the current project for you to further edit them and retrain the model on a different dataset, for example. (See Figure 3-7.)
)
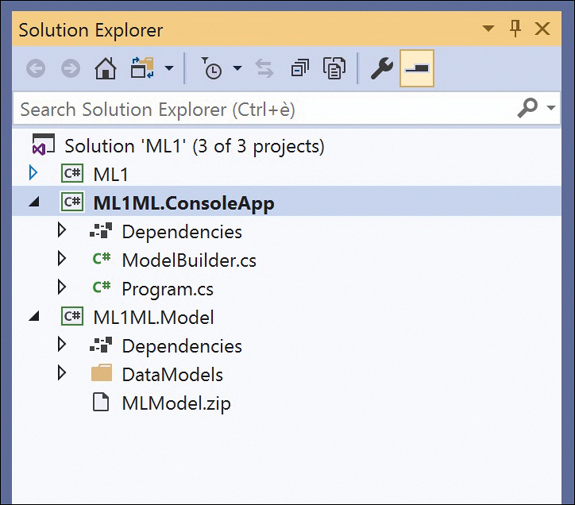
Figure 3-7 Autogenerated projects added by the Model Builder
As you can see, the figure contains two projects. One is a console application that contains a ModelBuilder.cs file packed with the code used to build the model. The other project is a class library and contains a sample client application seen as the foundation for using the model. This project also contains the actual model as a ZIP file.