Implement workloads and security
- By Mike Pfeiffer, Derek Schauland, Nicole Stevens, Timothy L. Warner
- 11/20/2019
- Skill 2.1: Migrate servers to Azure
- Skill 2.2: Configure Serverless Computing
Skill 2.2: Configure Serverless Computing
In the age of the cloud, even using servers is considered legacy technology in some instances because there are platform-based services that will run the code provided rather than deploying applications, functions, or other units of work to a server. The cloud provider—Azure, in this case—takes care of the workings under the hood, and the customer needs to worry only about the code to be executed.
There are more than a few resources in Azure that run without infrastructure—or serverless:
Azure Storage
Azure Functions
Azure Cosmos DB
Azure Active Directory
These are just a few of the services that are available for serverless compute. Serverless resources are the managed services of Azure. They’re not quite platform as a service (PaaS), but they’re not all software as a service (SaaS), either. They’re somewhere in between.
Serverless objects are the serverless resources to be used in an architecture. These are the building blocks used in a solution, and there will be several types created depending on the solution being presented.
Two of the most popular serverless technologies supported by Azure are logic apps and function apps. The details of configuring these are discussed in turn.
A logic app is a serverless component that handles business logic and integrations between components—much like Microsoft Flow, but with full customization and development available.
Create a simple logic app
To build a simple logic app that watches for files in a OneDrive folder and sends an email when they’re found, complete the following steps:
Select Create A Resource from the Azure Navigation menu.
Type Logic Apps in the marketplace search and select the logic app resource.
Click Create on the logic app description.
Complete the Logic App creation form shown in Figure 2-10 and click Create.
Name Provide a name for the logic app.
Subscription Choose the subscription where the resource should be created.
Resource Group Select Create or Use Existing to choose the resource group where the logic app should be created. If you select Use Existing, choose the appropriate resource group from the drop-down menu.
Location Select the region where the logic app should be created.
Log Analytics Specify if log analytics should be enabled or disabled for this resource.
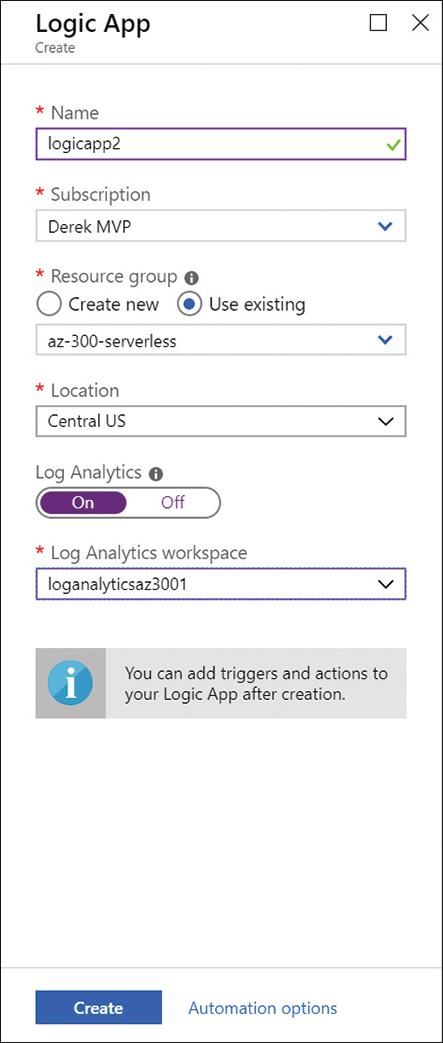
FIGURE 2-10 Creating a logic app resource
Once a logic app resource exists, you can apply the code to get it to act on resources through predefined templates, custom templates, or using a blank app and adding code to perform actions for the application.
To add code to copy Azure storage blobs from one account to another, complete the following steps:
Open the resource group specified when you created the logic app resource.
Select the name of the logic app.
The Logic Apps Designer opens so you can add templates, actions, and custom code to the logic app (see Figure 2-11).
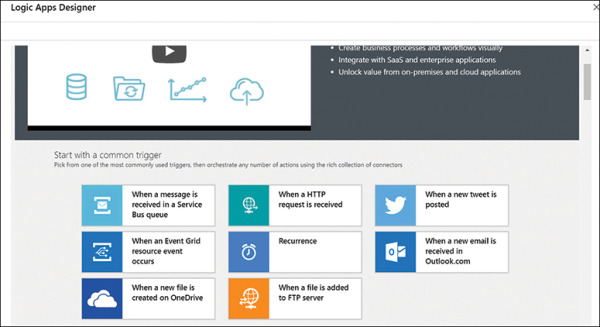
FIGURE 2-11 Logic Apps Designer with common templates
From the initial designer page, select the common trigger: When A New File Is Created On OneDrive (refer to Figure 2-11).
In this example, the logic app watches for new files in OneDrive and sends an email when a new file is landed. It is very simple but is designed to showcase the tools available to work with logic apps.
Specify the account credentials for OneDrive to be watched for files, and click Continue.
Specify the folder to be watched and the interval for how often the folder should be checked by the logic app as shown in Figure 2-12.
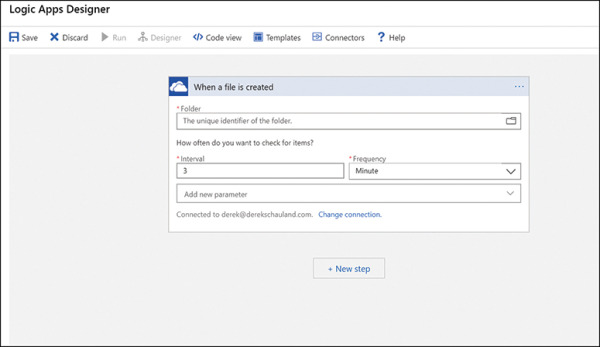
FIGURE 2-12 Specifying the OneDrive folder to be watched for new files
Choose a folder to monitor by clicking the folder icon at the end of the folder text box and choosing the root folder.
Set an interval. The default is 3 minutes.
Click New Step to add an action to the logic app.
Select Office 365 Outlook template.
Choose the Send An Email option.
Sign into Office 365.
Specify the To, Subject, and Body of the email as shown in Figure 2-13.

FIGURE 2-13 Configuring an action to send an email from a logic app
Click Save at the top of the designer window to ensure the changes made to the logic app are not lost.
Click the Run button in Logic Apps Designer to start the app watching for files.
Place a new file in the folder being watched by the logic app.
The Logic Apps Designer should show the progress of the app and that all steps for finding the file and sending the mail message have completed successfully.
)
)
)
)
Manage Azure Functions
Azure Functions allows the execution of code on demand, with no infrastructure to provision. Whereas logic apps provide integration between services, function apps run any piece of code on demand. How they’re triggered can be as versatile as the functions themselves.
As of this writing, Azure Functions support the following runtime environments:
.NET
JavaScript
Java
PowerShell (which is currently in preview)
To create a function app, complete the following steps:
Select the Create A Resource link in the Azure Portal Navigation bar.
Type function apps in the marketplace search box and select Function Apps.
On the Function Apps overview hub, click the Create button.
Complete the Function App creation form shown in Figure 2-14:
App Name Enter the name of the function app.
Subscription Enter the subscription that will house the resource.
Resource Group Create or select the Resource Group that will contain this resource.
OS Select the operating system that the function will use (Windows or Linux).
Hosting Plan Select the pricing model used for the app: Consumption (pay as you go) or App Service (specifically sized app service).

FIGURE 2-14 Creating a function
Location Select the Azure region where the resource will be located.
Runtime Stack Select the runtime environment for the function app.
Storage Create or select the storage account that the function app will use.
Application Insights Create or select an Application Insights resource for tracking usage and other statistics about this function app.
Click Create to build the function app.
)
In the resource group where you created the function app, select the function to view the settings and management options for it.
The Overview blade for the function app provides the URL, app service, and subscription information along with the status of the function (see Figure 2-15).
)
FIGURE 2-15 The Overview blade for an Azure function
Function apps are built to listen for events that kick off code execution. Some of the events that functions listen for are
HTTP Trigger
Timer Trigger
Azure Queue Storage
Azure Service Bus Queue trigger
Azure Service Bus Topic trigger
In addition to the Overview blade, there is a blade for platform features. These are the configuration items for the App Service plan and other parts of Azure’s serverless configuration for this function. Here, you configure things like networking, SSL, scaling, and custom domains, as shown in Figure 2-16.
)
FIGURE 2-16 The Platform Features blade for an Azure function app
Within the App Settings blade for function apps is the Kudu console, listed as Advanced Tools (Kudu). This console operates much like being logged into the back end of the system or app. Because this is a serverless application, there is no back end to be managed; this tool is used for troubleshooting a function app that isn’t performing as needed. Figure 2-17 shows the Kudu back end.
)
FIGURE 2-17 The Kudu troubleshooting console for a function app
Manage Azure Event Grid
Event Grid is an event-consumption service that relies on publish/subscription to pass information between services. Suppose I have an on-premises application that outputs log data and an Azure function that’s waiting to know what log data has been created by the on-premises application. The on-premises application would publish the log data to a topic in Azure Event Grid. The Azure function app would subscribe to the topic to be notified as the information lands in Event Grid.
The goal of Event Grid is to loosely couple services, allowing them to communicate, using an intermediate queue that can be checked for new data as necessary. The consumer app listens for the queue and is not connected to the publishing app directly.
To get started with Event Grid, complete the following steps:
Open the Subscriptions blade in the Azure portal.
Select Resource Providers under Settings.
Filter the list of providers by entering Event Grid in the Filter By Name box.
Click the Microsoft.EventGrid resource provider and then click Register at the top of the page.
Once the registration completes, you can begin using Event Grid by navigating to the Event Grid Topics services in the portal, as shown in Figure 2-18.
)
FIGURE 2-18 Event Grid topics
Once a subscription has topics created, each topic will have specific properties related to the subscription. Click the event grid subscription from the list. From the Topic Overview blade, the URL for the topic endpoint, the status, and the general subscription information is available. You can manage the following items from this point:
Access Control The Azure IAM/Role-Based configuration for which Azure users can read, edit, and update the topic. Access Control is discussed later in this chapter.
Access Keys Security keys used to authenticate applications publishing events to this topic.
Ensuring that the applications pushing information to this topic have a key to do so will ensure that the amount of noise sent to the topic is controlled. If the application sends an overly chatty amount of information, the noise may not be reduced.
With a topic created and collecting information, consuming services that require this information need to subscribe to these events and an endpoint for the subscription. In this case, an endpoint is an app service with a URL that the subscriber services will hit to interact with the topic.
Event subscriptions can collect any and all information sent to a topic, or they can be filtered in the following ways:
By Subject Allows filtering by the subject of messages sent to the topic—for example, only messages with .jpg images in them
Advanced filter A key value pair one level deep
In addition to filtering information to collect for a subscription, when you select the Additional Features tab when you’re creating an event subscription shows other configurable features including the following:
Max Event Delivery Attempts How many retries there will be.
Event Time To Live The number of days, hours, minutes, and seconds the event will be retried.
Dead-Lettering Select whether the messages that cannot be delivered should be placed in storage.
Event Subscription Expiration Time When the subscription will automatically expire.
Labels Any labels that might help identify the subscription.
Manage Azure Service Bus
Azure Service Bus is a multi-tenant asynchronous messaging service that can operate with first in, first out (FIFO) queuing or publish/subscribe information exchange. Using queues, the message bus service will exchange messages with one partner service. If using the publish/ subscribe (pub/sub) model, the sender can push information to any number of subscribed services.
A service bus namespace has several properties and options that can be managed for each instance:
Shared Access Policies The keys and connection strings available for accessing the resource. The level of permissions, manage, send, and listen are configured here because they’re part of the connection string.
Scale The tier of service the messaging service uses: Basic or Standard.
Geo-Recovery Disaster recovery settings that are available with a Premium namespace.
Export Template An ARM automation template for the service bus resource.
Queues The messaging queues used by the service bus.
Each configured queue displays the queue URL, max size, and current counts about the following message types:
Active Messages currently in the queue
Scheduled Messages sent to the queue by scheduled jobs or on a general schedule
Dead-Letter Messages that are undeliverable to any receiver
Transfer Messages pending transfer to another queue
Transfer Dead-Letter Messages Message that failed to transfer to another queue
In addition to viewing the number of messages in the queue, you can create shared access permissions for the queue. This will allow permissions for manage, send, and listen to be assigned. Also, this provides a connection string leveraging the assigned permissions that the listener application will use as the endpoint when collecting information from the queue.
In the properties blade of the selected message queue, the following settings can be updated:
Message time to live default
Lock duration
Duplicate detection history
Maximum delivery count
Maximum queue size
Queue state (is the queue active or disabled)
Move expired messages to the dead-letter subqueue; keep undeliverable messages in a subqueue to keep this message queue clean
The settings for a message queue are similar to those discussed earlier in the section about Event Grid because they serve a similar purpose for the configured queues.