Implement workloads and security
- By Mike Pfeiffer, Derek Schauland, Nicole Stevens, Timothy L. Warner
- 11/20/2019
- Skill 2.1: Migrate servers to Azure
- Skill 2.2: Configure Serverless Computing
In this sample chapter from Exam Ref AZ-300 Microsoft Azure Architect Technologies, the authors help you understand how you can bring your existing workloads to Azure by allowing the use of some familiar resources (IaaS Virtual Machines) and others that may be new (serverless computing) to your environment. In addition, the use of Multi-Factor Authentication (MFA) is covered here to ensure your cloud environment is as secure as possible.
Organizations are still working out the details of getting to the cloud. With all of the hardware and servers running in datacenters and in colocation spaces, moving to the cloud still takes a bit of effort.
Architecting solutions in Azure is not just development or infrastructure management in the cloud. It’s much more than that, and you need to understand how the Azure resources an organization needs to operate will sometimes be centered in development and sometimes in infrastructure. It’s up to you to know enough about these topics.
This chapter helps you understand how you can bring your existing workloads to Azure by allowing the use of some familiar resources (IaaS Virtual Machines) and others that may be new (serverless computing) to your environment. In addition, the use of Multi-Factor Authentication (MFA) is covered here to ensure your cloud environment is as secure as possible. An Azure Solutions Architect may face all these situations in day-to-day work life and needs to be ready for each of them.
Skills covered in this chapter:
Skill 2.1: Migrate servers to Azure
Skill 2.2: Configure serverless computing
Skill 2.3: Implement application load balancing
Skill 2.4: Integrate an Azure virtual network and an on-premises network
Skill 2.5: Manage Role-Based Access Control (RBAC)
Skill 2.6: Implement Multi-Factor Authentication (MFA)
Skill 2.1: Migrate servers to Azure
Because most organizations have been operating on infrastructure running in house, there is a significant opportunity to help them migrate these workloads to Azure, which may save some costs and provide efficiencies for these servers that their datacenters may not. Or they might want to explore getting out of the datacenter business. How can you help your organization or customer move out of a datacenter into the Azure cloud?
The recommended option for this is Azure Site Recovery (ASR), which offers different options depending on the type of workload you’re migrating (physical or virtual).
Configure Azure components of Site Recovery
Azure Site Recovery provides a way to bring your servers into Azure while allowing them to be failed back to your on-premises datacenter should the need arise as part of a business continuity and disaster recovery (BDCR) scenario. An increasingly common practice is to make the failover one-way and use ASR to move servers to Azure. Then you switch off their local counterparts, effectively migrating your environment to Azure.
Follow these steps to configure the Azure resources to migrate existing servers to Azure:
Log in to your Azure subscription.
Create a resource group to hold your Azure Backup Vault.
Create a new resource and select Backup and Site Recovery (OMS) from the Storage grouping in the Azure Marketplace as shown in Figure 2-1.
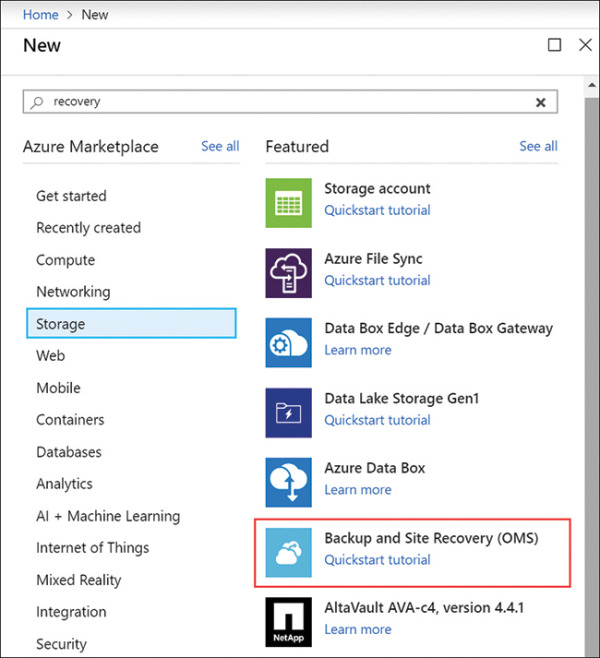
FIGURE 2-1 Creating a Backup and Site Recovery vault
In the Recovery Services vault Creation blade, shown in Figure 2-2, complete the form:
Name Choose a unique name for your Recovery Services vault.
Subscription Specify an active Azure subscription.
Resource Group Create a new or select an existing resource group for the Recovery Services vault.
Location Select the region to use for the Recovery Services vault.
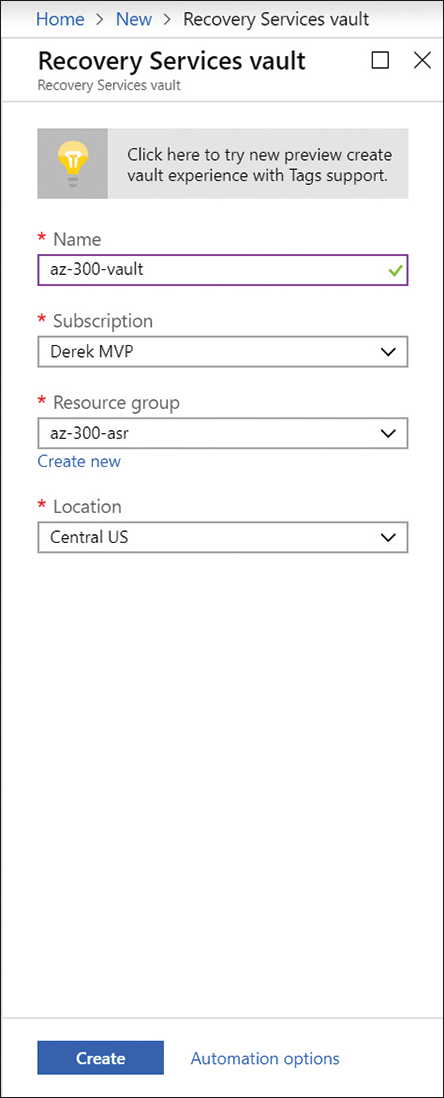
FIGURE 2-2 Creating a Recovery Services vault
Click the Create button to build the resource, which may take a few moments to complete.
)
Once the Recovery Services vault is ready, open the overview page by clicking the resource within the resource group. This page provides some high-level information, including any new things related to Recovery Services vault.
Configure on-premises components of Site Recovery
Use the following steps to get started with a site recovery (migration in this case):
Click the Site Recovery link under Getting Started in the Settings pane as shown in Figure 2-3.
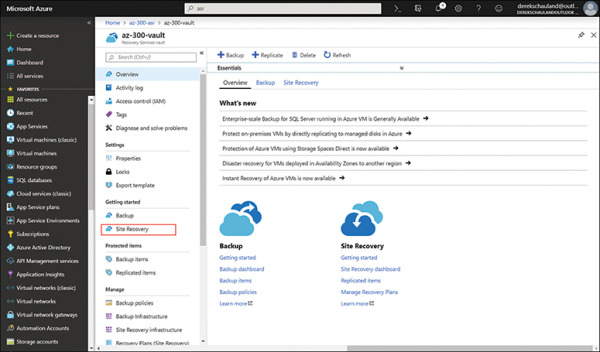
FIGURE 2-3 Getting Started with Site Recovery
Select the Prepare Infrastructure link to begin readying on-premises machines.
Complete the Prepare Infrastructure steps (shown in Figure 2-4):
Where are your machines located? On-premises.
Where do you want to replicate your machines to? To Azure.
Are your machines virtualized? Select the appropriate response:
Yes, with VMware.
Yes, with Hyper-V.
Other/Not virtualized.
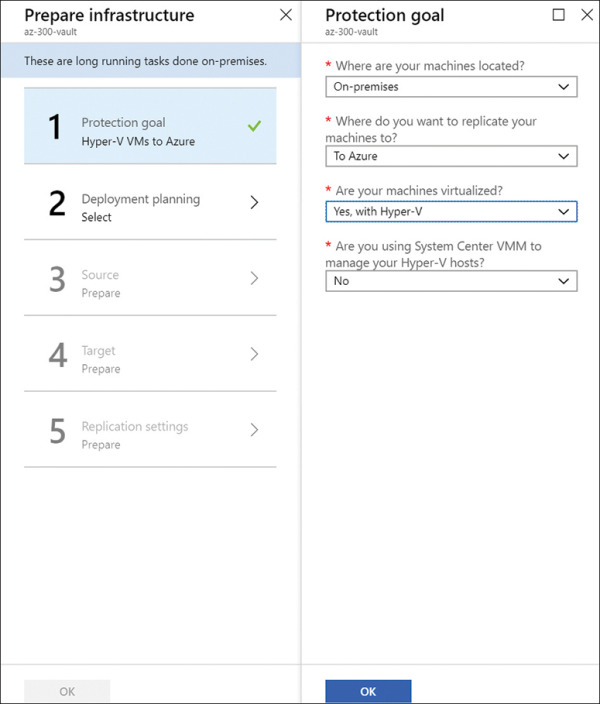
FIGURE 2-4 Configure protection goals
Click OK to complete the protection goal form.
)
)
)
Step 2 of infrastructure preparation is deployment planning, which helps to ensure that you have enough bandwidth to complete the transfer of virtualized workloads to Azure. This will take an estimate of the time needed to transfer the workloads to Azure based on machines found in your environment.
Click the Download link for the deployment planner, located in the middle pane of the Deployment planning step, to download a zip file to get started.
This zip file includes a template that will help in collecting information about the virtualized environment as well as a command-line tool to scan the virtualized environment to determine a baseline for the migration. The tool requires network access to the Hyper-V or VMware environment (or direct access to the VM hosts where the VMs are running). The command-line tool provides a report about throughput available to help determine the time it would take to move the scanned resources to Azure.
After the tool has been run, in the Azure portal, specify that the deployment planner has been completed and click OK.
Next the virtualization environment will be provided to Azure by adding the Hyper-V site and server(s).
To add a Hyper-V server, download the Azure Site Recovery Provider and the vault registration key (see Figure 2-5), and install them on the Hyper-V server. The vault registration info is necessary because ASR needs to know which recovery vault the VMs belong to once they are ready to migrate to Azure.
)
FIGURE 2-5 Preparing the source virtualization environment
Install the Site Recovery Provider on the virtualization host, if you’re using Hyper-V as shown in Figure 2-6.
)
FIGURE 2-6 Installation of Site Recovery Provider
After installation and registration, it may take some time for Azure to find the server that has been registered with Site Recovery vault.
Proceed with infrastructure prep by completing the Target section of the wizard as shown in Figure 2-7.
)
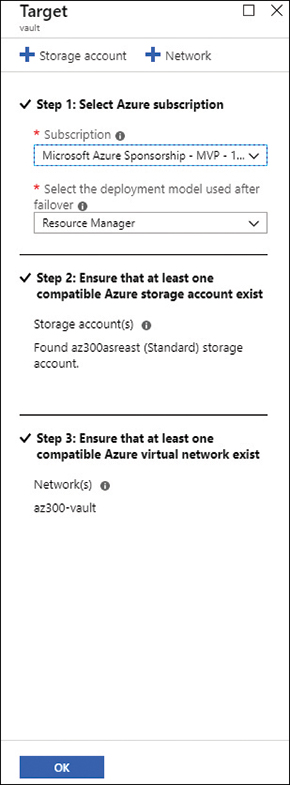
FIGURE 2-7 Preparing the Azure Target
Select the subscription and the deployment model used. (Generally, this will be Resource Manager.)
Click the Storage Account button at the top of the Target blade to add a storage account.
Provide the following storage account details:
Storage account name
Replication settings
Storage account type
When this storage account is created, it will be placed in the same region as the replication services vault.
If a network in the same region as the vault isn’t found, you can click the Add Network button at the top of the Target blade to create one. Much like storage, the network region will match the vault, other settings, including address range and name, will be available for configuration.
The last requirement for preparing infrastructure is to configure a replication policy. Complete the following steps to create a replication policy:
Click Create and Associate at the top of the Replication Policy blade. Enter the following information:
Name The name of the replication policy.
Source Type This should be prepopulated based on previous settings.
Target Type This should be prepopulated based on previous settings.
Copy Frequency Enter the replication frequency for subsequent copies to be captured.
Recovery Point Retention In Hours How much retention is needed for this server.
App Consistent Snapshot Frequency In Hours How often an app-consistent snapshot will be captured.
Initial Replication Start Time Enter a time for the initial replication to begin.
Associated Hyper-V Site Filled in based on previous settings.
Click OK to create the policy, and Azure builds and associates these settings with the specified on-premises environment.
Replicate data to Azure
After the completion of the on-premises settings, you return to the Site Recovery blade to continue configuration.
To enable replication, complete the following steps:
Select the source of the replication—on-premises, in this case.
Select the Source location—the Hyper-V server previously configured in these examples, HV001.
Click OK to proceed to the target settings.
Select the Azure subscription to use with this replication.
Provide a post failover resource group, a resource group for the failed over VM.
Choose the deployment model for the failed over virtual machine.
Select or create the storage account to use for storing disks for the VMs being failed over.
Select the option for when the Azure network should be configured: now or later.
If you selected now, select or create the network for use post failover.
Select the subnet for use by these VMs from the list of subnets available for the chosen network.
Click OK.
Select the virtual machines to failover as part of Azure Site Recovery.
Specify the following default properties and the properties for the selected virtual machines:
OS Type Whether the OS is Linux or Windows (available as default and per VM).
OS Disk Select the name of the OS Disk for the VM (available per VM).
Disks to replicate Select the disks attached to the VM to replicate (available per VM).
Click OK.
Review the replication policy settings for this replication. They will match the previously specified replication policy settings, but you can select other policies if they exist.
Click OK.
Click Enable Replication.
With replication options configured, the last part of the configuration to complete is the recovery plan. To configure the recovery plan, use the following steps:
On the Site Recovery blade, select Step 2: Manage Recovery Plans and click the Add Recovery Plan button at the top of the screen.
Provide a name for the recovery plan and select the deployment model for the items to be recovered.
Select the items for a recovery plan. Here you will choose the VMs that will be included in recovery.
Click OK to finalize the recovery plan.
Once the items are protected and ready to failover to Azure, you can test the failover by selecting the Site Recovery vault resource and choosing Recovery Plans (Site Recovery) from the manage section of the navigation pane.
Select the appropriate recovery plan for this failover.
This overview screen shows the number of items in the recovery plan in both the source and target, as shown in Figure 2-8.
)
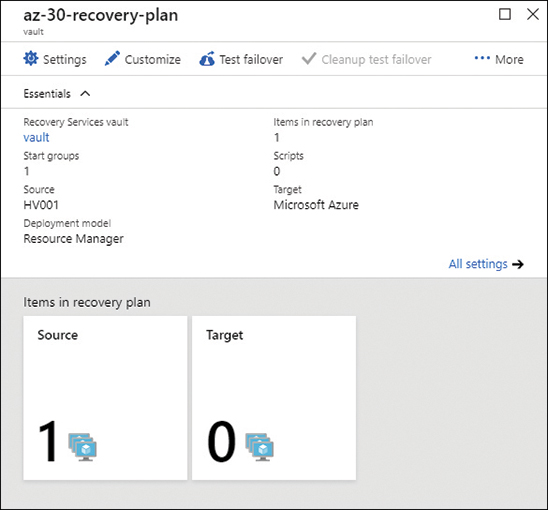
FIGURE 2-8 Site Recovery plan overview
To test the configuration, click the Test Failover button at the top of the Site Recovery Plan blade and complete the following steps:
Select the recovery point to use for the test.
Select the Azure Virtual Network for the replicated VM.
Click OK to start the test failover.
Once the failover completes, the VM should appear in the resource group that was specified for post failover use as shown in Figure 2-9.
)
FIGURE 2-9 Resources after failover running in Azure
Migrate by using Azure Site Recovery
Once the test failover has completed, your VM is running in Azure, and you can see that things are as expected. When you’re happy with the result of the running VM, you can complete a cleanup of the test, which will delete any resources created as a part of the test failover. Selecting the item(s) in the replicated items list and choosing the option to cleanup test failover. When ready to migrate, use an actual failover by completing the following steps:
Select Replicated Items in the ASR Vault Protected Items section.
Choose the item to be replicated from the list.
Once the item has synchronized, click the Failover button to send the VM to Azure.
Following the failover of the VM to Azure, cleanup of the on-premises environment happens as part of the completion of the migration to Azure. This ensures that the restore points for the migrated VM are cleaned up and that the source machine can be removed because it’ll be unprotected after these tasks have been completed.
You may need to tweak settings to optimize performance and ensure that remote management is configured once the system has landed, like switching to managed disks—the disks used in failover are standard disks.
There may also be some networking considerations after migrating the VM. External connectivity may require network security groups to ensure that RDP or SSH is active to allow connections. Remember that any firewall rules that were configured on premises will not necessarily be completely configured post migration in Azure.
After verification that the migrated resource is operating as needed, the last step of the migration is to remove the on-premises resources. In terms of Azure, the resources are still in a failover state because the process was to fail them over with the intention of failing back. An Azure Site Recovery migration is really a one-way failover.