Design and implement Microsoft 365 services
- By Orin Thomas
- 7/23/2019
- Skill 1.1: Manage domains
- Skill 1.2: Plan a Microsoft 365 implementation
In this sample chapter from Exam Ref MS-100 Microsoft 365 Identity and Services, author Orin Thomas teaches the skills of how to manage domains, plan a Microsoft 365 implementation, set up Microsoft 365 tenancy and subscription, manage Microsoft 365 subscription and tenant health, and plan migration of users and data.
Although it’s possible to simply start deploying Microsoft 365 once your organization has made the decision to adopt the technology, your organization will get more out of its Microsoft 365 deployment if some planning and design work has occurred before any Microsoft 365 services are configured. In this chapter you will learn about managing the Microsoft 365 domain namespace, how to plan a Microsoft 365 implementation, how to setup a Microsoft 365 tenancy and subscription, how to manage that subscription and tenancy’s health, and the steps that you’ll need to take to plan the migration and users from a traditional on-premises environment to a Microsoft 365 environment.
Skills in this chapter:
Manage domains
Plan a Microsoft 365 implementation
Setup Microsoft 365 tenancy and subscription
Manage Microsoft 365 subscription and tenant health
Plan migration of users and data
Skill 1.1: Manage domains
This section deals with managing domain name configurations for a Microsoft 365 tenancy. To master this skill you’ll need to understand how to configure a Microsoft 365 tenancy to use a DNS name managed by your organization. You’ll also need to know how to configure that domain name to work with a variety of Microsoft 365 services, as well as configure user names and email addresses to leverage the new domain name.
Add and configure additional domains
When you create a Microsoft 365 subscription, the subscription tenancy is automatically assigned a custom onmicrosoft.com domain. The tenant name is in the format name.onmicrosoft.com, where name is the name you want to assign to your organization’s tenancy. This name has to be unique, and no two organizations can share the same tenant name. When you initially create the tenancy, a check is performed against your proposed tenancy name. If a tenant already exists with that name, you’ll be alerted and required to select an alternative. While you’re unlikely to actually use the onmicrosoft.com domain name once you have fully configured your organization’s tenancy, it’s important to note that the tenant name cannot be changed after you configure your Microsoft 365 subscription. The tenant name chosen at setup remains with the subscription over the course of the subscription’s existence, and cannot be removed. Resist the temptation to assign an amusing name, because your organization will be stuck with it even if it isn’t the primary domain name used.
You can assign a domain name that you own to the tenant so that you don’t have to use the tenant name on a regular basis. For example, you might sign up to a Microsoft 365 subscription with the tenant name contoso.onmicrosoft.com. Any accounts you create will use the contoso.onmicrosoft.com email suffix for their Office 365 Exchange mailboxes. Once you’ve set up Microsoft 365, however, you can assign a custom domain name and have the custom domain name used as the primary email suffix. For example, assuming that you owned the domain name contoso.com, you could configure your tenancy to use the custom domain name contoso.com with the contoso.onmicrosoft.com tenancy.
Microsoft 365 supports the addition of up to 900 domains to a single subscription. You can use separate domain names with a subscription, such as contoso.com, or tailwindtraders.com. You can also associate subdomains of a domain name such as partners.tailwindtraders.com or australia.contoso.com.
Acquiring a domain name
If your organization wants to use a new domain name with its Microsoft 365 tenancy, it can procure one with a registrar. When you do this, you can choose to have the registrar host the name server records for the domain, or select your own name server records. The vast majority of organizations will have already procured a domain name and have it hosted either with a specific domain registrar, their ISP, or even on their own DNS servers. To use a domain with Microsoft 365, the DNS servers used as name servers for the domain need to support the following record types:
CNAME records To fully support Skype for Business online, the name server DNS servers need to be able to support multiple CNAME records in a DNS zone.
SPF/TXT records These records allow you to configure sender protection framework records, which can be used to combat unsolicited commercial email. TXT records are also one method of verifying domain ownership.
SRV records SRV records are used for Skype for Business Online IM and presence integration using the Outlook Web App as well as federation with Skype for Business Online users in different organizations including public Internet connectivity with Microsoft accounts.
MX records These records are used to route mail to Exchange Online mail servers.
Purchasing a domain through Microsoft 365
In some regions, you’re able to purchase a custom domain name from within Microsoft 365. When you do this, you’re limited to the following top level domains:
.biz
.com
.info
.me
.mobi
.net
.org
.tv
.co.uk
.org.uk
Purchasing a domain through Microsoft 365 has the advantage of meaning that the vast majority of DNS related operations will be performed automatically for you. You shouldn’t choose this option if your organization will continue to use email services outside Microsoft 365 because you won’t be able to modify the appropriate MX records.
Configuring a custom domain name
To configure Microsoft 365 to use a custom domain name, you need to add the name of the custom domain name to Microsoft 365. The account used to perform this action must be an Global Administrator of a business or enterprise plan.
To add a custom domain to Microsoft 365, perform the following steps:
In the Microsoft 365 Admin Center, click Domains under Setup as shown in Figure 1-1.
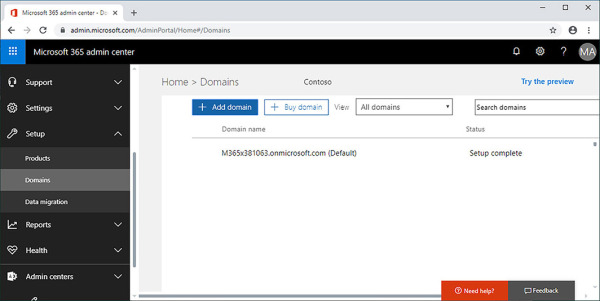
Figure 1-1 Domains node
If your organization already has a domain, click Add A Domain. The alternative is that the console provides the option to buy a domain through Office 365 and GoDaddy. The advantage of buying through GoDaddy is that you can have the entire process of assigning a custom domain to Microsoft 365 occur automatically. If your organization’s domain is already hosted elsewhere, you’ll instead have to confirm ownership of that domain by configuring special TXT or MX records that can be checked by the setup process.
When you click Add A Domain, you are presented with the New Domain page. Enter the name of the existing domain you want to configure as shown in Figure 1-2 and click Next.
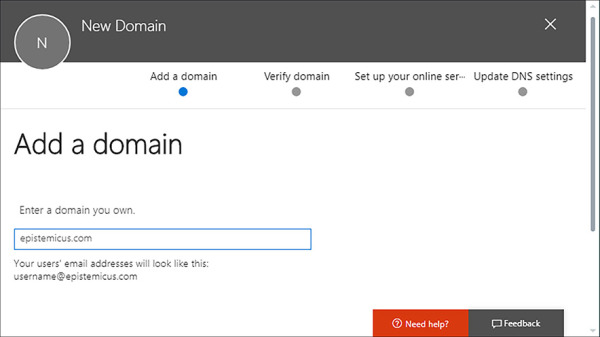
Figure 1-2 Add a new domain in Microsoft 365
This will begin the process of adding the domain, but you’ll need to confirm ownership before you can use the domain.
)
)
Verify custom domain
You can only use a custom domain name with Microsoft 365 if your organization owns the domain name. Microsoft requires that you perform a series of DNS configuration changes to the domain name that will prove that your organization controls and has ownership of the domain.
To confirm ownership of your organization’s domain, perform the following steps:
Once you’ve specified the domain you want to add, verify the domain on the Verify Domain page. This involves adding a TXT or MX record with the properties listed on the Verify Domain page show in Figure 1-3 to the DNS zone. You do this by configuring the DNS zone with the DNS provider.
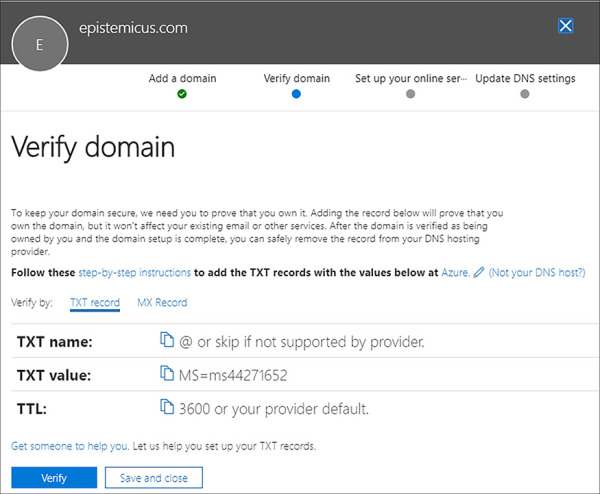
Figure 1-3 Verify Domain
Figure 1-4 shows the TXT record configured as part of the DNS zone, epistemicus.com, hosted in DNS on Microsoft Azure.
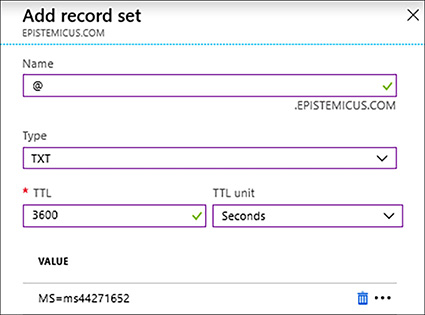
Figure 1-4 TXT record in Azure DNS
Once you have added the record, click Verify. Microsoft 365 will then attempt to confirm the presence of the record. Depending on how DNS is configured, it may take up to 15 minutes before the verification process will successfully complete.
)
Configure workloads for new domain name
By configuring a custom domain’s purpose, you can choose how it will be used with a variety of Microsoft 365 services. For example, you might want to use one custom domain as an email suffix, and another custom domain for use with Exchange and Mobile Device Management for Office 365. You can only configure a domain purpose once you’ve verified the DNS zone. Microsoft 365 allows you to configure separate domains for the Exchange, Skype for Business, and Mobile Device Management for Office 365 workloads.
To configure domain purpose, continue the wizard after verifying the DNS zone and select which services you wish the zone to support. Once you have added the records to the DNS zone, you can verify that the records have been entered correctly by clicking Verify as shown in Figure 1-5.
)
Figure 1-5 TXT record in Azure DNS
Exchange Online related DNS records
When you provision Microsoft 365 for your organization, Microsoft takes care of ensuring that the DNS records for your organization’s tenant domain, which is the onmicrosoft.com domain, are configured properly so that email addresses that use the tenant domain as an email domain suffix have mail routed properly.
For example, if you provision a Microsoft 365 tenant, and the tenant domain is contoso.onmicrosoft.com, then email sent to users at this email domain, such as an email sent to don.funk@contoso.onmicrosoft.com, will arrive at the correct location because Microsoft 365 will provision the appropriate DNS records automatically when the tenancy is provisioned.
When you add a custom domain to Microsoft 365, you need to configure an appropriate set of DNS records to ensure that mail flows properly to Exchange Online mailboxes that use the custom domain. For example, if your custom domain is tailspintoys.com, you need to configure DNS so that email will function properly for Exchange Online mailboxes that are configured to use the tailspintoys.com email domain. When properly configured, the user associated with the Exchange Online mailbox don.funk@tailspintoys.com will receive email sent from other hosts on the Internet.
If your custom DNS zone is hosted by GoDaddy, Microsoft 365 can configure the appropriate DNS records for you automatically. If your custom DNS zone is hosted by another DNS hosting provider, you’ll have to manually configure DNS records.
You need to configure the following DNS records:
Autodiscover CNAME record for Autodiscover service
MX record for mail routing
SPF (Sender Policy Framework) record to verify identity of mail server
TXT record for Exchange federation
CNAME record for Exchange federation
These records are listed in Table 1-1. The specifics of records will be provided for you by the Microsoft DNS setup wizard. The MX record takes the form <customdnsname>.mail.protection.outlook.com, and will vary depending on the custom domain name being registered.
Table 1-1 Microsoft 365 Exchange DNS records
Type |
Priority |
Host name |
Value |
TTL |
MX |
0 |
@ |
<customdnsname>.mail.protection.outlook.com |
1 HR |
TXT |
- |
@ |
v=spf1 include:spf.protection.outlook.com -all |
1 HR |
CNAME |
- |
autodiscover |
1 HR |
MX Record
You need to configure an MX record in your custom domain to point to an Office 365 target mail server. The address of this target mail server will depend on the name of the custom domain and is described in the documentation as being in the form <mx token>.mail. protection.outlook.com. You can determine the value for MX token by performing the following steps:
In the Microsoft 365 Admin Center, navigate to the Domains node under Settings.
Select the Custom Domain; this will open the Domain Properties page.
Locate the MX record as shown in Figure 1-6.
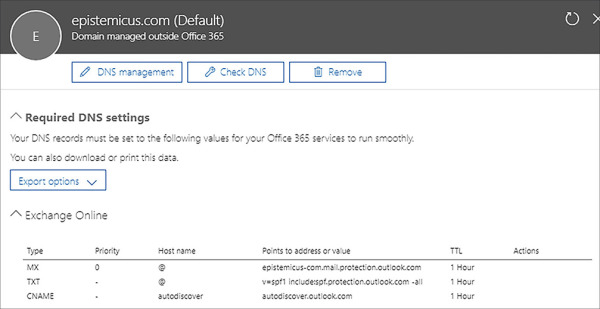
Figure 1-6 TXT record in Azure DNS
)
To ensure that mail routes properly, you need to configure the MX priority for the record to be a lower value than any other MX records configured for the custom domain. When mail is being routed, a check is performed to determine which MX record has the lowest value for the priority field. For example, an MX record with a priority of 10 will be chosen as a destination for mail routing over an MX record with a priority of 20.
Figure 1-7 shows the MX record for the epistemicus.com domain configuration when the DNS zone is hosted in Azure DNS.
)
Figure 1-7 MX record in Azure DNS
SPF Record
The Sender Protection Framework (SPF) record is a special TXT record that reduces the possibility of malicious third parties using the custom domain to send spam or malicious email. An SPF record is used to validate which email servers are authorized to send messages on behalf of the custom domain. The SPF record must be a TXT record where the TXT value must include v=spf1 include:spf.protection.outlook.com –all. The record should also be set with a TTL value of 3600. Only one TXT record for SPF should exist within a specific zone. If an SPF record is already present, append the Microsoft 365 values to the existing record rather than creating a new one. Figure 1-8 shows an SPF record for Exchange Online hosted in Azure DNS for the epistemicus.com domain.
)
Figure 1-8 SPF record in Azure DNS
Autodiscover CNAME Record
You need to create a CNAME record that uses the Autodiscover alias to point to the hostname Autodiscover.outlook.com, so that Outlook clients have their settings automatically provisioned for Exchange Online. For example, if the custom domain you assigned to Microsoft 365 was tailspintoys.com, you would need to create the CNAME record Autodiscover. tailspintoys.com and have it point to Autodiscover.outlook.com. Figure 1-9 shows this type of record configured for the epistemicus.com domain using Azure DNS.
)
Figure 1-9 Autodiscover record in Azure DNS
Exchange Federation Txt Records
If you are configuring federation between an on-premises Exchange deployment and Exchange Online, you need to create two special TXT records that will include a custom-generated domain-proof hash text.
The first record will include the custom domain name and the hash text, such as tailspintoys.com and Y96nu89138789315669824, respectively. The second record will include the name exchangedelegation, with the custom domain name and then the custom generated domain-proof hash text like exchangedelegation.tailspintoys.com and Y3259071352452626169.
Exchange Federation CNAME Record
If you are configuring federation, you need an additional CNAME record to support federation with Office 365. This CNAME record will need the alias autodiscover.service, and should also point to autodiscover.outlook.com.
Skype for Business related DNS records
Skype for Business requires you to configure two types of DNS records if you have a custom domain. You need to configure two SRV records and two CNAME records to get Skype for Business working properly with a custom domain, as shown for the epistemicus.com domain in Figure 1-10.
)
Figure 1-10 Skype for Business related DNS records
Skype for Business Online CNAME Records
If you want to use Skype for Business with a custom domain, you also need to create two separate CNAME records. The first CNAME record uses the alias sip, and points to sipdir.online.lync.com. This CNAME record allows the client to find the Skype for Business service and assists in the process of signing in. The second CNAME record assists the Skype for Business mobile device client to find the Skype for Business service and also assists with sign-in. The alias for this record is lyncdiscover, and the record target is webdir.online.lync.com. These records are listed in Table 1-2.
Table 1-2 Microsoft 365 Skype for Business CNAME DNS records
Type |
Host name |
Value |
TTL |
CNAME |
sip |
sipdir.online.lync.com |
1 HR |
CNAME |
lyncdiscover |
webdir.online.lync.com |
1 HR |
Skype for Business Online SRV Records
Skype for Business Online requires two SRV records. The first record is used to coordinate the flow of data between Skype for Business clients. This record should have the following properties:
Service _sip
Protocol _TCP
Priority 100
Weight 1
Port 443
Target sipdir.online.lync.com
The second record is used by Skype for Business to share instant messaging features with clients other than Lync for Business by allowing SIP federation. This record should have the following properties:
Service _sipfederationtls
Protocol _TCP
Priority 100
Weight 1
Port 5061
Target sipfed.online.lync.com
These records are also listed in Table 1-3.
Table 1-3 Microsoft 365 Skype for Business SRV DNS records
Service |
Protocol |
port |
target |
name |
TTL |
_sip |
_tls |
443 |
sipdir.online.lync.com |
@ |
1 HR |
_sipfederationtls |
_tcp |
5061 |
sipfed.online.lync.com |
@ |
1 HR |
Mobile Device Management for Microsoft 365 DNS records
If you are using Mobile Device Management for Microsoft 365, you need to create two CNAME records, also known as Alias, so that devices can find the appropriate location to register with. These two records are listed in Table 1-4.
Table 1-4 Microsoft 365 Mobile Device Management DNS records
Type |
Host name |
Value |
TTL |
CNAME |
enterpriseregistration |
enterpriseregistration.windows.net |
1 HR |
CNAME |
enterpriseenrollment |
enterpriseenrollment.manage.microsoft.com |
1 HR |
Verifying DNS settings
You can check DNS settings at any time by selecting the domain in the Microsoft 365 Admin Center, and clicking Check DNS, as shown in Figure 1-11. When you do this, Microsoft 365 will perform a query against the records required for the services you have chosen and validate that the results returned by the query match those that are required by Microsoft 365.
)
Figure 1-11 TXT record in Azure DNS
Set default domain
Setting the default domain configures which domain suffix will automatically be used with Microsoft 365 user accounts. You can only select a default domain if you have configured Microsoft 365 with at least one custom domain.
To configure the default domain:
Sign into the Microsoft 365 Admin Center as a Global Admin.
Under Setup, click Domains and then click on the domain that you wish to configure as the default domain.
On the domain’s page, shown in Figure 1-12, click Set As Default.
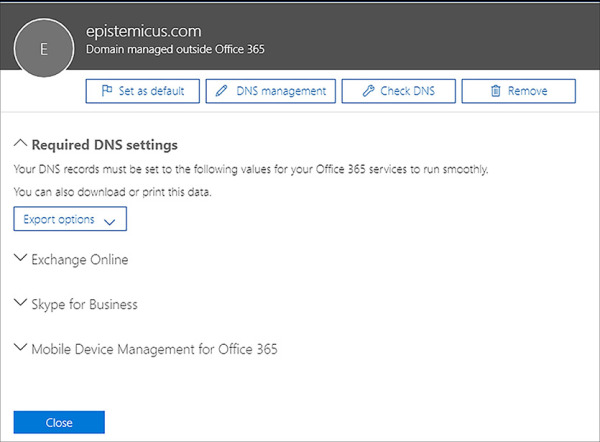
Figure 1-12 TXT record in Azure DNS
)
Set primary domain name
You can also set the primary domain name in Exchange Online. This works in a similar way to the default domain for Microsoft 365, although it is possible to have a primary domain name for Exchange Online that is different from the default domain for Microsoft 365. When you do this, the email address that a user has will default to the primary domain name, but the sign-in name for Microsoft 365 will use the default domain. To avoid confusion, it is simpler to set the default domain and primary domain to the same value.
To configure the primary domain type for Exchange Online, perform the following steps:
Sign into the Microsoft 365 admin center as a Global Admin.
Under Admin Centers, click Exchange. This will open the Exchange Admin Center.
Under Mail Flow, shown in Figure 1-13, click Accepted Domains.

Figure 1-13 Accepted domains in Exchange admin center
Set the domain that you wish to have become the primary domain and click the Pencil (Edit) icon.
On the Accepted Domain page, ensure that the domain is configured as Authoritative and that the domain is set to be the default domain as shown in Figure 1-14.
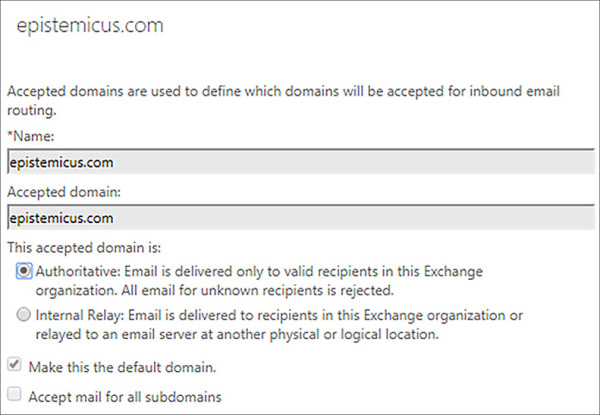
Figure 1-14 Configuring Default Domain
)
)
Configure user identities for new domain name
When your Microsoft 365 organization adopts a new custom domain name, it will also be necessary to decide what steps you should take in terms of allowing users to leverage that domain name. For example, should all newly created user accounts be assigned that domain name for email and the UPN sign in? Should existing user accounts be modified so that they use the new domain name for email and UPN sign in? Should the new domain name simply be added as an alternative domain suffix to the existing organizational email address? In this section you’ll learn what steps you can take to modify the primary address so that it uses a new domain name.
Manage email address
The default address, also known as the primary address and as the reply-to address, is the address that users use to sign in to Microsoft 365 resources, including Office 365, and which recipients reply to when they receive an email message from a user. You can view the primary email address for a user in the Microsoft 365 Admin Center on the user’s properties page, as shown in Figure 1-15.
)
Figure 1-15 Primary Email Address
It’s possible to change the primary email address once you have added an additional email address to an Office 365 user. It is important to note that changing the primary email address also changes the user name. For example, the warning in Figure 1-16 indicates that by changing the primary email address associated with the Adele Vance user account, the user name will also be changed. The email suffix for the primary address must be configured as an accepted domain for the Office 365 tenancy.
)
Figure 1-16 Change Primary Email Address
You can perform a bulk email address update using PowerShell. You might choose to do this in the event that the organization renames itself. This step should be taken with extreme care because supporting a small number of users through a transition to a new email and logon address is relatively simple, whereas supporting every user in the organization through a transition to a new email and logon address is what might politely be termed “logistically complex.”
To update the email and logon domains of multiple users, perform the following steps:
In the Active Users node of the Microsoft 365 Admin Center, select all of the users whose email and logon domains you want to update, as shown in Figure 1-17.
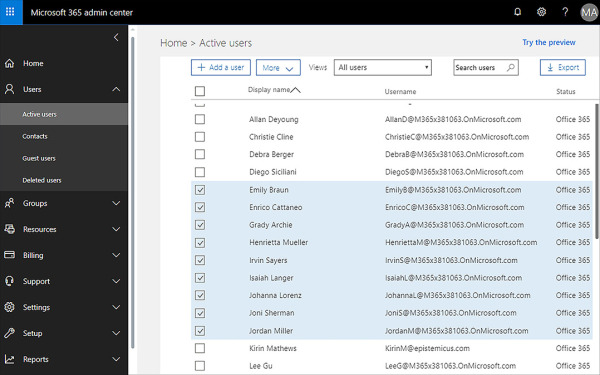
Figure 1-17 Select multiple users
Once the users are selected, on the More drop down menu, click Edit Domains.
On the Edit Domains drop down, select one of the domains that has been added to Microsoft 365, as shown in Figure 1-18, and click Save. You will be presented with a warning that email addresses and usernames in apps associated with Microsoft 365 will need to be updated.
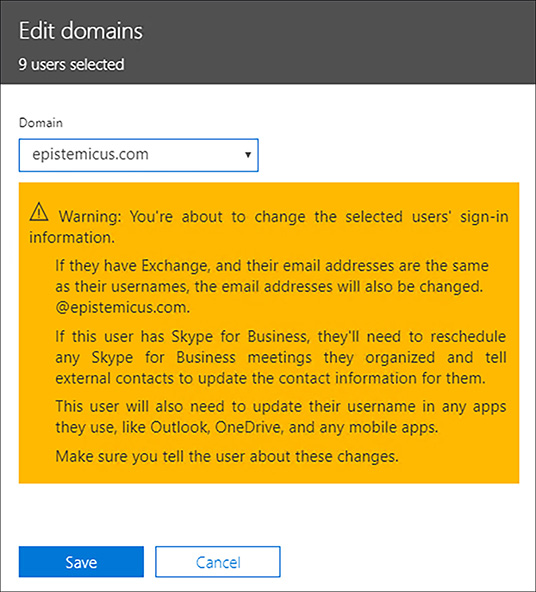
Figure 1-18 Select multiple users
When the operation is complete, a confirmation dialog will be displayed as shown in Figure 1-19. Click Close to dismiss the dialog.
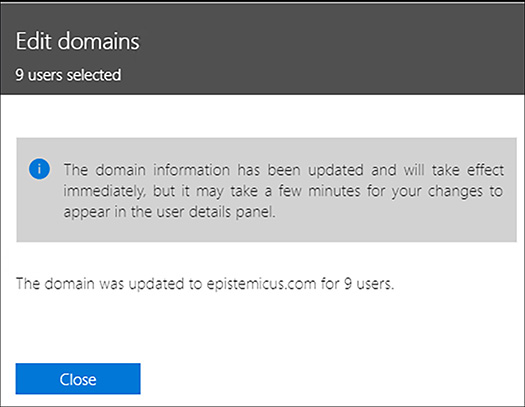
Figure 1-19 Confirmation dialog box
)
Additional email addresses
Additional email addresses allow mailboxes to receive messages from more than a single address. Also known as proxy or secondary addresses, they can take any format and can use any domain name associated with the organization’s Microsoft 365 tenancy. For example, Adele Vance’s user account could have the primary username and address as AdeleV@contoso.com, but could also have the following addresses also associated with the same Exchange mailbox:
You can add additional email addresses to an Office 365 account’s Exchange Online mailbox using a variety of methods. To add an additional email address to an Exchange Online mailbox using Exchange Admin Center, perform the following steps:
Sign in to the Microsoft 365 Admin Center with a user account that has Tenant Administrator permissions.
In the Microsoft 365 Admin Center, click Exchange under Admin Centers, as shown in Figure 1-20.
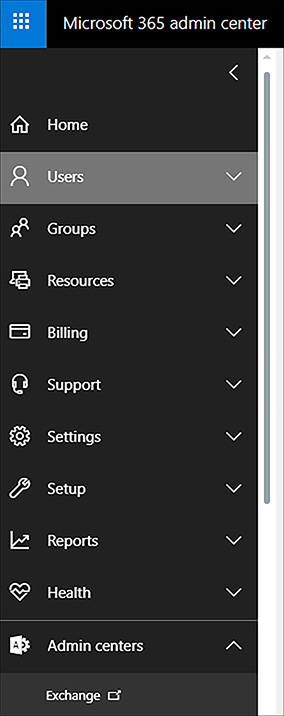
Figure 1-20 Locate Exchange Admin Center
In Exchange Admin Center, click Recipients and then click Mailboxes. Select the recipient to which you wish to add an additional email address. Figure 1-21 shows the Adele Vance mailbox selected.
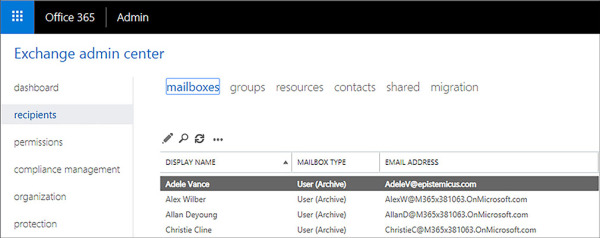
Figure 1-21 Recipients
Click the Edit (Pencil) icon.
On the User Mailbox properties page, click Email Address, as shown in Figure 1-22.
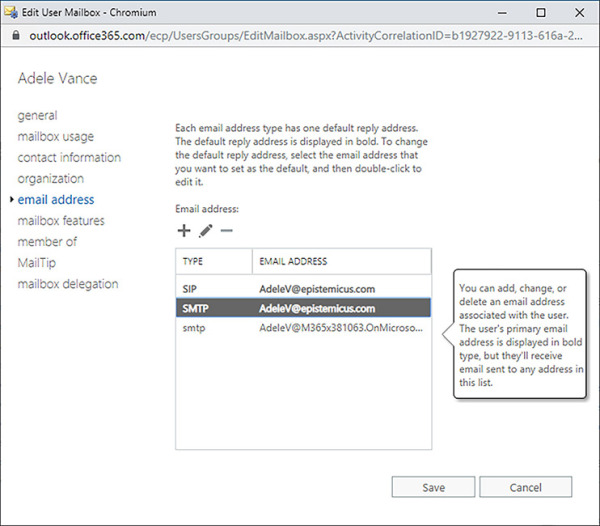
Figure 1-22 Email addresses
Click the Plus (+) icon.
On the New Email Address page, ensure that SMTP is selected, as shown in Figure 1-23, and then enter the new email address. You can also specify the new email address as the default reply-to address.
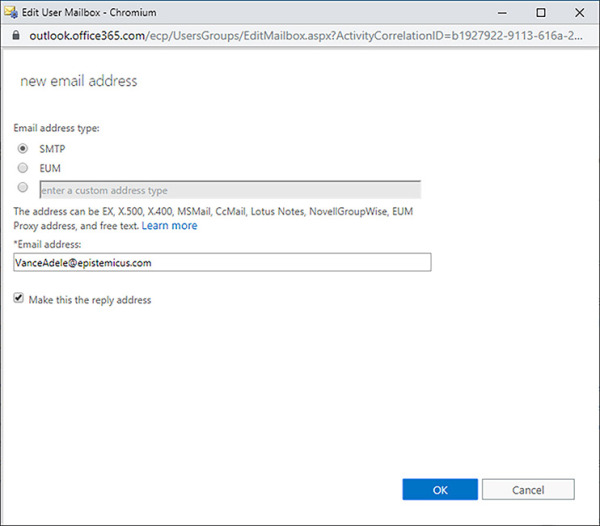
Figure 1-23 New Email Address
Click OK to save changes
)
)
)
To add an additional email address to an Exchange Online mailbox using the Microsoft 365 Admin Center, perform the following steps:
In the Office Admin Center, select Active Users under Users.
Select the user for which you want to configure the primary email address. Figure 1-24 shows Debra Berger selected.
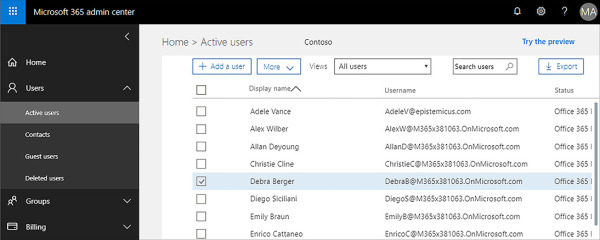
Figure 1-24 Debra Berger user account
On the More menu, click Edit Email Addresses And Username.
In the Alias box, shown in Figure 1-25, type the new email address and click Add.

Figure 1-25 Edit Email Address
To set the new email address as the new primary email address, as shown in Figure 1-26, click Set As Primary.
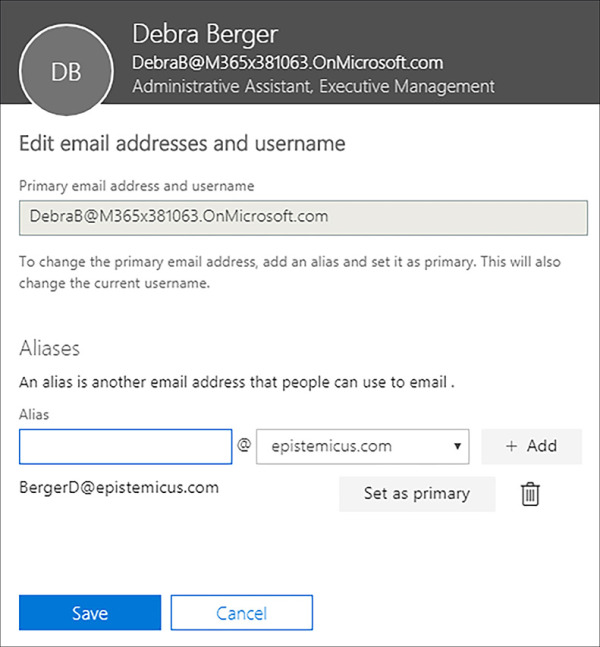
Figure 1-26 Other Email Addresses
)
)
)
)
)
)
)
You can use the Set-Mailbox cmdlet to add additional email addresses. For example, to add the email address berger.debra@epistemicus.com to Debra Berger’s Exchange Online mailbox, issue the following command using PowerShell as a global admin:
Set-Mailbox "Debra Berger" –EmailAddresses @{Add=berger.debra@epistemicus.com}
Design domain name configuration
As you learned earlier in this chapter, you can configure a Microsoft 365 subscription with up to 900 domain names, which can be completely different domain names and subdomains of a given domain name. Being able to associate up to 900 domain names with a single subscription gives your organization a substantial number of options when it comes to implementing a domain name design. For example, you can configure each of the services that are associated with a Microsoft 365 subscription with a different domain name. For example, you might choose to have the following configuration if your organization owned the contoso.com domain:
Contoso.com Domain name associated with Exchange Online. Each user signs into Microsoft 365 using an account with a contoso.com UPN suffix.
Skype.contoso.com Subdomain name associated with the Skype for Business services.
Mdm.contoso.com Subdomain name associated with mobile device management functionality for Microsoft 365.
You might also choose to configure separate subdomains and provide them as alternate email domains used with secondary addresses for Exchange Online mailboxes. For example, you might have adele.vance@contoso.com as the primary email address for a mailbox, but configure adele.vance@tailwindtraders.com as a proxy address, allowing the Adele Vance mailbox to receive email addressed to multiple addresses in the same mailbox.
 EXAM TIP
Remember the types of DNS records that you can configure to verify ownership of a specific custom domain name.