Implement modern device services
- By Robert Clements and Brian Svidergol
- 6/14/2019
Skill 1.4: Plan Windows 10 deployment
In 2015 Microsoft released Windows 10, an operating system that would completely shift the industry and the way in which enterprises managed and supported Windows. In the past you could expect a new version of Windows every 3-5 years, and the support lifecycle for those versions would overlap by a good margin. Organizations had very little pressure to quickly adopt the next major release. They could wait 12 months for major issues to be addressed, and then spend an additional 12-18 months testing and deploying the next release of Windows.
Windows 10 has evolved greatly since its original introduction. This version of the popular client operating system is delivered to customers as a service, meaning instead of waiting 3-5 years for new features or intermittent service packs, Microsoft deploys a major feature update every 6 months. These feature updates introduce new capabilities, security enhancements, bug fixes, and much more. In addition, the support lifecycle for Windows 10 releases are shorter than previous versions of Windows. This encourages organizations to stay current with Windows 10.
In this chapter we are going to cover Windows 10 in depth. This will include planning considerations around Windows as a Service (WaaS), a term you should become very familiar with. We will walk through the various deployment methods for Windows 10 and look at the pros and cons for each. We will cover upgrade readiness, a service that helps customers prepare for Windows 10 and maintain compatibility. Finally, we will look at the variety of security features introduced with Windows 10, which serves as one of the major benefits for adopting and staying current with Windows 10.
Plan for Windows as a Service (WaaS)
IT organizations that have delivered and supported earlier versions of Windows will experience some significant changes once they adopt Windows 10. The upgrade to Windows 10 (moving from Windows 7 to Windows 10, for example) shares a lot of similarities with previous upgrades. Once your fleet of devices is running Windows 10, you need to establish guiding principles for supporting upcoming feature updates, such as hardware, driver, and application compatibility.
In this section we will introduce you to the core components and services relative to WaaS. This will include a closer look at servicing channels, which determine your feature update deployment cycle. We will also be covering Windows Insider for Business. This is a program based on Windows Insider that provides organizations a centralized approach for testing and providing feedback.
Identify the core components for WaaS
The term “as a Service” (aaS) has been largely adopted to represent a transformation in the way digital services are provided to customers. Some common examples of this model include Software as a Service (SaaS) and Infrastructure as a Service (IaaS). Both examples are built on cloud-based technologies. Customers now have the option to purchase Microsoft Office as a subscription (SaaS), providing frequent updates and new capabilities every month. Landing servers in your local data center may not be realistic when you can move those servers to the cloud (IaaS) and reduce on-premises support and maintenance.
With Windows 10, Microsoft introduced Windows as a Service (WaaS). The idea for WaaS is that customers no longer buy a new version of Windows every 3-5 years. Instead you purchase Windows 10 and receive frequent updates and features. Moving Windows to a semi-annual release schedule enabled Microsoft to make some foundational changes in how the operating system would be serviced moving forward. As part of that transformation, they introduced new components in Windows 10 to support the WaaS model.
Each of these terms is a key component of WaaS and relates to how you will manage Windows 10.
Feature updates These updates deliver new functionality to the operating system. Feature updates are a core design change in Windows 10 and are the foundation to WaaS. Microsoft delivers these updates twice a year, one in the Fall and one in the Spring. From a deployment perspective, these updates are designed to be installed in-place, over the existing version of Windows 10. Users can expect to retain all their data and applications during the upgrade process. Microsoft has also introduced several tools to help administrators deliver these updates. We will be reviewing each of these tools in this skill.
Quality updates These updates deliver security and reliability fixes to the operating system. Quality updates redefine the way administrators manage patching for Windows devices. Prior to Windows 10, Microsoft released a variety of individual updates on “patch Tuesday.” In managed environments, administrators could then choose which updates to install. For example, some organizations might only install critical security updates each month or completely miss an important update from a prior month. This resulted in fragmented patch levels and reliability issues. Quality updates help address these issues. They are cumulative, meaning the patch content from the previous month is automatically rolled into the next month’s update. They are also condensed, reducing the number of individual updates you need to deploy and manage. For example, instead of six individual security updates for August, you have a single quality update.
Servicing channels Servicing channels represent the management controls available for determining which release of Windows 10 is deployed and when. Feature updates can be delivered using management solutions such as ConfigMgr, but they can also be delivered through Windows Update. Administrators must consider how they want to manage these updates and at what frequency they want them installed.
Deployment rings Deployment rings represents a concept for rolling out Windows 10 feature updates in stages. A ring contains a collection of devices that you determine are ready for the upgrade. You might have a ring for pilot devices and a ring for production. These rings can also directly relate to different management solutions and deployment scenarios such as ConfigMgr with Windows 10 Servicing or Intune with Windows 10 Update Rings.
Windows Insider The Windows Insider program was an original concept delivered in parallel with the first release of Windows 10. Customers were given the opportunity to join this program and test pre-release features. Participants had access to a feedback mechanism where they could share ideas and bugs. For enterprise customers, Windows Insider for Business was introduced to make enrollment easier.
Plan for servicing channels
We touched briefly on servicing channels in the last section. In this section we will cover servicing channels in detail. First, it is worth noting that the terminology for servicing channels has undergone changes since its original introduction. This was done to help align the update terminology between Windows 10 and Office 365. Earlier naming standards used branch identifiers. For example, Current Branch (CB), Current Branch for Business, and Long-Term Servicing Branch (LTSB). LTSB are still associated with some early editions of Windows Enterprise, but all other components are now referred to as servicing channels.
Servicing channels are broken down into three different types, each delivering a different service. As an administrator, it is your responsibility to identify and deploy the appropriate servicing channel based on the needs of your organization.
Insider Program With Windows 10 Microsoft has encouraged customers to start their testing early. Windows Insider delivers a servicing channel that enables customers to enroll their devices and begin testing new features and capabilities before they are released to the general public. For business customers, this enables you to start compatibility testing earlier. Members of the Insider program also have a direct feedback link through the Feedback Hub application. The Insider program includes three deployment rings that you can configure.
Fast Ring Participants of the Fast Ring are the first to receive new features and changes. These enhancements are validated on a small population of devices before they become available to the Fast Ring. Customers should expect possible issues and blockers when enrolled in this ring.
Slow Ring Participants of the Slow Ring receive Insider builds after the Fast Ring. These builds include updates and fixes for issues identified by Fast Ring participants. There is still a risk that these builds could experience issues, but you can expect it to be more stable.
Release Preview Ring Participants of the Release Preview Ring will receive a release preview Insider build in advance of general availability. This enables organizations to start piloting the next release of Windows 10 with minimal risk, while still having access to provide feedback.
Semi-Annual Channel After a new feature update is released to the general public it enters the Semi-Annual Channel. At this point administrators can begin managing how these updates are delivered to their production devices. There are two deployment rings for this servicing channel.
Semi-Annual Channel (Targeted) Newly released updates will enter this deployment ring first. Customers that choose this ring will receive the latest feature update, with the option to defer up to 365 days.
Semi-Annual Channel After a period of time, usually about 4 months, feature updates are moved to the Semi-Annual Channel deployment ring. This provides organizations another option for postponing their rollout, in addition to the 365- day deferral rules.
Long-Term Servicing Channel Customers with specialized systems running Windows 10, such as medical equipment or heavy machinery, can leverage the Long-Term Servicing Channel to prevent the deployment of feature updates and receive extended support. Unlike Semi-Annual Channel, administrators must install the LTSB edition of Windows 10 Enterprise. There is no configuration option to quickly switch between Long-Term Servicing Channel and Semi-Annual Channel. Administrators will have to re-image devices if they need to make this change. Also, Long-Term Servicing Channel is not designed for systems that are used for productivity or content creation. Devices running Office should not be using Long-Term Servicing Channel.
Each servicing channel also has a different release cadence and support lifecycle. Refer to Table 1-15 for these details.
Table 1-15 Servicing Channel Support
Servicing Channel |
New Releases |
End of Support |
|---|---|---|
Insider Program - Fast |
Weekly |
It varies based from release to release, but all Insider builds will eventually expire if you do not stay current. |
Insider Program - Slow |
Monthly |
It varies based from release to release, but all Insider builds will eventually expire if you do not stay current. |
Semi-Annual Channel |
Every 6 months |
Fall releases have 30 months of support. Spring releases have 18 months of support. |
Long-Term Servicing Channel |
Every 2-3 years |
Up to 10 years of support. |
Plan for Windows Insider for Business
Windows Insider delivers pre-release builds of Windows 10 to customers that enroll in the Insider program. Once enrolled, your device will start receiving Insider builds. As a participant you get to try new features and capabilities before they are released. The Insider build also includes a dedicated feedback channel for reporting issues or general feedback to the Windows development team. Through this program Microsoft is able to collect real-world data from a vast range of users and devices. That data helps address issues and improve Windows before an update is released to the general public. After joining the Insider program, you can enroll your existing Windows 10 device by navigating to the Windows Insider Program settings page, as shown in Figure 1-56. From there you click Get Started and enter your account credentials.
)
Figure 1-56 Windows Insider Program Settings
Windows Insider for Business is the same Insider program that we just reviewed, but with some extra controls to help organizations manage their enrolled users and devices. These controls include:
Domain registration Customers that are synced with Azure Active Directory (Azure AD) can register their tenant with the Windows Insider Program. This enables employees to sign in with their Azure AD credentials.
Track feedback The feedback submitted through the Feedback Hub is tagged with the corresponding user’s Azure AD account. That feedback can then be tracked for internal analysis and data collection.
Registering your domain with the Windows Insider Program can be accomplished by following these steps:
Navigate to the Windows Insider registration page at https://insider.windows.com/en-us/for-business-organization-admin/.
Sign in with your Azure AD account and confirm you have access to complete the registration. Confirmation is shown at the top of the page under Register Your Domain With The Windows Insider Program. Your account must meet the following requirements. If these requirements are met, you will see a message prompting you to register your domain, as shown in Figure 1-57.
Assigned the Global Administrator role in Azure AD.
Existing participant of the Windows Insider Program.

Figure 1-57 Windows Insider for Business Sign In
On the Manage Insider Preview Builds page, click the link: Register Your Domain With The Windows Insider Program For Business.
On the Register page, review the program agreement, check the box to accept the terms, and click Register.
Review the registration results to confirm your organization was successfully registered, as shown in Figure 1-58.
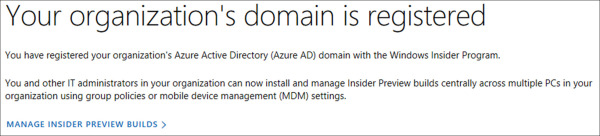
Figure 1-58 Windows Insider for Business Registration
)
)
Plan the appropriate Windows 10 Enterprise deployment method
With Windows 10, deployment methods refer to both the initial deployment of the operating system and the deployment of future feature updates. Feature updates in Windows 10 are responsible for upgrading the operating system from one major release to the next. Both scenarios play an important role when you are supporting WaaS. Many of the techniques we review in this section can be used to manage new deployments of Windows 10 and support future feature updates.
Windows 10 supports many of the traditional deployment scenarios that you may already be familiar with. For example, deploying the latest version of Windows during an organization’s next major hardware refresh has been a common scenario for earlier versions of the operating system. There are new methods available, however, such as the in-place upgrade, which can help simplify your migration if new hardware is not readily available.
For this section we will be looking at a variety of deployment methods available for Windows 10, along with the pros and cons for each. This will include capabilities available with modern servicing, such as Windows Update for Business. We will also be working with task sequences in ConfigMgr as part of the in-place upgrade. Finally, we will cover the traditional methods that are still supported with Windows 10.
Plan for deploying Windows 10 Enterprise
There are two main scenarios associated with Windows 10 deployment methods. The first scenario involves moving to Windows 10 from an early version of the operating system. For example, today your client devices have Windows 8.1 installed and you are planning a migration to Windows 10. The second scenario involves keeping Windows 10 current with the latest feature updates. For example, today your client devices have Windows 10, version 1803 installed. You are planning an upgrade to Windows 10, version 1809. There are deployment methods for each of these scenarios.
In some cases, a deployment method can be used for both deployments and upgrades, such as the in-place upgrade. Other methods are more specific, such as Windows Update for Business. The first thing you need to understand is what options are available and in what scenarios they apply.
Traditional methods This category covers several of the deployment methods used with earlier versions of the Windows operating system. Microsoft is continuing to support these methods and has released compatibility updates for tools such as the Microsoft Deployment Toolkit (MDT) and the Windows Assessment and Deployment Kit (Windows ADK), both of which support traditional imaging and upgrades.
Bare metal This deployment method refers to scenarios where new hardware is procured, or existing hardware is repurposed. In both situations a Windows image is installed and configured according to the organization’s IT standards. Bare metal deployments are seen at most organizations and are commonly leveraged in situations where you need to roll out a new version of the operating system or another major application, such as Microsoft Office. It can help consolidate efforts.
Refresh This deployment method refers to scenarios where an existing device needs to be wiped and reloaded. In this situation the existing user state is backed up, the disk is wiped, the latest image is installed, and the user state is restored. Refresh deployments are often seen when a device becomes inoperable and needs to be wiped. This type of deployment can also be used in upgrade scenarios, such as moving from Windows 7 to Windows 10.
Replace This deployment method is similar to the refresh method but includes new hardware as part of the process. For example, a user is running a 3-year old laptop with Windows 8.1 installed. You backup the user state on this device and restore it to a new laptop running Windows 10.
In-place upgrade This deployment method refers to scenarios where an existing version of Windows is installed, and you upgrade the device to a newer release of Windows 10. This method supports both upgrading to Windows 10 and staying current. For example, let’s say you have a device running Windows 7 and you deploy an in-place upgrade for Windows 10, version 1809. Alternatively, you have a device running Windows 10, version 1803 and you deploy an in-place upgrade for Windows 10, version 1809. This process retains the applications, settings, and user data on the system. The old version of Windows is moved to a Windows.old folder for a configurable amount of time, which can then be referenced in the event that you need to roll back the operating system.
Modern servicing This deployment method refers to scenarios where you need to keep current with new releases of Windows 10. Similar to the in-place upgrade, modern servicing can address situations where you are moving from one version of Windows 10 to the next. However, modern servicing technologies are specific to Windows 10, preventing them from being used with earlier versions of the operating system. Windows Update for Business, Windows Server Update Services (WSUS), and System Center Configuration Manager (ConfigMgr) are all tools that support modern servicing.
Now that we have covered the basic deployment methods for Windows 10, let’s take a look at the different deployment formats. Windows 10 is available in two formats: Electronic Software Delivery (ESD), available through Windows Update or the Windows 10 Media Creation Tool, and Windows Imaging Format (WIM), available through traditional installation media (ISO). There are a number of solutions available for each deployment format, with pros and cons for each. Refer to Table 1-16 for a breakdown of these formats, followed by an introduction to each of the deployment solutions.
Table 1-16 Modern servicing techniques
Deployment Format |
Delivery Solution |
Pros |
Cons |
|---|---|---|---|
Electronic Software Delivery (ESD) |
Windows Update for Business (WUfB) Windows Server Update Services (WSUS) System Center Configuration Manager (ConfigMgr) |
Smallest package size. Fastest installation. |
Limited control to handle pre and post upgrade tasks. |
Windows Imaging Format (WIM) |
System Center Configuration Manager (ConfigMgr) Microsoft Deployment Toolkit (MDT) Third-party management solutions |
Full control over the upgrade experience end-to-end. |
Highest administrative effort. Largest package size. |
Windows Update for Business (WUfB) WUfB is a series of new policies available to Windows 10 clients. These policies enable administrators to manage the servicing channel and deferral settings for Windows 10 feature updates and quality updates. This service delivers updates to clients through the public Windows Update network using the ESD deployment format. WUfB policies can be configured using a GPO or Intune MDM policy.
Windows Server Update Services (WSUS) WSUS is an on-premises solution for organizations that need to fully manage the updates that they deploy to their clients. Administrators can synchronize with the Microsoft Update catalog and deploy approved updates for all supported versions of the Windows operating system. This includes feature updates and quality updates for Windows 10.
System Center Configuration Manager (ConfigMgr) ConfigMgr is an on-premises device management solution for organizations that need to fully manage the updates that they deploy to their clients. With ConfigMgr, administrators are given the option to use task sequences or Software Updates (WSUS). With task sequences you have additional control over the in-place upgrade scenario.
Microsoft Deployment Toolkit (MDT) MDT is a free deployment tool that enables administrators to support Windows 10 images and in-place upgrades. Similar to ConfigMgr, MDT uses task sequences for image creation and upgrades.
As you prepare to deploy Windows 10 using the in-place upgrade method, there are a number of items to consider. While there are several benefits to supporting this method, each of these items can impact the success of your implementation.
Compatibility Hardware, drivers, and applications all need to be reviewed for Windows 10 compatibility. Older hardware, including peripherals, may not support the latest release of Windows 10 or have supported drivers, in which case they would need to be replaced or updated. Applications that are incompatible can cause the upgrade to fail and need to be assessed as well. Later in this skill we will review Upgrade Readiness, a service provided by Microsoft to help identify compatibility issues.
Legacy BIOS to UEFI Windows 10 supports legacy BIOS and UEFI, both of which use different partition maps on the system drive. That said, there are security features, such as Secure Boot, that require UEFI. In this case you can complete an in-place upgrade on a device running legacy BIOS and then use the MBR2GPT tool to convert the partition map from Master Boot Record (MBR) to GUID Partition Table (GPT).
Disk encryption The Windows 10 in-place upgrade supports BitLocker natively. If the system drive is encrypted with BitLocker, the upgrade will work without any additional administrative effort. If the drive is encrypted with a third-party solution, you will need to contact the vendor for instructions on how to address the encryption software during the upgrade.
Language packs The Windows 10 in-place upgrade will retain the system default user interface (UI) language. Any additional language packs that have been installed previously will need to be re-installed following the upgrade.
32-bit to 64-bit The Windows 10 in-place upgrade does not support upgrading devices from 32-bit versions of Windows to 64-bit. If this is a scenario you need to plan for, consider using the refresh or replace deployment methods.
Windows To Go Windows To Go is a feature that enables customers to boot a Windows installation from a supported USB storage device. The Windows 10 in-place upgrade is not supported on Windows To Go devices running older versions of the operating system. Once on Windows 10, future Feature updates can be installed.
Existing images If you have an existing operating system image for Windows 7 or Windows 8.1, installing that image, upgrading it to Windows 10, and recapturing it is not supported. A new operating system will need to be recreated for Windows 10 deployments. Alternatively, you can start utilizing offline servicing to avoid traditional reference image designs.
Dual-boot The Windows 10 in-place upgrade supports devices running a single version of Windows. Devices configured in a dual-boot or multi-boot configuration are not supported.
Design an in-place upgrade for Windows 10
In this section we take a closer look at the in-place upgrade deployment method. This is a common starting point for organizations that are planning their migration to Windows 10. In the following example we work with a task sequence in ConfigMgr, version 1810. In this version of ConfigMgr a task sequence template is provided to support in-place upgrade scenarios.
To begin, you first need to download a copy of the Windows 10 installation media. This can be retrieved by downloading the latest Windows 10 ISO from the Microsoft volume license service center (VLSC). To access the VLSC, visit: https://www.microsoft.com/Licensing/servicecenter/default.aspx. Once downloaded, you will need to extract the files from that ISO in preparation for creating the operating system upgrade package required by ConfigMgr. Refer to Figure 1-59 for an example of the extracted files needed.
)
Figure 1-59 Windows 10 Installation Media
ConfigMgr requires the Windows 10 installation media in order to complete the in-place upgrade. The installation media is referenced in the task sequence as an operating system upgrade package. When this step runs, ConfigMgr is executing setup.exe with a series of command-line options that instruct setup how to complete the upgrade. Setup.exe can be executed independently of ConfigMgr and it is worth reviewing the variety of supported options.
In Figure 1-60 you can see an example of the in-place upgrade task sequence template provided with ConfigMgr, version 1810. Each of the groups in this task sequence template are provided to assist you with creating a working upgrade deployment. You can add, remove, or modify any of these steps to meet your requirements. Each group contains a basic description to provide additional guidance.
)
Figure 1-60 In-place Upgrade Task Sequence
Prepare for Upgrade This group is designed for steps that will run in the current operating system. These steps should be focused at pre-upgrade operations, such as checking for 20 GB of free disk space (a requirement for Setup) or ensuring that the computer is connected to a wired connection (if you do not support upgrades over wireless).
Upgrade the Operating System This group is designed for steps that trigger the in-place upgrade. The Upgrade Operating System and Restart Computer steps are included as part of the template. The Upgrade Operating System step includes a number of options, as shown in Figure 1-61. In this screen shot we have selected the checkbox: Perform Windows Setup Compatibility Scan Without Starting Upgrade. This setting runs setup using the /Comapt option. Windows setup will scan the device for possible incompatibilities. If any are found, a return code is generated with a series of logs that will need further analysis.
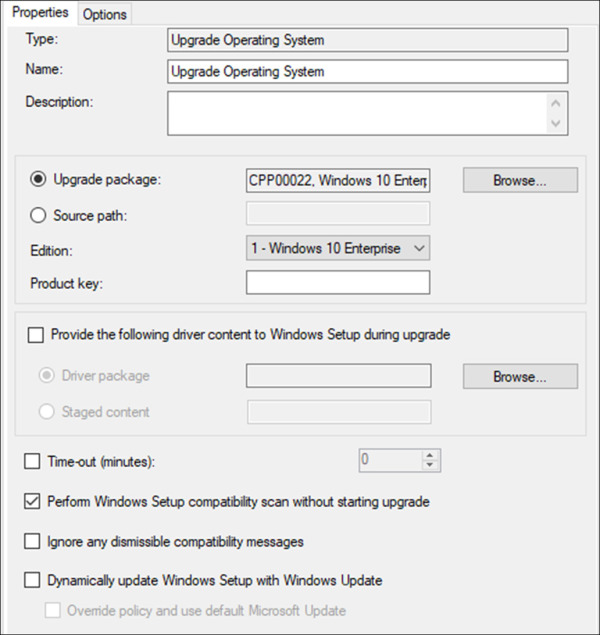
Figure 1-61 Task Sequence – Upgrade Operating System
Post-Processing This group is designed for steps that need to run after the upgrade has completed successfully. This group will run based on the task sequence variable _SMSTSSetupRollback equaling false. Possible steps might include installing applications, resuming disk encryption, or running custom configuration changes for your organization.
Rollback This group is designed for steps that need to run after an upgrade has failed and triggered a rollback. This group will run based on the task sequence variable _SMSTSSetupRollback equaling true. Possible steps might include sending an email notification to the device owner that the upgrade was unsuccessful, or automatically creating an incident in your service desk system.
Run Actions on Failure Similar to the Rollback group, this group is designed for steps that need to run after an upgrade has failed. This group will run based on the task sequence variable _SMSTSOSUpgradeActionReturnCode not equaling 0. Possible steps might include running a log collector or diagnostic tool, such as SetupDiag.
)
Once you have configured this task sequence to meet your needs, you can use the deployment ring strategy discussed earlier in this chapter. In ConfigMgr this can be done using a series of device collections (groups of devices) followed by a phase deployment (a multi-phase deployment based on success criteria). For the exam you will want to be familiar with the in-place upgrade task sequence and what its capabilities are versus other deployment methods.
Design a servicing plan for Windows 10
In this section we are going to take a look at the modern servicing deployment method. This method delivers new feature updates to existing devices that already have Windows 10 installed. With modern servicing, feature updates are installed similar to a traditional Windows Update. In the following examples we are going to review three techniques for enabling modern servicing.
Modern Servicing with Microsoft Intune
The first solution we will look at is the Windows 10 update rings in Microsoft Intune. This solution requires the target devices to be enrolled in Intune. Once enrolled, devices that have this policy assigned will be configured to use Windows Update for Business. Follow these steps to create an update ring policy in Microsoft Intune.
Sign-in to the Microsoft Azure portal at https://portal.azure.com/.
Click All Services.
Search for Intune and select it.
Under Manage, click Software Updates.
On the Software updates blade, under Manage, click Windows 10 Update Rings.
On the Software updates – Windows 10 Update blade, click Create. Refer to Figure 1-62 for an example of the update settings available through this policy.
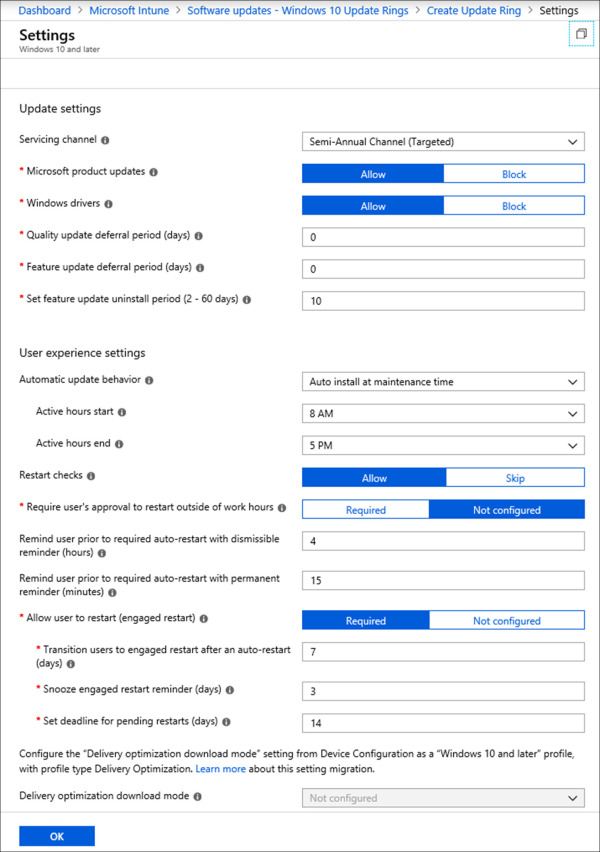
Figure 1-62 Windows 10 Update Rings
)
The Windows Update policy is split into two sections: Update settings and User experience settings. There are two controls under Update settings that are used to manage the deployment of feature updates. These include the following:
Servicing channel The servicing channel dropdown includes each of the servicing channels that we reviewed in skill 4.1. Use this option to setup deployment rings for Windows Insider for Business, or configure this option to configure deployments of public releases once they reach semi-annual channel.
Feature update deferral period (days) The feature update deferral period enables you to defer an update up to 365 days. This option is designed to give you an additional grace period to accommodate your deployment workflow.
After configuring and assigning this policy you have the option to pause the assignment for up to 35 days, in the event where you may need to halt all upgrades to troubleshoot an issue. The option to pause the assignment of a feature update can be done from the Software updates – Windows 10 Update Rings blade by selecting the policy and clicking Pause on the Overview page. If you are ready to resume the assignment you can do so from the same blade, otherwise the assignment will automatically resume after 35 days.
Modern Servicing with Group Policy
The next solution we are going to review involves configuring WUfB using the Group Policy. The Group Policy settings are identical to Intune, so this will be a brief example. The major difference with Group Policy is how the various settings are split into individual policies. For example, the settings for user experience are broken down between multiple policies. In the following example we will configure a new GPO for WUfB. In this example we are using the latest ADMX templates provided with Windows 10, version 1809.
Open the Group Policy Management Editor.
Create a new Group Policy Object (GPO) and name it “WUfB”.
Right-click the new GPO and click Edit.
Under Computer Configuration, expand Policies.
Expand Administrative Templates.
Expand Windows Components.
Expand Windows Update.
Expand Windows Update for Business.
Locate and edit the policy: Select when Preview Builds and Feature Updates are received.
Select the radio button next to Enabled and configure the following options. Refer to Figure 1-63 for an example of this policy configuration.
Set the Windows readiness level to Semi-Annual Channel.
Leave the deferral setting at 0.
Leave the pause value blank.
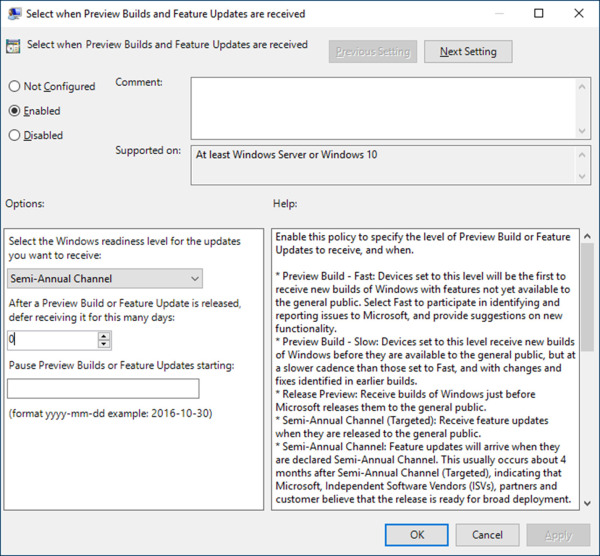
Figure 1-63 GPO for Feature Updates
)
Modern Servicing with Configmgr
The last solution we will review is the Window 10 Servicing feature in ConfigMgr. This deployment method is ideal for environments that have chosen the ESD update format but still want to manage the update deployments through ConfigMgr.
Windows 10 servicing utilizes ConfigMgr’s Software Update mechanics. The Software Update feature in ConfigMgr uses WSUS for synchronizing updates from the Microsoft Update catalog. Those updates can then be managed and deployed by ConfigMgr. The Windows 10 Servicing feature leverages these capabilities. The creation wizard will walk you through creating a servicing plan, setting up deployment rings, and creating the deployment. In this example we are creating a servicing plan in ConfigMgr, version 1810.
Click Start, search for Configuration Manager Console and select it.
In the Configuration Manager Console, click the Software Library workspace.
Under Overview, expand Windows 10 Servicing.
Under Windows 10 Servicing, select Servicing Plans.
In the ribbon, click Create Servicing Plan.
In Figure 1-64 you can see an example of a Windows 10 servicing plan created in ConfigMgr. The summary page outlines the configuration options for each of the various controls.
)
Figure 1-64 Windows 10 Servicing Wizard
General The General page of the wizard is used to assign a name and description for the servicing plan.
Servicing Plan The Servicing Plan page of the wizard is used to select the device collection that will receive the deployment generated by this servicing plan.
Deployment Ring The Deployment Ring page of the wizard is used to select a servicing channel and delay deployment up to 120 days. Note that on this page your only options for servicing channels are Semi-Annual Channel (Targeted) and Semi-Annual Channel. You do not have options for Windows Insider builds.
Upgrades The Upgrades page of the wizard is used to define the criteria for the updates you are deploying with this servicing plan. For example, if you are creating a servicing plan for just 64-bit devices, you can configure the architecture attribute to only retrieve 64-bit updates.
Deployment Schedule The Deployment Schedule page of the wizard is used to define when the update will become available and when it will be enforced.
User Experience The User Experience page of the wizard is used to configure what notifications are displayed to the user and how reboot behavior will be handled. If you are using maintenance windows in ConfigMgr, you can configure whether they are acknowledged for this deployment.
Package The Package page of the wizard is used to assign a deployment package or to configure the servicing plan to use the Microsoft cloud, reducing the need to download and replicate content internally.
Analyze upgrade readiness for Windows 10
Earlier in this chapter we covered some of the requirements that you need to consider prior to deploying Windows 10. Most customers preparing to deploy a new operating system are going to do extensive testing and validation of their hardware, drivers, and applications before they start large scale deployments. This process can be time-consuming, even more so when that operating system is undergoing major changes every six months.
Upgrade readiness is a service provided by Microsoft to help customers identify compatibility concerns in support of WaaS. Customers that choose to enroll in this service can get metrics and visual indicators on which components need the most attention and which devices are ready to upgrade. This is made possible using Windows telemetry and the Microsoft cloud.
Plan for upgrade readiness
To prepare for upgrade readiness you need to be familiar with the requirements for Windows Analytics. In Skill 1.3 we introduced you to the various device monitoring services available with Windows Analytics. This included upgrade readiness, device health, and update compliance. Because all three of these solutions are delivered through Windows Analytics and are data-driven based on telemetry, the implementation is similar for each.
To begin, we will cover the fundamentals of upgrade readiness and items that you should be familiar with.
Telemetry The upgrade readiness service requires that you set the Windows telemetry level to basic (minimum) for any devices that you enroll in the service.
Operating system support Upgrade readiness supports devices running Windows 7 SP1, Windows 8.1, or Windows 10. For Windows 7 SP1 you must install KB2952664. For Windows 8.1 you must install KB2976978.
Target operating system Upgrade readiness can provide you with compatibility information for one operating system version at a time. For example, in Figure 1-65 you can see the dropdown menu for Target Version To Be Evaluated. This option is configured as part of the solution settings in Azure. The operating system version you select will be used for data analysis. When a new Windows 10 feature update is released, you will need to update this field to the new build number. Change the target version can take up to 24 hours to apply.

Figure 1-65 Upgrade Readiness Solution Settings
Data availability Once a device is configured to upload telemetry and associate it with a commercial ID, that data can take up to 72 hours before it is visible in upgrade readiness. After that you can expect to see updates every 24 hours. For example, if a device has an incompatible application and you update that application, the change will be reflected within 24 hours.
Cost The upgrade readiness service has no cost. The free offering provides 7 days of historical data and up to 500 MB of storage. If your organization decides it needs to retain 90 days of historical data, you will need to procure Azure storage to accommodate this requirement.
)
Navigate upgrade readiness
Once you have your devices uploading telemetry to Microsoft with your organization’s commercial ID, the results will be shown in the Log Analytics service in the Azure portal. From there you can begin navigating through the different blades and assessing your organization’s upgrade readiness compatibility.
This next walk-through will introduce you to the upgrade readiness solution in the Azure portal. For this demonstration we have already created a Log Analytics workspace for Alpine Ski House, named ASH-Analytics. The devices in this organization are also configured for upgrade readiness. We will be looking at the Alpine Ski House environment to determine if they are ready to adopt Windows 10, version 1809. To access the upgrade readiness solution, follow these steps.
Sign-in to the Microsoft Azure portal at https://portal.azure.com/.
Click All Services.
Search for Log Analytics and select it.
On the Log Analytics blade, select the workspace containing your upgrade readiness solution. In this example we are selecting the workspace named ASH-Analytics.
On the ASH-Analytics blade, under General, select Solutions.
On the ASH-Analytics – Solutions blade, select the solution starting with CompatibilityAssessment. In this example the solution is named CompatibilityAssessment(ASH-Analytics).
On the CompatibilityAssessment(ASH-Analytics) blade, click the Upgrade Readiness tile. This will present you with the upgrade readiness workflow page, consisting of multiple blades with data related to Windows 10 compatibility.
The upgrade readiness solution is designed as a workflow, with multiple steps that walk you through the end-to-end process for upgrading to Windows 10. The first information you are presented with is the Upgrade Overview blade, as shown in Figure 1-66. This blade provides an upgrade summary based on the targeted operating system version that you configured. In this example you can see at the bottom of the blade that Windows 10 Version 1809 is the target operating system. Total computers represent the total number of devices that have submitted telemetry to Windows Analytics. Completed upgrades represent the total number of devices that have successfully upgraded to Windows 10, version 1809.
)
Figure 1-66 Upgrade Readiness - Upgrade Overview
The next blade you are presented with relative to upgrade readiness is STEP 1: Identify Important Apps, as shown in Figure 1-67. This blade is designed to highlight applications in your environment that may need attention prior to deploying Windows 10. The first number on this blade, Total Applications, summarizes the total number of applications identified in your organization. The second number, Applications In Need Of Review, identifies applications that Microsoft does not have compatibility information for and recommends that you review. You can click either of these values to drill down into the various data categories.
Applications are automatically grouped based on importance. For example, applications that are installed on less than 2% of devices are grouped together. You also have the option to assign or modify the importance level with a selection of built-in options. This is accomplished by clicking on the Assign importance link at the bottom of the blade. Defining the importance level will assist in organizing your application portfolio, along with defining which applications are upgrade ready. These include the following.
Not reviewed This is the default importance level for applications that are installed on more than 2% of devices. To clearly understand which apps are important, you can modify this default value to something with additional meaning.
Mission critical This is an optional importance level, signifying a mission critical dependency on the application.
Business critical This is an optional importance level, signifying a business-critical dependency on the application.
Important This is an optional importance level, signifying the application is important to the organization.
Best effort This is an optional importance level, signifying the application is not important and compatibility will be approached as a best effort.
Ignore This is an optional importance level, signifying the application is not important and can be safely ignored from future compatibility reports. Selecting this option will mark the application as upgrade ready, removing it as a blocker.
Review in progress This is an optional importance level, signifying the application is currently under review and the importance level has not yet been identified.
)
Figure 1-67 Upgrade Readiness - Identify Important Apps
The next blade you are presented with is STEP 2: Resolve Issues. This step in the workflow includes a series of blades for addressing issues that are considered to be upgrade blockers. Refer to the following list for more information about each of the blades in step 2.
Review Applications With Known Issues This blade highlights applications with known issues. Applications that Microsoft has a fix for will be marked accordingly, reducing the number of applications that you need to review. As you review these apps you have the option to adjust the upgrade readiness value, approving or blocking applications from the upgrade. These values include:
Not Reviewed This is the default value for applications that are installed on more than 2% of devices and all drivers.
Review In Progress Assigning this value to an application or driver will prevent them from being approved until they can be marked ready to upgrade. This should be used for any applications or drivers that you still need to validate.
Ready To Upgrade Assigning this value to an application or driver will mark it as upgrade ready.
Won’t Upgrade Assigning this value to an application or driver will mark all corresponding devices as not upgrade ready.
Review Known Driver Issues This blade highlights drivers with known issues. Drivers that Microsoft has information on will be marked accordingly. For example, if a newer version of the driver is available through Windows Update, those drivers will be grouped together. Similar to the previous application blades, you can define the same upgrade readiness values to approve or deny drivers.
Review Low-Risk Apps And Drivers This blade highlights applications and drivers that need review but are determined to be low risk based on various conditions. For example, if Microsoft has identified an application as highly adopted (installed on more than 100,000 devices) that application will be marked as low risk.
Prioritize App And Driver Testing This blade highlights applications and drivers that are currently blocking the upgrade for your target operating system on more than 80% of devices. Reviewing and prioritizing these items can yield a high return for upgrade readiness.
The next blade you are presented with is STEP 3: Deploy, as shown in Figure 1-68. This step in the workflow consolidates all information that has been collected and categorizes devices based on upgrade readiness. There are three upgrade decisions included on this blade.
Review In Progress Devices in this category have at least one application or driver installed that has been marked with review in progress. These markings are applied in step 1 and step 2 of the workflow.
Won’t Upgrade Devices in this category have at least one application or driver installed that has been marked with won’t upgrade. Alternatively, these devices do not meet a system requirement to complete the upgrade, such as free disk space.
Ready To Upgrade Devices in this category have all applications and drivers marked with Ready to Upgrade. When you are ready to deploy the upgrade to these devices, export the list of computers and target them with your preferred management solution.
)
Figure 1-68 Upgrade Readiness - Deploy
The next blade you are presented with is STEP 4: Monitor. This step in the workflow includes a series of blades for monitoring the progress of your upgrade deployments. Refer to the following list for more information about each of the blades in step 4.
Update Progress (last 30 days) This blade highlights the deployment status for all of your devices. There are five deployment categories that group devices.
Not Started This category contains devices that have not started the upgrade. This includes devices that are upgrade ready and those that are not.
Upgrade completed This category contains devices that have successfully completed the upgrade to your target operating system.
Failed This category contains devices that attempted to upgrade to your target operating system but were unsuccessful.
In Progress This category contains devices that have started the upgrade to your target operating system and have not yet reported back their results.
Progress stalled This category contains devices that have started the upgrade and stalled.
Driver issues This blade highlights drivers that are reporting issues following a successful upgrade. This information includes the problem code reported in device manager for the affected device(s).
User feedback This blade highlights user feedback submitted through the Feedback Hub app. Users that have submitted feedback using their Azure AD account will be consolidated and displayed here for review.
Evaluate and deploy additional Windows 10 Enterprise security features
For this section we will be exploring the core security features available with Windows 10, including which ones integrate with Microsoft 365, and what options you have available for evaluating these features in your environment. Windows 10 is a cloud-connected operating system, engineered to protect against modern day security threats. There are several security features in Windows 10, some of which can be connected to Microsoft 365 for centralized management and reporting. These features provide coverage across three main areas: identity and access management, information protection, and threat protection.
Determine what security features are available with Windows 10
Migrating to Windows 10 introduces a new collection of security features and enhancements that earlier versions of the operating system do not have access to. For the exam you will need to be familiar with these features and their capabilities. Moving to a semi-annual release cycle has enabled Microsoft to address major security vulnerabilities in a much shorter timeframe. This also means that these features are frequently evolving over time with new releases of Windows 10.
The security capabilities in Windows 10 are grouped into three categories. These include:
Identity and access management Security features in this category are focused at enhancing security identities. This includes capabilities such as two-factor authentication and biometric credentials.
Information protection Security features in this category are focused at protecting the data in your organization. This includes capabilities such as drive encryption, data leakage protection, and information protection.
Threat protection Security features in this category are focused at protecting against vulnerabilities and threats. This includes capabilities such as antivirus, antimalware, and behavioral monitoring.
Table 1-17 includes a breakdown of each core Windows 10 security component, their protection category, the required Windows edition, and their capabilities description. In this table you will see references to S Mode. Alongside the variety of security features built-in to Windows 10, S Mode adjusts the behavior of the operating system. When activated, new security requirements are enforced, such as only allowing apps from the Microsoft Store and limiting browser usage to Microsoft Edge.
Table 1-17 Windows 10 Security Components
Technology |
Protection Category |
Windows Edition |
Description |
|---|---|---|---|
Windows Hello for Business |
Identity and access management |
S mode, Enterprise |
Password replacement, enabling strong two-factor authentication for PCs and mobile devices. Leverages biometric credentials and supports Active Directory and Azure AD accounts. |
Windows Defender Credential Guard |
Identity and access management |
S mode Enterprise, Enterprise |
Virtualization-based security that protects secrets stored on the device, including NTLM password hashes, Kerberos credentials, and credential manager domain credentials. |
BitLocker |
Information protection |
S mode, Pro, Enterprise |
Drive encryption solution that is strongest when combined with a hardware-based Trusted Platform Module (TPM). Supports the escrowing of recovery keys in Azure AD. |
Windows Information Protection |
Information protection |
S mode, Pro, Enterprise |
Data leakage prevention (DLP) solution that can apply additional protection to company files, preventing data leakage. |
Windows Defender Application Guard |
Threat protection |
S mode Enterprise, Enterprise |
Enhanced security for Microsoft Edge that isolates untrusted sites to a Hyper-V enabled container, protecting the host operating system from potential threats. |
Windows Defender Application Control |
Threat protection |
Enterprise |
Policy-based protection that prevents access to non-approved applications. |
Windows Defender Exploit Guard |
Threat protection |
S mode, Pro, Enterprise |
Collection of host intrusion prevention tools focused at reducing fileless attacks. Features include exploit protection, attack surface reduction rules, network protection, and controlled folder access. |
Windows Defender Antivirus |
Threat protection |
S mode, Pro, Enterprise |
Antivirus and antimalware definition-based solution that is integrated with Windows 10. |
Windows Defender Advanced Threat Protection (Windows Defender ATP) |
Threat protection |
Enterprise |
Cloud-connected integration with the built-in security features in Windows 10. Provides behavioral-based analysis using machine learning and cloud-based analytics. Includes monitoring and alerts based on threat intelligence data generated by Microsoft and collected by other partners. |
From an evaluation perspective, the majority of these features are built-in to the operating system. As long as you have a compatible edition of Windows 10, you can enable these features for testing without any additional licensing. To keep current with the list of available features, including requirements and deployment documentation, visit: https://docs.microsoft.com/windows/security/.