Implement modern device services
- By Robert Clements and Brian Svidergol
- 6/14/2019
Skill 1.3: Plan for devices and apps
Most organizations assume responsibility for a range of devices and apps, which need to be maintained and supported in order to ensure that employees are productive, successful, and have a healthy work-life balance. There are common factors that organizations consider when planning for devices: the physical hardware and generation of that hardware, the operating system and version, and any peripherals such as display adapters or printers. For apps, planning considerations may include: line-of-business (LOB) applications, preferred publishers, licensing, and version control. As you plan for devices and apps, you must also consider how these planning considerations will be distributed, configured, and supported.
For the MS-101 exam, planning for devices and apps is focused on testing your knowledge of the Microsoft 365 ecosystem and how these technologies solve different problems. In this chapter we focus on device management and security. This includes a deep dive into device co-management, and a look at device profiles and security with Microsoft Intune. App deployment, management of apps, and app security will also be covered.
Create and configure Microsoft Store for Business
The method in which applications are delivered to users and devices has evolved over the years. For traditional Win32 applications, some organizations may still have situations where their help desk staff is managing and installing these apps manually. Others may be leveraging features like ConfigMgr’s application model, which offers a custom-tailored self-service method for employees to install traditional Win32 applications.
Another self-service app experience is available through the Microsoft Store. This service was first introduced in Windows 8 as a standalone application that was installed with the operating system. At that time, it was referred to as the Windows Store, and like many other app store platforms, consumers can navigate the store and install apps that Microsoft had approved for publication. The apps in the Microsoft Store are not packaged in the traditional Win32 format. Instead, they use the Universal Windows Platform (UWP) app type.
Enterprise and education customers have access to the Microsoft Store for Business (MSfB) or Microsoft Store for Education (MSfE). For this exam we will be focusing on the MSfB, but the two stores provide parallel offerings. Administrators have the option to configure a private store, enabling them to purchase apps in bulk, assign licenses, and deliver apps using self-service or direct assignment. This design has evolved with Windows 10 and will be the focus here.
Plan for Microsoft Store for Business prerequisites
The MSfB is designed for organizations that want to take a modern approach at managing their application portfolio. Managing and delivering apps using this solution provides IT administrators with several capabilities. Table 1-8 contains a list of core features included with the MSfB.
Table 1-8 Microsoft Store for Business Features
Feature |
Description |
|---|---|
Scaling flexibility |
The MSfB is a cloud-based technology, providing a robust and reliable infrastructure for hosting and distributing apps across different geolocations and org sizes. Customers that already have Azure AD, Office 365, and Windows 10 deployed can enable an end-to-end app management solution using the MSfB. Customers that have an on-premises management solution can enable integration with the MSfB and begin modernizing their apps. |
Purchasing and licensing |
Administrators can procure apps and licensing in volume. Licenses can be assigned and reclaimed. |
Private store |
Administrators can enable a private store for their organization. This store can be customized with managed apps and collections, providing users with a tailored experience. The private store can be accessed from the Microsoft Store app on Windows 10 devices or from a web browser. |
App distribution |
Apps that are acquired through the MSfB can be distributed to users in multiple ways:
|
Line-of-business apps |
Administrators can add LOB apps to the private store for management and distribution. |
App updates |
Apps that are purchased and managed online can receive automatic updates through the MSfB. |
As you begin planning for MSfB there are a few prerequisites that you should be familiar with. First, you need to understand the difference between the two available licensing models: online-licensed apps and offline-licensed apps. Depending on the licensing model you choose can dictate which prerequisites you need to address.
Online-licensed apps Apps purchased using the online licensing model require users to connect to the Microsoft Store service in order to acquire the app and corresponding license. Licenses are maintained using the user’s Azure AD identity. This is the default license model, and will be the primary option if your users have Azure AD accounts, and access to the Microsoft Store is enabled.
Offline-licensed apps Apps purchased using the offline licensing model do not require connectivity to the Microsoft Store. Instead, administrators can download their purchased apps and licenses for deployment within their internal network. Not all apps support offline licensing. It is up to the independent software vendor (ISV) to opt-in for this option in the development center by selecting Disconnected (offline) licensing during submission. Offline-licensed apps can be deployed at imaging time using a provisioning package or distributed to systems using a management solution such as ConfigMgr.
Next, we will cover the baseline prerequisites for setting up MSfB. These are items that you will need to plan for before you begin your implementation. Also, take note of the items that mention online and offline licensing requirements. These will differ slightly depending on which licensing model you choose.
Microsoft Store for Business account A global administrator needs to visit https://businessstore.microsoft.com and sign in to activate the private store.
Azure AD accounts for admins Administrators that will be tasked with acquiring apps, distributing apps, and manage licensing will also need an Azure AD account. These requirements are the same for both online and offline licensing.
Azure AD accounts for users An Azure AD account will be required for users that access the MSfB to download and install online-licensed apps. Users do not require an Azure AD account for offline-licensed apps.
Platform support Users that are accessing the MSfB will need to do so from a supported PC or mobile device. This includes Windows 10, version 1511, or later.
Browser support Administrators that are managing the MSfB will need to do so from a supported browser. MSfB is compatible with Internet Explorer 10 or later, current versions of Microsoft Edge, Chrome, or Firefox.
Setup the private store
The private store is designed to help organizations deliver a unified experience to their employees when browsing and installing apps. This feature enables administrators to customize their own private Microsoft Store and manage app purchasing and distribution. From a user experience perspective, this includes the ability to adjust app visibility in the store based on user or group membership, along with grouping and sorting apps to your liking.
In Figure 1-39 you can see an example of the Alpine Ski House private store. In this section we will walk through the process of setting up a private store for MSfB.
)
Figure 1-39 Private Store
In the following example you are an admin for Alpine Ski House. You have been tasked with creating a private store for your organization. Follow these steps to setup the private store:
Navigate to the Microsoft Store For Business at https://businessstore.microsoft.com.
Sign-in using an Azure AD Global Administrator account. Signing in without a global administrator account will only give you access to browse the standard Microsoft Store For Business.
In the menu bar at the top of the page, click the Private Store option. If this option is not visible, maximize your browser window or locate the collapse menu button in the upper left-hand corner. Click the menu button and select Private Store from the navigation menu, as shown in Figure 1-40.
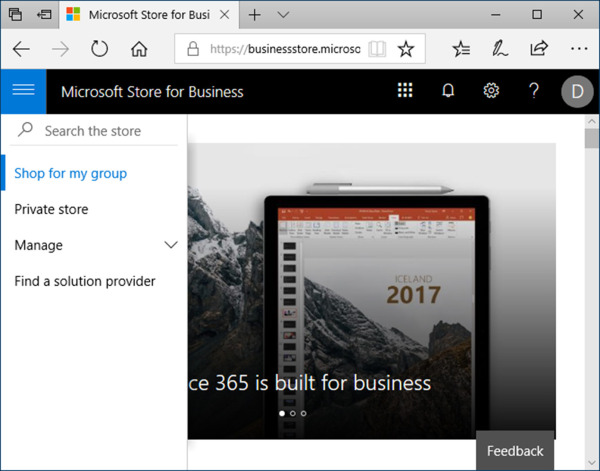
Figure 1-40 Microsoft Store for Business Portal
Review the Microsoft Store for Business and your data consent form. Check the box to consent and click Accept, as shown in Figure 1-41. Declining this consent form will automatically sign you out of the store.
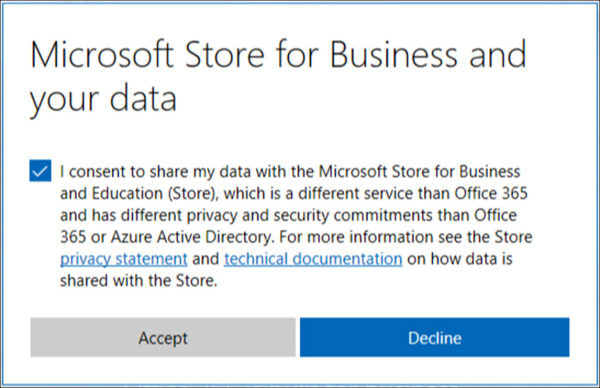
Figure 1-41 Microsoft Store for Business Consent
)
)
The private store has now been created and is associated with your Azure AD tenant. Once the private store is available you can access the Manage menu, which contains several administrative options that we will be reviewing in more detail in the next section.
At the time of this writing if you click the Private Store option after accepting the consent form you will see text that states: Check with your admin. They need to set up your private store before you can use it. This can be a bit confusing, because the store has already been created. It turns out that before you can access the private store and see apps, you need to accept a service agreement. You can do this by adding an app to your inventory. Continuing with our Alpine Ski House scenario, register a free copy of the OneNote app to trigger and accept the pending service agreement.
In the menu bar at the top of the page, type OneNote in the search field and select Enter. If the search field is not visible, maximize your browser window or locate the collapse menu button in the upper left-hand corner. Click the menu button and enter your search in the navigation menu.
From the search results, locate and click the free Microsoft OneNote app.
On the OneNote shop page, click Get The App.
Review the Microsoft Store For Business and Education Services Agreement. Check the box to accept the agreement and click Accept, as shown in Figure 1-42. This agreement is required to start using the private store.
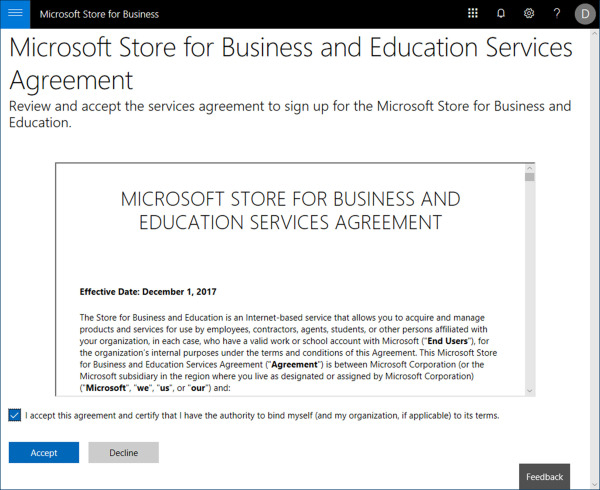
Figure 1-42 Microsoft Store for Business Agreement.
On the Thanks for your order form, click Close. This confirms that the app has been purchased and added to your app inventory.
)
At the conclusion of this scenario the private store option on the menu bar will be replaced with the name of your organization (taken from your Azure tenant). When you click your organization name you should see the OneNote app listed in your app inventory. At this stage you can open the Microsoft Store on a compatible Windows 10 device, sign-in with your Azure AD credentials, and access your organization’s private store.
Configure Microsoft Store for Business
The management portal for MSfB contains several pages for app administration, licensing, and account management. Among these pages are a few controls to customize the private store. In this section we will introduce you to the portal, and walk through each of the available menu options.
Refer to Figure 1-43 for a preview of the MSfB management portal. In this screenshot we have the main navigation menu open and the Manage submenu is expanded. This submenu contains the administrative controls for managing your organization’s MSfB experience. Let’s take a closer look at the available options.
)
Figure 1-43 Microsoft Store For Business Management Portal
Home This page provides administrators an overview dashboard that contains summary information for various items such as license availability and recent purchases. The overview also includes drill down objects to other management options such as settings and permissions.
Quotes This page is used to view and interact with quotes that have been assigned to your organization for apps and other solutions. Expect this page to be blank unless you have a partner that has sent you a quote.
Products & Services This page is used to view your app inventory, benefits information and new LOB app. App inventory will include all registered apps for your organization, along with drill down details and customization options for each app. Benefits information is tied to your Microsoft agreement. LOB apps pertain to any newly registered LOB apps assigned to your organization.
My Organization This page is used to view account profile information, status information for your Microsoft agreements, connected tenants that you established with the Microsoft Products and Services Agreement (MSPA), and review requests that require admin approval.
Devices This page is used for managing your Windows AutoPilot deployments. AutoPilot is a technology that enables administrators to reduce traditional imaging needs by configuring automated system setup and configuration with Azure AD, Intune, Office 365, and MSfB.
Billing & Payments This page is used to view invoices assigned to your organization and manage your account payment methods.
Order History This page is used to view your order history and order details for software and subscriptions purchased by your organization.
Partners This page is used to view the list of partners assigned to your organization. Partners are available to help organizations purchase and manage products and services. You can search for partner details by navigating to the Find A Solution Provider menu option.
Permissions This page is used to view and manage the role-based access controls for your organization. This includes roles for admin, purchaser, basic purchaser, and device guard signer. Once your private store is active, it is important to review the default options and define the roles according to your business needs.
Settings This page is used to view and manage the core settings for your organization’s store experience. This includes shopping controls based on role-based access, distribution settings, and connectivity to your preferred MDM solution, device guard policies, and notification controls for invoices.
Support This page is used for accessing support information about MSfB and opening support requests.
Now that you have a better understanding of the management portal, we will look at some customization controls for the private store. There are three primary locations that contain settings pertaining to the private store. The first location is the private store itself, which will be listed in the menu bar as the name of your organization. In this scenario the private store is called Alpine Ski House. Clicking on this link will present you with the store interface, as shown in Figure 1-44.
)
Figure 1-44 Microsoft Store for Business Private Store
This page enables administrators to customize the store interface for their employees. The changes you make here will be visible to employees when they access your organization’s private store. Available options include the ability to create new collections by clicking on the + Add Collection button. You can also remove collections and assign apps to collections by clicking on the more options icon (…) next to the collection name.
In this example we are hiding the default collection, Alpine Ski House, which by default will contain all available apps. To replace this collection, we have created two new collections: Productivity (shown in the screen shot) and File Sharing (not shown). These new collections contain a custom list of apps based on our preference.
The second location for customizing the private store is under Manage, Products & Services, then Apps & Software. On this page you will see a list of apps from your inventory. Clicking on any one of these apps will take you to the product details page for that app. The lower half of this page has a tab for Private store availability, as shown in Figure 1-45.
)
Figure 1-45 Private Store availability
The options on the Private store availability tab enable an administrator to control which users an app is visible to in the private store. In this example we have selected the radio button next to Specific groups, followed by an Azure AD security group that contains IT administrators. After saving these settings, the app will only be visible in the private store for users that are members of the IT Admins group.
Plan app deployment
In this section we will be working with app deployment in the cloud. App deployment with Microsoft 365 is centralized around cloud-based management. Traditional solutions for on-premises app deployment are still available, but working with apps in the cloud is the focus for this exam. The two major technologies that we will be focusing on are MSfB and Microsoft Intune. These technologies can operate independently, but are designed to be integrated for end-to-end coverage. For example, MSfB standalone can offer a suitable solution for Windows 10 devices, but if you need to distribute apps to iOS and Android then integrating Intune makes sense.
Plan for app deployment prerequisites
There are a few different ways to deploy apps in the Microsoft cloud. The prerequisites for these methods will depend on the requirements of the organization. For example, if your organization uses Office 365, but does not have an Intune subscription, you can still use the MSfB to help manage apps on Windows 10 devices. If your organization does have an Intune subscription, you can setup a MSfB account and integrate it with Intune to streamline the management and distribution of your apps across multiple platforms.
Based on the examples described above, many of the prerequisites for app deployment are going to be conditional. That said, you should be familiar with each of the available options and in what situations they apply.
Microsoft Store For Business Standalone If you choose to leverage the benefits of MSfB, your organization must have an active MSfB account.
Microsoft Store For Business + Intune If you plan to connect your MSfB account with Intune, you must activate Microsoft Intune. You can do this from the Intune portal, under Manage, Settings, Distribute, then Management Tools.
Microsoft Intune If you choose to leverage Intune for app management and distribution, your organization must have an active Intune subscription. This includes setting the MDM authority to Intune in the Azure portal.
Device Enrollment If you plan to require app installation on devices, those devices must be enrolled with Intune.
Supported Platforms MSfB supports Windows 10 devices. If you need to support other platforms, such as Android or iOS, you will need to consider an Intune subscription.
Supported App Types MSfB supports the conversion of multiple Windows app file formats into appx bundles for distribution. This conversion process requires an install sequence and capture of the app. Intune has a conversion process that converts the installer to a compatible intunewin bundle. The Intune solution is in preview at the time of this writing. Both scenarios should be planned for if you have a requirement to deploy Win32 apps.
Plan for app deployment types
In this section we are going to cover planning considerations for app deployment types. This topic refers to the various app deployment types that Microsoft Intune supports. In the management portal, administrators have access to a variety of app types that they can deploy to users and devices.
One of the first things to consider when planning your app management model is file formats. The file format of apps can vary based on publisher and platform. Variations by publisher is only true for Windows apps, where you have traditional file formats such as .exe and .msi, as well as newer formats such as .appx and .msix. This segmentation adds a lot of effort for IT admins that support a variety of apps. Variations by platform includes Android, iOS, and Windows. Modern and mobile apps are all platform-specific and need to be considered.
Next, you should know which app deployment types are available in Intune, and what options they provide. For this we will open the management portal and look at the client apps.
Sign-in to the Microsoft Azure portal at https://portal.azure.com/.
Click All Services.
Search for Intune and select it.
Under Manage, select Client Apps.
On the Client apps blade, under Manage, select Apps.
On the Client apps – Apps blade, click Add.
On the Add app blade, review the list of available app types. Refer to Table 1-9 for a breakdown of each app type and its capabilities.
Table 1-9 Client App types
Platform |
App Type |
Notes |
|---|---|---|
Android, iOS, Windows Phone 8.1, Windows |
Store app |
All store apps require an app store URL that directs the app to the appropriate provider. With MSfB integration, Microsoft Store apps will automatically be synchronized with Intune every 24 hours. |
Windows 10, macOS |
Office 365 Suite |
Office 365 apps can be bundled as a suite or created as standalone apps. Additional configuration options are available for architecture type, update channel, removal of previous MSI versions, automatic agreement acceptance, and shared computer activation. |
Web link |
Other |
Web link enable you to create an app that launches a browser to a specific URL, such as your help desk portal. |
Built-In app |
Other |
Built-In app enables you to quickly distribute curated managed apps, such as Office 365 or Adobe Reader for iOS and Android. |
Line-of-business app |
Other |
Line-of-business app enables you to upload in-house apps. Accepted file formats include .msi, .msix, .msixbundle, .appx, and .appxbundle. |
Windows app (Win32) - preview |
Other |
Win32 app enables you to upload a repackaged application using the .intunewin file format. At the time of this writing, this feature is in a preview state. |
Create and deploy apps with Intune
In this section we are going to walk through the app creation process in Intune and cover how to deploy those apps to enrolled devices. The app deployment capabilities of Intune continue to evolve, with recent additions including Win32 app support. These are some notable milestones for the product, because Win32 app supports breaks the barrier from traditional on-premises app management requirements with new cloud capabilities.
Manage Store Apps with Intune
Before you start working with apps in Intune, remember that you can synchronize Microsoft Store apps. Enabling this capability will simplify the management of Microsoft Store apps and provide us the ability to deploy them using Intune.
Navigate to the Microsoft Store for Business at https://www.microsoft.com/business-store.
Sign-in using an Azure AD account with admin access.
On the menu bar at the top of the page, click Manage.
On the Manage page, click Settings in the navigation list.
On the Settings page, select the Distribute tab.
On the Distribute tab, under Management tools, click Activate in the Action column for Microsoft Intune and Microsoft Intune Enrollment, as shown in Figure 1-46.

Figure 1-46 Microsoft Store for Business Management Tools
)
With Intune set as the active management tool for MSfB, you can verify the synchronization status in the Intune console.
Sign-in to the Microsoft Azure portal at https://portal.azure.com/.
Click All Services.
Search for Intune and select it.
Under Manage, select Client Apps.
On the Client apps blade, under Setup, select Microsoft Store For Business. This blade includes status and last sync information. You also have the option to change the language for apps in the console and force a sync.
After completing a sync, any Microsoft Store apps in your MSfB inventory will be visible in the Intune console. You can view and manage these apps by navigating to the Apps blade under Client Apps. In Figure 1-47 you can see an example of the synchronized Microsoft Store apps.
)
Figure 1-47 Microsoft Intune Client Apps
Creating Apps in Intune
We covered app deployment types earlier in this skill, which is one of the first options that you configure when creating apps in Intune. From there you can begin adding apps to your Intune library. In the following example we are going to add an Office 365 app to our Intune app library. This scenario will introduce you to the app creation process and get you comfortable with the portal.
Sign-in to the Microsoft Azure portal at https://portal.azure.com/.
Click All Services.
Search for Intune and select it.
Under Manage, select Client Apps.
On the Client apps blade, under Manage, select Apps.
On the Client Apps – Apps blade, click Add in the menu.
On the Add App blade, select Windows 10 under the Office 365 Suite app type.
Click Configure App Suite. This blade will present you with each of the available products in the Office 365 suite.
On the Configure App Suite blade, select the following products, as shown in Figure 1-48, and click OK.
Excel, OneDrive Desktop, OneNote, Outlook, PowerPoint, Skype for Business, and Word.
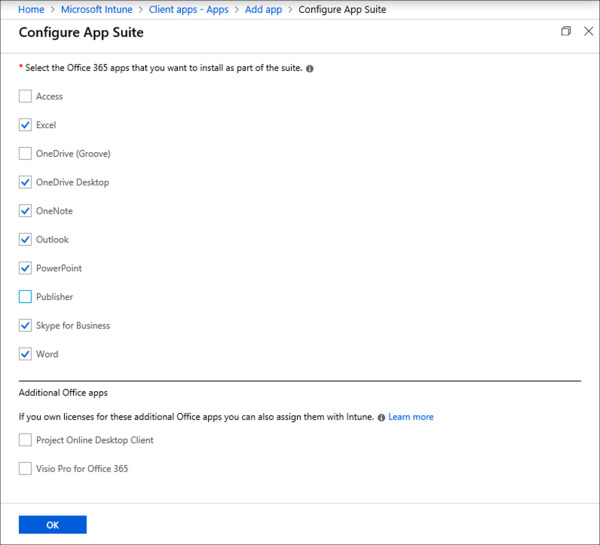
Figure 1-48 Office 365 App Suite Configuration
On the Add app blade, click App Suite Information. This blade includes information pertaining to the app metadata, such as name and description. Because this is an Office 365 app some fields are prepopulated, such as the publisher and app icon.
On the App Suite Information blade, fill in the following values and click OK. Refer to Figure 1-49 for an example.
Suite Name This is a required field. Enter a name for the app. App names should be unique in order to prevent conflicts in the company portal.
Suite Description This is a required field. Enter a description for the app.
Publisher This field is pre-populated for Office 365 apps. For apps where the field is not populated, enter a publisher for the app.
Category This field is optional. There are nine categories to choose from and you can select as many as you want. Assigning a category will enable users to filter apps easier. Office 365 apps default to the productivity category.
Display this As A Featured App In The Company Portal This toggle sets whether the app is set on the main page of the company portal. Set the toggle to Yes. The company portal is used by employees to access and install apps. It can be accessed using the Microsoft Store app or by visiting https://portal.manage.microsoft.com/.
Information URL This field is optional. You can enter a web address that contains information about the app. Leave this field blank.
Privacy URL This field is optional. You can enter a web address that contains privacy information about the app. Leave this field blank.
Developer This field is optional. This field is prepopulated for Office 365 apps.
Owner This field is optional. This field is prepopulated for Office 365 apps.
Notes This field is optional. Leave this field blank.
Logo This field is optional. This field is prepopulated for Office 365 apps.
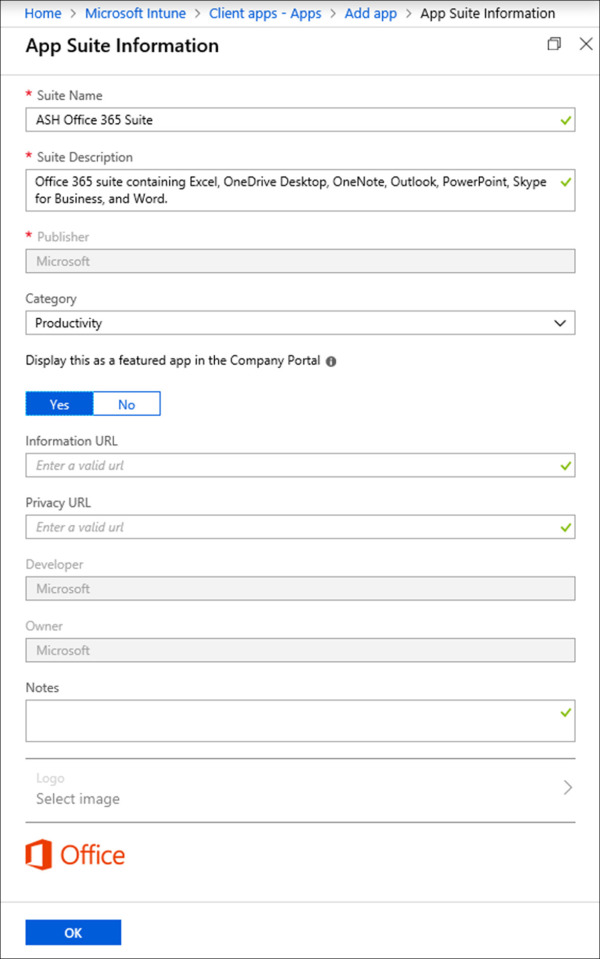
Figure 1-49 Office 365 App Suite Information
On the Add app blade, click App Suite Settings. This blade contains options for what version of the app will be installed and other actions such as activation.
On the App Suite Settings blade, fill in the following values and click OK. Refer to Figure 1-50 for an example.
Office Version 64-bit.
Update Channel Monthly (Targeted).
Version To Install on End User Devices Latest.
Specific Version Latest version.
Remove Other Versions Of Office (MSI) From End User Devices Yes.
Automatically Accept The App End User License Agreement. Yes.
Use Shared Computer Activation. Yes.
Languages. No changes.
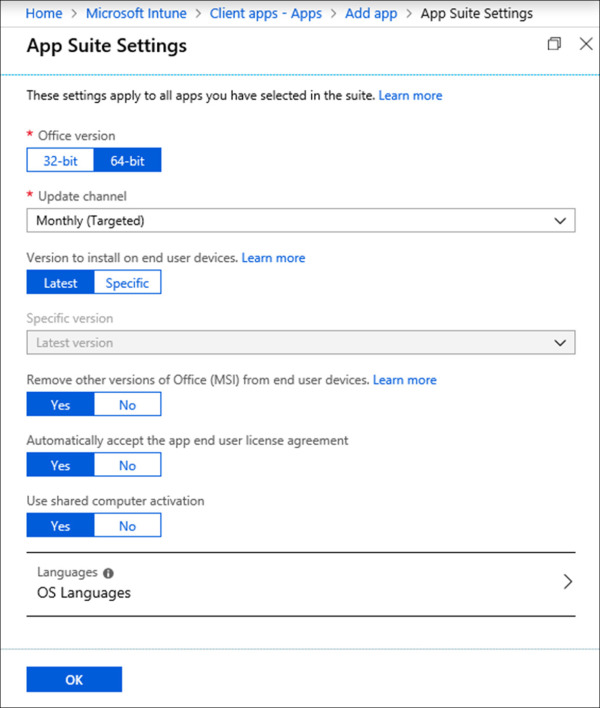
Figure 1-50 Office 365 App Suite Settings
On the Add App blade, click Add to add the new Office 365 suite app to your Intune app library.
Review the Azure portal notifications to confirm that the app was created successfully.
)
)
)
With these steps complete, you should have the new Office 365 Suite app listed on the Client Apps – Apps blade, alongside the MSfB apps that we saw earlier in this skill section.
ASSIGNING APPS IN INTUNE
Apps that are present in your Intune app library can be assigned to groups of users and devices for install or uninstall. When you create a new app assignment you are given three assignment types to choose from. These include:
Available for enrolled devices This assignment type makes the app available to devices that are enrolled in Intune.
Required This assignment type forces the app to install on the targeted group of users or devices.
Uninstall This assignment type forces the app to be uninstalled from the targeted group of users or devices.
In the following example we will take our Office 365 suite app and assign it to the Alpine Ski House as a requirement for all devices.
Sign-in to the Microsoft Azure portal at https://portal.azure.com/.
Click All Services.
Search for Intune and select it.
Under Manage, select Client Apps.
On the Client apps blade, under Manage, select Apps.
On the Client Apps – Apps blade, locate the ASH Office 365 Suite app and select it.
On the ASH Office 365 Suite blade, under Manage, select Assignments.
On the Assignments blade, click the aDD GROUP button.
On the Add group blade, select Required for the Assignment type.
Click Included Groups.
On the Assign blade, fill in the following information and click OK:
Make This App Required For All Users No
Make This App Required For All Devices Yes
On the Add group blade, click OK.
 EXAM TIP
Plan for questions on the exam that will test your knowledge of the assignment controls. Spend time creating groups, adding users and devices to those groups, and working with the include and exclude assignments. An example scenario might include two security groups and five computers with different membership between the groups. It will be your responsibility to solve question such as how to install app XYZ on two computers and uninstall app ABC from the other three computers.
Plan device co-management
In this skill we are going to dive into co-management. This delivers a new approach at transitioning device management workloads to the cloud. ConfigMgr is a traditional on-premises management solution with an extensive list of capabilities. Co-management is designed to bridge ConfigMgr and Intune, enabling administrators to choose which solution manages which workload. For example, ConfigMgr can continue managing compliance policies but endpoint protection is going to be managed by Intune.
In the past, ConfigMgr and Intune worked together in a hybrid format. This offered administrators a single pane of glass for managing a variety of platforms. However, it became apparent that enhancing a cloud solution like Intune moved at a much faster pace than customers supporting ConfigMgr. This introduced challenges. The hybrid format also didn’t provide the tools needed to help customers move to a fully cloud managed solution at their own pace.
The co-management connector is a feature in ConfigMgr that you configure. From there administrators can selectively pilot and migrate specific workloads from their on-premises infrastructure to Intune.
Plan for co-management prerequisites
To prepare for co-management you need to be familiar with the prerequisites. This first list contains each of the core technical requirements that need to be addressed before you can establish a connection between ConfigMgr and Intune.
ConfigMgr Site Version. Co-management is available in ConfigMgr 1710 or later.
Multiple ConfigMgr Sites. Support for connecting multiple ConfigMgr environments to a single Intune tenant requires ConfigMgr 1806 or later.
Windows 10 Version. Devices that will be co-managed require Windows 10, version 1709 or later.
Device Enrollment. Devices that will be con-managed need to be enrolled in Intune and have a ConfigMgr client installed.
Intune Subscription. Co-management requires an active Intune subscription.
MDM Authority. The MDM authority for your Azure AD tenant must be set to Intune. MDM for Office 365 and hybrid ConfigMgr are not supported.
While co-management can help customers transition to Intune, it can also be used to support existing Intune customers that still need ConfigMgr for use cases such as operating system deployment. There are two supported scenarios that you should be familiar with when planning for co-management. Table 1-10 describes these scenarios and the corresponding prerequisites for each.
Table 1-10 Co-management Prerequisites
Scenario |
Prerequisite |
Description |
|---|---|---|
Domain joined devices with ConfigMgr |
Devices need to be hybrid Azure AD joined |
This scenario supports customers that are transitioning their on-premises device management workloads to Intune. |
Azure AD joined devices with Intune |
Devices need to be Azure AD joined. ConfigMgr site needs to have a Cloud Management Gateway (CMG) deployed. The CMG enables Intune to deploy the ConfigMgr client to these devices. |
This scenario supports customers with devices that are Azure AD joined and managed using Intune, but still require ConfigMgr for certain tasks. For example, customers using AutoPilot to deploy new devices. |
Create the co-management connection
In this section we are going to walk through the process of creating the co-management connection in the ConfigMgr management console. For this example, we are running ConfigMgr version 1806.
Open the Configuration Manager Console.
Click the Administration workspace.
Under Overview, expand Cloud Services.
Click Co-Management.
In the ribbon, select Configure Co-Management.
On the Co-management Configuration Wizard, on the Subscription page, click Sign In, enter your Azure AD credentials, and click Next.
On the Enablement page, select Pilot from the Automatic enrollment in Intune dropdown and click Next. This will enable automatic enrollment to Intune for a limited set of devices in a pilot device collection.
On the Workloads page, move each of the sliders to the Pilot Intune column, as shown in Figure 1-51. This will shift the corresponding workloads to Intune for all devices in your pilot device collection.
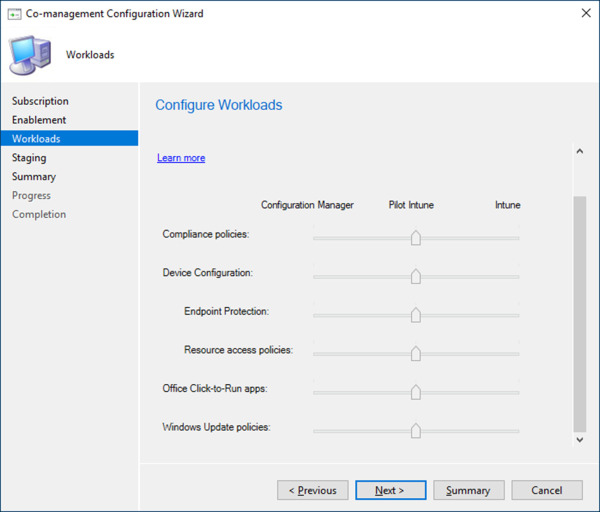
Figure 1-51 Co-management Workloads
On the Staging page, click Browse, select a device collection containing devices that are approved for co-management testing, and click Next. The devices in this pilot collection will automatically be enrolled in Intune and all workloads will be enabled for Intune management.
On the Summary page, review the configuration options and click Next.
On the Completion page, confirm the process was successful, and click Close.
)
After completing these steps, the co-management connector will be present in the ConfigMgr management console. If you need to modify the settings that you configured during setup, you can select the co-management connector in the console and click properties in the ribbon. From there you can make updates to your Intune enrollment settings, workloads, and pilot collection.
As a final step, you can validate that the targeted devices are communicating with Intune by locating them in the Intune console and viewing the device details. To locate a device, follow these steps:
Sign-in to the Microsoft Azure portal at https://portal.azure.com/.
Click All Services.
Search for Intune and select it.
On the Microsoft Intune blade, under Manage, select Devices.
On the Devices blade, under Manage, select All Devices.
On the Devices – All Devices blade, locate a device from your co-management collection and select it. This will bring up the details for that device. Refer to Figure 1-52 for an example of a co-managed device in the Intune console.
)
Figure 1-52 Microsoft Intune Co-managed Device
In this example ASH-CLIENT-01 has successfully enrolled in Intune and is being co-managed. We can see from Figure 1-52 that the compliance policies workload is being managed by Intune based on the Compliance field showing Not Compliant. The lower section shares specific details about the device’s co-management status, including the health state of the ConfigMgr client, and the last time the device checked in.
Migrate your workloads to Intune
During the setup process for co-management we briefly showed the available workload options in the ConfigMgr console. The sliders on the Workloads page instruct devices where to receive the corresponding instructions. Refer to Table 1-11 for additional information about each of the workload options and their corresponding requirements.
Table 1-11 Co-management Workloads
Workload |
ConfigMgr Version |
Intune Controls |
|---|---|---|
Compliance policies |
1710 |
Device compliance policies are managed in Intune under Intune, Device compliance, then Policies. Intune device compliance can be used for monitoring and/or conditional access. |
Device Configuration |
1806 |
Device profiles are managed in Intune under Intune, Device configuration, Profiles. Intune device profiles apply rules, such as password requirements. |
Endpoint Protection |
1802 |
Endpoint protection profiles are managed in Intune under Intune, Device configuration, then Profiles. These profiles control the behavior of Windows Defender, including antivirus, antispam, firewall, and encryption. |
Resource access policies |
1710 |
Resource access policies are managed in Intune under Intune, Device configuration, then Profiles. These policies can control access to services such as email, wi-fi, VPN, and certificates. |
Office Click-to-Run apps |
1806 |
Office Click-to-Run apps are managed in Intune under Intune, Client Apps, then Apps. Administrators can create and assign Office Click-to-Run apps for deployment to users and devices. |
Windows Update policies |
1710 |
Windows Update policies are managed in Intune under Intune, Software updates, Windows 10 Update Rings. These policies control Windows Update behavior on managed devices. |
Mobile apps (preview) |
1806 |
Mobile apps are managed in Intune under Intune, Client Apps, then Apps. Administrators can create and assign mobile apps for deployment to mobile devices. |
Plan device monitoring
In this skill section we are going to review the Device Health and Update Compliance solutions offered through Windows Analytics. These offerings enable organizations to monitor the health and compliance of the devices and apps in their environment. Both solutions are provided as part of the Operations Management Suite (OMS), a centralized repository that provides deeper insight and manageability controls for organizations.
Devices enrolled in Windows Analytics upload relative diagnostic data to Microsoft. That data is processed and analyzed in the Microsoft cloud and reported back to customers in a modern dashboard. Customers can navigate the dashboard, retrieve critical event information, and build custom queries. These solutions introduce a new landscape for monitoring devices in the enterprise.
Understand Your Options for Device Monitoring
Microsoft 365 provides a suite of solutions for monitoring the devices in your organization. At the time of this writing there are three solutions available: Upgrade Readiness, Update Compliance, and Device Health. In this skill section we are focusing on Device Health and Update Compliance as key sources for monitoring the pulse of devices and applications. In an upcoming chapter we will take a closer look at Upgrade Readiness, which provides customers with readiness details for Windows 10.
Refer to Table 1-12 for a summary of these solutions, include their core capabilities and the minimum required telemetry level for each (more to come on this).
Table 1-12 Windows Analytics Solutions
Solution |
Telementry Level |
Capabilities |
|---|---|---|
Upgrade Readiness |
Basic |
Lifecycle management for Windows 10 compatibility and deployment readiness. Device and application inventory. Driver and application compatibility information for Windows 10. Application usage. |
Update Compliance |
Basic |
Monitoring of Windows 10 quality and feature update compliance. Reports on update compliance and issues that require attention. Status information for Windows Defender signatures and threats. Status information for delivery optimization. |
Device Health |
Enhanced (limited) |
Monitoring of Windows 10 device and application health. Crash report details related to applications and device drivers. Reports for login health and authentication method trends. Visibility into Windows Information Protection misconfigurations. |
Plan for Windows Analytics prerequisites
Windows Analytics enables organizations to receive insights into their environment using Microsoft cloud services. Customers that choose to leverage Device Health and Update Compliance must opt-in and enable Windows telemetry on their devices. At the time of this writing, Microsoft does not offer a comparable on-premises solution for Device Health and Update Compliance.
The following list outlines the prerequisites required to configure Windows Analytics for use with Device Health and Update Compliance.
Azure Subscription An Azure subscription is required to establish a connection with the log analytics workspace in OMS.
Commercial ID After creating an OMS workspace, you are provided with a commercial ID for device enrollment. The commercial ID can be configured on devices using Intune, ConfigMgr, Group Policy, or an alternative management solution.
Windows 10 Device Health and Update compliance are compatible with Windows 10 devices (laptops and desktops only) running Professional, Education, and Enterprise editions.
Windows Telemetry Devices must have Windows telemetry enabled and set to certain diagnostic levels in order to support these monitoring solutions.
Device Health. Windows telemetry must be enabled and set to Enhanced. Devices running Windows 10, version 1709 or later, can optionally be configured to limit enhanced diagnostic data to the minimum required by Windows Analytics. This can be configured using a GPO.
Update Compliance. Windows telemetry must be enabled and set to Basic.
Data sharing There are several Microsoft cloud endpoints that your devices must be able to communicate with in order to upload diagnostic data. For a list of these endpoints, visit: https://docs.microsoft.com/windows/deployment/update/windows-analytics-get-started#enable-data-sharing.
Enable Windows Analytics
Now that you understand the prerequisites for Device Health and Update Compliance, we will walk through the process of enabling Windows Analytics on devices. This can be achieved in a variety of ways. In this example we will be using Group Policy to apply the configuration for Device Health. Each new release of Windows 10 includes a new set of Group Policy ADMX templates. For this walk through we will be using the Windows 10 1809 templates. Be sure to download the latest compatible templates for your environment.
In the following steps we will be configuring three policies to enable Windows telemetry for Device Health and Update Compliance. There are additional policies available that control other elements of Windows telemetry. While you are in the editor, take time to review the other options and what their capabilities are.
Open the Group Policy Management Editor on a server in your domain.
Create a new Group Policy Object (GPO) and name it Enable Windows Telemetry.
Right-click the new GPO and click Edit.
Under Computer Configuration, expand Policies.
Expand Administrative Templates.
Expand Windows Components.
Locate and click the folder for Data Collection And Preview Builds.
Locate and edit the policy: Allow Telemetry. This policy object enables Windows telemetry.
Select the radio button next to Enabled.
Select 2 – Enhanced from the dropdown.
Click OK.
Locate and edit the policy: Configure The Commercial ID. This policy assigns the Commercial ID to devices. The Commercial ID uniquely identifies the devices in your organization so the corresponding data is available in log analytics.
Select the radio button next to Enabled.
Enter the Commercial ID value in the text field.
Click OK.
Locate and edit the policy: Limit Enhanced Diagnostic Data To The Minimum Required By Windows Analytics. This policy reduces the amount of data devices upload to the minimum required by Windows Analytics.
Select the radio button next to Enabled.
Select Enable Windows Analytics Collection from the dropdown.
Click OK.
Close the Enable Windows Telemetry policy.
This policy is now ready to be deployed to your compatible Windows 10 devices. Once deployed, expect to see data in the log analytics workspace within 24 hours for Internet-connected devices.
Plan for device profiles
In this skill section we cover device configuration profiles in Microsoft Intune. In its simplest form, a device configuration profile enables administrators to assign a desired configuration change to a managed device. These profiles offer a variety of options across multiple platforms. Administrators can leverage them to automatically configure common tasks on managed devices such as corporate email accounts, VPN settings, and wireless configurations.
Determine which device profiles are available
For starters, this is one of those features that you need to get hands on with in the console. There are dozens of profile combinations available and if the out-of-box options don’t fit your needs, each platform supports the capability to assign a custom profile. Custom profiles for Windows Phone 8.1, Windows 10, and Android use the Open Mobile Alliance Uniform Resource Identifier (OMA-URI) standard. macOS and iOS platforms use the Apple Configurator profile format.
Configuration service provider (CSP) is another term you should familiarize yourself with. A CSP functions similar to Group Policy. CSPs interface with the client operating system to read, set, modify, or delete configuration settings defined by an administrator. Many of the built-in device profile settings in Intune are established using CSPs, and custom settings can be added using OMA-URI strings.
Table 1-13 provides some example use cases where device configuration profiles can be leveraged. Depending on the needs of your organization, you can create scopes that are based on corporate-owned and personally-owned devices. This format can be used to help adopt the bring-your-own-device (BYOD) initiative.
Table 1-13 Device Profile Use Cases
Platform |
Owner |
Profile Type |
Use Case |
|---|---|---|---|
Android |
Personal |
Device restrictions |
Create a device profile for enhanced security. The profile contains settings that require a password to unlock the device and encryption is enforced. |
Android Enterprise |
Corporate |
Wi-Fi |
Create a wireless profile for wireless connectivity. The profile contains settings for SSID, automatic connection, EAP type, certificates, and authentication methods. |
macOS |
Personal |
Device restrictions |
Create a device profile for enhanced security. The profile contains settings to block the following features: camera, file transfers using iTunes, AirDrop, all iCloud sync and backup capabilities. |
Windows 8.1 and later |
Corporate |
VPN |
Create a device profile for VPN connectivity. The profile contains the corporate VPN servers, VPN configuration file, and spit tunneling preferences. |
Windows 10 and later |
Corporate |
Windows Advanced Threat Protection |
Create a device profile for Windows ATP. The profile contains an ATP onboarding configuration package. |
Create device profiles
In this section we are going to walk through the process of creating a device profile for the iOS platform and assigning it to a group of managed devices. For this example, we are creating a configuration profile for the Alpine Ski House lodge. This location has several iPads available for customers to use. You need to configure a basic wireless profile that will enable the devices to access the guest wireless network. Once devices receive the profile, they will automatically connect to the wireless network when in range.
Sign-in to the Microsoft Azure portal at https://portal.azure.com/.
Click All Services.
Search for Intune and select it.
On the Microsoft Intune blade, under Manage, select Device Configuration.
On the Device configuration blade, under Manage, select Profiles.
On the Device configuration – Profiles blade, click Create Profile.
On the Create profile blade, fill in the following information:
Name iOS Guest Wireless Profile
Description iOS guest wireless profile for the Alpine Ski House lodge
Platform iOS
Profile type Wi-Fi
On the Wi-Fi blade, fill in the following information and click OK.
Wi-Fi type Basic
Network name AlpineSkiHouseLodge
SSID ASH-Lodge
Connect automatically Enable
Hidden network Disable
Security type WPA/WPA2-Personal
Pre-shared key P@ssw0rd
Proxy settings None
On the Create Profile blade click Create to finish the profile.
Review the Azure portal notifications to confirm that the profile was created successfully.
On the iOS Guest Wireless Profile blade, under Manage, select Assignments.
On the iOS Guest Wireless Profile – Assignments blade, on the Include tab, click Select Groups To Include.
On the Select groups to include blade, locate and select a security group containing the Alpine Ski House lodge iOS devices and click Select.
Click Save.
Review the Azure portal notifications to confirm that the assignment was created successfully.
After creating and assigning this wireless profile, you can monitor the progress of that profile assignment by navigating to the Device Configuration – Profiles blade and selecting it from the list. This will direct you to the Overview dashboard, which contains helpful information about the assignment status. This includes a chart that summarizes total success, errors, and conflicts—all helpful data points for troubleshooting and success tracking.
Plan for Mobile Application Management
In this skill section we cover planning considerations for application management on mobile devices. Application management refers to the protection of company data within an application. For example, say a user opens an email from their corporate account using Microsoft Outlook for Android. This email contains confidential information. Application management can be used to prevent the user from copying data from this email and pasting it into another application. For the exam you will need to be comfortable with creating and assigning these policies.
Plan for app protection prerequisites
The capability to manage the data within an application has evolved over the years. Microsoft’s solution for this is called app protection policies. This is a feature available with Microsoft Intune. In the past, application management required the management of the device running the app. With app protection policies, the policy is assigned to the user. This alleviates the need for devices to be enrolled in an MDM. Instead the user signs into the app with their Azure AD account and the necessary policies get applied.
The following list covers the basic prerequisites for deploying app protection policies in an organization:
Azure AD subscription A basic Azure AD subscription is required to establish Azure AD accounts.
Intune subscription App protection policies are a capability of Microsoft Intune. You will need an Intune subscription in order to create and manage these policies. Users that have these policies assigned will require an Intune license.
Office 365 subscription App protection policies assigned to Office 365 mobile apps will require users to have an Office 365 license assigned to their Azure AD account.
Azure AD account Users must have an Azure AD account.
Supported platforms App protection policies are supported for iOS, Android, and Windows 10.
Security groups App protection policies are assigned to Azure AD security groups that contain user objects. You will need to create the desired groups in Azure AD or synchronize your existing on-premises groups using Azure AD Connect.
Supported apps App protection policies are not available for all apps. The app must support the Intune SDK features that enable app management.
Configure app protection policies
In this section we proceed with creating an app protection policy and assigning it to a group of users. A common scenario that you may be presented with is app management for Office 365. These are often the core productivity apps for users, and company data is an important aspect to consider.
In the following example we are going to create an app protection policy for the Alpine Ski House sales team. These users travel often and use a mixture of corporate and personal mobile devices for accessing company resources. The app protection policy will control data for each of the core Office 365 mobile apps.
Sign-in to the Microsoft Azure portal at https://portal.azure.com/.
Click All services.
Search for Intune and select it.
Under Manage, select Client Apps.
On the Client Apps blade, under Manage, select App Protection Policies.
On the Client Apps – App Protection Policies blade, click Create Policy.
On the Create policy blade, fill in the following information:
Name ASH APP for Android.
Description APP for Office 365 apps on Android.
Platform Android.
Target To All App Types Yes.
On the Create policy blade, Click Apps.
On the Apps blade, select the following apps and click Select:
Excel
OneNote
Outlook
PowerPoint
Word
On the Create Policy blade, click Settings.
On the Settings blade, click Data Protection.
On the Data protection blade, select the following options and click OK. Refer to Figure 1-53 for an example of the configuration.
Backup Org data To Android Backup Services Block
Send Org Data To Other Apps Policy Managed Apps
Receive Data From Other Apps Policy Managed Apps
Save Copies Of Org Data Block
Allow User To Save Copies To Selected Services Onedrive For Business
Restrict cut, copy, And Paste Between Other Apps Policy Managed Apps
Screen Capture And Google Assistant Disable
Encrypt Org Data Require
Encrypt Org Data On Enrolled Devices Require
Sync App With Native Contacts App Disable
Printing Org Data Disable
Share Web Content With Policy Managed Browsers Require
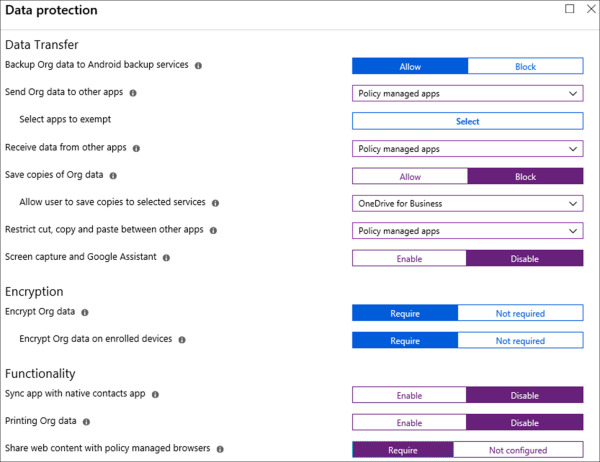
Figure 1-53 App Protection Policy – Data Protection
On the Settings blade, click Access Requirements.
On the Access requirements blade, select the following options and click OK. Refer to Figure 1-54 for an example of the configuration.
PIN For Access Require
Pin Type Numeric
Simple PIN Block
Select Minimum PIN Length 6
Fingerprint Instead Of PIN For Access (Android 6.0+) Yes
Override Fingerprint With PIN After Timeout Require
Timeout (Minutes Of Inactivity) 30
App PIN When Device PIN Is Set Enable
Work Or School Account Credentials For Access Require
Recheck The Access Requirements After (Minutes Of Inactivity) 30
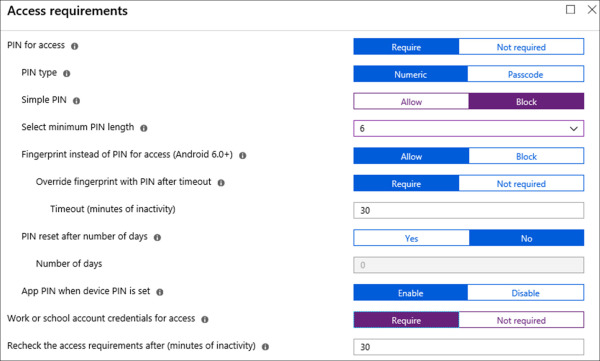
Figure 1-54 App Protection Policy – Data Protection
On the Settings blade, click Conditional launch.
On the Conditional Launch page, review the default options and click OK. Refer to Figure 1-55 for an example of the available options. Conditional launch enforces periodic checks to ensure that app protection policies are up-to-date and compliant. There are seven available settings:
Max PIN Attempts If a user enters their PIN incorrectly more than the defined number of times, the user can be forced to reset their PIN, or the app data can be wiped.
Offline Grace Period If the managed app does not check-in for a defined period, access to the app can be blocked or the app data can be wiped.
Jailbroken/Rooted devices If the device has been jailbroken or rooted, access to the app can be blocked or the app data can be wiped.
Min OS Version If the device OS does not meet the minimum version, the user can be warned, access to the app can be blocked, or the app data can be wiped.
Min App Version If the app does not meet the minimum version, the user can be warned, access to the app can be blocked, or the app data can be wiped.
Min Patch Version If the device OS does not meet the minimum patch version, the user can be warned, access to the app can be blocked, or the app data can be wiped.
Device Manufacturer(s) If the device is not made by the specified manufacturer, access to the app can be blocked or the app data can be wiped.
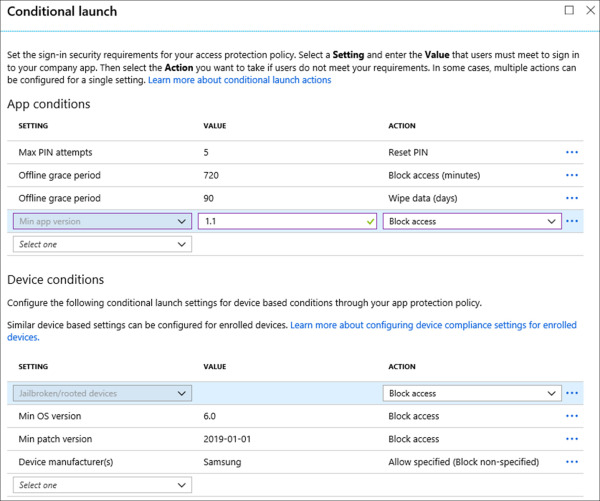
Figure 1-55 App Protection Policy – Data Protection
On the Settings blade, click OK.
On the Add a policy blade, click Create.
On the Client Apps – App Protection Policies blade, select the ASH APP For Android policy.
On the Intune App Protection blade, under Manage, click Assignments.
On the Intune App Protection – Assignments blade, on the Include tab, click Select Groups To Include.
Select the Alpine Ski House Sales group and click Select.
)
)
)
After completing this walk-through you should have a new app protection policy created and deployed. You can review the check-in information for users that access this app by navigating to the ASH APP For Android setting and selecting Overview. This blade provides insight into how many users are accessing the associated apps and the check-in count for each app in the policy.
Plan mobile device security
Planning for device security is something all organizations need to prioritize. Over the past few years Microsoft has invested considerable resources on improving the security posture of their products. This is seen in each of the solutions that we have discussed thus far, and makes up a large portion of this exam.
From a mobile device perspective, you have several tools at your disposal. Microsoft Intune and Azure AD give you access to device configuration profiles, device compliance, conditional access, and app protection policies. We cover each of these technologies individually in this book, but the focus for this section is to understand how they connect to improve the security of your mobile devices.
Design a mobile device security implementation
The cloud-based security offerings that are covered in this exam can operate independently of each other but are designed to work together. In combination they can form a layered defense structure that improves the security posture of your organization, your data, and your users.
Table 1-14 covers each of the core technologies used to manage and secure mobile devices. The defense layer column illustrates what components the corresponding technology is designed to manage. For example, device configuration profiles focus on the configuration of the device operating system, such as disabling the ability to use your device as a personal hotspot. The design considerations column highlights the capabilities of each technology and relative design suggestions.
Table 1-14 Mobile Device Security Layers
Technology |
Product |
Defense Layer |
Design Considerations |
|---|---|---|---|
Device configuration profiles |
Microsoft Intune |
Device |
Device configuration profiles apply to enrolled and managed devices. Design configuration profiles to align with your device compliance requirements. |
Device compliance policies |
Microsoft Intune |
Device, application |
Device compliance policies apply to enrolled and managed devices. Design compliance policies to align with configuration profiles. Consider what conditional access restrictions will use device compliance. |
Conditional access policies |
Azure AD |
Application |
Conditional access policies apply to Azure AD joined and hybrid Azure AD joined devices. Design conditional access policies to incorporate device compliance requirements. |
App protection policies |
Microsoft Intune |
Application |
App protection policies apply to Azure AD accounts. Design app protection policies around managed and unmanaged devices. |